

English Manual
Page 1
Serial Number Decal QUESTIONS? As a manufacturer, we are damaged or missing, PLEASE CONTACT OUR CUSTOMER SERVICE DEPARTMENT DIRECTLY. MST ON THE WEB: www.proformservice.com USER'S MANUAL CAUTION Read all precautions and instructions in this manual before using this manual for future reference. Keep this equipment. Visit our website at www.proform.com new products, prizes, fitness tips, and much more! PFEL6066.0 Serial No...
Serial Number Decal QUESTIONS? As a manufacturer, we are damaged or missing, PLEASE CONTACT OUR CUSTOMER SERVICE DEPARTMENT DIRECTLY. MST ON THE WEB: www.proformservice.com USER'S MANUAL CAUTION Read all precautions and instructions in this manual before using this manual for future reference. Keep this equipment. Visit our website at www.proform.com new products, prizes, fitness tips, and much more! PFEL6066.0 Serial No...
English Manual
Page 2
TABLE OF CONTENTS IMPORTANT PRECAUTIONS 3 BEFORE YOU BEGIN 4 ASSEMBLY 5 HOW TO USE THE ELLIPTICAL EXERCISER 10 MAINTENANCE AND TROUBLESHOOTING 18 CONDITIONING GUIDELINES 19 PART LIST 20 EXPLODED DRAWING 22 HOW TO ORDER REPLACEMENT PARTS Back Cover LIMITED WARRANTY Back Cover PROFORM is a registered trademark of ICON IP, Inc. 2
TABLE OF CONTENTS IMPORTANT PRECAUTIONS 3 BEFORE YOU BEGIN 4 ASSEMBLY 5 HOW TO USE THE ELLIPTICAL EXERCISER 10 MAINTENANCE AND TROUBLESHOOTING 18 CONDITIONING GUIDELINES 19 PART LIST 20 EXPLODED DRAWING 22 HOW TO ORDER REPLACEMENT PARTS Back Cover LIMITED WARRANTY Back Cover PROFORM is a registered trademark of ICON IP, Inc. 2
English Manual
Page 3
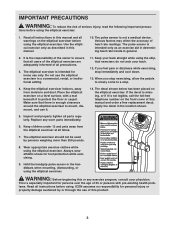
... instructions in general. 2. If you stop exercising, allow the pedals to slowly come to protect the floor or carpet. This is not legible, call the toll-free telephone number on a level surface, with pre-existing health problems. Read all users of the elliptical exerciser are adequately informed of serious injury, read the following important precau- Use the elliptical exercise only as an exercise aid in determining heart rate...
... instructions in general. 2. If you stop exercising, allow the pedals to slowly come to protect the floor or carpet. This is not legible, call the toll-free telephone number on a level surface, with pre-existing health problems. Read all users of the elliptical exerciser are adequately informed of serious injury, read the following important precau- Use the elliptical exercise only as an exercise aid in determining heart rate...
English Manual
Page 4
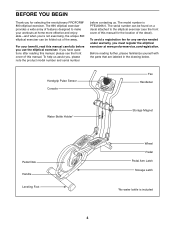
... us. Handgrip Pulse Sensor Console Fan Handlebar Water Bottle Holder* Storage Magnet Pedal Disk Handle Leveling Foot Wheel Pedal Pedal Arm Latch Storage Latch *No water bottle is PFEL6066.0. To avoid a registration fee for any service needed under warranty, you must register the elliptical exerciser at home more effective and enjoyable-and when you're not exercising, the unique 890 elliptical exerciser can be folded out of the away. The model number is included...
... us. Handgrip Pulse Sensor Console Fan Handlebar Water Bottle Holder* Storage Magnet Pedal Disk Handle Leveling Foot Wheel Pedal Pedal Arm Latch Storage Latch *No water bottle is PFEL6066.0. To avoid a registration fee for any service needed under warranty, you must register the elliptical exerciser at home more effective and enjoyable-and when you're not exercising, the unique 890 elliptical exerciser can be folded out of the away. The model number is included...
English Manual
Page 5
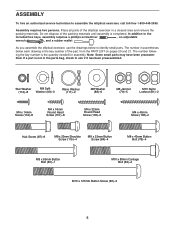
... assemble the elliptical exerciser, call toll-free 1-800-445-2480. The number in a cleared area and remove the packing materials. If a part is the key number of the elliptical exerciser in parentheses below to see if it has been preassembled. ASSEMBLY To hire an authorized service technician to the included hex keys, assembly requires a phillips screwdriver , an adjustable wrench , and a rubber mallet . Place all parts of the part...
... assemble the elliptical exerciser, call toll-free 1-800-445-2480. The number in a cleared area and remove the packing materials. If a part is the key number of the elliptical exerciser in parentheses below to see if it has been preassembled. ASSEMBLY To hire an authorized service technician to the included hex keys, assembly requires a phillips screwdriver , an adjustable wrench , and a rubber mallet . Place all parts of the part...
English Manual
Page 6
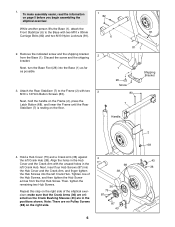
... shown. Next, insert four Hub Screws (87) into the Hub Cover and the Crank Arm, and finger tighten the Hub Screws into the Base (1) as far as possible. 3. Next, hold the handle on the Frame (2), press the Latch Button (68), and lower the Frame until the Rear Stabilizer (7) is resting on page 5 before you begin assembling the elliptical exerciser. 1 82 While another person lifts...
... shown. Next, insert four Hub Screws (87) into the Hub Cover and the Crank Arm, and finger tighten the Hub Screws into the Base (1) as far as possible. 3. Next, hold the handle on the Frame (2), press the Latch Button (68), and lower the Frame until the Rear Stabilizer (7) is resting on page 5 before you begin assembling the elliptical exerciser. 1 82 While another person lifts...
English Manual
Page 7
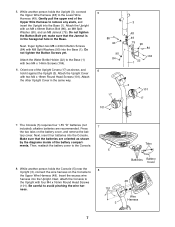
... Lower Wire Harness (49). Press 7 the two tabs on the Console to the Base (1) with four M4 x 16mm Round Head Screws (101). ments. Do not tighten the Button Bolt yet; make sure that the batteries are recommended. Next, finger tighten two M8 x 23mm Button Screws (84) with M8 Split Washers (90) into the Console. tery cover. While another person holds the Console (5) near the Upright (3), connect the wire...
... Lower Wire Harness (49). Press 7 the two tabs on the Console to the Base (1) with four M4 x 16mm Round Head Screws (101). ments. Do not tighten the Button Bolt yet; make sure that the batteries are recommended. Next, finger tighten two M8 x 23mm Button Screws (84) with M8 Split Washers (90) into the Console. tery cover. While another person holds the Console (5) near the Upright (3), connect the wire...
English Manual
Page 9
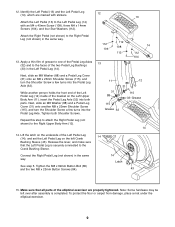
...). Tighten both parts. Lift the latch on the underside of the bracket on the left over after assembly is securely connected to the Right Upper Body Arm (12). 14 14. See step 5. To protect the floor or carpet from damage, place a mat under the elliptical exerciser. 9 Identify the Left Pedal (13) and the Left Pedal Leg (14), which are properly tightened. Tighten the M8 x 69mm Button Bolt...
...). Tighten both parts. Lift the latch on the underside of the bracket on the left over after assembly is securely connected to the Right Upper Body Arm (12). 14 14. See step 5. To protect the floor or carpet from damage, place a mat under the elliptical exerciser. 9 Identify the Left Pedal (13) and the Left Pedal Leg (14), which are properly tightened. Tighten the M8 x 69mm Button Bolt...
English Manual
Page 10
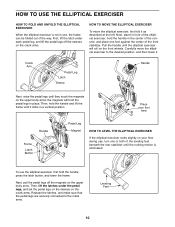
... during use the elliptical exerciser, first hold the pedal legs in a vertical position. Carefully move the elliptical exerciser, first fold it locks in place. HOW TO USE THE ELLIPTICAL EXERCISER HOW TO FOLD AND UNFOLD THE ELLIPTICAL EXERCISER When the elliptical exerciser is eliminated. Place your foot here Handle Frame Latch Button Pedal Leg Magnet HOW TO LEVEL THE ELLIPTICAL EXERCISER If the elliptical exerciser rocks slightly on the crank arms. HOW TO MOVE THE ELLIPTICAL EXERCISER To move the elliptical exerciser to the crank arms...
... during use the elliptical exerciser, first hold the pedal legs in a vertical position. Carefully move the elliptical exerciser, first fold it locks in place. HOW TO USE THE ELLIPTICAL EXERCISER HOW TO FOLD AND UNFOLD THE ELLIPTICAL EXERCISER When the elliptical exerciser is eliminated. Place your foot here Handle Frame Latch Button Pedal Leg Magnet HOW TO LEVEL THE ELLIPTICAL EXERCISER If the elliptical exerciser rocks slightly on the crank arms. HOW TO MOVE THE ELLIPTICAL EXERCISER To move the elliptical exerciser to the crank arms...

English Manual
Page 12
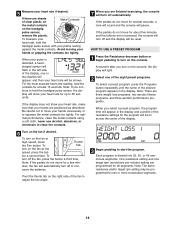
.... The console also offers two heart rate programs that automatically control the resistance of the pedals while guiding you can even measure your heart rate using the handgrip pulse sensor. To use the manual mode of the console, follow the steps beginning on the face of the console, remove the plastic. 12 To use a heart rate program, see page 14. When you select the manual mode of the console, you through effective workouts. Choose a weight loss, an aerobic fitness, or...
.... The console also offers two heart rate programs that automatically control the resistance of the pedals while guiding you can even measure your heart rate using the handgrip pulse sensor. To use the manual mode of the console, follow the steps beginning on the face of the console, remove the plastic. 12 To use a heart rate program, see page 14. When you select the manual mode of the console, you through effective workouts. Choose a weight loss, an aerobic fitness, or...

English Manual
Page 13
HOW TO USE THE MANUAL MODE 1 Press the Resistance decrease button or begin to appear in succession. Note: After you exercise, indicators will show the approximate number of the pedals by pressing the Programs button repeatedly until the entire track appears. As you press the buttons, it will take a moment for the pedals to turn on the console, the display will show the time remaining in revolutions per minute (rpm...
HOW TO USE THE MANUAL MODE 1 Press the Resistance decrease button or begin to appear in succession. Note: After you exercise, indicators will show the approximate number of the pedals by pressing the Programs button repeatedly until the entire track appears. As you press the buttons, it will take a moment for the pedals to turn on the console, the display will show the time remaining in revolutions per minute (rpm...
English Manual
Page 14
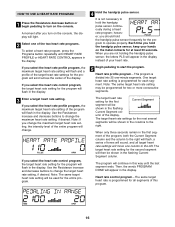
... right side of the desired program appears in the display. Note: If you turn on the fan at high speed, press Thumb the Fan button. If the pedals do not move your heart rate for at least 15 seconds. HOW TO USE A PRESET PROGRAM 1 Press the Resistance decrease button or begin pedaling to hold the handgrip pulse sensor with your heart rate will be reset. One resistance setting and one or two dashes...
... right side of the desired program appears in the display. Note: If you turn on the fan at high speed, press Thumb the Fan button. If the pedals do not move your heart rate for at least 15 seconds. HOW TO USE A PRESET PROGRAM 1 Press the Resistance decrease button or begin pedaling to hold the handgrip pulse sensor with your heart rate will be reset. One resistance setting and one or two dashes...

English Manual
Page 15
... of the Current Segment column have the same number of tones will continue in this way until the last segment ends. Every few times you can manually override the setting by pressing the Resistance decrease or increase button. Important: When the current segment of the display. See step 5 on page 14. 6 Turn on page 14. 15 When the first...
... of the Current Segment column have the same number of tones will continue in this way until the last segment ends. Every few times you can manually override the setting by pressing the Resistance decrease or increase button. Important: When the current segment of the display. See step 5 on page 14. 6 Turn on page 14. 15 When the first...
English Manual
Page 16
... the display. HOW TO USE A HEART RATE PROGRAM 1 Press the Resistance decrease button or begin pedaling to turn on the console, the display will light. 2 Select one of the two heart rate programs. To select a heart rate program, press the Programs button repeatedly until the last segment ends. If you select the heart rate control program, the target heart rate setting for the first Current Segment segment will be shown in the display. Each time you change the maximum target heart rate setting...
... the display. HOW TO USE A HEART RATE PROGRAM 1 Press the Resistance decrease button or begin pedaling to turn on the console, the display will light. 2 Select one of the two heart rate programs. To select a heart rate program, press the Programs button repeatedly until the last segment ends. If you select the heart rate control program, the target heart rate setting for the first Current Segment segment will be shown in the display. Each time you change the maximum target heart rate setting...

English Manual
Page 17
... heart rate closer to the target heart rate setting. 6 Follow your progress with the display. When the words PEDAL FASTER appear in the display, decrease your pace. Also, when the console compares your heart rate to the target heart rate setting, the resistance of the pedals will automatically increase or decrease to bring your heart rate closer to the target heart rate. Note: You can manually override the resistance settings; however, you . See step...
... heart rate closer to the target heart rate setting. 6 Follow your progress with the display. When the words PEDAL FASTER appear in the display, decrease your pace. Also, when the console compares your heart rate to the target heart rate setting, the resistance of the pedals will automatically increase or decrease to bring your heart rate closer to the target heart rate. Note: You can manually override the resistance settings; however, you . See step...
English Manual
Page 18
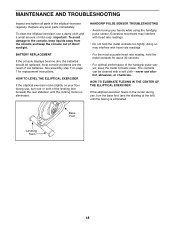
... eliminated. HANDGRIP PULSE SENSOR TROUBLESHOOTING • Avoid moving your floor during use a damp cloth and a small amount of mild soap. Base Foot Leveling Feet 18 The contacts can be replaced; MAINTENANCE AND TROUBLESHOOTING Inspect and tighten all parts of low batteries. To clean the elliptical exerciser, use , turn one or both of direct sunlight. doing so may interfere with heart rate readings. • For the most console problems are the...
... eliminated. HANDGRIP PULSE SENSOR TROUBLESHOOTING • Avoid moving your floor during use a damp cloth and a small amount of mild soap. Base Foot Leveling Feet 18 The contacts can be replaced; MAINTENANCE AND TROUBLESHOOTING Inspect and tighten all parts of low batteries. To clean the elliptical exerciser, use , turn one or both of direct sunlight. doing so may interfere with heart rate readings. • For the most console problems are the...

English Manual
Page 19
... minutes of exercising with pre-existing health problems. The pulse sensor is especially important for fat burning; Fat Burning To burn fat effectively, you to the nearest ten years). Note: During the first few minutes of the chart (ages are your heart rate as an exercise aid in determining heart rate trends in your age. Aerobic Exercise If your exercise program. WORKOUT GUIDELINES Each workout should...
... minutes of exercising with pre-existing health problems. The pulse sensor is especially important for fat burning; Fat Burning To burn fat effectively, you to the nearest ten years). Note: During the first few minutes of the chart (ages are your heart rate as an exercise aid in determining heart rate trends in your age. Aerobic Exercise If your exercise program. WORKOUT GUIDELINES Each workout should...
English Manual
Page 20
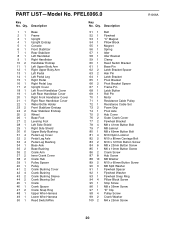
... 2 Belt Flywheel "C" Magnet Pillow Block Magnet Spring Idler Idler Bracket Clamp Reed Switch Bracket Base Pin Latch Bracket Spacer Hair Pin Latch Bracket Pivot Bracket Pivot Bracket Spacer Frame Pin Latch Button Roll Pin Motor Resistance Cable Pulley Resistance Cable Set Foam Grip Pivot Axle Hub Cover Outer Crank Cover Flywheel Bracket M8 x 41mm Button Bolt M8 Jamnut M8 x 69mm Button Bolt M10 Nylon Locknut M10 x 80mm Carriage Bolt M10 x 127mm Button Screw M8 x 23mm Button Screw M6 x 10mm Button Screw Crank Screw Hub Screw...
... 2 Belt Flywheel "C" Magnet Pillow Block Magnet Spring Idler Idler Bracket Clamp Reed Switch Bracket Base Pin Latch Bracket Spacer Hair Pin Latch Bracket Pivot Bracket Pivot Bracket Spacer Frame Pin Latch Button Roll Pin Motor Resistance Cable Pulley Resistance Cable Set Foam Grip Pivot Axle Hub Cover Outer Crank Cover Flywheel Bracket M8 x 41mm Button Bolt M8 Jamnut M8 x 69mm Button Bolt M10 Nylon Locknut M10 x 80mm Carriage Bolt M10 x 127mm Button Screw M8 x 23mm Button Screw M6 x 10mm Button Screw Crank Screw Hub Screw...
English Manual
Page 21
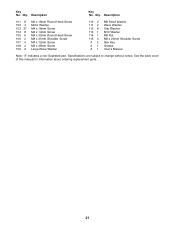
... Screw M8 x 31mm Shoulder Screw M4 x 12mm Screw M4 x 45mm Screw Large Wave Washer 110 2 111 2 112 8 113 1 114 1 115 4 #2 #1 #1 M8 Small Washer Wave Washer Star Washer M10 Washer M6 Nut M8 x 23mm Shoulder Screw Hex Key Grease User's Manual Note: "#" indicates a non-illustrated part. See the back cover of this manual for information about ordering replacement parts. 21 Key No. Description Key No. Specifications are subject to change...
... Screw M8 x 31mm Shoulder Screw M4 x 12mm Screw M4 x 45mm Screw Large Wave Washer 110 2 111 2 112 8 113 1 114 1 115 4 #2 #1 #1 M8 Small Washer Wave Washer Star Washer M10 Washer M6 Nut M8 x 23mm Shoulder Screw Hex Key Grease User's Manual Note: "#" indicates a non-illustrated part. See the back cover of this manual for information about ordering replacement parts. 21 Key No. Description Key No. Specifications are subject to change...
English Manual
Page 24
... you . ICON HEALTH & FITNESS, INC., 1500 S. 1000 W., LOGAN, UT 84321-9813 Part No. 241299 R1006A Printed in -home service, the customer will be prepared to provide the following information when contacting us: • the MODEL NUMBER of the product (PFEL6066.0) • the NAME of the product (PROFORM 890 elliptical exerciser) • the SERIAL NUMBER of the product (see the front cover of this manual) • the KEY NUMBER and...
... you . ICON HEALTH & FITNESS, INC., 1500 S. 1000 W., LOGAN, UT 84321-9813 Part No. 241299 R1006A Printed in -home service, the customer will be prepared to provide the following information when contacting us: • the MODEL NUMBER of the product (PFEL6066.0) • the NAME of the product (PROFORM 890 elliptical exerciser) • the SERIAL NUMBER of the product (see the front cover of this manual) • the KEY NUMBER and...

