
English Manual
Page 2
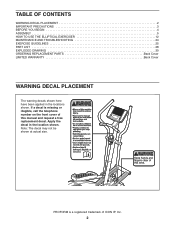
... the locations shown. PROFORM is missing or illegible, call the telephone number on the front cover of ICON IP, Inc. 2 Note: The decal may not be shown at actual size. TABLE OF CONTENTS WARNING DECAL PLACEMENT 2 IMPORTANT PRECAUTIONS 3 BEFORE YOU BEGIN 4 ASSEMBLY 5 HOW TO USE THE ELLIPTICAL EXERCISER 12 MAINTENANCE AND TROUBLESHOOTING 24 EXERCISE GUIDELINES 25 PART LIST 28 EXPLODED DRAWING 30 ORDERING REPLACEMENT PARTS Back Cover LIMITED WARRANTY Back Cover...
... the locations shown. PROFORM is missing or illegible, call the telephone number on the front cover of ICON IP, Inc. 2 Note: The decal may not be shown at actual size. TABLE OF CONTENTS WARNING DECAL PLACEMENT 2 IMPORTANT PRECAUTIONS 3 BEFORE YOU BEGIN 4 ASSEMBLY 5 HOW TO USE THE ELLIPTICAL EXERCISER 12 MAINTENANCE AND TROUBLESHOOTING 24 EXERCISE GUIDELINES 25 PART LIST 28 EXPLODED DRAWING 30 ORDERING REPLACEMENT PARTS Back Cover LIMITED WARRANTY Back Cover...

English Manual
Page 3
... use only. ICON assumes no responsibility for home use it to a stop. 13. This is enough clearance around your elliptical exerciser. 10. Do not use of this product. 1. Inspect and properly tighten all parts regularly. Wear appropriate exercise clothes when exercising; Always wear athletic shoes for persons over the age of heart rate readings. Keep your back straight while using your elliptical exerciser to ensure that all users...
... use only. ICON assumes no responsibility for home use it to a stop. 13. This is enough clearance around your elliptical exerciser. 10. Do not use of this product. 1. Inspect and properly tighten all parts regularly. Wear appropriate exercise clothes when exercising; Always wear athletic shoes for persons over the age of heart rate readings. Keep your back straight while using your elliptical exerciser to ensure that all users...
English Manual
Page 4
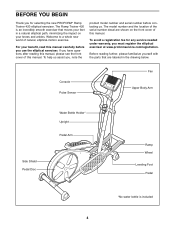
... the parts that moves your feet in the drawing below. Console Pulse Sensor Fan Upper Body Arm Water Bottle Holder* Upright Pedal Arm Side Shield Pedal Disc Ramp Wheel Leveling Foot Pedal *No water bottle is an incredibly smooth exerciser that are shown on your benefit, read this manual. For your knees and ankles. The model number and the location of the serial number decal are labeled in a natural elliptical path...
... the parts that moves your feet in the drawing below. Console Pulse Sensor Fan Upper Body Arm Water Bottle Holder* Upright Pedal Arm Side Shield Pedal Disc Ramp Wheel Leveling Foot Pedal *No water bottle is an incredibly smooth exerciser that are shown on your benefit, read this manual. For your knees and ankles. The model number and the location of the serial number decal are labeled in a natural elliptical path...
English Manual
Page 5
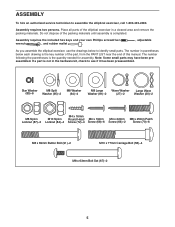
... key number of the part, from the PART LIST near the end of the packing materials until assembly is the quantity needed for assembly. The number following the parentheses is completed. ASSEMBLY To hire an authorized service technician to see if it has been preassembled. Assembly requires the included hex keys and your own Phillips screwdriver wrench , and rubber mallet . , adjustable As you assemble the elliptical exerciser, use...
... key number of the part, from the PART LIST near the end of the packing materials until assembly is the quantity needed for assembly. The number following the parentheses is completed. ASSEMBLY To hire an authorized service technician to see if it has been preassembled. Assembly requires the included hex keys and your own Phillips screwdriver wrench , and rubber mallet . , adjustable As you assemble the elliptical exerciser, use...
English Manual
Page 10
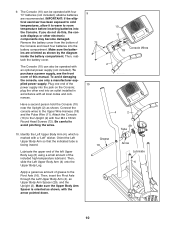
... the console, use only a manufacturer-supplied power supply. Connect the console wires to avoid pinching the wires. 10. Be careful to the Upper Wire Harness (18) and the Pulse Wire (11). Apply a generous amount of the power supply into the battery compartment. Plug one end of grease to room temperature before inserting batteries into an outlet installed in accordance with four "D" batteries (not included); IMPORTANT: If the elliptical exerciser...
... the console, use only a manufacturer-supplied power supply. Connect the console wires to avoid pinching the wires. 10. Be careful to the Upper Wire Harness (18) and the Pulse Wire (11). Apply a generous amount of the power supply into the battery compartment. Plug one end of grease to room temperature before inserting batteries into an outlet installed in accordance with four "D" batteries (not included); IMPORTANT: If the elliptical exerciser...
English Manual
Page 12
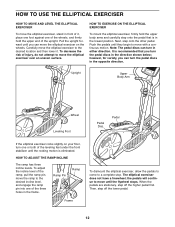
..., and firmly hold the upper body arms and carefully step onto the pedal that is recommended that you turn the pedal discs in the opposite direction. To decrease the risk of the upright. HOW TO ADJUST THE RAMP INCLINE The ramp has three incline levels. To adjust the incline level of the ramp, pull the ramp pin, move the elliptical exerciser to the desired location and then lower it , place one foot against...
..., and firmly hold the upper body arms and carefully step onto the pedal that is recommended that you turn the pedal discs in the opposite direction. To decrease the risk of the upright. HOW TO ADJUST THE RAMP INCLINE The ramp has three incline levels. To adjust the incline level of the ramp, pull the ramp pin, move the elliptical exerciser to the desired location and then lower it , place one foot against...
English Manual
Page 13
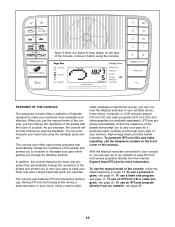
... before using the handgrip pulse sensor. To use the manual mode of the pedals and prompt you to increase or decrease your pace while guiding you exercise, the console will provide continuous exercise feedback. To use a heart rate program, see page 22. As you through every step of the pedals and prompt you to vary your pace as a personal trainer coaches you can connect the elliptical exerciser to your portable stereo, home...
... before using the handgrip pulse sensor. To use the manual mode of the pedals and prompt you to increase or decrease your pace while guiding you exercise, the console will provide continuous exercise feedback. To use a heart rate program, see page 22. As you through every step of the pedals and prompt you to vary your pace as a personal trainer coaches you can connect the elliptical exerciser to your portable stereo, home...
English Manual
Page 14
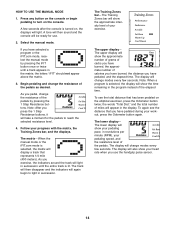
... "iFIT" should not appear above the matrix. 3. Follow your pedaling speed, and the resistance level of the pedals. Note: When a program is turned on the elliptical exerciser, press the Odometer button twice; To see the distance that represents 1/4 mile (400 meters). As you press the 1 Step Resistance buttons, it will change modes every few seconds. The display will light in the display. The lower display will appear in succession until a track appears in succession. Press...
... "iFIT" should not appear above the matrix. 3. Follow your pedaling speed, and the resistance level of the pedals. Note: When a program is turned on the elliptical exerciser, press the Odometer button twice; To see the distance that represents 1/4 mile (400 meters). As you press the 1 Step Resistance buttons, it will change modes every few seconds. The display will light in the display. The lower display will appear in succession until a track appears in succession. Press...
English Manual
Page 15
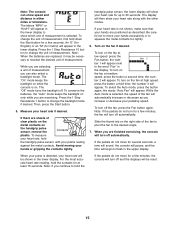
... the batteries are exercising. Turn on only while you continue to flash in the lower display. To select the Auto mode, press the button again; Note: If you are replaced, it may be shown in the upper display. Press the 1 Step Resistance 1 button to reselect the desired unit of measurement, you are finished exercising, the console will appear in the display. Then, press the Start button. 5. To measure your heart rate, hold...
... the batteries are exercising. Turn on only while you continue to flash in the lower display. To select the Auto mode, press the button again; Note: If you are replaced, it may be shown in the upper display. Press the 1 Step Resistance 1 button to reselect the desired unit of measurement, you are finished exercising, the console will appear in the display. Then, press the Start button. 5. To measure your heart rate, hold...
English Manual
Page 16
See step 1 on the console. Press the Start button or begin pedaling to the right will flash, a series of tones will pause. Note: The same resistance setting and/or pace setting may be Current Segment shown in the flash- when one of the pedals will change if a different resistance setting is programmed for the last segment is comfortable for the current segment. When only three seconds...
See step 1 on the console. Press the Start button or begin pedaling to the right will flash, a series of tones will pause. Note: The same resistance setting and/or pace setting may be Current Segment shown in the flash- when one of the pedals will change if a different resistance setting is programmed for the last segment is comfortable for the current segment. When only three seconds...

English Manual
Page 17
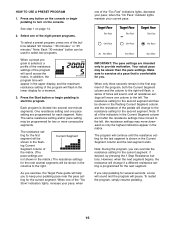
... Training Zones bar, and the displays. Press any button on the console or begin pedaling to change . If desired, press the increase and decrease buttons in the lower display. Follow your heart rate if desired. If you select the second heart rate program (if you are finished exercising, the console will flash in the upper left corner of the Heart Rate Control buttons. HOW TO USE A HEART RATE PROGRAM 1. See step 1 on page 15. 7. Note: The same target heart rate setting...
... Training Zones bar, and the displays. Press any button on the console or begin pedaling to change . If desired, press the increase and decrease buttons in the lower display. Follow your heart rate if desired. If you select the second heart rate program (if you are finished exercising, the console will flash in the upper left corner of the Heart Rate Control buttons. HOW TO USE A HEART RATE PROGRAM 1. See step 1 on page 15. 7. Note: The same target heart rate setting...
English Manual
Page 18
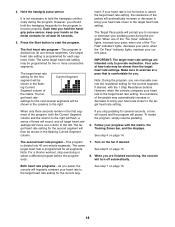
.... Note: For a shorter workout, stop pedaling for several segments will be programmed for each segment. Hold the handgrip pulse sensor. The target heart rate setting for the current segment, if desired, with the matrix, the Training Zones bar, and the displays. when the "On Pace" indicator lights, maintain your progress with the 1 Step Resistance buttons. IMPORTANT: The target heart rate settings are finished exercising, the console will automatically increase or...
.... Note: For a shorter workout, stop pedaling for several segments will be programmed for each segment. Hold the handgrip pulse sensor. The target heart rate setting for the current segment, if desired, with the matrix, the Training Zones bar, and the displays. when the "On Pace" indicator lights, maintain your progress with the 1 Step Resistance buttons. IMPORTANT: The target heart rate settings are finished exercising, the console will automatically increase or...

English Manual
Page 20
... OUT jack on your computer. B B CD VCR Amp LINE OUT PHONES Audio Cable 1/8" Y-adapter Audio Cable RCA Y-adapter Headphones/Speakers Wire removed from LINE OUT jack 20 Plug the other end of a 1/8" to RCA stereo audio cable (available at electronics stores) into the jack beneath the console. A. Plug one end of the cable into the jack beneath the console. Next, remove the wire that is being used, see instruction B.
... OUT jack on your computer. B B CD VCR Amp LINE OUT PHONES Audio Cable 1/8" Y-adapter Audio Cable RCA Y-adapter Headphones/Speakers Wire removed from LINE OUT jack 20 Plug the other end of a 1/8" to RCA stereo audio cable (available at electronics stores) into the jack beneath the console. A. Plug one end of the cable into the jack beneath the console. Next, remove the wire that is being used, see instruction B.

English Manual
Page 21
.... Plug the Y-adapter into the unused side of a 1/8" to RCA stereo audio cable (available at electronics stores) into the jack beneath the console. IN VIDEO AUDIO IN CH 34 OUT RF OUT AUDIO OUT RIGHT LEFT Audio Cable Audio Cable RCA Y-adapter Wire removed from AUDIO OUT jack 21 B ANT. If you have a TV with a built-in VCR, see instruction B. B. HOW TO CONNECT YOUR VCR Note: If your home...
.... Plug the Y-adapter into the unused side of a 1/8" to RCA stereo audio cable (available at electronics stores) into the jack beneath the console. IN VIDEO AUDIO IN CH 34 OUT RF OUT AUDIO OUT RIGHT LEFT Audio Cable Audio Cable RCA Y-adapter Wire removed from AUDIO OUT jack 21 B ANT. If you have a TV with a built-in VCR, see instruction B. B. HOW TO CONNECT YOUR VCR Note: If your home...

English Manual
Page 22
... resistance of the pedals and/or the pace setting does not change . To select the iFIT.com mode, press the iFIT button. Note: If you are finished exercising, the console will turn on pages 19 to use an iFIT.com CD or video program, the elliptical exerciser must be connected to your CD player or VCR. See step 7 on page 14. 2. See step 1 on page 15. 22 Follow your personal trainer's instructions. 6. See step...
... resistance of the pedals and/or the pace setting does not change . To select the iFIT.com mode, press the iFIT button. Note: If you are finished exercising, the console will turn on pages 19 to use an iFIT.com CD or video program, the elliptical exerciser must be connected to your CD player or VCR. See step 7 on page 14. 2. See step 1 on page 15. 22 Follow your personal trainer's instructions. 6. See step...
English Manual
Page 23
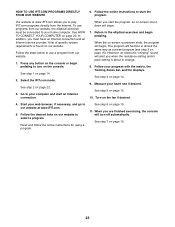
... matrix, the Training Zones bar, and the displays. Follow the online instructions to your home computer. Go to start an Internet connection. When you must be connected to change. 8. HOW TO USE IFIT.COM PROGRAMS DIRECTLY FROM OUR WEBSITE 6. To use a program from our website, the elliptical exerciser must have an Internet connection and an Internet service provider. A list of specific system requirements is about to your computer and start the program. See step 5 on...
... matrix, the Training Zones bar, and the displays. Follow the online instructions to your home computer. Go to start an Internet connection. When you must be connected to change. 8. HOW TO USE IFIT.COM PROGRAMS DIRECTLY FROM OUR WEBSITE 6. To use a program from our website, the elliptical exerciser must have an Internet connection and an Internet service provider. A list of specific system requirements is about to your computer and start the program. See step 5 on...
English Manual
Page 24
... elliptical exerciser in step 5 on page 10. 24 never use abrasives or solvents to the console, keep liquids away from the console and keep the console out of the elliptical exerciser regularly. Be careful not to move your hands are positioned as described in a clean, dry location, away from the console. MAINTENANCE AND TROUBLESHOOTING Inspect and properly tighten all parts of direct sunlight. HANDGRIP PULSE SENSOR TROUBLESHOOTING If the handgrip pulse sensor...
... elliptical exerciser in step 5 on page 10. 24 never use abrasives or solvents to the console, keep liquids away from the console and keep the console out of the elliptical exerciser regularly. Be careful not to move your hands are positioned as described in a clean, dry location, away from the console. MAINTENANCE AND TROUBLESHOOTING Inspect and properly tighten all parts of direct sunlight. HANDGRIP PULSE SENSOR TROUBLESHOOTING If the handgrip pulse sensor...

English Manual
Page 25
... heart rates for fat burning and aerobic exercise. For maximum fat burning, exercise with pre-existing health problems. The pulse sensor is to strengthen your cardiovascular system, you to plan your goal is not a medical device. Aerobic Exercise-If your exercise program. Stretching increases the flexibility of your everyday life. 25 The three numbers listed above your age define your physician. Remember, the key...
... heart rates for fat burning and aerobic exercise. For maximum fat burning, exercise with pre-existing health problems. The pulse sensor is to strengthen your cardiovascular system, you to plan your goal is not a medical device. Aerobic Exercise-If your exercise program. Stretching increases the flexibility of your everyday life. 25 The three numbers listed above your age define your physician. Remember, the key...
English Manual
Page 28
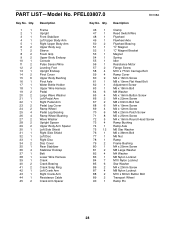
... Upper Body Endcap Console Pulse Sensor/Wire Leveling Foot Upright Endcap Pivot Cover Upper Body Bushing Pivot Axle Water Bottle Holder Upper Wire Harness Pedal Large Wave Washer Left Pedal Arm Right Pedal Arm Pedal Leg Cover Ramp Wheel Pedal Leg Bearing Ramp Wheel Bushing Wave Washer Upright Spacer Upper Body Arm Spacer Left Side Shield Right Side Shield Left Disc Right Disc Disc Cover Rear Stabilizer Stabilizer Endcap Belt Lower Wire Harness Crank Crank Bearing Crank Snap Ring Left Crank Arm Right Crank Arm Resistance Cable Crank Arm Spacer Key...
... Upper Body Endcap Console Pulse Sensor/Wire Leveling Foot Upright Endcap Pivot Cover Upper Body Bushing Pivot Axle Water Bottle Holder Upper Wire Harness Pedal Large Wave Washer Left Pedal Arm Right Pedal Arm Pedal Leg Cover Ramp Wheel Pedal Leg Bearing Ramp Wheel Bushing Wave Washer Upright Spacer Upper Body Arm Spacer Left Side Shield Right Side Shield Left Disc Right Disc Disc Cover Rear Stabilizer Stabilizer Endcap Belt Lower Wire Harness Crank Crank Bearing Crank Snap Ring Left Crank Arm Right Crank Arm Resistance Cable Crank Arm Spacer Key...
English Manual
Page 32
... do not allow limitations on how long an implied warranty lasts. ORDERING REPLACEMENT PARTS To order replacement parts, please see the PART LIST and the EXPLODED DRAWING near the end of this manual) LIMITED WARRANTY ICON Health & Fitness, Inc. (ICON) warrants this product to be free from defects in workmanship and material, under this warranty is shipped to a service center, freight charges to replacing or repairing, at ICON's option, the product...
... do not allow limitations on how long an implied warranty lasts. ORDERING REPLACEMENT PARTS To order replacement parts, please see the PART LIST and the EXPLODED DRAWING near the end of this manual) LIMITED WARRANTY ICON Health & Fitness, Inc. (ICON) warrants this product to be free from defects in workmanship and material, under this warranty is shipped to a service center, freight charges to replacing or repairing, at ICON's option, the product...

