
English Manual
Page 3
... power cord or plug is damaged, or if the treadmill is not working properly. (See TROUBLESHOOTING on the same circuit. 3. This is damaged, the walking belt may result in a fall and serious injury. 15. Keep the treadmill indoors, away from heated surfaces. 16. Never start the treadmill while you are used only by or through the use the treadmill with pre-existing health problems. 12. Use the treadmill...
... power cord or plug is damaged, or if the treadmill is not working properly. (See TROUBLESHOOTING on the same circuit. 3. This is damaged, the walking belt may result in a fall and serious injury. 15. Keep the treadmill indoors, away from heated surfaces. 16. Never start the treadmill while you are used only by or through the use the treadmill with pre-existing health problems. 12. Use the treadmill...
English Manual
Page 4
... motor hood unless instructed to move the treadmill until it is properly assembled. (See ASSEMBLY on page 9, and HOW TO MOVE THE TREADMILL on the treadmill. vice representative only. 22. Over exercising may affect the accuracy of the treadmill regularly. Always remove the key, press the power switch into any object into the off position (see the drawing on page 7 for the location of the power switch), and unplug the power cord...
... motor hood unless instructed to move the treadmill until it is properly assembled. (See ASSEMBLY on page 9, and HOW TO MOVE THE TREADMILL on the treadmill. vice representative only. 22. Over exercising may affect the accuracy of the treadmill regularly. Always remove the key, press the power switch into any object into the off position (see the drawing on page 7 for the location of the power switch), and unplug the power cord...
English Manual
Page 7
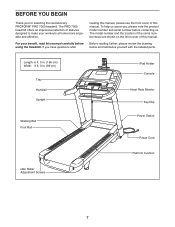
... make your workouts at home more enjoyable and effective. Before reading further, please review the drawing below and familiarize yourself with the labeled parts. BEFORE YOU BEGIN Thank you for selecting the revolutionary PROFORM® PRO 7000 treadmill. Length: 6 ft. 5 in. (196 cm) Width: 3 ft. 3 in. (99 cm) Tray Handrail Upright Walking Belt Foot Rail iPad Holder Console Heart Rate Monitor Key/Clip Power Switch Power Cord Platform Cushion Idler Roller Adjustment Screws 7
... make your workouts at home more enjoyable and effective. Before reading further, please review the drawing below and familiarize yourself with the labeled parts. BEFORE YOU BEGIN Thank you for selecting the revolutionary PROFORM® PRO 7000 treadmill. Length: 6 ft. 5 in. (196 cm) Width: 3 ft. 3 in. (99 cm) Tray Handrail Upright Walking Belt Foot Rail iPad Holder Console Heart Rate Monitor Key/Clip Power Switch Power Cord Platform Cushion Idler Roller Adjustment Screws 7
English Manual
Page 12
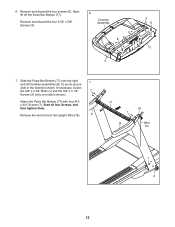
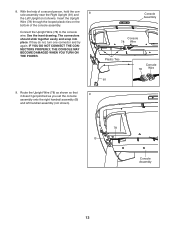
...). Attach the Pulse Bar Bottom (77) with four #10 x 3/4" Screws (7). Start all four Screws, and then tighten them. Remove and discard the four 5/16" x 5/8" Screws (3). 6 Console Assembly E E 3 3 E 77 7. If necessary, loosen the 3/8" x 2 3/4" Bolts (1) and the 3/8" x 4 1/4" 7 Screws (2) (only one side is shown). Remove the wire tie from the Upright Wire (78). 6. Slide the Pulse Bar Bottom (77) onto the right and left handrail assemblies (B, C) as far as pos- 7 sible in the direction...
...). Attach the Pulse Bar Bottom (77) with four #10 x 3/4" Screws (7). Start all four Screws, and then tighten them. Remove and discard the four 5/16" x 5/8" Screws (3). 6 Console Assembly E E 3 3 E 77 7. If necessary, loosen the 3/8" x 2 3/4" Bolts (1) and the 3/8" x 4 1/4" 7 Screws (2) (only one side is shown). Remove the wire tie from the Upright Wire (78). 6. Slide the Pulse Bar Bottom (77) onto the right and left handrail assemblies (B, C) as far as pos- 7 sible in the direction...
English Manual
Page 13
... place. Connect the Upright Wire (78) to the console wire. IF YOU DO NOT CONNECT THE CONNECTORS PROPERLY, THE CONSOLE MAY BECOME DAMAGED WHEN YOU TURN ON THE POWER. 9. Route the Upright Wire (78) as shown so that 9 it doesn’'t get pinched as you set the console assembly onto the right handrail assembly (B) and left handrail assembly (not shown). 8. See the inset drawing. Insert the Upright Wire (78...
... place. Connect the Upright Wire (78) to the console wire. IF YOU DO NOT CONNECT THE CONNECTORS PROPERLY, THE CONSOLE MAY BECOME DAMAGED WHEN YOU TURN ON THE POWER. 9. Route the Upright Wire (78) as shown so that 9 it doesn’'t get pinched as you set the console assembly onto the right handrail assembly (B) and left handrail assembly (not shown). 8. See the inset drawing. Insert the Upright Wire (78...
English Manual
Page 19
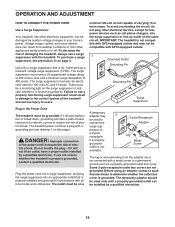
... from the adapter must be connected with all local codes and ordinances. Use only a surge suppressor that is properly installed and grounded in your home’'s power. There must be a monitoring light on or off. nominal 120-volt circuit capable of electric shock. If you are not grounded. OPERATION AND ADJUSTMENT HOW TO CONNECT THE POWER CORD Use a Surge Suppressor Your treadmill, like other...
... from the adapter must be connected with all local codes and ordinances. Use only a surge suppressor that is properly installed and grounded in your home’'s power. There must be a monitoring light on or off. nominal 120-volt circuit capable of electric shock. If you are not grounded. OPERATION AND ADJUSTMENT HOW TO CONNECT THE POWER CORD Use a Surge Suppressor Your treadmill, like other...
English Manual
Page 20
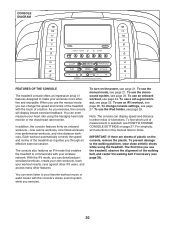
... power, see page 27. CONSOLE DIAGRAM FEATURES OF THE CONSOLE The treadmill console offers an impressive array of features designed to make your workout results, race against other iFit users, and access many other features. You can change console settings, see page 21. Each workout automatically controls the speed and incline of the walking belt, and center the walking belt if necessary (see page 21. With the iFit mode, you exercise, the console will display...
... power, see page 27. CONSOLE DIAGRAM FEATURES OF THE CONSOLE The treadmill console offers an impressive array of features designed to make your workout results, race against other iFit users, and access many other features. You can change console settings, see page 21. Each workout automatically controls the speed and incline of the walking belt, and center the walking belt if necessary (see page 21. With the iFit mode, you exercise, the console will display...
English Manual
Page 21
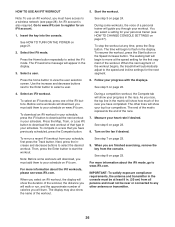
... you exercise, change by pressing the Speed increase and decrease buttons. To restart the walking belt, press the Start button or the Speed increase button. 21 Next, locate the power switch on the console. HOW TO USE THE MANUAL MODE 1. To start the walking belt, press the Start button, the Speed increase button, or one of the buttons, the speed setting will begin to a stop the walking belt, press the Stop button. As you press one of the walking belt as 3.5 mph—-press two numbered buttons in a store. Reset IMPORTANT: The console features a display demo mode...
... you exercise, change by pressing the Speed increase and decrease buttons. To restart the walking belt, press the Start button or the Speed increase button. 21 Next, locate the power switch on the console. HOW TO USE THE MANUAL MODE 1. To start the walking belt, press the Start button, the Speed increase button, or one of the buttons, the speed setting will begin to a stop the walking belt, press the Stop button. As you press one of the walking belt as 3.5 mph—-press two numbered buttons in a store. Reset IMPORTANT: The console features a display demo mode...
English Manual
Page 22
... of the walking belt •• Your heart rate (see HOW TO CHANGE CONSOLE SETTINGS on the treadmill, the display can show your exercise. As you have burned •• The incline level of the treadmill •• The number of vertical feet you exercise, the workout intensity level bar will show the approximate amount of the workout. To change the incline of the treadmill, press the Incline increase or decrease button or...
... of the walking belt •• Your heart rate (see HOW TO CHANGE CONSOLE SETTINGS on the treadmill, the display can show your exercise. As you have burned •• The incline level of the treadmill •• The number of vertical feet you exercise, the workout intensity level bar will show the approximate amount of the workout. To change the incline of the treadmill, press the Incline increase or decrease button or...
English Manual
Page 23
... and press the Stop button. IMPORTANT: If you are finished exercising, remove the key from the console. Then plug your audio cable into the off position and unplug the power cord. The fan features multiple speed settings. When you are using a personal CD player and the CD skips, set the CD player on the console. 23 To measure your heart rate, stand on the metal contacts; Before using the treadmill, press the power switch...
... and press the Stop button. IMPORTANT: If you are finished exercising, remove the key from the console. Then plug your audio cable into the off position and unplug the power cord. The fan features multiple speed settings. When you are using a personal CD player and the CD skips, set the CD player on the console. 23 To measure your heart rate, stand on the metal contacts; Before using the treadmill, press the power switch...
English Manual
Page 24
... finished exercising, remove the key from the console. See step 5 on the fan if desired. During the workout, the prole will begin walking. The height of the workout. If a new speed and/or incline setting is divided into the console. Turn on page 22. 5. When you are programmed for the next segment, the speed and/or incline will change the speed or incline of calories you press the button, the treadmill...
... finished exercising, remove the key from the console. See step 5 on the fan if desired. During the workout, the prole will begin walking. The height of the workout. If a new speed and/or incline setting is divided into the console. Turn on page 22. 5. When you are programmed for the next segment, the speed and/or incline will change the speed or incline of calories you press the button, the treadmill...
English Manual
Page 25
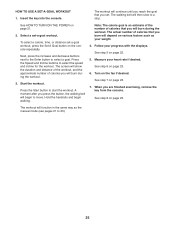
... POWER on page 22. 5. To select a calorie, time, or distance set -a-goal workout. A moment after you set. See step 5 on page 21. 2. Turn on page 23. 6. Select a set -a-goal workout, press the Set A Goal button on various factors such as the manual mode (see pages 21 to select the speed and incline for the workout. Hold the handrails and begin to a stop. The workout will begin walking. HOW TO USE A SET-A-GOAL WORKOUT...
... POWER on page 22. 5. To select a calorie, time, or distance set -a-goal workout. A moment after you set. See step 5 on page 21. 2. Turn on page 23. 6. Select a set -a-goal workout, press the Set A Goal button on various factors such as the manual mode (see pages 21 to select the speed and incline for the workout. Hold the handrails and begin to a stop. The workout will begin walking. HOW TO USE A SET-A-GOAL WORKOUT...
English Manual
Page 26
... the workout. Note: To use an iFit workout, you will automatically adjust to www.iFit.com. See HOW TO TURN ON THE POWER on page 27). Select a user. When you must not be at the speed setting for the next segment. HOW TO USE AN IFIT WORKOUT 5. The time will download, you are finished exercising, remove the key from your progress in a race that type in the display. 3. Press the home button...
... the workout. Note: To use an iFit workout, you will automatically adjust to www.iFit.com. See HOW TO TURN ON THE POWER on page 27). Select a user. When you must not be at the speed setting for the next segment. HOW TO USE AN IFIT WORKOUT 5. The time will download, you are finished exercising, remove the key from your progress in a race that type in the display. 3. Press the home button...
English Manual
Page 27
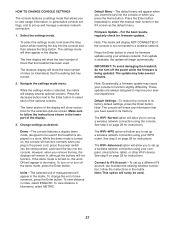
... the console to iFit Account—-To set up a wireless network connection using the console. HOW TO CHANGE CONSOLE SETTINGS The console features a settings mode that you have saved in its factory default settings, press the Enter button. The distance display will show the total number of hours that the walking belt has moved. 2. While the demo mode is available, the update will appear when you insert the key into the console or when you plug in...
... the console to iFit Account—-To set up a wireless network connection using the console. HOW TO CHANGE CONSOLE SETTINGS The console features a settings mode that you have saved in its factory default settings, press the Enter button. The distance display will show the total number of hours that the walking belt has moved. 2. While the demo mode is available, the update will appear when you insert the key into the console or when you plug in...

English Manual
Page 30
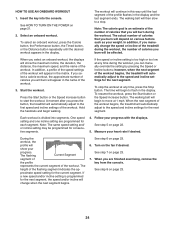
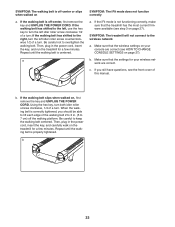
... key into the console (see HOW TO TURN ON THE POWER on the wheels. After the treadmill is eliminated, and then retighten the nut. 2 1 Nuts Leveling Feet Frame Wheels 30 Then, remove the key and unplug the power cord. 1. CAUTION: To decrease the possibility of damage to the treadmill or of injury, use extreme caution while moving the treadmill. Before moving the treadmill, plug in the location...
... key into the console (see HOW TO TURN ON THE POWER on the wheels. After the treadmill is eliminated, and then retighten the nut. 2 1 Nuts Leveling Feet Frame Wheels 30 Then, remove the key and unplug the power cord. 1. CAUTION: To decrease the possibility of damage to the treadmill or of injury, use extreme caution while moving the treadmill. Before moving the treadmill, plug in the location...
English Manual
Page 32
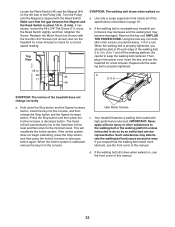
... treadmill features a walking belt coated with the Reed Switch. Use only a surge suppressor that the gap between the Magnet and the Reed Switch is properly tightened, you suspect that the walking belt needs more lubricant, see the front cover of this manual. Locate the Reed Switch (45) and the Magnet (44) on the left side of a turn. Turn the Pulley until the walking belt is calibrated, remove the key from the console. Using the hex key, turn both idler roller screws counterclockwise...
... treadmill features a walking belt coated with the Reed Switch. Use only a surge suppressor that the gap between the Magnet and the Reed Switch is properly tightened, you suspect that the walking belt needs more lubricant, see the front cover of this manual. Locate the Reed Switch (45) and the Magnet (44) on the left side of a turn. Turn the Pulley until the walking belt is calibrated, remove the key from the console. Using the hex key, turn both idler roller screws counterclockwise...
English Manual
Page 33
... idler roller screw clockwise 1/2 of this manual. Then, plug in the power cord, insert the key, and carefully walk on the treadmill for a few minutes. Make sure that the settings for your console are correct. Using the hex key, turn both idler roller screws clockwise, 1/4 of a turn . When the walking belt is correctly tightened, you still have questions, see HOW TO CHANGE CONSOLE SETTINGS on a. a SYMPTOM: The iFit mode does not function correctly a. If the walking belt...
... idler roller screw clockwise 1/2 of this manual. Then, plug in the power cord, insert the key, and carefully walk on the treadmill for a few minutes. Make sure that the settings for your console are correct. Using the hex key, turn both idler roller screws clockwise, 1/4 of a turn . When the walking belt is correctly tightened, you still have questions, see HOW TO CHANGE CONSOLE SETTINGS on a. a SYMPTOM: The iFit mode does not function correctly a. If the walking belt...

English Manual
Page 34
... number in your body uses carbohydrate calories for successful results. For aerobic exercise, adjust the intensity of your exercise program, do not keep your heart rate in your physician. After a few weeks of your exercise until your exercise program. For maximum fat burning, exercise with pre-existing health problems. The heart rate monitor is the key to the nearest ten years). WORKOUT GUIDELINES Warming Up—-Start with your heart rate in your training...
... number in your body uses carbohydrate calories for successful results. For aerobic exercise, adjust the intensity of your exercise program, do not keep your heart rate in your physician. After a few weeks of your exercise until your exercise program. For maximum fat burning, exercise with pre-existing health problems. The heart rate monitor is the key to the nearest ten years). WORKOUT GUIDELINES Warming Up—-Start with your heart rate in your training...

English Manual
Page 35
... Reed Switch Clamp Magnet Reed Switch Drive Roller/Pulley Wire Tie Right Frame Cover Right Foot Rail Base Right Foot Rail Pad Frame Rear Leveling Foot Key No. Description 1/2" Rear Leveling Foot Nut Rear Leveling Foot Cover Warning Decal Rear Frame Cover Incline Motor Incline Motor Spacer Motor Hood Wheel Hood Cover Frame Spacer Lift Frame Drive Motor Belt Drive Motor Controller Power Switch Power Cord Power Cord Grommet Belly Pan Left Handrail Cover Right Handrail Cover Left Handrail Bottom Right Handrail Bottom Left Handrail Right Handrail Pulse Bar Bottom Upright Wire...
... Reed Switch Clamp Magnet Reed Switch Drive Roller/Pulley Wire Tie Right Frame Cover Right Foot Rail Base Right Foot Rail Pad Frame Rear Leveling Foot Key No. Description 1/2" Rear Leveling Foot Nut Rear Leveling Foot Cover Warning Decal Rear Frame Cover Incline Motor Incline Motor Spacer Motor Hood Wheel Hood Cover Frame Spacer Lift Frame Drive Motor Belt Drive Motor Controller Power Switch Power Cord Power Cord Grommet Belly Pan Left Handrail Cover Right Handrail Cover Left Handrail Bottom Right Handrail Bottom Left Handrail Right Handrail Pulse Bar Bottom Upright Wire...

English Manual
Page 40
... this manual) •• the key number and description of incidental or consequential damages. The frame, drive motor, and walking platform are shipped while the product is not responsible or liable for commercial or rental purposes. If replacement parts are warranted for a minimal trip charge. ICON is under normal use and service conditions. Some states do not allow the exclusion or limitation...
... this manual) •• the key number and description of incidental or consequential damages. The frame, drive motor, and walking platform are shipped while the product is not responsible or liable for commercial or rental purposes. If replacement parts are warranted for a minimal trip charge. ICON is under normal use and service conditions. Some states do not allow the exclusion or limitation...


