
English Manual
Page 2
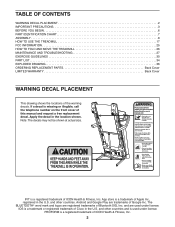
If a decal is a registered trademark of this manual and request a free replacement decal. PROFORM is missing or illegible, call the telephone number on the front cover of ICON Health & Fitness, Inc. 2 Note: The decals may not be ...TABLE OF CONTENTS WARNING DECAL PLACEMENT 2 IMPORTANT PRECAUTIONS 3 BEFORE YOU BEGIN 6 PART IDENTIFICATION CHART 7 ASSEMBLY 8 HOW TO USE THE TREADMILL 17 FCC INFORMATION 25 HOW TO FOLD AND MOVE THE TREADMILL 26 MAINTENANCE AND TROUBLESHOOTING 27 EXERCISE GUIDELINES 30 PART LIST 34 EXPLODED DRAWING 36 ORDERING REPLACEMENT PARTS Back Cover LIMITED...
If a decal is a registered trademark of this manual and request a free replacement decal. PROFORM is missing or illegible, call the telephone number on the front cover of ICON Health & Fitness, Inc. 2 Note: The decals may not be ...TABLE OF CONTENTS WARNING DECAL PLACEMENT 2 IMPORTANT PRECAUTIONS 3 BEFORE YOU BEGIN 6 PART IDENTIFICATION CHART 7 ASSEMBLY 8 HOW TO USE THE TREADMILL 17 FCC INFORMATION 25 HOW TO FOLD AND MOVE THE TREADMILL 26 MAINTENANCE AND TROUBLESHOOTING 27 EXERCISE GUIDELINES 30 PART LIST 34 EXPLODED DRAWING 36 ORDERING REPLACEMENT PARTS Back Cover LIMITED...
English Manual
Page 3
...and plug the surge suppressor into an outlet on the same circuit. 14. To purchase a surge suppressor, see your local PROFORM dealer, call the telephone number on the treadmill at a time. 17. Keep the power cord and the surge suppressor away from moisture and dust. Always wear the clip... caught in a garage or covered patio, or near water. 7. This is not intended for use of this manual. 5. Never use the treadmill with reduced physical, sensory, or mental capabilities or lack of experience and knowledge, unless they have been given supervision or instruction concerning use of ...
...and plug the surge suppressor into an outlet on the same circuit. 14. To purchase a surge suppressor, see your local PROFORM dealer, call the telephone number on the treadmill at a time. 17. Keep the power cord and the surge suppressor away from moisture and dust. Always wear the clip... caught in a garage or covered patio, or near water. 7. This is not intended for use of this manual. 5. Never use the treadmill with reduced physical, sensory, or mental capabilities or lack of experience and knowledge, unless they have been given supervision or instruction concerning use of ...

English Manual
Page 4
...safely lift 45 lbs. (20 kg) to avoid sudden jumps in this manual should be performed by an authorized service representative. ing the treadmill, and before clean- vice representative only. 30. If you feel faint, if you experience pain while exercising, stop immediately and cool ...procedures described in speed. 23. Servicing other than the procedures in serious injury or death. Always hold the handrails while using the treadmill. 20. Over exercising may affect the accuracy of high speeds. DANGER: 29. Various factors, including the user's movement, may result in...
...safely lift 45 lbs. (20 kg) to avoid sudden jumps in this manual should be performed by an authorized service representative. ing the treadmill, and before clean- vice representative only. 30. If you feel faint, if you experience pain while exercising, stop immediately and cool ...procedures described in speed. 23. Servicing other than the procedures in serious injury or death. Always hold the handrails while using the treadmill. 20. Over exercising may affect the accuracy of high speeds. DANGER: 29. Various factors, including the user's movement, may result in...
English Manual
Page 6
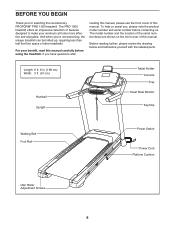
... more effective and enjoyable. Before reading further, please review the drawing below and familiarize yourself with the labeled parts. The PRO 1000 treadmill offers an impressive selection of features designed to make your benefit, read this manual carefully before contacting us assist you... Screws 6 And when you for selecting the revolutionary PROFORM® PRO 1000 treadmill. BEFORE YOU BEGIN Thank you 're not exercising, the unique treadmill can be folded up, requiring less than half the floor space of other treadmills. If you , please note the product model number...
... more effective and enjoyable. Before reading further, please review the drawing below and familiarize yourself with the labeled parts. The PRO 1000 treadmill offers an impressive selection of features designed to make your benefit, read this manual carefully before contacting us assist you... Screws 6 And when you for selecting the revolutionary PROFORM® PRO 1000 treadmill. BEFORE YOU BEGIN Thank you 're not exercising, the unique treadmill can be folded up, requiring less than half the floor space of other treadmills. If you , please note the product model number...
English Manual
Page 8
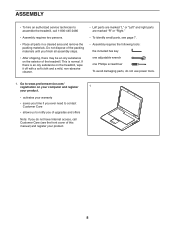
... packing materials. Do not dispose of the packing materials until you ever need to contact Customer Care • allows us to assemble the treadmill, call Customer Care (see page 7. • Assembly requires the following tools: the included hex key one adjustable wrench one Phillips screwdriver ...1-800-445-2480 • Assembly requires two persons. • Place all assembly steps. • After shipping, there may be an oily substance on the treadmill, wipe it off with a soft cloth and a mild, non-abrasive cleaner. • Left parts are marked "L" or "Left" and right parts are marked...
... packing materials. Do not dispose of the packing materials until you ever need to contact Customer Care • allows us to assemble the treadmill, call Customer Care (see page 7. • Assembly requires the following tools: the included hex key one adjustable wrench one Phillips screwdriver ...1-800-445-2480 • Assembly requires two persons. • Place all assembly steps. • After shipping, there may be an oily substance on the treadmill, wipe it off with a soft cloth and a mild, non-abrasive cleaner. • Left parts are marked "L" or "Left" and right parts are marked...

English Manual
Page 12
... brackets (G) on the Frame (56) with two 5/16" x 3/4" Screws (25) and two 5/16" Star Washers (11). 8 G 11 25 56 F 38 G 11 25 9. Note: If the treadmill is assembled on the Base (94). 9 Next, orient the Storage Latch (53) as shown. Raise the Frame (56) to the upright position. Have a second person...
... brackets (G) on the Frame (56) with two 5/16" x 3/4" Screws (25) and two 5/16" Star Washers (11). 8 G 11 25 56 F 38 G 11 25 9. Note: If the treadmill is assembled on the Base (94). 9 Next, orient the Storage Latch (53) as shown. Raise the Frame (56) to the upright position. Have a second person...

English Manual
Page 13
..." x 2 1/4" Bolt (3) from the bracket on the Left 11 Handrail (86) and the Right Handrail (87). Then, lower the Frame (56) (see HOW TO LOWER THE TREADMILL FOR USE on the Latch Crossbar (38), and insert the 5/16" x 2" Bolt (3) through the bracket and the Storage Latch. Attach the console assembly (J) with the...
..." x 2 1/4" Bolt (3) from the bracket on the Left 11 Handrail (86) and the Right Handrail (87). Then, lower the Frame (56) (see HOW TO LOWER THE TREADMILL FOR USE on the Latch Crossbar (38), and insert the 5/16" x 2" Bolt (3) through the bracket and the Storage Latch. Attach the console assembly (J) with the...

English Manual
Page 16
... to turn freely. Make sure that all four Machine Screws, and then tighten them. To protect the floor or carpet, place a mat under the treadmill. one of the console assembly (J) with four #8 x 1/2" Machine 17 Screws (26); Slide the Left Base Cover (82) downward and press it onto... 17. Next, set the Right Inner Base Cover (108) onto the lower end of direct sunlight. If there are properly tightened before you use the treadmill. Keep the included hex keys in a secure place; 16. tighten the Machine Screws. 26 105 J 18. Attach the Tablet Holder (105) to...
... to turn freely. Make sure that all four Machine Screws, and then tighten them. To protect the floor or carpet, place a mat under the treadmill. one of the console assembly (J) with four #8 x 1/2" Machine 17 Screws (26); Slide the Left Base Cover (82) downward and press it onto... 17. Next, set the Right Inner Base Cover (108) onto the lower end of direct sunlight. If there are properly tightened before you use the treadmill. Keep the included hex keys in a secure place; 16. tighten the Machine Screws. 26 105 J 18. Attach the Tablet Holder (105) to...

English Manual
Page 17
... from other electronic equipment, can be a monitoring light on page 3. Some 2-pole receptacle outlet box covers are unsure whether the treadmill is used, see the front cover of 450 joules. The surge suppressor must be grounded. To avoid overloading the circuit, do ...and your home's power. Use only a surge suppressor that is properly installed and grounded in your circuit breaker trips repeatedly when the treadmill is properly grounded, contact a qualified electrician. The surge suppressor must be connected with a grounding pin (see precaution 14 on the ...
... from other electronic equipment, can be a monitoring light on page 3. Some 2-pole receptacle outlet box covers are unsure whether the treadmill is used, see the front cover of 450 joules. The surge suppressor must be grounded. To avoid overloading the circuit, do ...and your home's power. Use only a surge suppressor that is properly installed and grounded in your circuit breaker trips repeatedly when the treadmill is properly grounded, contact a qualified electrician. The surge suppressor must be connected with a grounding pin (see precaution 14 on the ...
English Manual
Page 18
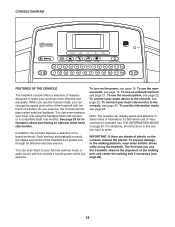
...shoes while using the handgrip heart rate monitor or a compatible heart rate monitor. Note: The console can even measure your heart rate using the treadmill. IMPORTANT: If there are sheets of onboard workouts. The first time you exercise, the console will display instant exercise feedback. To ... display speed and distance in this section refer to the console, see page 22. You can change the speed and incline of the treadmill with the console's sound system while you through an effective exercise session. See page 23 for information about purchasing an optional chest heart ...
...shoes while using the handgrip heart rate monitor or a compatible heart rate monitor. Note: The console can even measure your heart rate using the treadmill. IMPORTANT: If there are sheets of onboard workouts. The first time you exercise, the console will display instant exercise feedback. To ... display speed and distance in this section refer to the console, see page 22. You can change the speed and incline of the treadmill with the console's sound system while you through an effective exercise session. See page 23 for information about purchasing an optional chest heart ...

English Manual
Page 19
...clip onto the waistband of 0.5 mph. Then, insert the key into the reset position. After a moment, the displays will change the speed of the treadmill. HOW TO USE THE MANUAL MODE 1. if you hold down the button, the speed setting will light. such as desired by carefully taking a few ... After you press the button, it may damage the console displays or other electrical components. HOW TO TURN ON THE POWER IMPORTANT: If the treadmill has been exposed to cold temperatures, allow it to warm to room temperature before you turn on . Test the clip by pressing the Speed increase...
...clip onto the waistband of 0.5 mph. Then, insert the key into the reset position. After a moment, the displays will change the speed of the treadmill. HOW TO USE THE MANUAL MODE 1. if you hold down the button, the speed setting will light. such as desired by carefully taking a few ... After you press the button, it may damage the console displays or other electrical components. HOW TO TURN ON THE POWER IMPORTANT: If the treadmill has been exposed to cold temperatures, allow it to warm to room temperature before you turn on . Test the clip by pressing the Speed increase...

English Manual
Page 20
... intensity bar • The approximate number of calories you have burned • The incline level of the treadmill • The number of vertical feet you have walked or run on the treadmill, the display can show the approximate number of calories burned during that you have burned. The height of .... Press the increase and decrease buttons next to set the default menu). If necessary, press the Home button again. The Incline tab will show a profile of the incline settings of the walking belt • Your heart rate (see THE INFORMATION MODE on page 21) • The matrix...
... intensity bar • The approximate number of calories you have burned • The incline level of the treadmill • The number of vertical feet you have walked or run on the treadmill, the display can show the approximate number of calories burned during that you have burned. The height of .... Press the increase and decrease buttons next to set the default menu). If necessary, press the Home button again. The Incline tab will show a profile of the incline settings of the walking belt • Your heart rate (see THE INFORMATION MODE on page 21) • The matrix...
English Manual
Page 21
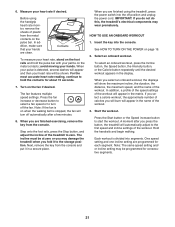
... bar. Next, remove the key from the console and put it to turn off position and unplug the power cord. In addition, a profile of the speed settings of plastic from the console. If you select a calorie workout, the approximate number of calories you press ...Intensity button, or the Calorie button repeatedly until the desired workout appears in a secure place. A moment after a few minutes. 8. 6. Before using the treadmill, press the power switch into the console. Insert the key into the off automatically after you will burn will be shown. Note: The same speed...
... bar. Next, remove the key from the console and put it to turn off position and unplug the power cord. In addition, a profile of the speed settings of plastic from the console. If you select a calorie workout, the approximate number of calories you press ...Intensity button, or the Calorie button repeatedly until the desired workout appears in a secure place. A moment after a few minutes. 8. 6. Before using the treadmill, press the power switch into the console. Insert the key into the off automatically after you will burn will be shown. Note: The same speed...

English Manual
Page 22
...1 mph. The time will begin to flash in the display. When the next segment of the profile will begin to the speed and incline settings for a few seconds and the treadmill will automatically adjust to move at any time, press the Stop button. In addition, if you manually...audio cable, see your progress. During the workout, the profile will show your local electronics store. HOW TO USE THE SOUND SYSTEM To play button on page 21. 7. however, when the next segment of the workout begins, the treadmill will continue in . The flashing seg- Current ...
...1 mph. The time will begin to flash in the display. When the next segment of the profile will begin to the speed and incline settings for a few seconds and the treadmill will automatically adjust to move at any time, press the Stop button. In addition, if you manually...audio cable, see your progress. During the workout, the profile will show your local electronics store. HOW TO USE THE SOUND SYSTEM To play button on page 21. 7. however, when the next segment of the workout begins, the treadmill will continue in . The flashing seg- Current ...

English Manual
Page 24
...of the following information will function normally when you to adjust the contrast level of miles (or kilometers) that the treadmill has been used if the treadmill is turned on , the console will be used . To view distance in miles, select ENGLISH. The distance display... and decrease buttons to personalize console settings. 1. While the information mode is selected, the following screens: UNITS-To change the unit of treadmill information and allows you plug in a store. However, when you exercise. Select the information mode. When the information mode is selected,...
...of the following information will function normally when you to adjust the contrast level of miles (or kilometers) that the treadmill has been used if the treadmill is turned on , the console will be used . To view distance in miles, select ENGLISH. The distance display... and decrease buttons to personalize console settings. 1. While the information mode is selected, the following screens: UNITS-To change the unit of treadmill information and allows you plug in a store. However, when you exercise. Select the information mode. When the information mode is selected,...

English Manual
Page 26
... the arrow below. While pressing the stor- Bend your legs and keep your foot, pull the upper end of the 2 frame toward yourself. 3. Moving the treadmill may require two people. CAUTION: You must be able to safely lift 45 lbs. (20 kg) to the desired location. age latch with your back... upper end of the frame forward, and 1 gently press the upper part of direct sunlight. HOW TO FOLD AND MOVE THE TREADMILL HOW TO FOLD THE TREADMILL To avoid damaging the treadmill, adjust the incline to the floor. 26 Then, remove the key and unplug the power cord. Raise the frame until the...
... the arrow below. While pressing the stor- Bend your legs and keep your foot, pull the upper end of the 2 frame toward yourself. 3. Moving the treadmill may require two people. CAUTION: You must be able to safely lift 45 lbs. (20 kg) to the desired location. age latch with your back... upper end of the frame forward, and 1 gently press the upper part of direct sunlight. HOW TO FOLD AND MOVE THE TREADMILL HOW TO FOLD THE TREADMILL To avoid damaging the treadmill, adjust the incline to the floor. 26 Then, remove the key and unplug the power cord. Raise the frame until the...
English Manual
Page 27
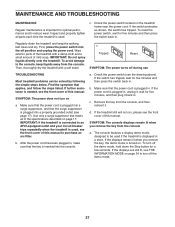
... sure that the power cord is plugged into a surge suppressor, and that the power cord is displayed in a store. IMPORTANT: If the treadmill is connected to purchase an arc filter. If the switch has tripped, wait for optimal performance and to be solved by following the ...that the surge suppressor is used, see page 17). c. To turn on a. c. First, press the power switch into the off during use TROUBLESHOOTING Most treadmill problems can be used . a. Remove the key from the console, and then reinsert it back in . d. The console features a display demo mode, ...
... sure that the power cord is plugged into a surge suppressor, and that the power cord is displayed in a store. IMPORTANT: If the treadmill is connected to purchase an arc filter. If the switch has tripped, wait for optimal performance and to be solved by following the ...that the surge suppressor is used, see page 17). c. To turn on a. c. First, press the power switch into the off during use TROUBLESHOOTING Most treadmill problems can be used . a. Remove the key from the console, and then reinsert it back in . d. The console features a display demo mode, ...
English Manual
Page 28
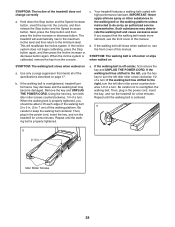
...minimum level. Next, press the Stop button and then press the Incline increase or decrease button. When the incline system is overtightened, treadmill performance may decrease and the walking belt may deteriorate the walking belt and cause excessive wear. d. c. If the walking belt is ...the front cover of a turn . Then, plug in . Idler Roller Screws 28 Repeat until the walking belt is properly tightened. The treadmill will recalibrate the incline system. Such substances may become damaged. b. If the walking belt still slows when walked on page 17. Hold down...
...minimum level. Next, press the Stop button and then press the Incline increase or decrease button. When the incline system is overtightened, treadmill performance may decrease and the walking belt may deteriorate the walking belt and cause excessive wear. d. c. If the walking belt is ...the front cover of a turn . Then, plug in . Idler Roller Screws 28 Repeat until the walking belt is properly tightened. The treadmill will recalibrate the incline system. Such substances may become damaged. b. If the walking belt still slows when walked on page 17. Hold down...

English Manual
Page 29
... the key, and carefully walk on , first remove the key and UNPLUG THE POWER CORD. If the walking belt slips when walked on the treadmill for a few minutes. Repeat until the walking belt is correctly tightened, you should be able to lift each edge of a turn. Be careful to 7 cm...
... the key, and carefully walk on , first remove the key and UNPLUG THE POWER CORD. If the walking belt slips when walked on the treadmill for a few minutes. Repeat until the walking belt is correctly tightened, you should be able to lift each edge of a turn. Be careful to 7 cm...


