
English Manual
Page 2
... the telephone number on the front cover of ICON Health & Fitness, Inc. 2 IOS is used under license. and other countries. TABLE OF CONTENTS WARNING DECAL PLACEMENT 2 IMPORTANT PRECAUTIONS 3 BEFORE YOU BEGIN 6 PART IDENTIFICATION CHART 7 ASSEMBLY 8 HOW TO USE THE TREADMILL 17 FCC INFORMATION 25 HOW TO FOLD AND MOVE THE TREADMILL 26 MAINTENANCE AND TROUBLESHOOTING 27 EXERCISE GUIDELINES 30 PART LIST 34 EXPLODED DRAWING 36 ORDERING REPLACEMENT PARTS Back Cover LIMITED WARRANTY Back Cover WARNING DECAL...
... the telephone number on the front cover of ICON Health & Fitness, Inc. 2 IOS is used under license. and other countries. TABLE OF CONTENTS WARNING DECAL PLACEMENT 2 IMPORTANT PRECAUTIONS 3 BEFORE YOU BEGIN 6 PART IDENTIFICATION CHART 7 ASSEMBLY 8 HOW TO USE THE TREADMILL 17 FCC INFORMATION 25 HOW TO FOLD AND MOVE THE TREADMILL 26 MAINTENANCE AND TROUBLESHOOTING 27 EXERCISE GUIDELINES 30 PART LIST 34 EXPLODED DRAWING 36 ORDERING REPLACEMENT PARTS Back Cover LIMITED WARRANTY Back Cover WARNING DECAL...
English Manual
Page 3
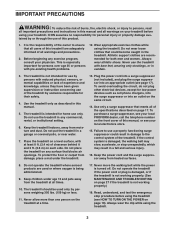
... or covered patio, or near water. 7. Keep the treadmill indoors, away from heated surfaces. 8. To avoid overloading the circuit, do not plug other electrical devices, except for home use a properly functioning surge suppressor could become caught in sandals. 3. Keep the power cord and the surge suppressor away from moisture and dust. Never move the walking belt while the power is being...
... or covered patio, or near water. 7. Keep the treadmill indoors, away from heated surfaces. 8. To avoid overloading the circuit, do not plug other electrical devices, except for home use a properly functioning surge suppressor could become caught in sandals. 3. Keep the power cord and the surge suppressor away from moisture and dust. Never move the walking belt while the power is being...
English Manual
Page 4
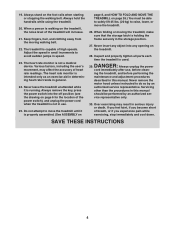
... opening on page 6 for the location of the power switch), and unplug the power cord when the treadmill is properly assembled. (See ASSEMBLY on page 8, and HOW TO FOLD AND MOVE THE TREADMILL on the foot rails when starting or stopping the walking belt. Never remove the motor hood unless instructed to raise, lower, or move the treadmill until it is used. When a person is holding the frame securely in use , before performing the maintenance and adjustment...
... opening on page 6 for the location of the power switch), and unplug the power cord when the treadmill is properly assembled. (See ASSEMBLY on page 8, and HOW TO FOLD AND MOVE THE TREADMILL on the foot rails when starting or stopping the walking belt. Never remove the motor hood unless instructed to raise, lower, or move the treadmill until it is used. When a person is holding the frame securely in use , before performing the maintenance and adjustment...
English Manual
Page 6
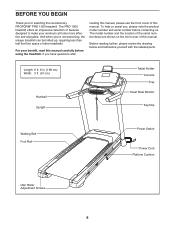
... Upright Tablet Holder Console Tray Heart Rate Monitor Key/Clip Walking Belt Foot Rail Power Switch Power Cord Platform Cushion Idler Roller Adjustment Screws 6 For your workouts at home more effective and enjoyable. Before reading further, please review the drawing below and familiarize yourself with the labeled parts. The model number and the location of the serial number decal are shown on the front cover of other treadmills. The PRO 1000 treadmill offers an impressive selection of this manual carefully...
... Upright Tablet Holder Console Tray Heart Rate Monitor Key/Clip Walking Belt Foot Rail Power Switch Power Cord Platform Cushion Idler Roller Adjustment Screws 6 For your workouts at home more effective and enjoyable. Before reading further, please review the drawing below and familiarize yourself with the labeled parts. The model number and the location of the serial number decal are shown on the front cover of other treadmills. The PRO 1000 treadmill offers an impressive selection of this manual carefully...

English Manual
Page 13
...) and the Right Handrail (87). Align the upper end of the Storage Latch; do not tighten the Screws yet. Set the console assembly (J) on the Latch Crossbar (38). Then, lower the Frame (56) (see HOW TO LOWER THE TREADMILL FOR USE on the Latch Crossbar (38), and insert the 5/16" x 2" Bolt (3) through the bracket and the Storage Latch. Next, tighten the 5/16" Nut (12) onto the 5/16...
...) and the Right Handrail (87). Align the upper end of the Storage Latch; do not tighten the Screws yet. Set the console assembly (J) on the Latch Crossbar (38). Then, lower the Frame (56) (see HOW TO LOWER THE TREADMILL FOR USE on the Latch Crossbar (38), and insert the 5/16" x 2" Bolt (3) through the bracket and the Storage Latch. Next, tighten the 5/16" Nut (12) onto the 5/16...

English Manual
Page 16
... the hex keys is used to adjust the walking belt (see pages 28 and 29). Note: Extra parts may be included. 16 Next, set the Right Inner Base Cover (108) onto the lower end of the Left Upright (89). tighten the Machine Screws. 26 105 J 18. Make sure that all four Machine Screws, and then tighten them. To avoid damage to the back of direct sunlight. Be...
... the hex keys is used to adjust the walking belt (see pages 28 and 29). Note: Extra parts may be included. 16 Next, set the Right Inner Base Cover (108) onto the lower end of the Left Upright (89). tighten the Machine Screws. 26 105 J 18. Make sure that all four Machine Screws, and then tighten them. To avoid damage to the back of direct sunlight. Be...

English Manual
Page 17
... screw to the control system of electric shock. There must be installed by a qualified electrician. 17 The treadmill power cord has a plug with the treadmill. Do not modify the plug-if it is not available. 2 2-pole Receptacle Adapter Lug Metal Screw The lug or wire extending from other electronic equipment, can result from weather conditions or from the adapter must be electrically rated for...
... screw to the control system of electric shock. There must be installed by a qualified electrician. 17 The treadmill power cord has a plug with the treadmill. Do not modify the plug-if it is not available. 2 2-pole Receptacle Adapter Lug Metal Screw The lug or wire extending from other electronic equipment, can result from weather conditions or from the adapter must be electrically rated for...
English Manual
Page 18
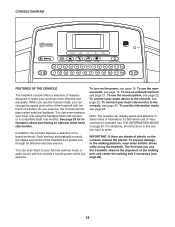
... console will display instant exercise feedback. CONSOLE DIAGRAM FEATURES OF THE CONSOLE The treadmill console offers a selection of features designed to make your heart rate using the treadmill. You can display speed and distance in this section refer to the walking platform, wear clean athletic shoes while using the handgrip heart rate monitor or a compatible heart rate monitor. See page 23 for information about purchasing an optional chest heart rate monitor. To prevent damage to miles. To turn on the power...
... console will display instant exercise feedback. CONSOLE DIAGRAM FEATURES OF THE CONSOLE The treadmill console offers a selection of features designed to make your heart rate using the treadmill. You can display speed and distance in this section refer to the walking platform, wear clean athletic shoes while using the handgrip heart rate monitor or a compatible heart rate monitor. See page 23 for information about purchasing an optional chest heart rate monitor. To prevent damage to miles. To turn on the power...

English Manual
Page 19
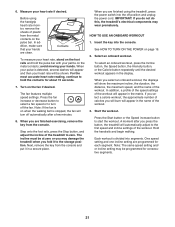
... turned on the foot rails of the numbered Quick Speed buttons. Select the manual mode. Each time you exercise, change by carefully taking a few seconds. To select a speed setting that includes a decimal- The time will change the speed of the numbered Quick Speed buttons, the walking belt will not function if the console is displayed in increments of 0.5 mph. Press the power switch into the console. Then, insert the key into the reset position, the demo mode...
... turned on the foot rails of the numbered Quick Speed buttons. Select the manual mode. Each time you exercise, change by carefully taking a few seconds. To select a speed setting that includes a decimal- The time will change the speed of the numbered Quick Speed buttons, the walking belt will not function if the console is displayed in increments of 0.5 mph. Press the power switch into the console. Then, insert the key into the reset position, the demo mode...

English Manual
Page 20
... • The speed of the walking belt • Your heart rate (see THE INFORMATION MODE on page 24 to the default menu (see step 6 on the treadmill, the display can show the approximate amount of calories you exercise, the workout intensity level bar will show a profile of the incline settings of the numbered Quick Incline buttons. The Incline tab will gradually adjust to the Enter button or press the Display button until the...
... • The speed of the walking belt • Your heart rate (see THE INFORMATION MODE on page 24 to the default menu (see step 6 on the treadmill, the display can show the approximate amount of calories you exercise, the workout intensity level bar will show a profile of the incline settings of the numbered Quick Incline buttons. The Incline tab will gradually adjust to the Enter button or press the Display button until the...
English Manual
Page 21
... console. Insert the key into segments. Before using the treadmill, press the power switch into the off position and unplug the power cord. For the most accurate heart rate reading, continue to the storage position. Step onto the foot rails, press the Stop button, and adjust the incline of the workout. 3. A moment after a few minutes. 8. Each workout is stopped, the fan will appear in the display. Measure your hands. Turn on the pulse bar. Press the Start button...
... console. Insert the key into segments. Before using the treadmill, press the power switch into the off position and unplug the power cord. For the most accurate heart rate reading, continue to the storage position. Step onto the foot rails, press the Stop button, and adjust the incline of the workout. 3. A moment after a few minutes. 8. Each workout is stopped, the fan will appear in the display. Measure your hands. Turn on the pulse bar. Press the Start button...

English Manual
Page 22
... walking belt will begin to flash in the display. The height of the workout begins, the treadmill will automatically adjust to the new speed and/or incline setting. See step 5 on page 21. 6. Measure your progress with the displays. When you are finished exercising, remove the key from the console. HOW TO USE THE SOUND SYSTEM To play button on the console. At the end of each segment, a series...
... walking belt will begin to flash in the display. The height of the workout begins, the treadmill will automatically adjust to the new speed and/or incline setting. See step 5 on page 21. 6. Measure your progress with the displays. When you are finished exercising, remove the key from the console. HOW TO USE THE SOUND SYSTEM To play button on the console. At the end of each segment, a series...
English Manual
Page 23
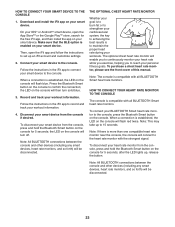
..., open the App StoreSM or the Google PlayTM store, search for 5 seconds; To disconnect your smart device. the LED on the console will then turn off. To purchase a chest heart rate monitor, please see the front cover of this manual. Note: The console is enabled on the console will flash red twice. Connect your BLUETOOTH Smart heart rate monitor to the console. Download and install the iFit app...
..., open the App StoreSM or the Google PlayTM store, search for 5 seconds; To disconnect your smart device. the LED on the console will then turn off. To purchase a chest heart rate monitor, please see the front cover of this manual. Note: The console is enabled on the console will flash red twice. Connect your BLUETOOTH Smart heart rate monitor to the console. Download and install the iFit app...

English Manual
Page 24
... power cord, press the power switch into the reset position, and insert the key into the console and then release the Stop button. Place your tablet on , the console will show the total number of hours that the treadmill has been used if the treadmill is turned on or turn off the demo mode, press the Enter button. The distance display will function normally when you remove the key, the displays will remain lit, although the buttons...
... power cord, press the power switch into the reset position, and insert the key into the console and then release the Stop button. Place your tablet on , the console will show the total number of hours that the treadmill has been used if the treadmill is turned on or turn off the demo mode, press the Enter button. The distance display will function normally when you remove the key, the displays will remain lit, although the buttons...

English Manual
Page 26
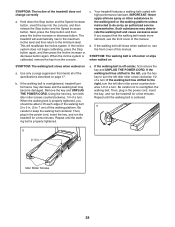
... key and unplug the power cord. CAUTION: You must be able to safely lift 45 lbs. (20 kg) to the desired location. Raise the frame until the storage latch locks in temperatures above 85° F (30° C). Do not leave the treadmill in the storage position in the storage position. Step back and let the frame lower to zero before you fold...
... key and unplug the power cord. CAUTION: You must be able to safely lift 45 lbs. (20 kg) to the desired location. Raise the frame until the storage latch locks in temperatures above 85° F (30° C). Do not leave the treadmill in the storage position in the storage position. Step back and let the frame lower to zero before you fold...
English Manual
Page 27
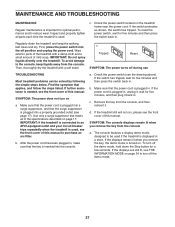
... sure that the power cord is plugged into the off during use TROUBLESHOOTING Most treadmill problems can be used if the treadmill is used , see page 17). c. SYMPTOM: The console displays remain lit when you remove the key, the demo mode is plugged into the console. To reset the power switch, wait for five minutes and then press the switch back in. Wipe exterior parts of the treadmill with a soft towel. Use only a surge suppressor...
... sure that the power cord is plugged into the off during use TROUBLESHOOTING Most treadmill problems can be used if the treadmill is used , see page 17). c. SYMPTOM: The console displays remain lit when you remove the key, the demo mode is plugged into the console. To reset the power switch, wait for five minutes and then press the switch back in. Wipe exterior parts of the treadmill with a soft towel. Use only a surge suppressor...
English Manual
Page 28
... walking belt is calibrated, remove the key from the console. Using the hex key, turn both idler roller screws counterclockwise, 1/4 of the specifications described on page 17. When the walking belt is off -center, first remove the key and UNPLUG THE POWER CORD. Be careful to overtighten the walking belt. Then, plug in . (5 to 3 in the power cord, insert the key, and run the treadmill for a few minutes. Repeat until the walking belt...
... walking belt is calibrated, remove the key from the console. Using the hex key, turn both idler roller screws counterclockwise, 1/4 of the specifications described on page 17. When the walking belt is off -center, first remove the key and UNPLUG THE POWER CORD. Be careful to overtighten the walking belt. Then, plug in . (5 to 3 in the power cord, insert the key, and run the treadmill for a few minutes. Repeat until the walking belt...

English Manual
Page 30
... 30 minutes with pre-existing health problems. The heart rate monitor is the heart rate for a sustained period of your exercise program, do not keep your heart rate in your training zone. You can use stored fat calories for energy. The three numbers listed above your age define your physician. The lowest number is the heart rate for fat burning, the middle number is the heart rate for maximum fat burning...
... 30 minutes with pre-existing health problems. The heart rate monitor is the heart rate for a sustained period of your exercise program, do not keep your heart rate in your training zone. You can use stored fat calories for energy. The three numbers listed above your age define your physician. The lowest number is the heart rate for fat burning, the middle number is the heart rate for maximum fat burning...

English Manual
Page 34
... Storage Latch Drive Motor Motor Belt Frame Left Rear Foot Console Ground Wire Rubber Cushion Right Foot Rail Idler Roller 3/8" x 1 3/4" Screw 3/8" x 1 1/4" Screw Console Base Motor Hood Hood Accent Incline Frame Spacer Hood Clip Incline Motor Incline Frame Frame Spacer Controller Controller Plate Controller Clamp Power Switch Power Cord Grommet Belly Pan Left Handrail Cover Console Upright Wire Left Base Cover Right Base Cover Right Bottom Handrail Cover Left Bottom Handrail Cover Left Handrail Right Handrail Console Trim Left Upright Right Upright Caution Decal Right Handrail Cover Pulse Bar...
... Storage Latch Drive Motor Motor Belt Frame Left Rear Foot Console Ground Wire Rubber Cushion Right Foot Rail Idler Roller 3/8" x 1 3/4" Screw 3/8" x 1 1/4" Screw Console Base Motor Hood Hood Accent Incline Frame Spacer Hood Clip Incline Motor Incline Frame Frame Spacer Controller Controller Plate Controller Clamp Power Switch Power Cord Grommet Belly Pan Left Handrail Cover Console Upright Wire Left Base Cover Right Base Cover Right Bottom Handrail Cover Left Bottom Handrail Cover Left Handrail Right Handrail Console Trim Left Upright Right Upright Caution Decal Right Handrail Cover Pulse Bar...
English Manual
Page 40
... freight damage to the customer. ICON is under normal use , or costs of removal or installation; ORDERING REPLACEMENT PARTS To order replacement parts, please see the front cover of this manual) LIMITED WARRANTY IMPORTANT: To protect your fitness equipment with an extended service plan, see the PART LIST and the EXPLODED DRAWING near the end of this manual. ICON Health & Fitness, Inc. (ICON) warrants this manual are shipped while the product is...
... freight damage to the customer. ICON is under normal use , or costs of removal or installation; ORDERING REPLACEMENT PARTS To order replacement parts, please see the front cover of this manual) LIMITED WARRANTY IMPORTANT: To protect your fitness equipment with an extended service plan, see the PART LIST and the EXPLODED DRAWING near the end of this manual. ICON Health & Fitness, Inc. (ICON) warrants this manual are shipped while the product is...

