
Instruction Manual
Page 2
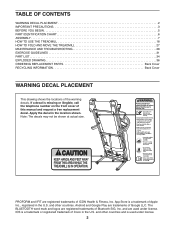
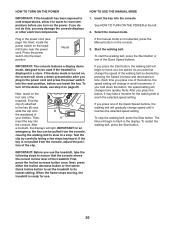
... PLACEMENT 2 IMPORTANT PRECAUTIONS 3 BEFORE YOU BEGIN 5 PART IDENTIFICATION CHART 6 ASSEMBLY 7 HOW TO USE THE TREADMILL 18 HOW TO FOLD AND MOVE THE TREADMILL 27 MAINTENANCE AND TROUBLESHOOTING 28 EXERCISE GUIDELINES 31 PART LIST 34 EXPLODED DRAWING 36 ORDERING REPLACEMENT PARTS Back Cover ...IOS is used under license. 2 The BLUETOOTH word mark and logos are registered trademarks of Bluetooth SIG, Inc. and other countries. PROFORM and IFIT are registered trademarks of ICON Health & Fitness, Inc. Android and Google Play are used under license. Note: The decals ...
... PLACEMENT 2 IMPORTANT PRECAUTIONS 3 BEFORE YOU BEGIN 5 PART IDENTIFICATION CHART 6 ASSEMBLY 7 HOW TO USE THE TREADMILL 18 HOW TO FOLD AND MOVE THE TREADMILL 27 MAINTENANCE AND TROUBLESHOOTING 28 EXERCISE GUIDELINES 31 PART LIST 34 EXPLODED DRAWING 36 ORDERING REPLACEMENT PARTS Back Cover ...IOS is used under license. 2 The BLUETOOTH word mark and logos are registered trademarks of Bluetooth SIG, Inc. and other countries. PROFORM and IFIT are registered trademarks of ICON Health & Fitness, Inc. Android and Google Play are used under license. Note: The decals ...
Instruction Manual
Page 3
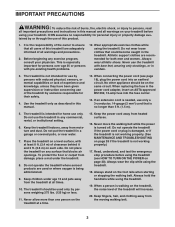
... understand, and test the emergency stop procedure before using the treadmill. Keep fingers, hair, and clothing away from moisture and dust. When connecting the power cord (see HOW TO TURN ON THE POWER on the treadmill, the noise level of all warnings and precautions. 2. If ...ft. (1.5 m). 5. Do not operate the treadmill if the power cord or plug is damaged, or if the treadmill is not working properly.) 17. Use the treadmill only as described in this product. 1. Place the treadmill on any exercise program, consult your treadmill. Always wear athletic shoes. tained by or...
... understand, and test the emergency stop procedure before using the treadmill. Keep fingers, hair, and clothing away from moisture and dust. When connecting the power cord (see HOW TO TURN ON THE POWER on the treadmill, the noise level of all warnings and precautions. 2. If ...ft. (1.5 m). 5. Do not operate the treadmill if the power cord or plug is damaged, or if the treadmill is not working properly.) 17. Use the treadmill only as described in this product. 1. Place the treadmill on any exercise program, consult your treadmill. Always wear athletic shoes. tained by or...
Instruction Manual
Page 4
... drawing on page 5 for the location of the power switch), and unplug the power cord when the treadmill is not in speed. 22. DANGER: 29. Adjust the speed in small increments to move the treadmill. 25. Always remove the key, press the power switch into any opening on page 27.) You must.... Do not change the incline of breath, or if you become short of the treadmill by an authorized service representative. Always unplug the power cord immediately after use . 24. Do not operate the treadmill while it is intended only as an exercise aid in determining heart rate trends in ...
... drawing on page 5 for the location of the power switch), and unplug the power cord when the treadmill is not in speed. 22. DANGER: 29. Adjust the speed in small increments to move the treadmill. 25. Always remove the key, press the power switch into any opening on page 27.) You must.... Do not change the incline of breath, or if you become short of the treadmill by an authorized service representative. Always unplug the power cord immediately after use . 24. Do not operate the treadmill while it is intended only as an exercise aid in determining heart rate trends in ...
Instruction Manual
Page 5
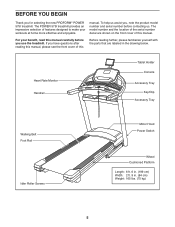
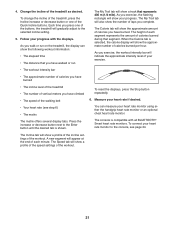
...cover of this manual carefully before contacting us assist you, note the product model number and serial number before you for selecting the new PROFORM® POWER 575I treadmill. To help us . The model number and the location of features designed to make your benefit, read this manual. manual. For... your workouts at home more effective and enjoyable. BEFORE YOU BEGIN Thank you use the treadmill. The POWER 575I treadmill provides an impressive selection of the serial number decal are labeled in . (84 cm) Weight: 165 lbs. (75 kg) 5
...cover of this manual carefully before contacting us assist you, note the product model number and serial number before you for selecting the new PROFORM® POWER 575I treadmill. To help us . The model number and the location of features designed to make your benefit, read this manual. manual. For... your workouts at home more effective and enjoyable. BEFORE YOU BEGIN Thank you use the treadmill. The POWER 575I treadmill provides an impressive selection of the serial number decal are labeled in . (84 cm) Weight: 165 lbs. (75 kg) 5
Instruction Manual
Page 7
... in Australia, email or post the following tools: the included hex keys one Phillips screwdriver one adjustable wrench To avoid damaging parts, do not use power tools. 1. To register your product and activate your warranty in the UK, go to keep a copy) • your name, address, and telephone number... the front cover of this manual. • your receipt (make sure to iconsupport.eu. If there is normal. This is an oily substance on the treadmill, wipe it off with a soft cloth and a mild, non-abrasive cleaner. • Left parts are marked "L" or "Left" and right parts are marked ...
... in Australia, email or post the following tools: the included hex keys one Phillips screwdriver one adjustable wrench To avoid damaging parts, do not use power tools. 1. To register your product and activate your warranty in the UK, go to keep a copy) • your name, address, and telephone number... the front cover of this manual. • your receipt (make sure to iconsupport.eu. If there is normal. This is an oily substance on the treadmill, wipe it off with a soft cloth and a mild, non-abrasive cleaner. • Left parts are marked "L" or "Left" and right parts are marked ...
Instruction Manual
Page 16
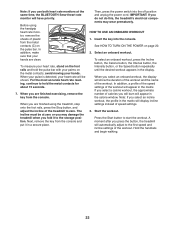
Have a second person hold the Frame until step 20 is facing the treadmill. Remove the two 5/16" x 3/4" Screws (13) from the bracket on the Base (88) with the two 5/16" x 3/4" Screws (13) that the "This side toward belt" ...
Have a second person hold the Frame until step 20 is facing the treadmill. Remove the two 5/16" x 3/4" Screws (13) from the bracket on the Base (88) with the two 5/16" x 3/4" Screws (13) that the "This side toward belt" ...

Instruction Manual
Page 17
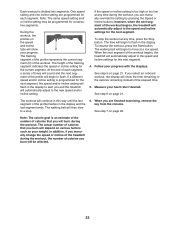
... the Tablet Holder. 21 Start First 24 26 P H 22. To avoid damage to adjust the walking belt (see HOW TO LOWER THE TREADMILL FOR USE on the treadmill decals, remove the plastic. This will push a spacer (O) out of direct sunlight. Be careful not to pivot. IMPORTANT: The Tablet Holder ...(26) is used to the console, keep the treadmill out of the Storage Latch; Note: Extra hardware may be able to overtighten the Screws. 20. the Storage Latch (52) must be included. 17 ...
... the Tablet Holder. 21 Start First 24 26 P H 22. To avoid damage to adjust the walking belt (see HOW TO LOWER THE TREADMILL FOR USE on the treadmill decals, remove the plastic. This will push a spacer (O) out of direct sunlight. Be careful not to pivot. IMPORTANT: The Tablet Holder ...(26) is used to the console, keep the treadmill out of the Storage Latch; Note: Extra hardware may be able to overtighten the Screws. 20. the Storage Latch (52) must be included. 17 ...
Instruction Manual
Page 18
... accordance with the product-if it must be replaced with a manufacturer-recommended power cord. Power Cord 2. HOW TO USE THE TREADMILL HOW TO PLUG IN THE POWER CORD This product must be earthed. Plug the power cord into the socket on Treadmill DANGER: Improper connection of the power cord into an appropriate outlet that is properly earthed.
... accordance with the product-if it must be replaced with a manufacturer-recommended power cord. Power Cord 2. HOW TO USE THE TREADMILL HOW TO PLUG IN THE POWER CORD This product must be earthed. Plug the power cord into the socket on Treadmill DANGER: Improper connection of the power cord into an appropriate outlet that is properly earthed.
Instruction Manual
Page 19
... while you exercise. 19 The first time you exercise, the console will display instant exercise feedback. CONSOLE DIAGRAM FEATURES OF THE CONSOLE The treadmill console offers a selection of features designed to the console, see page 24. You can also connect your workouts more effective and enjoyable. ...onboard workout, see page 20. Note: The console can change which unit of measurement is selected, press the Std/Met button on the power, see page 25. For simplicity, all instructions in either miles or kilometers. To use the manual mode, you through an effective exercise ...
... while you exercise. 19 The first time you exercise, the console will display instant exercise feedback. CONSOLE DIAGRAM FEATURES OF THE CONSOLE The treadmill console offers a selection of features designed to the console, see page 24. You can also connect your workouts more effective and enjoyable. ...onboard workout, see page 20. Note: The console can change which unit of measurement is selected, press the Std/Met button on the power, see page 25. For simplicity, all instructions in either miles or kilometers. To use the manual mode, you through an effective exercise ...
Instruction Manual
Page 20
...2. IMPORTANT: Before you turn off the demo mode, see page 18). When the frame stops moving, the treadmill is not selected, press the Manual button on the treadmill frame near the power cord. Press the power switch into the console. Next, stand on , the screen will light. Then, A insert the key into...position. Each time you insert the key. First, press the Incline increase button once. HOW TO TURN ON THE POWER HOW TO USE THE MANUAL MODE IMPORTANT: If the treadmill has been exposed to cold temperatures, allow it to warm to room temperature before you press one of the buttons...
...2. IMPORTANT: Before you turn off the demo mode, see page 18). When the frame stops moving, the treadmill is not selected, press the Manual button on the treadmill frame near the power cord. Press the power switch into the console. Next, stand on , the screen will light. Then, A insert the key into...position. Each time you insert the key. First, press the Incline increase button once. HOW TO TURN ON THE POWER HOW TO USE THE MANUAL MODE IMPORTANT: If the treadmill has been exposed to cold temperatures, allow it to warm to room temperature before you press one of the buttons...
Instruction Manual
Page 21
...a profile of the incline settings of the Quick Incline buttons. 4. As you exercise, the flashing rectangle will show the approximate number of the treadmill as desired. The My Trail tab will show the approximate amount of the walking belt • Your heart rate (see page 24. The ...Follow your exercise. • The workout intensity bar • The approximate number of calories you have burned • The incline level of the treadmill • The number of vertical meters you have climbed • The speed of calories you complete. The Calorie tab will gradually adjust to the...
...a profile of the incline settings of the Quick Incline buttons. 4. As you exercise, the flashing rectangle will show the approximate number of the treadmill as desired. The My Trail tab will show the approximate amount of the walking belt • Your heart rate (see page 24. The ...Follow your exercise. • The workout intensity bar • The approximate number of calories you have burned • The incline level of the treadmill • The number of vertical meters you have climbed • The speed of calories you complete. The Calorie tab will gradually adjust to the...
Instruction Manual
Page 22
... the Speed button repeatedly until the desired workout appears in a secure place. If you select a calorie workout, the approximate number of the treadmill to zero. Note: If you select an incline workout, the profile in the calorie window. tor, remove the sheets of the workout. To... incline settings of plastic from the console. Insert the key into the off position and unplug the power cord. Select an onboard workout. A moment after you press the button, the treadmill will appear in the matrix. In addition, make sure that your hands. Press the Start button...
... the Speed button repeatedly until the desired workout appears in a secure place. If you select a calorie workout, the approximate number of the treadmill to zero. Note: If you select an incline workout, the profile in the calorie window. tor, remove the sheets of the workout. To... incline settings of plastic from the console. Insert the key into the off position and unplug the power cord. Select an onboard workout. A moment after you press the button, the treadmill will appear in the matrix. In addition, make sure that your hands. Press the Start button...
Instruction Manual
Page 23
... different speed and/or incline setting is an estimate of the number of the workout begins, the treadmill will begin to the speed and incline settings for the next segment, the speed and/or incline ... profile will continue in this way until the last segment of calories you and the treadmill will show D your weight. To resume the workout, press the Start button. however, when the next ...segment of the workout begins, the treadmill will begin to a stop the workout at any time during the workout, the number of ...
... different speed and/or incline setting is an estimate of the number of the workout begins, the treadmill will begin to the speed and incline settings for the next segment, the speed and/or incline ... profile will continue in this way until the last segment of calories you and the treadmill will show D your weight. To resume the workout, press the Start button. however, when the next ...segment of the workout begins, the treadmill will begin to a stop the workout at any time during the workout, the number of ...
Instruction Manual
Page 25
...Exit the settings mode. While the information mode is meant for technicians. THE SETTINGS MODE The console features an information mode that keeps track of treadmill information and allows you exercise, plug a 3.5 mm male to 3.5 mm male audio cable (not included) into the jack on the console ...mode, press the Settings button. To speed up correctly. Note: To purchase an audio cable, see your local electronics store. The treadmill will automatically rise to the maximum incline level and then return to ensure that the audio cable is selected, the display will display ...
...Exit the settings mode. While the information mode is meant for technicians. THE SETTINGS MODE The console features an information mode that keeps track of treadmill information and allows you exercise, plug a 3.5 mm male to 3.5 mm male audio cable (not included) into the jack on the console ...mode, press the Settings button. To speed up correctly. Note: To purchase an audio cable, see your local electronics store. The treadmill will automatically rise to the maximum incline level and then return to ensure that the audio cable is selected, the display will display ...
Instruction Manual
Page 27
...it back, do not pull on the wheels (D), and carefully move the treadmill over an uneven surface. 2 3. While pressing the storage latch with your foot at the left. Then, remove the key and unplug the power cord. Hold the metal frame (A) firmly in the locked position. ...CAUTION: Make sure that the storage latch is in the location shown by the plastic foot rails. Keep the treadmill out of the frame toward yourself. 2 3. ...
...it back, do not pull on the wheels (D), and carefully move the treadmill over an uneven surface. 2 3. While pressing the storage latch with your foot at the left. Then, remove the key and unplug the power cord. Hold the metal frame (A) firmly in the locked position. ...CAUTION: Make sure that the storage latch is in the location shown by the plastic foot rails. Keep the treadmill out of the frame toward yourself. 2 3. ...

Instruction Manual
Page 28
... in, unplug it, wait for five minutes and then press the switch back in . SYMPTOM: The power does not turn on the treadmill 11 frame near the power cord. SYMPTOM: The displays of the treadmill with a soft towel. Next, remove the five #8 x 3/4" Screws (11), and carefully... pivot off position and unplug the power cord. To avoid damage to reduce wear. If the treadmill still will not run, please see page 18). c. First, press the power switch into the console. b. If the power cord is no longer than 5 ft. (1.5 m). Wipe exterior parts...
... in, unplug it, wait for five minutes and then press the switch back in . SYMPTOM: The power does not turn on the treadmill 11 frame near the power cord. SYMPTOM: The displays of the treadmill with a soft towel. Next, remove the five #8 x 3/4" Screws (11), and carefully... pivot off position and unplug the power cord. To avoid damage to reduce wear. If the treadmill still will not run, please see page 18). c. First, press the power switch into the console. b. If the power cord is no longer than 5 ft. (1.5 m). Wipe exterior parts...
Instruction Manual
Page 29
... #8 x 3/4" Screw (11), move the Reed Switch slightly, and then retighten the Screw. Remove the key and UNPLUG THE POWER CORD. When the walking belt is overtightened, treadmill performance may decrease and the walking belt may deteriorate the walking belt and cause excessive wear. b 2-3 in . SYMPTOM: The ...If you should be able to lift each edge of this manual. Make sure that is about 1/8 in the power cord, insert the key, and walk on the treadmill for a few minutes. Your treadmill features a walking belt coated with the Reed Switch. Reattach the Motor Hood (see step 2 on , see ...
... #8 x 3/4" Screw (11), move the Reed Switch slightly, and then retighten the Screw. Remove the key and UNPLUG THE POWER CORD. When the walking belt is overtightened, treadmill performance may decrease and the walking belt may deteriorate the walking belt and cause excessive wear. b 2-3 in . SYMPTOM: The ...If you should be able to lift each edge of this manual. Make sure that is about 1/8 in the power cord, insert the key, and walk on the treadmill for a few minutes. Your treadmill features a walking belt coated with the Reed Switch. Reattach the Motor Hood (see step 2 on , see ...
Instruction Manual
Page 30
... walking platform. if the walking belt has shifted to overtighten the walking belt. Repeat until the tablet holder stays in the power cord, insert the key, and walk on the treadmill for a few minutes. Using the hex key, turn both idler roller screws clockwise, 1/4 of a turn ; a 30 Be careful not to the... faces backward. Rotate the tablet holder (C) until the walking belt is rotated to keep the walking belt centered. First, remove the key and UNPLUG THE POWER CORD. Then, plug in place a. SYMPTOM: The walking belt is centered. SYMPTOM: The tablet holder does not stay in the...
... walking platform. if the walking belt has shifted to overtighten the walking belt. Repeat until the tablet holder stays in the power cord, insert the key, and walk on the treadmill for a few minutes. Using the hex key, turn both idler roller screws clockwise, 1/4 of a turn ; a 30 Be careful not to the... faces backward. Rotate the tablet holder (C) until the walking belt is rotated to keep the walking belt centered. First, remove the key and UNPLUG THE POWER CORD. Then, plug in place a. SYMPTOM: The walking belt is centered. SYMPTOM: The tablet holder does not stay in the...


