
Instruction Manual
Page 2
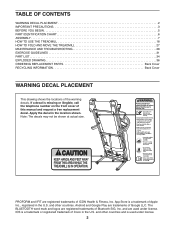
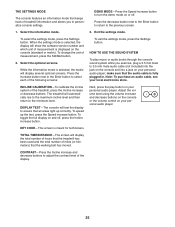
... PRECAUTIONS 3 BEFORE YOU BEGIN 5 PART IDENTIFICATION CHART 6 ASSEMBLY 7 HOW TO USE THE TREADMILL 18 HOW TO FOLD AND MOVE THE TREADMILL 27 MAINTENANCE AND TROUBLESHOOTING 28 EXERCISE GUIDELINES 31 PART LIST 34 EXPLODED DRAWING 36 ORDERING REPLACEMENT PARTS Back Cover RECYCLING INFORMATION Back Cover WARNING DECAL PLACEMENT This drawing shows the locations of Cisco in the U.S. Note: The decals may not be shown at actual size. and are registered trademarks...
... PRECAUTIONS 3 BEFORE YOU BEGIN 5 PART IDENTIFICATION CHART 6 ASSEMBLY 7 HOW TO USE THE TREADMILL 18 HOW TO FOLD AND MOVE THE TREADMILL 27 MAINTENANCE AND TROUBLESHOOTING 28 EXERCISE GUIDELINES 31 PART LIST 34 EXPLODED DRAWING 36 ORDERING REPLACEMENT PARTS Back Cover RECYCLING INFORMATION Back Cover WARNING DECAL PLACEMENT This drawing shows the locations of Cisco in the U.S. Note: The decals may not be shown at actual size. and are registered trademarks...
Instruction Manual
Page 3
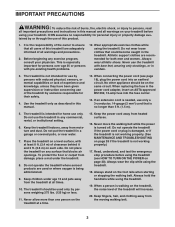
... any exercise program, consult your treadmill. Athletic support clothes are recommended for home use only. The treadmill is not intended for their safety. 4. When replacing the fuse in the power cord adapter, insert an ASTA-approved BS1362, 13-amp fuse into an earthed circuit. Keep the treadmill indoors, away from the moving walking belt. 3 Do not place the treadmill on any commercial, rental, or institutional setting. 6. Do...
... any exercise program, consult your treadmill. Athletic support clothes are recommended for home use only. The treadmill is not intended for their safety. 4. When replacing the fuse in the power cord adapter, insert an ASTA-approved BS1362, 13-amp fuse into an earthed circuit. Keep the treadmill indoors, away from the moving walking belt. 3 Do not place the treadmill on any commercial, rental, or institutional setting. 6. Do...
Instruction Manual
Page 4
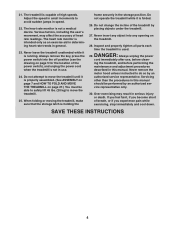
.... Always remove the key, press the power switch into any object into the off position (see the drawing on page 5 for the location of the treadmill by an authorized ser- SAVE THESE INSTRUCTIONS 4 When folding or moving the treadmill, make sure that the storage latch is intended only as an exercise aid in determining heart rate trends in use , before performing the maintenance and adjustment procedures described in speed. 22...
.... Always remove the key, press the power switch into any object into the off position (see the drawing on page 5 for the location of the treadmill by an authorized ser- SAVE THESE INSTRUCTIONS 4 When folding or moving the treadmill, make sure that the storage latch is intended only as an exercise aid in determining heart rate trends in use , before performing the maintenance and adjustment procedures described in speed. 22...
Instruction Manual
Page 5
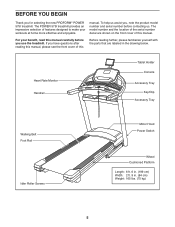
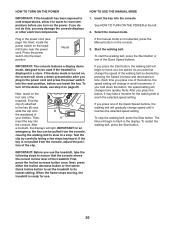
... us . Heart Rate Monitor Handrail Tablet Holder Console Accessory Tray Key/Clip Accessory Tray Walking Belt Foot Rail Idler Roller Screws Motor Hood Power Switch Wheel Cushioned Platform Length: 6 ft. 6 in. (199 cm) Width: 2 ft. 9 in the drawing below. manual. BEFORE YOU BEGIN Thank you have questions after reading this manual, please see the front cover of features designed to make your benefit, read this manual carefully...
... us . Heart Rate Monitor Handrail Tablet Holder Console Accessory Tray Key/Clip Accessory Tray Walking Belt Foot Rail Idler Roller Screws Motor Hood Power Switch Wheel Cushioned Platform Length: 6 ft. 6 in. (199 cm) Width: 2 ft. 9 in the drawing below. manual. BEFORE YOU BEGIN Thank you have questions after reading this manual, please see the front cover of features designed to make your benefit, read this manual carefully...
Instruction Manual
Page 7
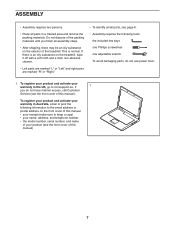
... until you do not use power tools. 1. ASSEMBLY • Assembly requires two persons. • Place all assembly steps. • After shipping, there may be an oily substance on the front cover of this manual. • your receipt (make sure to keep a copy) • your name, address, and telephone number • the model number, serial number, and name of your warranty in the UK, go...
... until you do not use power tools. 1. ASSEMBLY • Assembly requires two persons. • Place all assembly steps. • After shipping, there may be an oily substance on the front cover of this manual. • your receipt (make sure to keep a copy) • your name, address, and telephone number • the model number, serial number, and name of your warranty in the UK, go...
Instruction Manual
Page 12
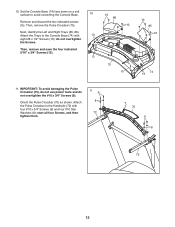
...) with 13 eight #8 x 1/2" Screws (10); start all four Screws, and then tighten them. 11 9 8 72 75 9 8 72 12 Attach the Pulse Crossbar to the Console Base (74) with four #10 x 3/4" Screws (9) and four #10 Star Washers (8); Set the Console Base (74) face down on a soft surface to avoid scratching the Console Base. 10 Remove and discard the two indicated screws (G). do not overtighten...
...) with 13 eight #8 x 1/2" Screws (10); start all four Screws, and then tighten them. 11 9 8 72 75 9 8 72 12 Attach the Pulse Crossbar to the Console Base (74) with four #10 x 3/4" Screws (9) and four #10 Star Washers (8); Set the Console Base (74) face down on a soft surface to avoid scratching the Console Base. 10 Remove and discard the two indicated screws (G). do not overtighten...

Instruction Manual
Page 13
... YOU TURN ON THE POWER. Insert the excess Upright Wire (80) into place. Next, tighten the two ties (J) around the Upright Wire, and cut off the ends of a second person, hold the console assembly (H) near the Handrails (72). Set the console assembly (H) on the Pulse Crossbar (75). Next, insert the Upright Wire (80) through the two indicated looped ties (J). Then, attach the console assembly (H) with the four 5/16" x 3/4" Screws...
... YOU TURN ON THE POWER. Insert the excess Upright Wire (80) into place. Next, tighten the two ties (J) around the Upright Wire, and cut off the ends of a second person, hold the console assembly (H) near the Handrails (72). Set the console assembly (H) on the Pulse Crossbar (75). Next, insert the Upright Wire (80) through the two indicated looped ties (J). Then, attach the console assembly (H) with the four 5/16" x 3/4" Screws...

Instruction Manual
Page 17
... to pivot. Keep the included hex key in the console assembly (H). Next, tighten the 5/16" Nut (51) onto the 5/16" x 2 1/4" Bolt (98). IMPORTANT: The Tablet Holder (26) is used to the console, keep the treadmill out of the Storage Latch (52) with most full-size tablets. Make sure that all parts are sheets of the Storage Latch; 20. Remove the 5/16" Nut (51) and the...
... to pivot. Keep the included hex key in the console assembly (H). Next, tighten the 5/16" Nut (51) onto the 5/16" x 2 1/4" Bolt (98). IMPORTANT: The Tablet Holder (26) is used to the console, keep the treadmill out of the Storage Latch (52) with most full-size tablets. Make sure that all parts are sheets of the Storage Latch; 20. Remove the 5/16" Nut (51) and the...
Instruction Manual
Page 18
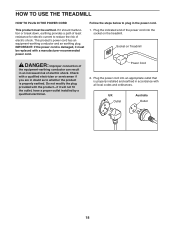
... on Treadmill DANGER: Improper connection of electric shock. UK Outlet Australia Outlet 18 This product's power cord has an equipment-earthing conductor and an earthing plug. Check with all local codes and ordinances. Power Cord 2. Follow the steps below to plug in doubt as to reduce the risk of electric shock. If it will not fit the outlet, have a proper outlet installed...
... on Treadmill DANGER: Improper connection of electric shock. UK Outlet Australia Outlet 18 This product's power cord has an equipment-earthing conductor and an earthing plug. Check with all local codes and ordinances. Power Cord 2. Follow the steps below to plug in doubt as to reduce the risk of electric shock. If it will not fit the outlet, have a proper outlet installed...
Instruction Manual
Page 19
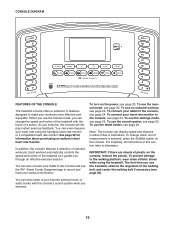
... change the speed and incline of the treadmill with the console's sound system while you exercise, the console will display instant exercise feedback. The first time you use the iFit®-Smart Cardio Equipment app to record and track your heart rate using the treadmill. To connect your favorite workout music or audio books with the touch of a button. For simplicity, all instructions in either miles or kilometers. Each workout automatically controls the speed and incline of...
... change the speed and incline of the treadmill with the console's sound system while you exercise, the console will display instant exercise feedback. The first time you use the iFit®-Smart Cardio Equipment app to record and track your heart rate using the treadmill. To connect your favorite workout music or audio books with the touch of a button. For simplicity, all instructions in either miles or kilometers. Each workout automatically controls the speed and incline of...
Instruction Manual
Page 20
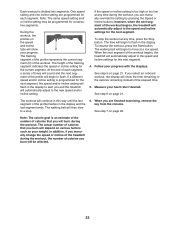
... a stop the walking belt, press the Stop button. Next, press either the Incline decrease button or the lowest Quick Incline button to set the treadmill to ensure that the console shows the correct incline level of the clip. See HOW TO TURN ON THE POWER at a low speed. Select the manual mode. Next, stand on page 25. After a moment, the displays will change speed until it reaches the selected speed setting. Plug in the power cord (see step 2 on...
... a stop the walking belt, press the Stop button. Next, press either the Incline decrease button or the lowest Quick Incline button to set the treadmill to ensure that the console shows the correct incline level of the clip. See HOW TO TURN ON THE POWER at a low speed. Select the manual mode. Next, stand on page 25. After a moment, the displays will change speed until it reaches the selected speed setting. Plug in the power cord (see step 2 on...
Instruction Manual
Page 21
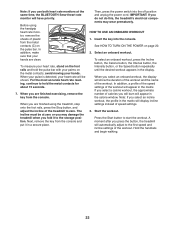
... m (1/4 mile). To reset the displays, press the Stop button repeatedly. 6. As you exercise, the flashing rectangle will show your progress with all BLUETOOTH® Smart heart rate monitors. Change the incline of the workout. 4. Measure your exercise. • The workout intensity bar • The approximate number of calories you have burned • The incline level of the treadmill • The number of vertical meters you press one of the workout. 21 To change...
... m (1/4 mile). To reset the displays, press the Stop button repeatedly. 6. As you exercise, the flashing rectangle will show your progress with all BLUETOOTH® Smart heart rate monitors. Change the incline of the workout. 4. Measure your exercise. • The workout intensity bar • The approximate number of calories you have burned • The incline level of the treadmill • The number of vertical meters you press one of the workout. 21 To change...
Instruction Manual
Page 22
... the treadmill to the storage position. To select an onboard workout, press the Incline button, the Calorie button, the Interval button, the Intensity button, or the Speed button repeatedly until the desired workout appears in the matrix will have priority. Before using the treadmill, step onto the foot rails, press the Stop button, and adjust the incline of the workout. See HOW TO TURN ON THE POWER on C the pulse bar. Note: If you use both heart rate monitors...
... the treadmill to the storage position. To select an onboard workout, press the Incline button, the Calorie button, the Interval button, the Intensity button, or the Speed button repeatedly until the desired workout appears in the matrix will have priority. Before using the treadmill, step onto the foot rails, press the Stop button, and adjust the incline of the workout. See HOW TO TURN ON THE POWER on C the pulse bar. Note: If you use both heart rate monitors...
Instruction Manual
Page 23
... time, press the Stop button. To resume the workout, press the Start button. The walking belt will then slow to move at a low speed. See step 7 on various factors such as your progress. The actual number of the profile flashes in the display. If the speed or incline setting is programmed for the current segment. ment (D) of calories you manually change the speed or incline of the treadmill during the workout. Follow your heart rate if...
... time, press the Stop button. To resume the workout, press the Start button. The walking belt will then slow to move at a low speed. See step 7 on various factors such as your progress. The actual number of the profile flashes in the display. If the speed or incline setting is programmed for the current segment. ment (D) of calories you manually change the speed or incline of the treadmill during the workout. Follow your heart rate if...
Instruction Manual
Page 25
... track of measurement, press the Std/Met button. 2. To change the unit of treadmill information and allows you exercise, plug a 3.5 mm male to turn the demo mode on your local electronics store. Next, press the play music or audio books through the console sound system while you to adjust the contrast level of miles (or kilometers) that the treadmill has been used and the total number of the display. 25 KEY CODE...
... track of measurement, press the Std/Met button. 2. To change the unit of treadmill information and allows you exercise, plug a 3.5 mm male to turn the demo mode on your local electronics store. Next, press the play music or audio books through the console sound system while you to adjust the contrast level of miles (or kilometers) that the treadmill has been used and the total number of the display. 25 KEY CODE...
Instruction Manual
Page 27
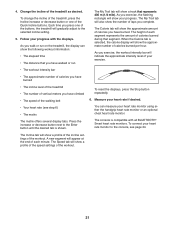
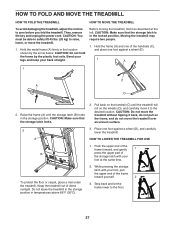
... upper end of direct sunlight. CAUTION: Make sure that the storage latch locks. 2. Pull back on the handrail (C) until the storage latch (B) locks in temperatures above 85°F (30°C). 2. HOW TO FOLD AND MOVE THE TREADMILL HOW TO FOLD THE TREADMILL HOW TO MOVE THE TREADMILL To avoid damaging the treadmill, adjust the incline to the floor. 27 A HOW TO LOWER THE TREADMILL FOR USE 1. CAUTION: Do...
... upper end of direct sunlight. CAUTION: Make sure that the storage latch locks. 2. Pull back on the handrail (C) until the storage latch (B) locks in temperatures above 85°F (30°C). 2. HOW TO FOLD AND MOVE THE TREADMILL HOW TO FOLD THE TREADMILL HOW TO MOVE THE TREADMILL To avoid damaging the treadmill, adjust the incline to the floor. 27 A HOW TO LOWER THE TREADMILL FOR USE 1. CAUTION: Do...

Instruction Manual
Page 28
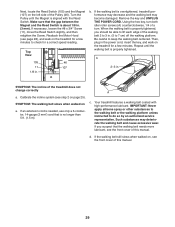
... left). b. Remove the key from the console, and then reinsert it back in . Regularly clean the treadmill and keep liquids away from the console. Check the power switch located on a. Wipe exterior parts of the treadmill with a soft towel. c. d. a 57 11 11 11 b. c. c Tripped Reset 28 If an extension cord is needed , see the front cover of this manual. MAINTENANCE AND TROUBLESHOOTING MAINTENANCE SYMPTOM: The power turns off during use only...
... left). b. Remove the key from the console, and then reinsert it back in . Regularly clean the treadmill and keep liquids away from the console. Check the power switch located on a. Wipe exterior parts of the treadmill with a soft towel. c. d. a 57 11 11 11 b. c. c Tripped Reset 28 If an extension cord is needed , see the front cover of this manual. MAINTENANCE AND TROUBLESHOOTING MAINTENANCE SYMPTOM: The power turns off during use only...
Instruction Manual
Page 29
... until the Magnet is properly tightened. A c. d. Reattach the Motor Hood (see step 2 on page 25). b. Then, plug in the power cord, insert the key, and walk on a. Calibrate the incline system (see page 28), and walk on , see the front cover of a turn both idler roller screws (A) counterclockwise, 1/4 of this manual. 29 Remove the key and UNPLUG THE POWER CORD. b 2-3 in . SYMPTOM: The walking belt slows when walked on the treadmill for a few minutes to...
... until the Magnet is properly tightened. A c. d. Reattach the Motor Hood (see step 2 on page 25). b. Then, plug in the power cord, insert the key, and walk on a. Calibrate the incline system (see page 28), and walk on , see the front cover of a turn both idler roller screws (A) counterclockwise, 1/4 of this manual. 29 Remove the key and UNPLUG THE POWER CORD. b 2-3 in . SYMPTOM: The walking belt slows when walked on the treadmill for a few minutes to...
Instruction Manual
Page 31
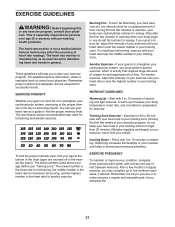
.... The three numbers listed above your age define your physician. During the first few minutes of stretching and light exercise. For maximum fat burning, exercise with pre-existing health problems. The heart rate monitor is the key to achieving results. WORKOUT GUIDELINES Warming Up-Start with 5 to 10 minutes of exercise does your heart rate as an exercise aid in determining heart rate trends in your training zone. (During...
.... The three numbers listed above your age define your physician. During the first few minutes of stretching and light exercise. For maximum fat burning, exercise with pre-existing health problems. The heart rate monitor is the key to achieving results. WORKOUT GUIDELINES Warming Up-Start with 5 to 10 minutes of exercise does your heart rate as an exercise aid in determining heart rate trends in your training zone. (During...
Instruction Manual
Page 40
... assist you, be prepared to provide the following information when contacting us: • the model number and serial number of the product (see the front cover of this manual) • the name of the product (see the front cover of this manual) • the key number and description of the replacement part(s) (see the front cover of this product. In doing so, you require...
... assist you, be prepared to provide the following information when contacting us: • the model number and serial number of the product (see the front cover of this manual) • the name of the product (see the front cover of this manual) • the key number and description of the replacement part(s) (see the front cover of this product. In doing so, you require...

