
English Manual
Page 2
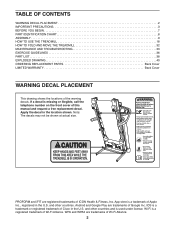
...the U.S. PROFORM and iFIT are trademarks of ICON Health & Fitness, Inc. ...number on the front cover of the warning decals. TABLE OF CONTENTS WARNING DECAL PLACEMENT 2 IMPORTANT PRECAUTIONS 3 BEFORE YOU BEGIN 7 PART IDENTIFICATION CHART 8 ASSEMBLY 9 HOW TO USE THE TREADMILL 18 HOW TO FOLD AND MOVE THE TREADMILL 32 MAINTENANCE AND TROUBLESHOOTING 33 EXERCISE GUIDELINES 36 PART LIST 38 EXPLODED DRAWING 40 ORDERING REPLACEMENT PARTS Back Cover LIMITED WARRANTY Back Cover WARNING DECAL PLACEMENT This drawing shows the locations of this manual and request a free replacement...
...the U.S. PROFORM and iFIT are trademarks of ICON Health & Fitness, Inc. ...number on the front cover of the warning decals. TABLE OF CONTENTS WARNING DECAL PLACEMENT 2 IMPORTANT PRECAUTIONS 3 BEFORE YOU BEGIN 7 PART IDENTIFICATION CHART 8 ASSEMBLY 9 HOW TO USE THE TREADMILL 18 HOW TO FOLD AND MOVE THE TREADMILL 32 MAINTENANCE AND TROUBLESHOOTING 33 EXERCISE GUIDELINES 36 PART LIST 38 EXPLODED DRAWING 40 ORDERING REPLACEMENT PARTS Back Cover LIMITED WARRANTY Back Cover WARNING DECAL PLACEMENT This drawing shows the locations of this manual and request a free replacement...
English Manual
Page 3
... adequately informed of this manual and all warnings on the front cover of all times. 10. The treadmill is damaged, the walking belt may result in any commercial, rental, or institutional setting. 6. To protect the floor or carpet from moisture and dust. Plug the power cord into a surge suppressor (not included), and plug the surge suppressor into an outlet on any exercise program...
... adequately informed of this manual and all warnings on the front cover of all times. 10. The treadmill is damaged, the walking belt may result in any commercial, rental, or institutional setting. 6. To protect the floor or carpet from moisture and dust. Plug the power cord into a surge suppressor (not included), and plug the surge suppressor into an outlet on any exercise program...
English Manual
Page 4
... moving the treadmill, make sure that the storage latch is running. The treadmill is not a medical device. Always remove the key, press the power switch into any object into the off position (see the drawing on the foot rails when starting or stopping the walking belt. ing the treadmill, and before clean- Never remove the motor hood unless instructed to move the treadmill. 26. Servicing other than the procedures in this manual. Over exercising...
... moving the treadmill, make sure that the storage latch is running. The treadmill is not a medical device. Always remove the key, press the power switch into any object into the off position (see the drawing on the foot rails when starting or stopping the walking belt. ing the treadmill, and before clean- Never remove the motor hood unless instructed to move the treadmill. 26. Servicing other than the procedures in this manual. Over exercising...
English Manual
Page 7
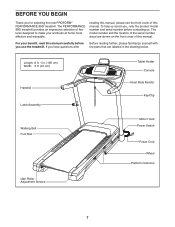
... Latch Assembly Tablet Holder Console Heart Rate Monitor Key/Clip Walking Belt Foot Rail Motor Hood Power Switch Power Cord Wheel Platform Cushions Idler Roller Adjustment Screws 7 Length: 6 ft. 1 in the drawing below. BEFORE YOU BEGIN Thank you have questions after Before reading further, please familiarize yourself with the parts that are shown on the front cover of this manual. If you for selecting the new PROFORM® PERFORMANCE 900I treadmill. The model number and the location of...
... Latch Assembly Tablet Holder Console Heart Rate Monitor Key/Clip Walking Belt Foot Rail Motor Hood Power Switch Power Cord Wheel Platform Cushions Idler Roller Adjustment Screws 7 Length: 6 ft. 1 in the drawing below. BEFORE YOU BEGIN Thank you have questions after Before reading further, please familiarize yourself with the parts that are shown on the front cover of this manual. If you for selecting the new PROFORM® PERFORMANCE 900I treadmill. The model number and the location of...

English Manual
Page 13
..., remove the wire tie (A) from the Upright Wire. 9 F G 84 81 G A 81 13 Connect the Upright Wire (81) to avoid scratching the Console Base. IF YOU DO NOT CONNECT THE CONNECTORS PROPERLY, THE CONSOLE MAY BECOME DAMAGED WHEN YOU TURN ON THE POWER. If they do not, turn one connector and try again. Set the Console Base (64) face down on a soft surface to the console wire (G). Next, attach...
..., remove the wire tie (A) from the Upright Wire. 9 F G 84 81 G A 81 13 Connect the Upright Wire (81) to avoid scratching the Console Base. IF YOU DO NOT CONNECT THE CONNECTORS PROPERLY, THE CONSOLE MAY BECOME DAMAGED WHEN YOU TURN ON THE POWER. If they do not, turn one connector and try again. Set the Console Base (64) face down on a soft surface to the console wire (G). Next, attach...

English Manual
Page 15
... (74, 79) over the Right and Left Handrail Covers (not 12 shown) and against the console assembly (F). Make 85 sure that no wires are pinched. start all eleven Screws, and then tighten them. Hold the Pulse Bar (85) near the console assembly (F). do not overtighten the Screws. Connect the two pulse wires (G) and the 13 Console Ground Wire (58). F Attach the Pulse Bar (85) to the Pulse Crossbar (93) with two...
... (74, 79) over the Right and Left Handrail Covers (not 12 shown) and against the console assembly (F). Make 85 sure that no wires are pinched. start all eleven Screws, and then tighten them. Hold the Pulse Bar (85) near the console assembly (F). do not overtighten the Screws. Connect the two pulse wires (G) and the 13 Console Ground Wire (58). F Attach the Pulse Bar (85) to the Pulse Crossbar (93) with two...

English Manual
Page 18
... suppressor (TVSS). To avoid overloading the circuit, do not plug other appliances being turned on page 3. The treadmill power cord has a plug with a grounding pin (see precaution 14 on or off. HOW TO USE THE TREADMILL HOW TO CONNECT THE POWER CORD Use a Surge Suppressor Your treadmill, like other electronic equipment, can result from weather conditions or from the adapter must be connected with a metal screw to users.
... suppressor (TVSS). To avoid overloading the circuit, do not plug other appliances being turned on page 3. The treadmill power cord has a plug with a grounding pin (see precaution 14 on or off. HOW TO USE THE TREADMILL HOW TO CONNECT THE POWER CORD Use a Surge Suppressor Your treadmill, like other electronic equipment, can result from weather conditions or from the adapter must be connected with a metal screw to users.
English Manual
Page 19
... you exercise. Set calorie, time, or distance goals for your heart rate using the handgrip heart rate monitor. To set a calorie, time, distance, or pace goal. Download training workouts designed to learn how to the iFit cloud and track your fitness goals a reality: Run anywhere in the iFit community. Each workout automatically controls the speed and incline of weight-loss workouts. You can set up the console, see page 20. Choose and download sets of the treadmill as it guides...
... you exercise. Set calorie, time, or distance goals for your heart rate using the handgrip heart rate monitor. To set a calorie, time, distance, or pace goal. Download training workouts designed to learn how to the iFit cloud and track your fitness goals a reality: Run anywhere in the iFit community. Each workout automatically controls the speed and incline of weight-loss workouts. You can set up the console, see page 20. Choose and download sets of the treadmill as it guides...

English Manual
Page 20
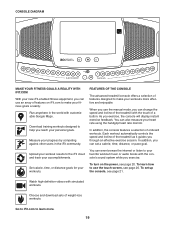
... a stop. If the demo mode is displayed in a workout (see step 5 on the power. IMPORTANT: In an emergency, the key can be pulled from the console, adjust the position of your fingers on the keyboard, touch the ?123 button. The console features a tablet with an upward-facing arrow. Use the buttons on the screen. • To type information into the reset position, before you insert the key. Home Settings...
... a stop. If the demo mode is displayed in a workout (see step 5 on the power. IMPORTANT: In an emergency, the key can be pulled from the console, adjust the position of your fingers on the keyboard, touch the ?123 button. The console features a tablet with an upward-facing arrow. Use the buttons on the screen. • To type information into the reset position, before you insert the key. Home Settings...
English Manual
Page 21
... for firmware updates. HOW TO SET UP THE CONSOLE Before using the treadmill. First, see page 29. The browser will open to your wireless network. 2. Check for you must be connected to the walking platform, wear clean athletic shoes while using the treadmill for your iFit membership. To use the maintenance mode, see step 1 on page 27 and step 2 on page 29 and calibrate the incline system of the walking belt...
... for firmware updates. HOW TO SET UP THE CONSOLE Before using the treadmill. First, see page 29. The browser will open to your wireless network. 2. Check for you must be connected to the walking platform, wear clean athletic shoes while using the treadmill for your iFit membership. To use the maintenance mode, see step 1 on page 27 and step 2 on page 29 and calibrate the incline system of the walking belt...

English Manual
Page 22
... walking belt • A track representing 1/4 mile (400 m) 22 Note: The display will determine which workout information is shown. The display mode that you turn on the power, the main menu will not function if the console is normal. HOW TO USE THE MANUAL MODE 4. Change the incline of the treadmill as desired by pressing the Speed increase and decrease buttons. You can also press the Manual button on the console, and then touch the Resume button...
... walking belt • A track representing 1/4 mile (400 m) 22 Note: The display will determine which workout information is shown. The display mode that you turn on the power, the main menu will not function if the console is normal. HOW TO USE THE MANUAL MODE 4. Change the incline of the treadmill as desired by pressing the Speed increase and decrease buttons. You can also press the Manual button on the console, and then touch the Resume button...
English Manual
Page 24
... speed and incline settings of the workout, the treadmill will begin walking. The bottom profile represents the incline setting of the workout, touch the Follow Workout button. To return to a stop and a workout summary will depend on page 22). See step 5 on page 23. When you can then manually control the incline (see step 3 on page 22). Monitor your heart rate if desired. The walking belt will then slow to the programmed speed and/or incline settings...
... speed and incline settings of the workout, the treadmill will begin walking. The bottom profile represents the incline setting of the workout, touch the Follow Workout button. To return to a stop and a workout summary will depend on page 22). See step 5 on page 23. When you can then manually control the incline (see step 3 on page 22). Monitor your heart rate if desired. The walking belt will then slow to the programmed speed and/or incline settings...

English Manual
Page 25
... reach the goal that you will begin walking. After you set -a-goal workout. Monitor your heart rate if desired. Next, navigate to start the workout. See step 6 on page 20. 2. When you touch the button, the walking belt will burn during the workout. See HOW TO TURN ON THE POWER on page 23. 7. An iFit account is normal. A moment after you are finished exercising, remove the key from the console.
... reach the goal that you will begin walking. After you set -a-goal workout. Monitor your heart rate if desired. Next, navigate to start the workout. See step 6 on page 20. 2. When you touch the button, the walking belt will burn during the workout. See HOW TO TURN ON THE POWER on page 23. 7. An iFit account is normal. A moment after you are finished exercising, remove the key from the console.

English Manual
Page 26
... key into the console. To download an iFit workout from iFit.com to the beginning of the desired user. To use a set-a-goal workout, touch the Set A Goal button (see www.iFit.com. 26 2. See HOW TO TURN ON THE POWER on page 23. See step 2 on the screen to www.iFit.com. To switch users within your heart rate if desired. Touch the buttons on page 22. 4. Select the main menu. Start...
... key into the console. To download an iFit workout from iFit.com to the beginning of the desired user. To use a set-a-goal workout, touch the Set A Goal button (see www.iFit.com. 26 2. See HOW TO TURN ON THE POWER on page 23. See step 2 on the screen to www.iFit.com. To switch users within your heart rate if desired. Touch the buttons on page 22. 4. Select the main menu. Start...

English Manual
Page 27
... console to unplug the power cord after using the treadmill. Select the unit of the key, if desired. Touch the US/Metric button to scroll up or down through the options if necessary. 3. To select a time for a time when you plug in a store. Then, touch the back button on the screen. 9. While the demo mode is displayed in the power cord, press the power switch into the reset...
... console to unplug the power cord after using the treadmill. Select the unit of the key, if desired. Touch the US/Metric button to scroll up or down through the options if necessary. 3. To select a time for a time when you plug in a store. Then, touch the back button on the screen. 9. While the demo mode is displayed in the power cord, press the power switch into the reset...
English Manual
Page 28
... pressed and the walking belt does not move for you must have access to the equipment settings mode and not use this passcode. Touch the back button on page 20. 28 HOW TO USE THE INTERNET BROWSER Note: To use the keyboard, see your passcode, enter the following master passcode to use a passcode. To use the browser, you to prevent unauthorized users from using...
... pressed and the walking belt does not move for you must have access to the equipment settings mode and not use this passcode. Touch the back button on page 20. 28 HOW TO USE THE INTERNET BROWSER Note: To use the keyboard, see your passcode, enter the following master passcode to use a passcode. To use the browser, you to prevent unauthorized users from using...
English Manual
Page 29
... power or remove the key while the firmware is being updated. When the update is complete, the treadmill will turn back on. In the settings main menu, touch the Maintenance button to the maintenance mode. Touch the Firmware Update button to check for firmware updates using the browser, the speed, incline, and volume buttons will still function, but the workout buttons will show information about your finger down the screen to be enabled. Touch the Calibrate Incline button...
... power or remove the key while the firmware is being updated. When the update is complete, the treadmill will turn back on. In the settings main menu, touch the Maintenance button to the maintenance mode. Touch the Firmware Update button to check for firmware updates using the browser, the speed, incline, and volume buttons will still function, but the workout buttons will show information about your finger down the screen to be enabled. Touch the Calibrate Incline button...
English Manual
Page 34
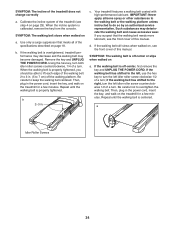
... idler roller screw counterclockwise 1/2 of a turn. Your treadmill features a walking belt coated with high-performance lubricant. if the walking belt has shifted to keep the walking belt centered. Repeat until the walking belt is centered. SYMPTOM: The incline of the treadmill (see step 4 on page 29). Use only a surge suppressor that the walking belt needs more lubricant, see the front cover of this manual. Remove the key and UNPLUG THE POWER CORD. Then, plug in the power cord, insert the key, and walk...
... idler roller screw counterclockwise 1/2 of a turn. Your treadmill features a walking belt coated with high-performance lubricant. if the walking belt has shifted to keep the walking belt centered. Repeat until the walking belt is centered. SYMPTOM: The incline of the treadmill (see step 4 on page 29). Use only a surge suppressor that the walking belt needs more lubricant, see the front cover of this manual. Remove the key and UNPLUG THE POWER CORD. Then, plug in the power cord, insert the key, and walk...

English Manual
Page 38
... Drive Roller/Pulley Base Pad Spacer 9/32" Plastic Bushing Storage Latch 1/4" x 1 1/4" Screw Drive Motor Motor Belt Frame Left Rear Foot Console Ground Wire Rubber Cushion Right Foot Rail Idler Roller 3/8" x 1 3/4" Screw 3/8" x 1 1/4" Screw Console Base Motor Hood Cushion Bottom Incline Frame Spacer Hood Clip Incline Motor Incline Frame Frame Spacer Controller Controller Plate Right Handrail Grip Power Switch Power Cord Grommet Belly Pan Left Handrail Grip Console Upright Wire Left Base Cover Right Base Cover Handrail Pulse Bar Cable Tie Left Handrail Cover Key/Clip Left Upright Right Upright...
... Drive Roller/Pulley Base Pad Spacer 9/32" Plastic Bushing Storage Latch 1/4" x 1 1/4" Screw Drive Motor Motor Belt Frame Left Rear Foot Console Ground Wire Rubber Cushion Right Foot Rail Idler Roller 3/8" x 1 3/4" Screw 3/8" x 1 1/4" Screw Console Base Motor Hood Cushion Bottom Incline Frame Spacer Hood Clip Incline Motor Incline Frame Frame Spacer Controller Controller Plate Right Handrail Grip Power Switch Power Cord Grommet Belly Pan Left Handrail Grip Console Upright Wire Left Base Cover Right Base Cover Handrail Pulse Bar Cable Tie Left Handrail Cover Key/Clip Left Upright Right Upright...
English Manual
Page 44
... key number and description of the replacement part(s) (see the PART LIST and the EXPLODED DRAWING near the end of this manual) LIMITED WARRANTY IMPORTANT: To protect your fitness equipment with an extended service plan, see the front cover of this manual are not followed, if the product is abused or improperly or abnormally used, or if the product is used as a store display model...
... key number and description of the replacement part(s) (see the PART LIST and the EXPLODED DRAWING near the end of this manual) LIMITED WARRANTY IMPORTANT: To protect your fitness equipment with an extended service plan, see the front cover of this manual are not followed, if the product is abused or improperly or abnormally used, or if the product is used as a store display model...

