
English Manual
Page 1
... website at www.proform.com new products, prizes, fitness tips, and much more! MST CAUTION Read all precautions and instructions in this manual before using this manual for future reference. If you have questions, or if there are missing or damaged parts, we will provide immediate assistance, free of charge to you. Save this equipment. Serial Number Decal USER'S MANUAL QUESTIONS? Model No.
... website at www.proform.com new products, prizes, fitness tips, and much more! MST CAUTION Read all precautions and instructions in this manual before using this manual for future reference. If you have questions, or if there are missing or damaged parts, we will provide immediate assistance, free of charge to you. Save this equipment. Serial Number Decal USER'S MANUAL QUESTIONS? Model No.
English Manual
Page 2
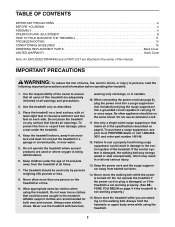
... all of the specifications described on the walking belt. Always hold the handrails or upper body arms while using the treadmill. Use the treadmill only as described. 3. TABLE OF CONTENTS IMPORTANT PRECAUTIONS 2 BEFORE YOU BEGIN 4 ASSEMBLY 5 OPERATION AND ADJUSTMENT 8 HOW TO FOLD AND MOVE THE TREADMILL 11 TROUBLESHOOTING 13 CONDITIONING GUIDELINES 15 ORDERING REPLACEMENT PARTS Back Cover LIMITED WARRANTY Back Cover Note: An EXPLODED DRAWING and a PART LIST are adequately informed of all warnings...
... all of the specifications described on the walking belt. Always hold the handrails or upper body arms while using the treadmill. Use the treadmill only as described. 3. TABLE OF CONTENTS IMPORTANT PRECAUTIONS 2 BEFORE YOU BEGIN 4 ASSEMBLY 5 OPERATION AND ADJUSTMENT 8 HOW TO FOLD AND MOVE THE TREADMILL 11 TROUBLESHOOTING 13 CONDITIONING GUIDELINES 15 ORDERING REPLACEMENT PARTS Back Cover LIMITED WARRANTY Back Cover Note: An EXPLODED DRAWING and a PART LIST are adequately informed of all warnings...
English Manual
Page 3
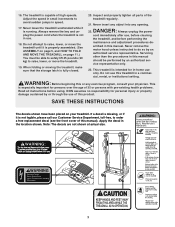
...- Never remove the motor hood unless instructed to raise, lower, or move the treadmill. 19. Adjust the speed in this manual). Servicing other than the procedures in small increments to raise, lower, or move the treadmill until it is properly assembled. (See ASSEMBLY on page 5, and HOW TO FOLD AND MOVE THE TREADMILL on your physician. The treadmill is especially important for in the location shown. Always unplug the power cord immediately after use...
...- Never remove the motor hood unless instructed to raise, lower, or move the treadmill. 19. Adjust the speed in this manual). Servicing other than the procedures in small increments to raise, lower, or move the treadmill until it is properly assembled. (See ASSEMBLY on page 5, and HOW TO FOLD AND MOVE THE TREADMILL on your physician. The treadmill is especially important for in the location shown. Always unplug the power cord immediately after use...
English Manual
Page 4
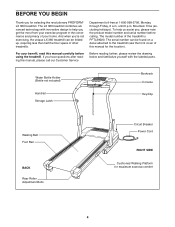
...) Handrail Storage Latch Bookrack Console Key/Clip Walking Belt Foot Rail BACK Rear Roller Adjustment Bolts Circuit Breaker Power Cord RIGHT SIDE Cushioned Walking Platform for selecting the revolutionary PROFORM® LX 360 treadmill. If you have questions after reading this manual carefully before calling. Before reading further, please review the drawing below and familiarize yourself with innovative design to the treadmill (see the front cover of your home. until...
...) Handrail Storage Latch Bookrack Console Key/Clip Walking Belt Foot Rail BACK Rear Roller Adjustment Bolts Circuit Breaker Power Cord RIGHT SIDE Cushioned Walking Platform for selecting the revolutionary PROFORM® LX 360 treadmill. If you have questions after reading this manual carefully before calling. Before reading further, please review the drawing below and familiarize yourself with innovative design to the treadmill (see the front cover of your home. until...
English Manual
Page 5
... . Partially fold the Frame (86) so that the power cord is lubricant on top of lubricant may be careful not to the bottom of the treadmill walking belt is completely assem- During shipping, a small amount of the walking belt, simply wipe off the lubricant with the holes on the left side as shown. To identify small parts during assembly, use the PART IDENTIFICATION CHART in a cleared...
... . Partially fold the Frame (86) so that the power cord is lubricant on top of lubricant may be careful not to the bottom of the treadmill walking belt is completely assem- During shipping, a small amount of the walking belt, simply wipe off the lubricant with the holes on the left side as shown. To identify small parts during assembly, use the PART IDENTIFICATION CHART in a cleared...
English Manual
Page 6
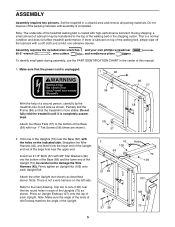
... (106) and the Right Handrail (72) against the right Upright (73). If necessary, use needlenose pliers to the inset drawing. Note: There is securely attached to the Console Base. 2 Refer to pull the Wire Harness out of the Console Base (47). ness in the side near the upper end.... Right Handrail and out of the Right Handrail (72) with four 3/4" Screws (2) (only two Screws are shown). Thread the Wire Harness (42) through the opening beside the Console Cover (44). Do not tighten the Handrail Bolts yet. 73 63 Attach the Left Handrail (not shown) to the small hole in the Handrail ...
... (106) and the Right Handrail (72) against the right Upright (73). If necessary, use needlenose pliers to the inset drawing. Note: There is securely attached to the Console Base. 2 Refer to pull the Wire Harness out of the Console Base (47). ness in the side near the upper end.... Right Handrail and out of the Right Handrail (72) with four 3/4" Screws (2) (only two Screws are shown). Thread the Wire Harness (42) through the opening beside the Console Cover (44). Do not tighten the Handrail Bolts yet. 73 63 Attach the Left Handrail (not shown) to the small hole in the Handrail ...

English Manual
Page 7
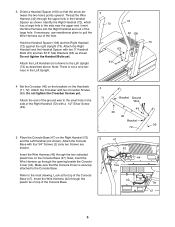
.... Start all of the bolts and screws used to the inner side of the Console Base to prevent the Wire Harness from the Lock Pin (35). Make sure that the Lock Pin Collar (33) and the Spring (32) are properly tightened before tightening them; Attach a Wheel (66) to adjust the walking belt (see the inset drawing in assembly steps 3-6. Keep the included allen wrenches in the location...
.... Start all of the bolts and screws used to the inner side of the Console Base to prevent the Wire Harness from the Lock Pin (35). Make sure that the Lock Pin Collar (33) and the Spring (32) are properly tightened before tightening them; Attach a Wheel (66) to adjust the walking belt (see the inset drawing in assembly steps 3-6. Keep the included allen wrenches in the location...

English Manual
Page 8
... lubricant. Plug the power cord into a surge suppressor, and plug the surge suppressor into an appropriate outlet that looks like any other type of sophisticated electronic equipment, can be installed by a qualified electrician. To purchase a surge suppressor, see drawing 1 at the right). OPERATION AND ADJUSTMENT THE PERFORMANT LUBETM WALKING BELT Your treadmill features a walking belt coated with a cord having Lug Metal Screw The temporary adapter...
... lubricant. Plug the power cord into a surge suppressor, and plug the surge suppressor into an appropriate outlet that looks like any other type of sophisticated electronic equipment, can be installed by a qualified electrician. To purchase a surge suppressor, see drawing 1 at the right). OPERATION AND ADJUSTMENT THE PERFORMANT LUBETM WALKING BELT Your treadmill features a walking belt coated with a cord having Lug Metal Screw The temporary adapter...
English Manual
Page 9
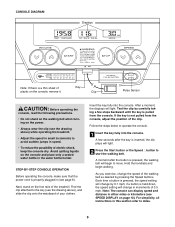
... clothes. STEP-BY-STEP CONSOLE OPERATION Before operating the console, make sure that the power cord is not pulled from the console. If the key is properly plugged in the water bottle holder. As you exercise, change by pressing the Speed buttons. Avoid spilling liquids on the console, remove it. After a moment, the displays will change the speed of the walking belt as desired by 0.1 mph; Follow the steps below to start the walking belt.
... clothes. STEP-BY-STEP CONSOLE OPERATION Before operating the console, make sure that the power cord is not pulled from the console. If the key is properly plugged in the water bottle holder. As you exercise, change by pressing the Speed buttons. Avoid spilling liquids on the console, remove it. After a moment, the displays will change the speed of the walking belt as desired by 0.1 mph; Follow the steps below to start the walking belt.

English Manual
Page 10
... the pulse sensor for about 15 seconds for a few seconds, the heartshaped indicator in a secure place. Press the Speed L button to change from the console. To reset the displays, press the Stop button, remove the key, and then reinsert the key. 5 Measure your heart rate. 6 When you use . 10 To stop the walking belt, press the Stop button. Fat Calories/Calories/ Pulse display-This display shows the approximate numbers of the treadmill and possible injury, unplug the power cord when the treadmill...
... the pulse sensor for about 15 seconds for a few seconds, the heartshaped indicator in a secure place. Press the Speed L button to change from the console. To reset the displays, press the Stop button, remove the key, and then reinsert the key. 5 Measure your heart rate. 6 When you use . 10 To stop the walking belt, press the Stop button. Fat Calories/Calories/ Pulse display-This display shows the approximate numbers of the treadmill and possible injury, unplug the power cord when the treadmill...
English Manual
Page 11
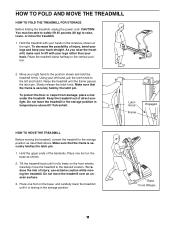
... desired location. Do not move the treadmill. 1. Make sure that the frame is securely held by the latch pin. Latch Knob Frame Engaged HOW TO MOVE THE TREADMILL Before moving the treadmill. Hold the upper ends of injury, bend your legs and keep your back. HOW TO FOLD AND MOVE THE TREADMILL HOW TO FOLD THE TREADMILL FOR STORAGE Before folding the treadmill, unplug the power cord. Move your left hand, pull the latch knob...
... desired location. Do not move the treadmill. 1. Make sure that the frame is securely held by the latch pin. Latch Knob Frame Engaged HOW TO MOVE THE TREADMILL Before moving the treadmill. Hold the upper ends of injury, bend your legs and keep your back. HOW TO FOLD AND MOVE THE TREADMILL HOW TO FOLD THE TREADMILL FOR STORAGE Before folding the treadmill, unplug the power cord. Move your left hand, pull the latch knob...

English Manual
Page 12
HOW TO LOWER THE TREADMILL FOR USE 1. Hold the upper end of injury, bend your legs and keep your back straight. Latch Knob Engaged Frame 12 Slowly release the latch knob. 2. Pivot the treadmill down until the frame is past the latch pin. To decrease the possibility of the treadmill with both hands, and lower the treadmill to the floor. Using your right hand as shown. Hold the treadmill firmly with your left hand, pull the latch knob to the floor. Do not drop the treadmill frame to the left and hold it.
HOW TO LOWER THE TREADMILL FOR USE 1. Hold the upper end of injury, bend your legs and keep your back straight. Latch Knob Engaged Frame 12 Slowly release the latch knob. 2. Pivot the treadmill down until the frame is past the latch pin. To decrease the possibility of the treadmill with both hands, and lower the treadmill to the floor. Using your right hand as shown. Hold the treadmill firmly with your left hand, pull the latch knob to the floor. Do not drop the treadmill frame to the left and hold it.
English Manual
Page 13
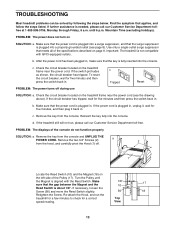
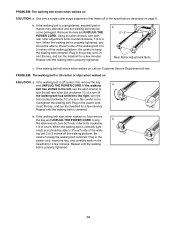
...-equipped outlets. Check the circuit breaker located on the treadmill frame near the power cord. Turn the Pulley until 6 p.m. If further assistance is plugged in, unplug it back in . If necessary, loosen the Screw (56) and move the Reed Switch slightly. 56 18 Retighten the Screw. TROUBLESHOOTING Most treadmill problems can be solved by following the steps below. c. Reinsert the key fully into a properly grounded outlet (see...
...-equipped outlets. Check the circuit breaker located on the treadmill frame near the power cord. Turn the Pulley until 6 p.m. If further assistance is plugged in, unplug it back in . If necessary, loosen the Screw (56) and move the Reed Switch slightly. 56 18 Retighten the Screw. TROUBLESHOOTING Most treadmill problems can be solved by following the steps below. c. Reinsert the key fully into a properly grounded outlet (see...
English Manual
Page 14
... or slips when walked on page 8. Plug in the power cord, insert the key, and run the treadmill for a few minutes. b 2"-3" Rear Roller Adjustment Bolts c. Plug in the power cord, insert the key, and carefully walk on , call our Customer Service Department toll-free. If the walking belt is centered. Plug in the power cord, insert the key, and run the treadmill for a few minutes. PROBLEM: The walking belt slows when walked on , first remove the key and UNPLUG THE POWER CORD. Use only...
... or slips when walked on page 8. Plug in the power cord, insert the key, and run the treadmill for a few minutes. b 2"-3" Rear Roller Adjustment Bolts c. Plug in the power cord, insert the key, and carefully walk on , call our Customer Service Department toll-free. If the walking belt is centered. Plug in the power cord, insert the key, and run the treadmill for a few minutes. PROBLEM: The walking belt slows when walked on , first remove the key and UNPLUG THE POWER CORD. Use only...
English Manual
Page 15
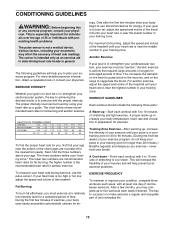
... to burn fat, adjust the speed and incline of your exercise program, do not keep your pulse in your age. If your heart rate is the recommended heart rate for energy. The sensor is in your movement, may complete up , increase the intensity of your exercise until your heart rate is to use the pulse sensor. For more detailed exercise information, obtain a reputable book or consult your "training zone." Only...
... to burn fat, adjust the speed and incline of your exercise program, do not keep your pulse in your age. If your heart rate is the recommended heart rate for energy. The sensor is in your movement, may complete up , increase the intensity of your exercise until your heart rate is to use the pulse sensor. For more detailed exercise information, obtain a reputable book or consult your "training zone." Only...
English Manual
Page 16
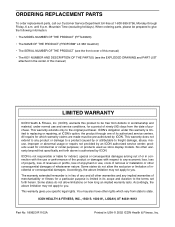
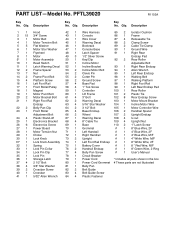
... 360 treadmill) • The SERIAL NUMBER OF THE PRODUCT (see the front cover of this manual) • The KEY NUMBER AND DESCRIPTION OF THE PART(S) (see the EXPLODED DRAWING and PART LIST attached in its authorized service centers. All repairs for a period of ninety (90) days from state to you. ICON is limited in the center of this manual) LIMITED WARRANTY ICON Health & Fitness, Inc. (ICON), warrants this warranty is limited to replacing or repairing, at...
... 360 treadmill) • The SERIAL NUMBER OF THE PRODUCT (see the front cover of this manual) • The KEY NUMBER AND DESCRIPTION OF THE PART(S) (see the EXPLODED DRAWING and PART LIST attached in its authorized service centers. All repairs for a period of ninety (90) days from state to you. ICON is limited in the center of this manual) LIMITED WARRANTY ICON Health & Fitness, Inc. (ICON), warrants this warranty is limited to replacing or repairing, at...

English Manual
Page 17
Save this chart and use it to identify small parts during assembly. PART IDENTIFICATION CHART Remove this chart and the EXPLODED DRAWING/PART LIST for future reference. 3/4" Screw (2)-8 1" Latch Screw (110)-2 1" Tek Screw (58)-4 1/2" Silver Screw (49)-3 Crossbar Screw (39)-2 5/16" Star Washer (63)-4 3/8" Star Washer (38)-4 2 1/2" Bolt (37)-4 3" Bolt (61)-4 Wheel Bolt (64)-2 Nut (13)-2 Upright Nut (109)-4 U-Nut (108)-4
Save this chart and use it to identify small parts during assembly. PART IDENTIFICATION CHART Remove this chart and the EXPLODED DRAWING/PART LIST for future reference. 3/4" Screw (2)-8 1" Latch Screw (110)-2 1" Tek Screw (58)-4 1/2" Silver Screw (49)-3 Crossbar Screw (39)-2 5/16" Star Washer (63)-4 3/8" Star Washer (38)-4 2 1/2" Bolt (37)-4 3" Bolt (61)-4 Wheel Bolt (64)-2 Nut (13)-2 Upright Nut (109)-4 U-Nut (108)-4
English Manual
Page 18
... 2 Cable Tie Clamp 6 1 Motor Star Washer 47 1 Console Base 90 1 Ground Wire 7 1 Flywheel 48 1 Latch Spacer 91 1 Right Rear 8 1 Motor 49 3 1/2" Silver Screw Endcap Pad 9* 1 Motor Assembly 50 1 Key/Clip 92 2 Rear Roller 10 1 Reed Switch 51 1 Incline Motor Adjustable Bolt 11 1 Latch Warning Decal 52 1 Incline Bracket 93 1 Right Rear Endcap 12 2 Frame Spacer 53 2 Incline Motor Bolt 94 1 Allen Wrench 13 7 Nut 54 2 Clevis Pin 95 1 Left Rear Endcap 14 2 Frame Pivot Bolt 55 2 Cotter Pin 96 1 Walking Belt...
... 2 Cable Tie Clamp 6 1 Motor Star Washer 47 1 Console Base 90 1 Ground Wire 7 1 Flywheel 48 1 Latch Spacer 91 1 Right Rear 8 1 Motor 49 3 1/2" Silver Screw Endcap Pad 9* 1 Motor Assembly 50 1 Key/Clip 92 2 Rear Roller 10 1 Reed Switch 51 1 Incline Motor Adjustable Bolt 11 1 Latch Warning Decal 52 1 Incline Bracket 93 1 Right Rear Endcap 12 2 Frame Spacer 53 2 Incline Motor Bolt 94 1 Allen Wrench 13 7 Nut 54 2 Clevis Pin 95 1 Left Rear Endcap 14 2 Frame Pivot Bolt 55 2 Cotter Pin 96 1 Walking Belt...

English Manual
Page 19
... 109 71 39 31* 58 110 30 36 32 33 48 34 35 87 88 81 89 106 63 61 77 76 R1102A EXPLODED DRAWING-Model No.
... 109 71 39 31* 58 110 30 36 32 33 48 34 35 87 88 81 89 106 63 61 77 76 R1102A EXPLODED DRAWING-Model No.

