

Instruction Manual
Page 2
... a registered trademark of Wi-Fi Alliance. 2 Google Maps is a trademark of the warning decal(s). and are trademarks of Wi-Fi Alliance. PROFORM and IFIT are registered trademarks of ICON Health & Fitness, Inc. Apply the decal in the location shown. Note: The decal(s) may not ... TABLE OF CONTENTS WARNING DECAL PLACEMENT 2 IMPORTANT PRECAUTIONS 3 BEFORE YOU BEGIN 4 PART IDENTIFICATION CHART 5 ASSEMBLY 6 HOW TO USE THE TRAINER 12 HOW TO USE THE CONSOLE 14 MAINTENANCE AND TROUBLESHOOTING 20 EXERCISE GUIDELINES 22 PART LIST 24 EXPLODED DRAWING 26 ORDERING REPLACEMENT PARTS Back ...
... a registered trademark of Wi-Fi Alliance. 2 Google Maps is a trademark of the warning decal(s). and are trademarks of Wi-Fi Alliance. PROFORM and IFIT are registered trademarks of ICON Health & Fitness, Inc. Apply the decal in the location shown. Note: The decal(s) may not ... TABLE OF CONTENTS WARNING DECAL PLACEMENT 2 IMPORTANT PRECAUTIONS 3 BEFORE YOU BEGIN 4 PART IDENTIFICATION CHART 5 ASSEMBLY 6 HOW TO USE THE TRAINER 12 HOW TO USE THE CONSOLE 14 MAINTENANCE AND TROUBLESHOOTING 20 EXERCISE GUIDELINES 22 PART LIST 24 EXPLODED DRAWING 26 ORDERING REPLACEMENT PARTS Back ...

Instruction Manual
Page 3
...each side. Do not use by persons weighing more than 325 lbs. (147 kg). 11. Keep children under the trainer. 14. The trainer does not have a freewheel; Do not put the trainer in serious injury or death. IMPORTANT PRECAUTIONS WARNING: To reduce the risk of breath, or if you become caught ... carpet from damage, place a mat under age 16 and pets away from moisture and dust. do not wear loose clothes that all warnings on the trainer. Over exercising may result in a garage or covered patio, or near water. 7. If you feel faint, if you experience pain while exercising, stop...
...each side. Do not use by persons weighing more than 325 lbs. (147 kg). 11. Keep children under the trainer. 14. The trainer does not have a freewheel; Do not put the trainer in serious injury or death. IMPORTANT PRECAUTIONS WARNING: To reduce the risk of breath, or if you become caught ... carpet from damage, place a mat under age 16 and pets away from moisture and dust. do not wear loose clothes that all warnings on the trainer. Over exercising may result in a garage or covered patio, or near water. 7. If you feel faint, if you experience pain while exercising, stop...

Instruction Manual
Page 4
... the location of the serial number decal are labeled in . (76 cm) Weight: 181 lbs. (82 kg) 4 If you for selecting the revolutionary PROFORM® HIIT L6 trainer. Handlebar Grip Accessory Tray Console Fan Pedal Leveling Foot Pedal Leg Wheel Length: 5 ft. 7 in. (170 cm) Width: 2 ft. 6 in ...the drawing below. For your workouts at home more effective and enjoyable. The HIIT L6 trainer provides an impressive selection of features designed to make your benefit, read this manual. BEFORE YOU BEGIN Thank you have questions after reading this manual...
... the location of the serial number decal are labeled in . (76 cm) Weight: 181 lbs. (82 kg) 4 If you for selecting the revolutionary PROFORM® HIIT L6 trainer. Handlebar Grip Accessory Tray Console Fan Pedal Leveling Foot Pedal Leg Wheel Length: 5 ft. 7 in. (170 cm) Width: 2 ft. 6 in ...the drawing below. For your workouts at home more effective and enjoyable. The HIIT L6 trainer provides an impressive selection of features designed to make your benefit, read this manual. BEFORE YOU BEGIN Thank you have questions after reading this manual...

Instruction Manual
Page 10
Make sure that the Pedals (22, 23) are level. Then, attach them . Press a set of the trainer. 9 65 65 12 10 66 107 10 66 B 107 10 Repeat this step on the other with two M4 x 22mm Screws (107). start all the ...
Make sure that the Pedals (22, 23) are level. Then, attach them . Press a set of the trainer. 9 65 65 12 10 66 107 10 66 B 107 10 Repeat this step on the other with two M4 x 22mm Screws (107). start all the ...
Instruction Manual
Page 11
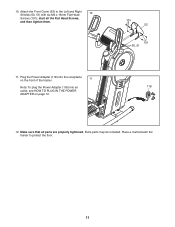
Plug the Power Adapter (118) into the receptacle on the front of the trainer. 11 Note: To plug the Power Adapter (118) into an outlet, see HOW TO PLUG IN THE POWER ADAPTER on page 12. 101 52 101 50, 51 118 12. 10. start all parts are properly tightened. Place a mat beneath the trainer to the Left and Right Shields (50, 51) with six M4 x 16mm Flat Head 10 Screws (101); Attach the Front Cover (52) to protect the floor. 11 Extra parts may be included. Make sure that all the Flat Head Screws, and then tighten them. 11.
Plug the Power Adapter (118) into the receptacle on the front of the trainer. 11 Note: To plug the Power Adapter (118) into an outlet, see HOW TO PLUG IN THE POWER ADAPTER on page 12. 101 52 101 50, 51 118 12. 10. start all parts are properly tightened. Place a mat beneath the trainer to the Left and Right Shields (50, 51) with six M4 x 16mm Flat Head 10 Screws (101); Attach the Front Cover (52) to protect the floor. 11 Extra parts may be included. Make sure that all the Flat Head Screws, and then tighten them. 11.
Instruction Manual
Page 12
... that is properly installed in accordance with all local codes and ordinances. Stand in the power adapter. Carefully move the trainer to the desired location, and then lower it to the size and weight of the trainer, moving it to warm to room temperature before you plug in front of the... trainer, hold the console bracket (B), and place one foot against one of the trainer. B C 12 Have a second person help you may damage the console displays ...
... that is properly installed in accordance with all local codes and ordinances. Stand in the power adapter. Carefully move the trainer to the desired location, and then lower it to the size and weight of the trainer, moving it to warm to room temperature before you plug in front of the... trainer, hold the console bracket (B), and place one foot against one of the trainer. B C 12 Have a second person help you may damage the console displays ...

Instruction Manual
Page 13
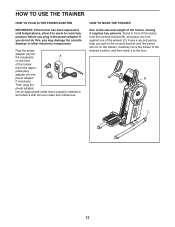
...securely in the direction shown by the arrow; variety, you can turn the pedals in the rocks slightly on lower position. To dismount the trainer, wait until the flywheel stops. Then, step off the higher pedal first. or both of this manual. When the pedals are stationary, ... the direction. To purchase a tablet holder, please see the front cover of the tion. the pedals will hold the handlebars (D) or the If the trainer grips (E) and step onto the pedal (F) that you turn one motion. however, for use , turn the pedals leveling feet (G) in place and enable...
...securely in the direction shown by the arrow; variety, you can turn the pedals in the rocks slightly on lower position. To dismount the trainer, wait until the flywheel stops. Then, step off the higher pedal first. or both of this manual. When the pedals are stationary, ... the direction. To purchase a tablet holder, please see the front cover of the tion. the pedals will hold the handlebars (D) or the If the trainer grips (E) and step onto the pedal (F) that you turn one motion. however, for use , turn the pedals leveling feet (G) in place and enable...

Instruction Manual
Page 16
... is added, its indicator will not be shown. The fan has several seconds, the console will pause and the time will be used if the trainer is established, the LED on page 18 for several speed settings. If the pedals do not move for more information. 6. When workout information is included...
... is added, its indicator will not be shown. The fan has several seconds, the console will pause and the time will be used if the trainer is established, the LED on page 18 for several speed settings. If the pedals do not move for more information. 6. When workout information is included...

Instruction Manual
Page 17
... select either the main menu (Home button) or the workout library (Browse button). Download and install the iFit app on the screen to select music, trainer voice, and volume options for the free iFit app, and then install the app on the console. If you select a workout, the screen will appear...
... select either the main menu (Home button) or the workout library (Browse button). Download and install the iFit app on the screen to select music, trainer voice, and volume options for the free iFit app, and then install the app on the console. If you select a workout, the screen will appear...

Instruction Manual
Page 19
..., end your workout before you can show the total number of measurement. The display will appear in miles or kilometers) that the trainer has been used if the trainer is selected, you press the Settings button. 2. The display will appear in standard or metric units of hours that the... trainer has been pedaled. Unit of Measurement-The currently selected unit of measurement, press the St/M button repeatedly. To turn off the demo mode, select...
..., end your workout before you can show the total number of measurement. The display will appear in miles or kilometers) that the trainer has been used if the trainer is selected, you press the Settings button. 2. The display will appear in standard or metric units of hours that the... trainer has been pedaled. Unit of Measurement-The currently selected unit of measurement, press the St/M button repeatedly. To turn off the demo mode, select...

Instruction Manual
Page 20
Then, reattach the lower rear shield cover. 20 Inspect and properly tighten all parts each time the trainer is fully plugged in. To clean the trainer, use only a manufacturer-supplied regulated power adapter. IMPORTANT: To avoid damage to or away from the console and keep the console out of ... optimal performance and to move, rock your weight backward and forward on the pedals until the pedals begin moving easily and the flywheel inside the trainer begins turning again. 21 113 116 104 Then, plug in the power adapter and turn the Large Pulley (21) for a moment. Repeat these...
Then, reattach the lower rear shield cover. 20 Inspect and properly tighten all parts each time the trainer is fully plugged in. To clean the trainer, use only a manufacturer-supplied regulated power adapter. IMPORTANT: To avoid damage to or away from the console and keep the console out of ... optimal performance and to move, rock your weight backward and forward on the pedals until the pedals begin moving easily and the flywheel inside the trainer begins turning again. 21 113 116 104 Then, plug in the power adapter and turn the Large Pulley (21) for a moment. Repeat these...
Instruction Manual
Page 21
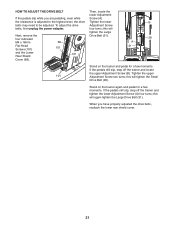
... Shield Cover (68). 68 101 101 Then, locate the lower Adjustment Screw (A). B 28 A 31 Stand on the trainer again and pedal for a few moments. Stand on the trainer and pedal for a few moments. this will again tighten the Large Drive Belt (31). Tighten the lower Adjustment Screw ... the drive belts may need to be adjusted. If the pedals still slip, step off the trainer and tighten the lower Adjustment Screw (A) four turns; If the pedals still slip, step off the trainer and locate the upper Adjustment Screw (B). this will tighten the Large Drive Belt (31).
... Shield Cover (68). 68 101 101 Then, locate the lower Adjustment Screw (A). B 28 A 31 Stand on the trainer again and pedal for a few moments. Stand on the trainer and pedal for a few moments. this will again tighten the Large Drive Belt (31). Tighten the lower Adjustment Screw ... the drive belts may need to be adjusted. If the pedals still slip, step off the trainer and tighten the lower Adjustment Screw (A) four turns; If the pedals still slip, step off the trainer and locate the upper Adjustment Screw (B). this will tighten the Large Drive Belt (31).


