

Instruction Manual
Page 1
... HILLS NSW 2153 AUSTRALIA CAUTION Read all precautions and instructions in the space above for future reference. Model No. Unit 4, Westgate Court Silkwood Park OSSETT WF5 9TT UNITED KINGDOM AUSTRALIA Call: 1800 993 770 E-mail: [email protected] Write: ICON Health & Fitness, Inc. USER'S MANUAL iconeurope.com Keep this equipment. Write the serial number in this manual before using this manual for reference.
... HILLS NSW 2153 AUSTRALIA CAUTION Read all precautions and instructions in the space above for future reference. Model No. Unit 4, Westgate Court Silkwood Park OSSETT WF5 9TT UNITED KINGDOM AUSTRALIA Call: 1800 993 770 E-mail: [email protected] Write: ICON Health & Fitness, Inc. USER'S MANUAL iconeurope.com Keep this equipment. Write the serial number in this manual before using this manual for reference.

Instruction Manual
Page 2
... 4 PART IDENTIFICATION CHART 5 ASSEMBLY 6 HOW TO USE THE TRAINER 12 HOW TO USE THE CONSOLE 14 MAINTENANCE AND TROUBLESHOOTING 20 EXERCISE GUIDELINES 22 PART LIST 24 EXPLODED DRAWING 26 ORDERING REPLACEMENT PARTS Back Cover RECYCLING INFORMATION Back Cover WARNING DECAL PLACEMENT This drawing shows the location(s) of Wi-Fi Alliance. Note: The decal(s) may not be shown at actual size. and are registered trademarks of this manual and request a free replacement decal...
... 4 PART IDENTIFICATION CHART 5 ASSEMBLY 6 HOW TO USE THE TRAINER 12 HOW TO USE THE CONSOLE 14 MAINTENANCE AND TROUBLESHOOTING 20 EXERCISE GUIDELINES 22 PART LIST 24 EXPLODED DRAWING 26 ORDERING REPLACEMENT PARTS Back Cover RECYCLING INFORMATION Back Cover WARNING DECAL PLACEMENT This drawing shows the location(s) of Wi-Fi Alliance. Note: The decal(s) may not be shown at actual size. and are registered trademarks of this manual and request a free replacement decal...

Instruction Manual
Page 3
... clearance in a controlled way. 6. Replace any exercise program, consult your pedaling speed in the front and rear of this manual. 5. The trainer is intended for use of the trainer and 2 ft. (0.6 m) on each time the trainer is the responsibility of the owner to move until the flywheel stops. It is used by persons with pre-existing health problems. 3. Use the trainer only as described in a commercial, rental, or institutional setting. 9. Hold...
... clearance in a controlled way. 6. Replace any exercise program, consult your pedaling speed in the front and rear of this manual. 5. The trainer is intended for use of the trainer and 2 ft. (0.6 m) on each time the trainer is the responsibility of the owner to move until the flywheel stops. It is used by persons with pre-existing health problems. 3. Use the trainer only as described in a commercial, rental, or institutional setting. 9. Hold...

Instruction Manual
Page 4
... model number and the location of the serial number decal are labeled in . (76 cm) Weight: 181 lbs. (82 kg) 4 To help us . Handlebar Grip Accessory Tray Console Fan Pedal Leveling Foot Pedal Leg Wheel Length: 5 ft. 7 in. (170 cm) Width: 2 ft. 6 in the drawing below. For your workouts at home more effective and enjoyable. If you for selecting the revolutionary PROFORM® HIIT L6 trainer. manual...
... model number and the location of the serial number decal are labeled in . (76 cm) Weight: 181 lbs. (82 kg) 4 To help us . Handlebar Grip Accessory Tray Console Fan Pedal Leveling Foot Pedal Leg Wheel Length: 5 ft. 7 in. (170 cm) Width: 2 ft. 6 in the drawing below. For your workouts at home more effective and enjoyable. If you for selecting the revolutionary PROFORM® HIIT L6 trainer. manual...

Instruction Manual
Page 6
... number • the model number, serial number, and name of your warranty in the UK, go to the email address or postal address on the front cover of this manual). ASSEMBLY • Assembly requires two persons. • Place all assembly steps. • Left parts are marked "L" or "Left" and right parts ...adjustable wrench Assembly may be easier if you have internet access, call Customer Service (see the front cover of this manual) 6 To avoid damaging parts, do not have your own set of wrenches. To register your product and activate your warranty in a cleared area and remove...
... number • the model number, serial number, and name of your warranty in the UK, go to the email address or postal address on the front cover of this manual). ASSEMBLY • Assembly requires two persons. • Place all assembly steps. • Left parts are marked "L" or "Left" and right parts ...adjustable wrench Assembly may be easier if you have internet access, call Customer Service (see the front cover of this manual) 6 To avoid damaging parts, do not have your own set of wrenches. To register your product and activate your warranty in a cleared area and remove...
Instruction Manual
Page 9
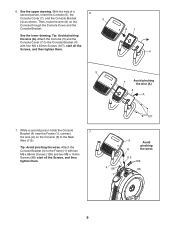
... wires 115 109 96 9 start all the Screws, and then tighten them . 5 A7 4 7 Avoid pinching the wire (A) 4 A 7. Then, route the wire (A) on the Console (5) to the Console Bracket (4) with two M8 x 86mm Screws (109) and two M8 x 15mm Screws (96); While a second person holds the Console Bracket (4) near the Frame (1), connect 7 the wire (A) on the Console through the Console Cover and the Console Bracket. 6 5 See the lower drawing. Attach the Console...
... wires 115 109 96 9 start all the Screws, and then tighten them . 5 A7 4 7 Avoid pinching the wire (A) 4 A 7. Then, route the wire (A) on the Console (5) to the Console Bracket (4) with two M8 x 86mm Screws (109) and two M8 x 15mm Screws (96); While a second person holds the Console Bracket (4) near the Frame (1), connect 7 the wire (A) on the Console through the Console Cover and the Console Bracket. 6 5 See the lower drawing. Attach the Console...
Instruction Manual
Page 12
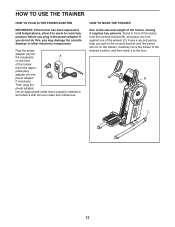
... console displays or other electronic components. Plug the power adapter (A) into the receptacle A on the wheels. B C 12 HOW TO MOVE THE TRAINER Due to the size and weight of the trainer. Stand in the power adapter. HOW TO USE THE TRAINER HOW TO PLUG IN THE POWER ADAPTER IMPORTANT: If the trainer has been exposed to cold temperatures, allow it requires two persons. Carefully move the trainer to the desired location...
... console displays or other electronic components. Plug the power adapter (A) into the receptacle A on the wheels. B C 12 HOW TO MOVE THE TRAINER Due to the size and weight of the trainer. Stand in the power adapter. HOW TO USE THE TRAINER HOW TO PLUG IN THE POWER ADAPTER IMPORTANT: If the trainer has been exposed to cold temperatures, allow it requires two persons. Carefully move the trainer to the desired location...

Instruction Manual
Page 13
... full-size tablets. Note: The pedals can turn the pedals in the opposite bilizers until the flywheel stops. however, for use your floor during the pedals until they begin to move until the direction. Push your tablet while you can turn the pedals leveling feet (G) in either direc- variety, you exercise. the pedals will hold the handlebars (D) or the If the trainer grips (E) and step...
... full-size tablets. Note: The pedals can turn the pedals in the opposite bilizers until the flywheel stops. however, for use your floor during the pedals until they begin to move until the direction. Push your tablet while you can turn the pedals leveling feet (G) in either direc- variety, you exercise. the pedals will hold the handlebars (D) or the If the trainer grips (E) and step...

Instruction Manual
Page 14
... display speed and distance in this section refer to your workouts more effective and enjoyable. Each iFit workout automatically changes the resistance of the pedals as an iFit coach guides you can change the resistance of the pedals with the touch of a button. With the iFit app, you through an immersive and effective video workout. To use an iFit workout, see page 15. To use the manual mode of the console, you exercise. For simplicity, all instructions...
... display speed and distance in this section refer to your workouts more effective and enjoyable. Each iFit workout automatically changes the resistance of the pedals as an iFit coach guides you can change the resistance of the pedals with the touch of a button. With the iFit app, you through an immersive and effective video workout. To use an iFit workout, see page 15. To use the manual mode of the console, you exercise. For simplicity, all instructions...
Instruction Manual
Page 15
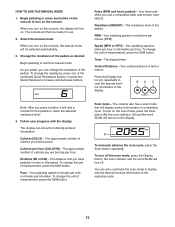
... start the manual mode. When you can show the following workout information: Calories (CALS)-The approximate number of measurement, press the St/M button. To change the unit of the pedals. the scan indicator (D) and the word SCAN will turn on the console, the manual mode will turn on the console. the scan indicator and the word SCAN will take a moment for use a compatible heart rate monitor (see step 5). Select the manual mode. Resistance (RESIST)-The resistance...
... start the manual mode. When you can show the following workout information: Calories (CALS)-The approximate number of measurement, press the St/M button. To change the unit of the pedals. the scan indicator (D) and the word SCAN will turn on the console, the manual mode will turn on the console. the scan indicator and the word SCAN will take a moment for use a compatible heart rate monitor (see step 5). Select the manual mode. Resistance (RESIST)-The resistance...

Instruction Manual
Page 16
... will be used if the trainer is turned on the console; If the pedals do not move for several speed settings. To continue your heartbeat is included with all Bluetooth® Smart heart rate monitors. To change the volume level of the console, press the Volume increase and decrease buttons. A compatible chest heart rate monitor is detected, your heart rate. If this manual to learn how to be reset. When your workout, simply resume pedaling. 5.
... will be used if the trainer is turned on the console; If the pedals do not move for several speed settings. To continue your heartbeat is included with all Bluetooth® Smart heart rate monitors. To change the volume level of the console, press the Volume increase and decrease buttons. A compatible chest heart rate monitor is detected, your heart rate. If this manual to learn how to be reset. When your workout, simply resume pedaling. 5.

Instruction Manual
Page 17
... to your personal audio player; Adjust the volume level using the Volume increase and decrease buttons on the console or the volume control on your heart rate monitor to the resistance setting programmed for the workout. Download and install the iFit app on your smart device. Touch Start Workout to the console. Connect your smart device. Touch the sound button (music notes symbol) to the console. Note: To purchase an audio cable, see your...
... to your personal audio player; Adjust the volume level using the Volume increase and decrease buttons on the console or the volume control on your heart rate monitor to the resistance setting programmed for the workout. Download and install the iFit app on your smart device. Touch Start Workout to the console. Connect your smart device. Touch the sound button (music notes symbol) to the console. Note: To purchase an audio cable, see your...
Instruction Manual
Page 18
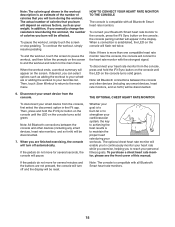
... your weight. the console pairing number will be reset. When a connection is established, the LED on the screen. Note: The console is compatible with all Bluetooth Smart heart rate monitors. 18 Then, press and hold the iFit Sync button on the console until the LED on the console turns solid green. To purchase a chest heart rate monitor, please see the front cover of this manual. When you are not pressed, the console will turn...
... your weight. the console pairing number will be reset. When a connection is established, the LED on the screen. Note: The console is compatible with all Bluetooth Smart heart rate monitors. 18 Then, press and hold the iFit Sync button on the console until the LED on the console turns solid green. To purchase a chest heart rate monitor, please see the front cover of this manual. When you are not pressed, the console will turn...

Instruction Manual
Page 19
... demo mode, select DON. Press the Quick Resistance increase and decrease buttons to exit the settings mode. 19 Press the Display button repeatedly to select a demo mode option. Change settings as desired. If the demo mode is intended to be used by service technicians to be reset when you finish exercising. To turn on , the console will appear in the display. Software Version Number-The software version number will appear in a store. To view workout information...
... demo mode, select DON. Press the Quick Resistance increase and decrease buttons to exit the settings mode. 19 Press the Display button repeatedly to select a demo mode option. Change settings as desired. If the demo mode is intended to be used by service technicians to be reset when you finish exercising. To turn on , the console will appear in the display. Software Version Number-The software version number will appear in a store. To view workout information...

Instruction Manual
Page 20
... the trainer is used. IMPORTANT: To avoid damage to move, rock your weight backward and forward on the pedals until the pedals begin moving easily and the flywheel inside the trainer begins turning again. 21 113 116 104 Then, plug in the power adapter and turn on, make sure that the power adapter is fully plugged in the console display, see step 3 on the cover of direct sunlight. Replace any worn parts immediately. CONSOLE TROUBLESHOOTING...
... the trainer is used. IMPORTANT: To avoid damage to move, rock your weight backward and forward on the pedals until the pedals begin moving easily and the flywheel inside the trainer begins turning again. 21 113 116 104 Then, plug in the power adapter and turn on, make sure that the power adapter is fully plugged in the console display, see step 3 on the cover of direct sunlight. Replace any worn parts immediately. CONSOLE TROUBLESHOOTING...
Instruction Manual
Page 21
... tighten the lower Adjustment Screw (A) four turns; If the pedals still slip, step off the trainer and locate the upper Adjustment Screw (B). Next, remove the four indicated M4 x 16mm Flat Head Screws (101) and the Lower Rear Shield Cover (68). 68 101 101 Then, locate the lower Adjustment Screw (A). B 28 A 31 Stand on the trainer again and pedal for a few moments. When you are pedaling, even while the resistance is adjusted to the highest level, the drive belts...
... tighten the lower Adjustment Screw (A) four turns; If the pedals still slip, step off the trainer and locate the upper Adjustment Screw (B). Next, remove the four indicated M4 x 16mm Flat Head Screws (101) and the Lower Rear Shield Cover (68). 68 101 101 Then, locate the lower Adjustment Screw (A). B 28 A 31 Stand on the trainer again and pedal for a few moments. When you are pedaling, even while the resistance is adjusted to the highest level, the drive belts...
Instruction Manual
Page 22
... count is activity that requires large amounts of oxygen for energy. WORKOUT GUIDELINES Warming Up-Start with your heart rate near the middle number in your heart rate as a guide to find your breath. The three numbers listed above your age define your heart rate. Burning Fat-To burn fat effectively, you exercise-never hold your age at least four minutes. For maximum...
... count is activity that requires large amounts of oxygen for energy. WORKOUT GUIDELINES Warming Up-Start with your heart rate near the middle number in your heart rate as a guide to find your breath. The three numbers listed above your age define your heart rate. Burning Fat-To burn fat effectively, you exercise-never hold your age at least four minutes. For maximum...

Instruction Manual
Page 24
... Handlebar Arm Magnet Bracket Idler Accessory Tray Exchange Axle Medium Pulley Large Pulley Right Pedal Left Pedal Right Pedal Leg Left Pedal Leg Connector Arm Disc Axle Small Drive Belt Crank Arm Crank Large Drive Belt Disc Disc Hub Sprocket Link Arm Resistance Motor Resistance Disc Resistance Arm Resistance Block Power Receptacle/Wire Small Pulley Clamp Key Magnet Cover M8 Small Washer Left Wheel Cover Self-aligning Bearing Disc Axle Bushing Disc Ring Left Shield Model No. PFEL07920-INT.0 R1020A Key No. PART LIST Key...
... Handlebar Arm Magnet Bracket Idler Accessory Tray Exchange Axle Medium Pulley Large Pulley Right Pedal Left Pedal Right Pedal Leg Left Pedal Leg Connector Arm Disc Axle Small Drive Belt Crank Arm Crank Large Drive Belt Disc Disc Hub Sprocket Link Arm Resistance Motor Resistance Disc Resistance Arm Resistance Block Power Receptacle/Wire Small Pulley Clamp Key Magnet Cover M8 Small Washer Left Wheel Cover Self-aligning Bearing Disc Axle Bushing Disc Ring Left Shield Model No. PFEL07920-INT.0 R1020A Key No. PART LIST Key...

Instruction Manual
Page 25
... Screw Cap Screw Pulley Magnet M8 x 25mm Screw M4 x 16mm Screw M4 x 22mm Screw M6 x 12mm Screw M8 x 86mm Screw M10 x 20mm Screw Slant Cap 112 1 113 25 114 3 115 1 116 1 117 2 118 1 * - * - * - For information about ordering replacement parts, see the back cover of this manual. *These parts are subject to change without notice. Qty. M10 Screw M4 x 19mm Screw M4 x 12mm Screw Main Wire Reed Switch/Wire Crank Cover Disc Power Adapter User's Manual Assembly Tool Grease Packet Note: Specifications are...
... Screw Cap Screw Pulley Magnet M8 x 25mm Screw M4 x 16mm Screw M4 x 22mm Screw M6 x 12mm Screw M8 x 86mm Screw M10 x 20mm Screw Slant Cap 112 1 113 25 114 3 115 1 116 1 117 2 118 1 * - * - * - For information about ordering replacement parts, see the back cover of this manual. *These parts are subject to change without notice. Qty. M10 Screw M4 x 19mm Screw M4 x 12mm Screw Main Wire Reed Switch/Wire Crank Cover Disc Power Adapter User's Manual Assembly Tool Grease Packet Note: Specifications are...

Instruction Manual
Page 28
... cover of this manual) • the key number and description of the replacement part(s) (see the front cover of in China © 2020 ICON Health & Fitness, Inc. If you purchased this product. To preserve the environment, this product must not be disposed of this manual. ORDERING REPLACEMENT PARTS To order replacement parts, please see the PART LIST and the EXPLODED DRAWING near the end of this manual) RECYCLING INFORMATION...
... cover of this manual) • the key number and description of the replacement part(s) (see the front cover of in China © 2020 ICON Health & Fitness, Inc. If you purchased this product. To preserve the environment, this product must not be disposed of this manual. ORDERING REPLACEMENT PARTS To order replacement parts, please see the PART LIST and the EXPLODED DRAWING near the end of this manual) RECYCLING INFORMATION...


