
English Manual
Page 3
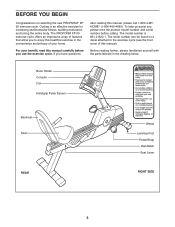
... BEGIN Congratulations on a decal attached to the exercise cycle (see the front convenience and privacy of you* rMhuostmbee.able to apply decal witchosveecruoref tahdihsemsioannuaat al).minimum temperature of 50 degrees F. The PROFORM XP 90 number before you have questions Before reading further...12 B PE Book Holder Console Fan Handgrip Pulse Sensor Backrest Seat REAR PART NO. B. Cycling is .125" MKT. Shaw DSGN MNG. TOLERA Seat Lever This drawing and all information the CONFIDENTIAL. This drawing is exercise cycle offers an impressive array of PMS 151 Orange PMS 151 Orange...
... BEGIN Congratulations on a decal attached to the exercise cycle (see the front convenience and privacy of you* rMhuostmbee.able to apply decal witchosveecruoref tahdihsemsioannuaat al).minimum temperature of 50 degrees F. The PROFORM XP 90 number before you have questions Before reading further...12 B PE Book Holder Console Fan Handgrip Pulse Sensor Backrest Seat REAR PART NO. B. Cycling is .125" MKT. Shaw DSGN MNG. TOLERA Seat Lever This drawing and all information the CONFIDENTIAL. This drawing is exercise cycle offers an impressive array of PMS 151 Orange PMS 151 Orange...

English Manual
Page 6
... are resting in the hexagonal holes in the same way. 5 55 61 49 3 6. Attach the other Handlebar (3) to the Seat Bracket (11) in the front of the Handlebar. Attach the Seat (9) to the Seat Bracket (11) with four M6 x 16mm Button Screws (8) and four M6 Washers 6 9 (66). 11 3 55 61 58 10 ... Bolts (58) and two M8 Nylon Locknuts (49). Attach the Backrest (31) to the Seat Bracket (11) with three M6 x 20mm Button Screws (63). 66 8 7 31 66 8 11 63 63 6 5. Attach the Seat Carriage Assembly to the Seat Bracket (11) with four M8 x 16mm Button Screws (61) and four M8 Split Washers...
... are resting in the hexagonal holes in the same way. 5 55 61 49 3 6. Attach the other Handlebar (3) to the Seat Bracket (11) in the front of the Handlebar. Attach the Seat (9) to the Seat Bracket (11) with four M6 x 16mm Button Screws (8) and four M6 Washers 6 9 (66). 11 3 55 61 58 10 ... Bolts (58) and two M8 Nylon Locknuts (49). Attach the Backrest (31) to the Seat Bracket (11) with three M6 x 20mm Button Screws (63). 66 8 7 31 66 8 11 63 63 6 5. Attach the Seat Carriage Assembly to the Seat Bracket (11) with four M8 x 16mm Button Screws (61) and four M8 Split Washers...

English Manual
Page 7
.... While another person holds the Console (4) in the position shown, connect the wire harness on the right side of the Seat Carriage Assembly (10), slide the Seat Carriage Assembly into the Upright (2). 57 80 Attach the Console (4) to the Upper Wire Harness (42). alkaline batteries are ...Battery Covers 23 41 Batteries 4 10. Next, insert four batteries into the end of the battery com- partments. Insert the excess wire harness down the seat lever (not shown) on the 10 4 Console to the Upright (2) with four M4 x 16mm Screws (57) and two Console Brackets (80). ...
.... While another person holds the Console (4) in the position shown, connect the wire harness on the right side of the Seat Carriage Assembly (10), slide the Seat Carriage Assembly into the Upright (2). 57 80 Attach the Console (4) to the Upper Wire Harness (42). alkaline batteries are ...Battery Covers 23 41 Batteries 4 10. Next, insert four batteries into the end of the battery com- partments. Insert the excess wire harness down the seat lever (not shown) on the 10 4 Console to the Upright (2) with four M4 x 16mm Screws (57) and two Console Brackets (80). ...
English Manual
Page 8
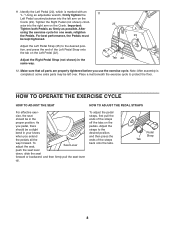
... arm on the Crank. HOW TO OPERATE THE EXERCISE CYCLE HOW TO ADJUST THE SEAT HOW TO ADJUST THE PEDAL STRAPS For effective exer- To adjust the seat, Seat Lever push the seat lever down, slide the seat forward or backward, and then firmly pull the seat lever up. Tighten the Right Pedal (not shown) ... the right arm on the Crank (29). wise into the left over. Important: Tighten both Pedals as firmly as possible. After using the exercise cycle for one week, retighten the Pedals. Adjust the Left Pedal Strap (25) to the desired position, and press the end of the straps back ...
... arm on the Crank. HOW TO OPERATE THE EXERCISE CYCLE HOW TO ADJUST THE SEAT HOW TO ADJUST THE PEDAL STRAPS For effective exer- To adjust the seat, Seat Lever push the seat lever down, slide the seat forward or backward, and then firmly pull the seat lever up. Tighten the Right Pedal (not shown) ... the right arm on the Crank (29). wise into the left over. Important: Tighten both Pedals as firmly as possible. After using the exercise cycle for one week, retighten the Pedals. Adjust the Left Pedal Strap (25) to the desired position, and press the end of the straps back ...
English Manual
Page 21
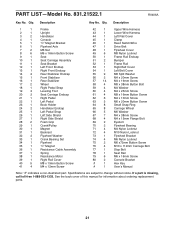
... 2 33 1 34 1 35 1 36 1 37 1 38 1 39 1 40 5 41 4 Frame Upright Handlebar Console "C" Magnet Bracket Flywheel Axle M6 Nut M6 x 16mm Button Screw Seat Seat Carriage Assembly Seat Bracket Left Front Endcap Right Front Endcap Rear Stabilizer Endcap Front Stabilizer Rear Stabilizer Wheel Right Pedal Strap Leveling Foot... Seat Carriage Endcap Right Pedal Left Pedal Book Holder Handlebar Endcap Left Pedal Strap Left Side Shield Right Side Shield Foam Grip...
... 2 33 1 34 1 35 1 36 1 37 1 38 1 39 1 40 5 41 4 Frame Upright Handlebar Console "C" Magnet Bracket Flywheel Axle M6 Nut M6 x 16mm Button Screw Seat Seat Carriage Assembly Seat Bracket Left Front Endcap Right Front Endcap Rear Stabilizer Endcap Front Stabilizer Rear Stabilizer Wheel Right Pedal Strap Leveling Foot... Seat Carriage Endcap Right Pedal Left Pedal Book Holder Handlebar Endcap Left Pedal Strap Left Side Shield Right Side Shield Foam Grip...


