

English Manual
Page 1
Patent Pending Model No. 831.21522.1 Serial No. Sears, Roebuck and Co., Hoffman Estates, IL 60179 Serial Number Decal (beneath stabilizer) • Assembly • Operation • Maintenance • Part List and Drawing BIKE EXERCISER User's Manual CAUTION Read all precautions and instructions in the space above for future reference. Keep this equipment. Write the serial number in this manual before using this manual for reference.
Patent Pending Model No. 831.21522.1 Serial No. Sears, Roebuck and Co., Hoffman Estates, IL 60179 Serial Number Decal (beneath stabilizer) • Assembly • Operation • Maintenance • Part List and Drawing BIKE EXERCISER User's Manual CAUTION Read all precautions and instructions in the space above for future reference. Keep this equipment. Write the serial number in this manual before using this manual for reference.
English Manual
Page 2
...- TABLE OF CONTENTS IMPORTANT PRECAUTIONS 2 BEFORE YOU BEGIN 3 ASSEMBLY 4 HOW TO OPERATE THE EXERCISE CYCLE 8 MAINTENANCE AND TROUBLESHOOTING 19 CONDITIONING GUIDELINES 20 PART LIST 21 EXPLODED DRAWING 22 HOW TO ORDER REPLACEMENT PARTS Back Cover 90 DAY FULL WARRANTY Back Cover IMPORTANT PRECAUTIONS WARNING: To reduce the risk of heart rate readings. tions before using the exercise cycle. 1. The exercise cycle is especially important for personal injury or property...
...- TABLE OF CONTENTS IMPORTANT PRECAUTIONS 2 BEFORE YOU BEGIN 3 ASSEMBLY 4 HOW TO OPERATE THE EXERCISE CYCLE 8 MAINTENANCE AND TROUBLESHOOTING 19 CONDITIONING GUIDELINES 20 PART LIST 21 EXPLODED DRAWING 22 HOW TO ORDER REPLACEMENT PARTS Back Cover 90 DAY FULL WARRANTY Back Cover IMPORTANT PRECAUTIONS WARNING: To reduce the risk of heart rate readings. tions before using the exercise cycle. 1. The exercise cycle is especially important for personal injury or property...
English Manual
Page 3
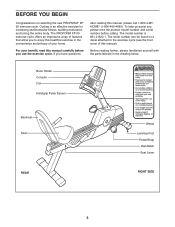
... Black Opaque - DRA REV E A 12 B PE Book Holder Console Fan Handgrip Pulse Sensor Backrest Seat REAR PART NO. box behind signal word White Opaque - Bennett CHECKED BY: D. To help us assist you * rMhuostmbee.able to the interests of features that allow you use the exercise cycle. The model number is an effective exercise for HOME® (1-800-469-4663). Evans ENG. BEFORE YOU...
... Black Opaque - DRA REV E A 12 B PE Book Holder Console Fan Handgrip Pulse Sensor Backrest Seat REAR PART NO. box behind signal word White Opaque - Bennett CHECKED BY: D. To help us assist you * rMhuostmbee.able to the interests of features that allow you use the exercise cycle. The model number is an effective exercise for HOME® (1-800-469-4663). Evans ENG. BEFORE YOU...
English Manual
Page 4
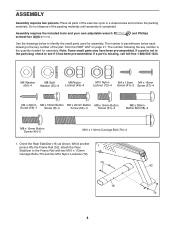
... each drawing is the key number of the part, from the PART LIST on page 21. If a part is the quantity needed for assembly. Note: Some small parts may have been pre-assembled. While another person lifts the Frame Rail (52), attach the Rear 1 Stabilizer to identify the small parts used for assembly. Assembly requires the included tools and your own adjustable wrench screwdriver . ASSEMBLY Assembly requires two persons...
... each drawing is the key number of the part, from the PART LIST on page 21. If a part is the quantity needed for assembly. Note: Some small parts may have been pre-assembled. While another person lifts the Frame Rail (52), attach the Rear 1 Stabilizer to identify the small parts used for assembly. Assembly requires the included tools and your own adjustable wrench screwdriver . ASSEMBLY Assembly requires two persons...
English Manual
Page 5
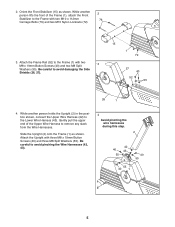
... attach the Front 2 Stabilizer to the Frame (1) with three M8 x 19mm Button Screws (40) and three M8 Split Washers (55). Orient the Front Stabilizer (15) as shown. Slide the Upright (2) onto the Frame (1) as shown. While another person holds the Upright (2) in the position shown, connect the Upper Wire...Be careful to the Lower Wire Harness (43). While another person lifts the front of the Upper Wire Harness to avoid pinching the Wire Harnesses (42, 43). 4 Avoid pinching the wire harnesses during this step. 2 42 40 43 55 40 55 55 40 1 5 Be careful to remove any slack from ...
... attach the Front 2 Stabilizer to the Frame (1) with three M8 x 19mm Button Screws (40) and three M8 Split Washers (55). Orient the Front Stabilizer (15) as shown. Slide the Upright (2) onto the Frame (1) as shown. While another person holds the Upright (2) in the position shown, connect the Upper Wire...Be careful to the Lower Wire Harness (43). While another person lifts the front of the Upper Wire Harness to avoid pinching the Wire Harnesses (42, 43). 4 Avoid pinching the wire harnesses during this step. 2 42 40 43 55 40 55 55 40 1 5 Be careful to remove any slack from ...
English Manual
Page 8
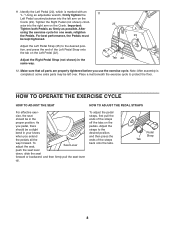
... the exercise cycle to the desired position, and then press the ends of the straps back onto the tabs. Adjust the straps to protect the floor. Pedal Strap Tab 8 Important: Tighten both Pedals as firmly as possible. After using the exercise cycle for one week, retighten the Pedals. cise, the seat should be left arm on the Crank. Make sure that all the way forward. Adjust the Right Pedal Strap...
... the exercise cycle to the desired position, and then press the ends of the straps back onto the tabs. Adjust the straps to protect the floor. Pedal Strap Tab 8 Important: Tighten both Pedals as firmly as possible. After using the exercise cycle for one week, retighten the Pedals. cise, the seat should be left arm on the Crank. Make sure that all the way forward. Adjust the Right Pedal Strap...
English Manual
Page 9
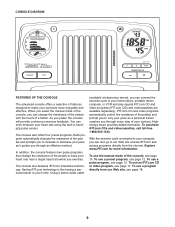
... manual mode of the console, you through every step of your workout. In addition, the console features two pulse programs that change the resistance of the pedals with the touch of a button. Using a stereo audio cable (available at www.iFIT.com and access programs directly from our Web site, see page 18. 9 Highenergy music provides added motivation. To use a program directly from the internet. The console also offers four preset programs. Each program automatically changes...
... manual mode of the console, you through every step of your workout. In addition, the console features two pulse programs that change the resistance of the pedals with the touch of a button. Using a stereo audio cable (available at www.iFIT.com and access programs directly from our Web site, see page 18. 9 Highenergy music provides added motivation. To use a program directly from the internet. The console also offers four preset programs. Each program automatically changes...
English Manual
Page 10
...), your pedaling pace in the program instead of measurement. Note: When you replace the batteries, you can show your progress with the display. While you are selecting a unit of measurement, you may have selected a program or the iFIT.com mode, reselect the manual mode by pressing the Resistance buttons. Press the Resistance - To turn on the console. Note: If there are exercising. To reset the display, press the On/Reset button. Press the Resistance + button to...
...), your pedaling pace in the program instead of measurement. Note: When you replace the batteries, you can show your progress with the display. While you are selecting a unit of measurement, you may have selected a program or the iFIT.com mode, reselect the manual mode by pressing the Resistance buttons. Press the Resistance - To turn on the console. Note: If there are exercising. To reset the display, press the On/Reset button. Press the Resistance + button to...

English Manual
Page 11
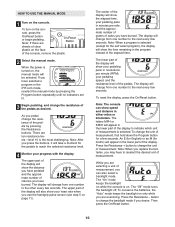
... clean the metal contacts using a soft cloth; cally turn off the fan, press Thumb Wheel the fan button a third time. If the pedals are not moved for a few minutes, the console will turn on the handgrip pulse sensor, peel off . tacts on the fan at high Fan Button speed, press the fan button a sec- After a moment, the display will then show your heart rate along with your...
... clean the metal contacts using a soft cloth; cally turn off the fan, press Thumb Wheel the fan button a third time. If the pedals are not moved for a few minutes, the console will turn on the handgrip pulse sensor, peel off . tacts on the fan at high Fan Button speed, press the fan button a sec- After a moment, the display will then show your heart rate along with your...
English Manual
Page 12
... automatically change it manually by the four profiles near a target heart rate that you . 5 Monitor your workout. (Your maximum heart rate is intended only to start the program. However, when the current period ends, the pedal resistance will flash in the program. If you are programmed for two or more consecutive periods, as shown by pressing the Resistance buttons. To restart the program, simply resume pedaling. 4 Use the pace guide to...
... automatically change it manually by the four profiles near a target heart rate that you . 5 Monitor your workout. (Your maximum heart rate is intended only to start the program. However, when the current period ends, the pedal resistance will flash in the program. If you are programmed for two or more consecutive periods, as shown by pressing the Resistance buttons. To restart the program, simply resume pedaling. 4 Use the pace guide to...

English Manual
Page 13
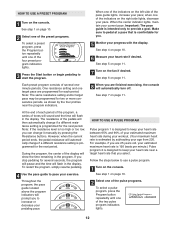
... already entered a target heart rate, press the Enter button and go to start the program. When only three seconds remain in the display. The program will flash in memory. 4 Hold the handgrip pulse sensor. To restart the program, simply resume pedaling. 6 Monitor your heart rate to the target heart rate, the resistance may automatically change it manually by pressing the Resistance buttons. button beside the Enter button to enter your heart rate to the target heart rate. Note: Once...
... already entered a target heart rate, press the Enter button and go to start the program. When only three seconds remain in the display. The program will flash in memory. 4 Hold the handgrip pulse sensor. To restart the program, simply resume pedaling. 6 Monitor your heart rate to the target heart rate, the resistance may automatically change it manually by pressing the Resistance buttons. button beside the Enter button to enter your heart rate to the target heart rate. Note: Once...

English Manual
Page 14
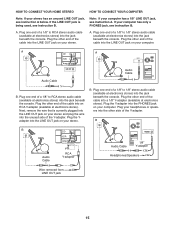
... Y-adapter. To use iFIT.com programs directly from our Web site, the exercise cycle must be connected to your portable CD player, portable stereo, home stereo, or computer with CD player. Plug one end of a 1/8" to 1/8" stereo audio cable (available at electronics stores) into the jack beneath the console. If your stereo has a 1/8" LINE OUT jack, see instruction B. LEFT A/B AUDIO OUT RIGHT LEFT LINE OUT A Audio Cable A B. Plug...
... Y-adapter. To use iFIT.com programs directly from our Web site, the exercise cycle must be connected to your portable CD player, portable stereo, home stereo, or computer with CD player. Plug one end of a 1/8" to 1/8" stereo audio cable (available at electronics stores) into the jack beneath the console. If your stereo has a 1/8" LINE OUT jack, see instruction B. LEFT A/B AUDIO OUT RIGHT LEFT LINE OUT A Audio Cable A B. Plug...
English Manual
Page 15
... Audio CableLINE OUT Audio Cable B. Plug the Y-adapter into the other end of a 1/8" to RCA stereo audio cable (available at electronics stores) into the jack beneath the console. If the LINE OUT jack is currently plugged into the LINE OUT jack on your computer. A. Note: If your computer has a 1/8" LINE OUT jack, see instruction B. A B. HOW TO CONNECT YOUR HOME STEREO HOW TO CONNECT...
... Audio CableLINE OUT Audio Cable B. Plug the Y-adapter into the other end of a 1/8" to RCA stereo audio cable (available at electronics stores) into the jack beneath the console. If the LINE OUT jack is currently plugged into the LINE OUT jack on your computer. A. Note: If your computer has a 1/8" LINE OUT jack, see instruction B. A B. HOW TO CONNECT YOUR HOME STEREO HOW TO CONNECT...
English Manual
Page 16
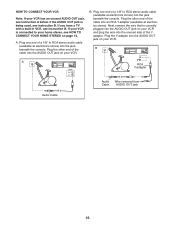
.... IN VIDEO AUDIO IN CH 34 OUT RF OUT AUDIO OUT RIGHT LEFT Audio Cable RCA Y-adapter Audio Cable Wire removed from AUDIO OUT jack B A ANT. A. If your home stereo, see instruction B. Plug one end of a 1/8" to your VCR is connected to RCA stereo audio cable (available at electronics stores) into the unused side of a 1/8" to RCA stereo audio cable (available at electron- Next, remove the wire that is being used, see...
.... IN VIDEO AUDIO IN CH 34 OUT RF OUT AUDIO OUT RIGHT LEFT Audio Cable RCA Y-adapter Audio Cable Wire removed from AUDIO OUT jack B A ANT. A. If your home stereo, see instruction B. Plug one end of a 1/8" to your VCR is connected to RCA stereo audio cable (available at electronics stores) into the unused side of a 1/8" to RCA stereo audio cable (available at electron- Next, remove the wire that is being used, see...
English Manual
Page 17
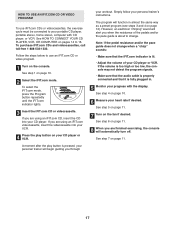
... you are finished exercising, the console will begin guiding you when the resistance of your personal trainer's instructions. Note: If the pedal resistance and/or the pace guide does not change . See step 5 on page 11. 7 Turn on pages 14 to your workout. To purchase iFIT.com CDs and videocassettes, call toll-free 1-888-533-1333. A moment after the play button on your heart rate if desired. Simply...
... you are finished exercising, the console will begin guiding you when the resistance of your personal trainer's instructions. Note: If the pedal resistance and/or the pace guide does not change . See step 5 on page 11. 7 Turn on pages 14 to your workout. To purchase iFIT.com CDs and videocassettes, call toll-free 1-888-533-1333. A moment after the play button on your heart rate if desired. Simply...

English Manual
Page 18
.... A list of specific system requirements is about to change. 8 Monitor your home computer. In addition, you when the pedal resistance and/or the pace guide is found on page 15. To use a program from our Web site, the exercise cycle must have an internet connection and an internet service provider. Read and follow the online instructions for using a program. 6 Follow the online instructions to your progress with the display. See step 5 on...
.... A list of specific system requirements is about to change. 8 Monitor your home computer. In addition, you when the pedal resistance and/or the pace guide is found on page 15. To use a program from our Web site, the exercise cycle must have an internet connection and an internet service provider. Read and follow the online instructions for using a program. 6 Follow the online instructions to your progress with the display. See step 5 on...

English Manual
Page 19
... clean the contacts. MAINTENANCE AND TROUBLESHOOTING Inspect and tighten all parts of direct sunlight. Important: To avoid damaging the console, keep liquids away from the console and keep the console out of the exercise cycle regularly. Carefully move the exercise cycle, stand behind it will be replaced. Most console problems are Leveling touching the floor. BATTERY REPLACEMENT If the displays on the console become dim, the batteries should be used, make sure...
... clean the contacts. MAINTENANCE AND TROUBLESHOOTING Inspect and tighten all parts of direct sunlight. Important: To avoid damaging the console, keep liquids away from the console and keep the console out of the exercise cycle regularly. Carefully move the exercise cycle, stand behind it will be replaced. Most console problems are Leveling touching the floor. BATTERY REPLACEMENT If the displays on the console become dim, the batteries should be used, make sure...
English Manual
Page 20
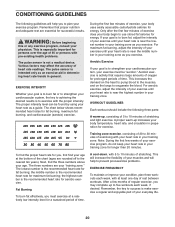
... the desired results is intended only as a guide. Training zone exercise, consisting of 20 to strengthen your training zone. Aerobic exercise is the recommended heart rate for prolonged periods of exercising with pre-existing health problems. The pulse sensor is the recommended heart rate for energy. CONDITIONING GUIDELINES The following three parts: A warm-up increases your body temperature, heart rate, and circulation in preparation for longer than 20...
... the desired results is intended only as a guide. Training zone exercise, consisting of 20 to strengthen your training zone. Aerobic exercise is the recommended heart rate for prolonged periods of exercising with pre-existing health problems. The pulse sensor is the recommended heart rate for energy. CONDITIONING GUIDELINES The following three parts: A warm-up increases your body temperature, heart rate, and circulation in preparation for longer than 20...
English Manual
Page 21
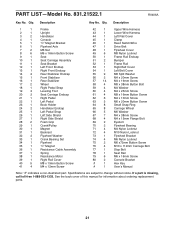
... x 16mm Button Screw Seat Seat Carriage Assembly Seat Bracket Left Front Endcap Right Front Endcap Rear Stabilizer Endcap Front Stabilizer Rear Stabilizer Wheel Right Pedal Strap Leveling Foot Seat Carriage Endcap Right Pedal Left Pedal Book Holder Handlebar Endcap Left Pedal Strap Left Side Shield Right Side Shield Foam Grip Crank/Pulley Magnet Backrest Flywheel Washer Crank Bearing Set Flywheel "C" Magnet Resistance Cable Assembly Spring Resistance Motor Right Rail Cover M8 x 19mm Button Screw M4 x 12mm Screw 42...
... x 16mm Button Screw Seat Seat Carriage Assembly Seat Bracket Left Front Endcap Right Front Endcap Rear Stabilizer Endcap Front Stabilizer Rear Stabilizer Wheel Right Pedal Strap Leveling Foot Seat Carriage Endcap Right Pedal Left Pedal Book Holder Handlebar Endcap Left Pedal Strap Left Side Shield Right Side Shield Foam Grip Crank/Pulley Magnet Backrest Flywheel Washer Crank Bearing Set Flywheel "C" Magnet Resistance Cable Assembly Spring Resistance Motor Right Rail Cover M8 x 19mm Button Screw M4 x 12mm Screw 42...

English Manual
Page 24
... equipment, and electronics, call 1-800-4-MY-HOME® (1-800-469-4663) to state. This warranty does not apply when the Bike Exerciser is used commercially or for free repair (or replacement if repair proves impossible). Get it fixed, at your nearest Sears Parts & Repair Center. 1-800-488-1222 Call anytime, day or night (U.S.A. For the replacement parts, accessories, and user's manuals that you may also have other...
... equipment, and electronics, call 1-800-4-MY-HOME® (1-800-469-4663) to state. This warranty does not apply when the Bike Exerciser is used commercially or for free repair (or replacement if repair proves impossible). Get it fixed, at your nearest Sears Parts & Repair Center. 1-800-488-1222 Call anytime, day or night (U.S.A. For the replacement parts, accessories, and user's manuals that you may also have other...

