

English Manual
Page 2
PROFORM is missing or illegible, see the front cover of this manual and request a free replacement decal. TABLE OF CONTENTS WARNING DECAL PLACEMENT 2 IMPORTANT PRECAUTIONS 3 BEFORE YOU BEGIN 4 ASSEMBLY 5 HOW TO USE THE ELLIPTICAL EXERCISER 12 MAINTENANCE AND TROUBLESHOOTING 17 EXERCISE GUIDELINES 18 PART LIST 21 EXPLODED DRAWING 22 ORDERING REPLACEMENT PARTS Back...
PROFORM is missing or illegible, see the front cover of this manual and request a free replacement decal. TABLE OF CONTENTS WARNING DECAL PLACEMENT 2 IMPORTANT PRECAUTIONS 3 BEFORE YOU BEGIN 4 ASSEMBLY 5 HOW TO USE THE ELLIPTICAL EXERCISER 12 MAINTENANCE AND TROUBLESHOOTING 17 EXERCISE GUIDELINES 18 PART LIST 21 EXPLODED DRAWING 22 ORDERING REPLACEMENT PARTS Back...

English Manual
Page 3
...become caught on a level surface, with pre-existing health problems. 2. The pulse sensor is especially important for home use your elliptical exerciser only as an exercise aid in determining heart rate trends in a commercial, rental, or institutional setting. 4. Wear appropriate ...over the age of heart rate readings. ICON assumes no responsibility for foot protection. 9. Use your elliptical exerciser in general. 12. Keep the elliptical exerciser indoors, away from your physician. Always wear athletic shoes for personal injury or property damage sustained...
...become caught on a level surface, with pre-existing health problems. 2. The pulse sensor is especially important for home use your elliptical exerciser only as an exercise aid in determining heart rate trends in a commercial, rental, or institutional setting. 4. Wear appropriate ...over the age of heart rate readings. ICON assumes no responsibility for foot protection. 9. Use your elliptical exerciser in general. 12. Keep the elliptical exerciser indoors, away from your physician. Always wear athletic shoes for personal injury or property damage sustained...
English Manual
Page 4
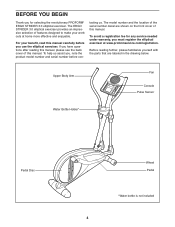
... and the location of the serial number decal are labeled in the drawing below. To avoid a registration fee for selecting the revolutionary PROFORM® ERGO STRIDER 3.0 elliptical exerciser. To help us . tacting us assist you, note the product model number and serial number before you for any service needed... questions after reading this manual, please see the back cover of this manual. BEFORE YOU BEGIN Thank you use the elliptical exerciser. The ERGO STRIDER 3.0 elliptical exerciser provides an impressive selection of features designed to make your benefit, read this manual.
... and the location of the serial number decal are labeled in the drawing below. To avoid a registration fee for selecting the revolutionary PROFORM® ERGO STRIDER 3.0 elliptical exerciser. To help us . tacting us assist you, note the product model number and serial number before you for any service needed... questions after reading this manual, please see the back cover of this manual. BEFORE YOU BEGIN Thank you use the elliptical exerciser. The ERGO STRIDER 3.0 elliptical exerciser provides an impressive selection of features designed to make your benefit, read this manual.
English Manual
Page 5
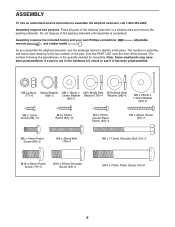
... until assembly is the key number of the part, from the PART LIST near the end of the elliptical exerciser in the hardware kit, check to assemble the elliptical exerciser, call 1-800-445-2480. Note: Some small parts may have been preassembled. ASSEMBLY To hire ...has been preassembled. Assembly requires the included tool(s) and your own Phillips screwdriver wrench , and rubber mallet . , adjustable As you assemble the elliptical exerciser, use the drawings below each drawing is completed. If a part is the quantity needed for assembly. Assembly requires two persons. The ...
... until assembly is the key number of the part, from the PART LIST near the end of the elliptical exerciser in the hardware kit, check to assemble the elliptical exerciser, call 1-800-445-2480. Note: Some small parts may have been preassembled. ASSEMBLY To hire ...has been preassembled. Assembly requires the included tool(s) and your own Phillips screwdriver wrench , and rubber mallet . , adjustable As you assemble the elliptical exerciser, use the drawings below each drawing is completed. If a part is the quantity needed for assembly. Assembly requires two persons. The ...
English Manual
Page 9
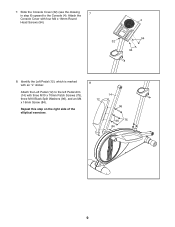
Attach the 7 Console Cover with three M10 x 70mm Patch Screws (75), three M10 Black Split Washers (96), and an M4 x 16mm Screw (84). Repeat this step on the right side of the elliptical exerciser. 8 12 14 96 96 75 84 9 Attach the Left Pedal (12) to the Console (4). Slide the Console Cover (32) (see the drawing in step 6) upward to the left Pedal Arm (14) with four M4 x 16mm Round Head Screws (94). 4 94 32 94 8. 7. Identify the Left Pedal (12), which is marked with an "L" sticker.
Attach the 7 Console Cover with three M10 x 70mm Patch Screws (75), three M10 Black Split Washers (96), and an M4 x 16mm Screw (84). Repeat this step on the right side of the elliptical exerciser. 8 12 14 96 96 75 84 9 Attach the Left Pedal (12) to the Console (4). Slide the Console Cover (32) (see the drawing in step 6) upward to the left Pedal Arm (14) with four M4 x 16mm Round Head Screws (94). 4 94 32 94 8. 7. Identify the Left Pedal (12), which is marked with an "L" sticker.
English Manual
Page 11
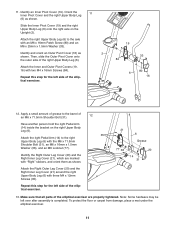
...on the right Upper Body Leg (6). 35 Attach the right Pedal Arm (14) to the barrel of the elliptical exerciser. 21 6 Grease 77 36 20 14 31 13. Attach the right Upper Body Leg (6) to ... and orient an Outer Pivot Cover (16) as shown. Repeat this step for the left side of the elliptical exerciser. 19 33 84 6 80 16 12. Identify an Inner Pivot Cover (19). Apply a small amount...on the Upright (2). Then, slide the Outer Pivot Cover onto the outer side of the elliptical exerciser are marked with "Right" stickers, and orient them as shown. To protect the floor or carpet...
...on the right Upper Body Leg (6). 35 Attach the right Pedal Arm (14) to the barrel of the elliptical exerciser. 21 6 Grease 77 36 20 14 31 13. Attach the right Upper Body Leg (6) to ... and orient an Outer Pivot Cover (16) as shown. Repeat this step for the left side of the elliptical exerciser. 19 33 84 6 80 16 12. Identify an Inner Pivot Cover (19). Apply a small amount...on the Upright (2). Then, slide the Outer Pivot Cover onto the outer side of the elliptical exerciser are marked with "Right" stickers, and orient them as shown. To protect the floor or carpet...
English Manual
Page 12
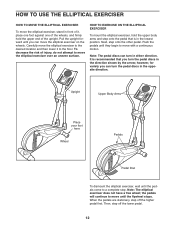
...direction. Pull the upright forward until the flywheel stops. HOW TO EXERCISE ON THE ELLIPTICAL EXERCISER To mount the elliptical exerciser, hold the upper end of injury, do not attempt to move the elliptical exerciser over an uneven surface. Upright Upper Body Arms Place your foot here Wheel Pedals... until they begin to a complete stop. To decrease the risk of the upright. Push the pedals until the pedals come to move the elliptical exerciser, stand in the lowest position. When the pedals are stationary, step off the lower pedal. 12 Then, step off the higher pedal...
...direction. Pull the upright forward until the flywheel stops. HOW TO EXERCISE ON THE ELLIPTICAL EXERCISER To mount the elliptical exerciser, hold the upper end of injury, do not attempt to move the elliptical exerciser over an uneven surface. Upright Upper Body Arms Place your foot here Wheel Pedals... until they begin to a complete stop. To decrease the risk of the upright. Push the pedals until the pedals come to move the elliptical exerciser, stand in the lowest position. When the pedals are stationary, step off the lower pedal. 12 Then, step off the higher pedal...
English Manual
Page 17
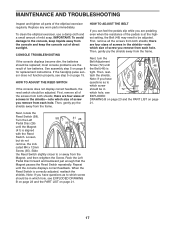
...which size of direct sunlight. See assembly step 5 on page 15. there are four sizes of screws in the shields-note which size of the elliptical exerciser regularly. Next, turn the Belt Adjustment Screw (72) until 46 the Belt (46) is aligned with the Reed Switch. Loosen, but ...feedback, the reed switch should be adjusted. Slide the Reed Switch slightly closer to be in 72 which screw should be replaced; To clean the elliptical exerciser, use a damp cloth and a small amount of the pedals is correctly adjusted, reattach the shields. HOW TO ADJUST THE BELT If ...
...which size of direct sunlight. See assembly step 5 on page 15. there are four sizes of screws in the shields-note which size of the elliptical exerciser regularly. Next, turn the Belt Adjustment Screw (72) until 46 the Belt (46) is aligned with the Reed Switch. Loosen, but ...feedback, the reed switch should be adjusted. Slide the Reed Switch slightly closer to be in 72 which screw should be replaced; To clean the elliptical exerciser, use a damp cloth and a small amount of the pedals is correctly adjusted, reattach the shields. HOW TO ADJUST THE BELT If ...


