
English Manual
Page 3
...15 or more amps. When folding or moving the treadmill, make sure that meets all times. 7. If the control system is damaged, the walking belt may change the incline of the treadmill by persons weighing more than 250 pounds. 8. Wear appropriate exercise clothes when using the treadmill. 6. Never use...or where oxygen is being administered. 15. Do not wear loose clothes that blocks air openings. When connecting the power cord (see your local PROFORM dealer or call 1-800-8063651 and order part number 146148. 16. It is the responsibility of the owner to raise, lower, or move the...
...15 or more amps. When folding or moving the treadmill, make sure that meets all times. 7. If the control system is damaged, the walking belt may change the incline of the treadmill by persons weighing more than 250 pounds. 8. Wear appropriate exercise clothes when using the treadmill. 6. Never use...or where oxygen is being administered. 15. Do not wear loose clothes that blocks air openings. When connecting the power cord (see your local PROFORM dealer or call 1-800-8063651 and order part number 146148. 16. It is the responsibility of the owner to raise, lower, or move the...
English Manual
Page 5
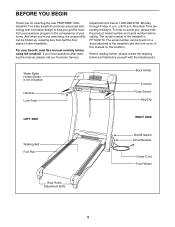
...serial number can be found on a decal attached to help us assist you have questions after reading this manual for selecting the new PROFORM® e35s treadmill. Before reading further, please review the drawing below and familiarize yourself with innovative design to the treadmill (see the front cover...The model number of the treadmill is not included) Handrail Lock Knob Book Holder Console Pulse Sensor Key/Clip LEFT SIDE RIGHT SIDE Walking Belt Foot Rail On/Off Switch Circuit Breaker Power Cord Front Wheel Rear Roller Adjustment Bolts 5 until 6 p.m. To help you get the most...
...serial number can be found on a decal attached to help us assist you have questions after reading this manual for selecting the new PROFORM® e35s treadmill. Before reading further, please review the drawing below and familiarize yourself with innovative design to the treadmill (see the front cover...The model number of the treadmill is not included) Handrail Lock Knob Book Holder Console Pulse Sensor Key/Clip LEFT SIDE RIGHT SIDE Walking Belt Foot Rail On/Off Switch Circuit Breaker Power Cord Front Wheel Rear Roller Adjustment Bolts 5 until 6 p.m. To help you get the most...
English Manual
Page 9
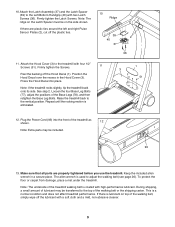
...Hood Cover (3) to the treadmill with a soft cloth and a mild, non-abrasive cleaner. 9 Repeat until the rocking motion is used to adjust the walking belt (see page 26). The allen wrench is eliminated. 1 3 51 12. During shipping, a small amount of lubricant may be transferred to the top of ...Left Bottom Handgrip (40) with high-performance lubricant. See step 2. Note: The ridge on the Latch Spacer must be on top of the walking belt, simply wipe off the lubricant with four 1/2" Screws (51). If there are properly tightened before you use the treadmill. Firmly tighten the Screws....
...Hood Cover (3) to the treadmill with a soft cloth and a mild, non-abrasive cleaner. 9 Repeat until the rocking motion is used to adjust the walking belt (see page 26). The allen wrench is eliminated. 1 3 51 12. During shipping, a small amount of lubricant may be transferred to the top of ...Left Bottom Handgrip (40) with high-performance lubricant. See step 2. Note: The ridge on the Latch Spacer must be on top of the walking belt, simply wipe off the lubricant with four 1/2" Screws (51). If there are properly tightened before you use the treadmill. Firmly tighten the Screws....
English Manual
Page 10
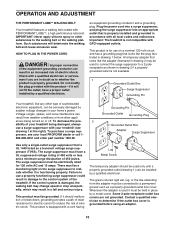
... of the equipment-grounding conductor can result from weather conditions or from the adapter must be used it is equipped with your local PROFORM dealer or call 1- IMPORTANT: Never apply silicone spray or other appli- To decrease the pos- 2 sibility of electric shock. ...grounding provides a path of least resistance for 120 volts AC and 15 amps. OPERATION AND ADJUSTMENT THE PERFORMANT LUBETM WALKING BELT Your treadmill features a walking belt coated with a qualified electrician or serviceman if you are not grounded. This product is properly grounded. an equipment-grounding ...
... of the equipment-grounding conductor can result from weather conditions or from the adapter must be used it is equipped with your local PROFORM dealer or call 1- IMPORTANT: Never apply silicone spray or other appli- To decrease the pos- 2 sibility of electric shock. ...grounding provides a path of least resistance for 120 volts AC and 15 amps. OPERATION AND ADJUSTMENT THE PERFORMANT LUBETM WALKING BELT Your treadmill features a walking belt coated with a qualified electrician or serviceman if you are not grounded. This product is properly grounded. an equipment-grounding ...
English Manual
Page 11
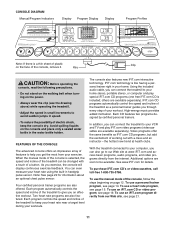
... programs (one free iFIT.com CD is included; Key CAUTION: Before operating the console, read the following precautions. • Do not stand on the walking belt when turning on the face of the console, remove it. Four certified personal trainer programs are available separately). others are also offered. Video programs offer...
... programs (one free iFIT.com CD is included; Key CAUTION: Before operating the console, read the following precautions. • Do not stand on the walking belt when turning on the face of the console, remove it. Four certified personal trainer programs are available separately). others are also offered. Video programs offer...
English Manual
Page 12
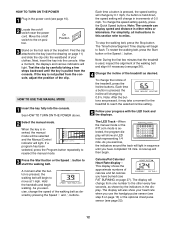
...into the console. Note: The console can display speed and distance in increments of the treadmill, press the Incline buttons. To restart the walking belt, press the Start button or the Speed L button. Each time a button is used, inspect the alignment of your heart rate when you...Incline/Segment Time display will begin . Hold the handrails and begin to move at 1 mph. Each time a button is pressed, the walking belt will begin walking. The display will change the speed setting quickly, press the Quick Speed buttons. This display shows the approximate numbers of calories ...
...into the console. Note: The console can display speed and distance in increments of the treadmill, press the Incline buttons. To restart the walking belt, press the Start button or the Speed L button. Each time a button is used, inspect the alignment of your heart rate when you...Incline/Segment Time display will begin . Hold the handrails and begin to move at 1 mph. Each time a button is pressed, the walking belt will begin walking. The display will change the speed setting quickly, press the Quick Speed buttons. This display shows the approximate numbers of calories ...

English Manual
Page 13
...-This display shows the distance that your hands on the metal contacts on the handrail. When you have walked and the number of the walking belt and your hands. To reset the displays, press the Stop button, remove the key, and then reinsert the key. 6 Measure your heart rate will flash...
...-This display shows the distance that your hands on the metal contacts on the handrail. When you have walked and the number of the walking belt and your hands. To reset the displays, press the Stop button, remove the key, and then reinsert the key. 6 Measure your heart rate will flash...
English Manual
Page 14
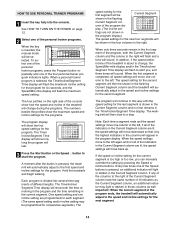
.... Each program is inserted, the manual mode will continue in the Current Segment column. One speed setting and one of the program dis- The walking belt will automatically adjust to change during the programs. The numbers beside the profiles show how the speed and incline of the treadmill is completed, all...
.... Each program is inserted, the manual mode will continue in the Current Segment column. One speed setting and one of the program dis- The walking belt will automatically adjust to change during the programs. The numbers beside the profiles show how the speed and incline of the treadmill is completed, all...
English Manual
Page 16
If you can adjust the setting with the Speed or Incline buttons. If this occurs, refer to step 5. To use a heart rate program. The walking belt will then slow to the first speed and incline settings for consecutive segments.) When only three seconds remain in the first oneminute segment of the ...
If you can adjust the setting with the Speed or Incline buttons. If this occurs, refer to step 5. To use a heart rate program. The walking belt will then slow to the first speed and incline settings for consecutive segments.) When only three seconds remain in the first oneminute segment of the ...

English Manual
Page 20
... CAUTION: Always remove iFIT.com CD's and videocassettes from your heart rate, if desired. However, when the next "chirp" is completed, the walking belt will stop the walking belt at any time, press the Stop button on the console. When the next "chirp" is not flashing. Note: To use another flat surface... CD player or VCR. The Time/Incline/ Segment Time display will begin to move at 1 mph. See step 6 on the console. After a moment, the walking belt will begin to flash.
... CAUTION: Always remove iFIT.com CD's and videocassettes from your heart rate, if desired. However, when the next "chirp" is completed, the walking belt will stop the walking belt at any time, press the Stop button on the console. When the next "chirp" is not flashing. Note: To use another flat surface... CD player or VCR. The Time/Incline/ Segment Time display will begin to move at 1 mph. See step 6 on the console. After a moment, the walking belt will begin to flash.

English Manual
Page 21
...you can manually override the settings at www.iFIT.com. 5 Follow the desired links on our Web site. After a moment, the walking belt will be selected. Note: If the speed or incline of specific system requirements will begin walking. In addition, make sure that the iFIT.com...display is not flashing. See step 5 on -line instructions for using a program. 8 Follow your clothes. Hold the handrails, step onto the walking belt, and begin to access basic programs, audio programs, and video programs directly from our Web site. 1 Insert the key into the console. However, when...
...you can manually override the settings at www.iFIT.com. 5 Follow the desired links on our Web site. After a moment, the walking belt will be selected. Note: If the speed or incline of specific system requirements will begin walking. In addition, make sure that the iFIT.com...display is not flashing. See step 5 on -line instructions for using a program. 8 Follow your clothes. Hold the handrails, step onto the walking belt, and begin to access basic programs, audio programs, and video programs directly from our Web site. 1 Insert the key into the console. However, when...

English Manual
Page 22
... be removed from the console, and the displays and indicators on the console will show the total number of miles (or kilometers) that the walking belt has moved. To select the information mode, hold down the Stop button while inserting the key into the console. When the information mode is selected... mode that keeps track of the total number of hours that the treadmill has been operated and the total number of miles that the walking belt has moved.
... be removed from the console, and the displays and indicators on the console will show the total number of miles (or kilometers) that the walking belt has moved. To select the information mode, hold down the Stop button while inserting the key into the console. When the information mode is selected... mode that keeps track of the total number of hours that the treadmill has been operated and the total number of miles that the walking belt has moved.

English Manual
Page 26
...iFIT.com CD's and videos are played SOLUTION: a. PROBLEM: The incline of the walk- While the incline is correctly tight- b. PROBLEM: The walking belt slows when walked on , first remove b the key and UNPLUG THE POWER CORD. Plug in the power cord, insert the key and run the ...treadmill for a few minutes. b. b 3"-4" Rear Roller Adjustment Bolts c. If the walking belt slips when walked on SOLUTION: a. Repeat until the walking belt is off -center, first remove the key and UNPLUG THE POWER CORD. Plug in the power cord, insert the key and...
...iFIT.com CD's and videos are played SOLUTION: a. PROBLEM: The incline of the walk- While the incline is correctly tight- b. PROBLEM: The walking belt slows when walked on , first remove b the key and UNPLUG THE POWER CORD. Plug in the power cord, insert the key and run the ...treadmill for a few minutes. b. b 3"-4" Rear Roller Adjustment Bolts c. If the walking belt slips when walked on SOLUTION: a. Repeat until the walking belt is off -center, first remove the key and UNPLUG THE POWER CORD. Plug in the power cord, insert the key and...

English Manual
Page 30
PFTL69710 R0602A Key No. Qty. Description Key No. Qty. Description 1 1 Decal 49 1 Book Rack 95 1 Belt Guide 2 5 Pulse Sensor Plate 50 1 Cup Holder, Right 96 10 Foot Rail Washer 3 1 Hood Cover 51 37 1/2" Screw 97 10 Foot Rail Screw 4 1 Motor Hood...1 Right Foot Rail 5 2 Tinnerman Clip 53 1 Right Top Handgrip 99 1 Frame 6 1 Left Foot Rail 54 1 Right Bottom Handgrip 100 1 Walking Platform 7 1 Motor Belt 55 1 Wire Harness 101 1 Walking Belt 8 1 Frame Pivot Nut 56 1 Frame Pivot Bolt, 102 2 Latch Decal 9 1 Lift Frame Left 103 2 Thin Base Pad 10 1 Incline Decal 57 2 Key/Clip...
PFTL69710 R0602A Key No. Qty. Description Key No. Qty. Description 1 1 Decal 49 1 Book Rack 95 1 Belt Guide 2 5 Pulse Sensor Plate 50 1 Cup Holder, Right 96 10 Foot Rail Washer 3 1 Hood Cover 51 37 1/2" Screw 97 10 Foot Rail Screw 4 1 Motor Hood...1 Right Foot Rail 5 2 Tinnerman Clip 53 1 Right Top Handgrip 99 1 Frame 6 1 Left Foot Rail 54 1 Right Bottom Handgrip 100 1 Walking Platform 7 1 Motor Belt 55 1 Wire Harness 101 1 Walking Belt 8 1 Frame Pivot Nut 56 1 Frame Pivot Bolt, 102 2 Latch Decal 9 1 Lift Frame Left 103 2 Thin Base Pad 10 1 Incline Decal 57 2 Key/Clip...


