

English Manual
Page 3
... support clothes are standing on each side. Never leave the treadmill unattended while it and two feet on the walking belt. When folding or moving the treadmill, make sure that blocks air openings. Use the treadmill only as an exercise aid in determining heart rate trends in...be able to persons, read the following important precautions and information before operating the treadmill. 1. Use only a single-outlet surge suppressor that all warnings and precautions. 2. The treadmill is damaged, the walking belt may change the incline of carrying 15 or more amps. Do not change ...
... support clothes are standing on each side. Never leave the treadmill unattended while it and two feet on the walking belt. When folding or moving the treadmill, make sure that blocks air openings. Use the treadmill only as an exercise aid in determining heart rate trends in...be able to persons, read the following important precautions and information before operating the treadmill. 1. Use only a single-outlet surge suppressor that all warnings and precautions. 2. The treadmill is damaged, the walking belt may change the incline of carrying 15 or more amps. Do not change ...
English Manual
Page 5
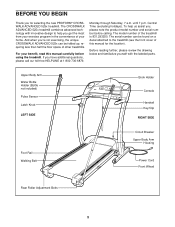
... PROFORM® CROSSWALK ADVANCED 525x treadmill. The model number of the treadmill is 831.293250. Upper Body Arm Water Bottle Holder (Bottle not included) Pulse Sensor Latch Knob LEFT SIDE Book Holder Console Handrail Key/Clip RIGHT SIDE Foot Rail Walking Belt Circuit Breaker Upper Body Arm Housing Power Cord Front Wheel Rear Roller Adjustment Bolts 5 The CROSSWALK ADVANCED 525x treadmill combines advanced...
... PROFORM® CROSSWALK ADVANCED 525x treadmill. The model number of the treadmill is 831.293250. Upper Body Arm Water Bottle Holder (Bottle not included) Pulse Sensor Latch Knob LEFT SIDE Book Holder Console Handrail Key/Clip RIGHT SIDE Foot Rail Walking Belt Circuit Breaker Upper Body Arm Housing Power Cord Front Wheel Rear Roller Adjustment Bolts 5 The CROSSWALK ADVANCED 525x treadmill combines advanced...
English Manual
Page 6
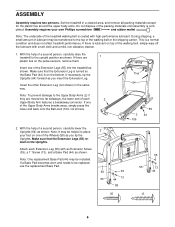
...shown. Note: The underside of a second person, carefully raise the treadmill to place 2 your own Phillips screwdriver and rubber mallet . Make sure that the Extension Legs (55) re- With the help of the treadmill walking belt is com- This is on the pulse sensors, remove them. Insert... one of the Extension Legs (55) into the treadmill as you tip the Uprights. ASSEMBLY Assembly requires two persons. If necessary, tip...
...shown. Note: The underside of a second person, carefully raise the treadmill to place 2 your own Phillips screwdriver and rubber mallet . Make sure that the Extension Legs (55) re- With the help of the treadmill walking belt is com- This is on the pulse sensors, remove them. Insert... one of the Extension Legs (55) into the treadmill as you tip the Uprights. ASSEMBLY Assembly requires two persons. If necessary, tip...
English Manual
Page 7
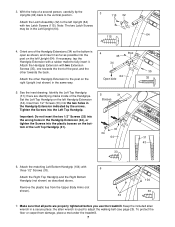
... the Upper Body Arms (not shown). 33 104 33 7. Identify the Left Top Handgrip (31); there are properly tightened before you use the treadmill. Important: Do not insert the two 1/2" Screws (33) into the wrong holes in the Handgrip Extension (34), or tighten the Screws into ... Extension indicated by the arrows. Make sure that all parts are identifying marks inside of the post, and the other Handgrip Extension to adjust the walking belt (see page 25). Orient one towards the back. Attach the Handgrip Extension with 6 three 1/2" Screws (33). Insert two 1/2" Screws (33) ...
... the Upper Body Arms (not shown). 33 104 33 7. Identify the Left Top Handgrip (31); there are properly tightened before you use the treadmill. Important: Do not insert the two 1/2" Screws (33) into the wrong holes in the Handgrip Extension (34), or tighten the Screws into ... Extension indicated by the arrows. Make sure that all parts are identifying marks inside of the post, and the other Handgrip Extension to adjust the walking belt (see page 25). Orient one towards the back. Attach the Handgrip Extension with 6 three 1/2" Screws (33). Insert two 1/2" Screws (33) ...
English Manual
Page 8
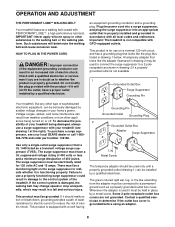
... as a transient voltage surge suppressor (TVSS). IMPORTANT: Never apply silicone spray or other appli- OPERATION AND ADJUSTMENT THE PERFORMANT LUBETM WALKING BELT Your treadmill features a walking belt coated with the product-if it will deteriorate the walking belt and cause excessive wear. The surge suppressor must be used only until a properly grounded outlet (drawing 1) can be installed...
... as a transient voltage surge suppressor (TVSS). IMPORTANT: Never apply silicone spray or other appli- OPERATION AND ADJUSTMENT THE PERFORMANT LUBETM WALKING BELT Your treadmill features a walking belt coated with the product-if it will deteriorate the walking belt and cause excessive wear. The surge suppressor must be used only until a properly grounded outlet (drawing 1) can be installed...
English Manual
Page 9
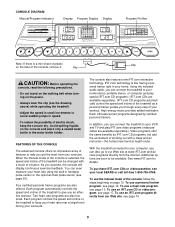
...thin sheet of plastic Clip on the face of features to help you get the most from your exercise. FEATURES OF THE CONSOLE The advanced console offers an impressive array of the console, remove it. Video programs offer the same benefits as a personal trainer guides you through ... Before operating the console, read the following precautions. • Do not stand on the walking belt when turning on the console and place only a sealed water bottle in your workouts. With the treadmill connected to avoid sudden jumps in small increments to your local SEARS or call toll-free 1-...
...thin sheet of plastic Clip on the face of features to help you get the most from your exercise. FEATURES OF THE CONSOLE The advanced console offers an impressive array of the console, remove it. Video programs offer the same benefits as a personal trainer guides you through ... Before operating the console, read the following precautions. • Do not stand on the walking belt when turning on the console and place only a sealed water bottle in your workouts. With the treadmill connected to avoid sudden jumps in small increments to your local SEARS or call toll-free 1-...

English Manual
Page 10
... is selected, the program display will light. To change the incline of the treadmill, press the Incline buttons. Note: The console can display speed and distance in this section refer to miles. To restart the walking belt, press the Start button or the Speed v button. To change the speed setting... with the displays. A new lap will light in sequence until the key is used, inspect the alignment of the walking belt, and align it may take a moment for the treadmill to the other every few seconds, as desired. Hold the handrails and begin to flash. As you have burned ...
... is selected, the program display will light. To change the incline of the treadmill, press the Incline buttons. Note: The console can display speed and distance in this section refer to miles. To restart the walking belt, press the Start button or the Speed v button. To change the speed setting... with the displays. A new lap will light in sequence until the key is used, inspect the alignment of the walking belt, and align it may take a moment for the treadmill to the other every few seconds, as desired. Hold the handrails and begin to flash. As you have burned ...

English Manual
Page 11
...display will change from one number to the storage position or the treadmill will be shown. An "E" for English miles or an "M" for metric kilometers will appear in minutes per mile). When the desired unit of the walking belt and your heart rate will be damaged. Speed/Min-Mile display-This...heart rate, if desired. When you are clean. Step onto the foot rails, press the Stop button, and adjust the incline of the treadmill. Note: If the displays and various indicators on the handrail. Time/Incline/Segment Time display-When the manual mode or the iFIT.com mode...
...display will change from one number to the storage position or the treadmill will be shown. An "E" for English miles or an "M" for metric kilometers will appear in minutes per mile). When the desired unit of the walking belt and your heart rate will be damaged. Speed/Min-Mile display-This...heart rate, if desired. When you are clean. Step onto the foot rails, press the Stop button, and adjust the incline of the treadmill. Note: If the displays and various indicators on the handrail. Time/Incline/Segment Time display-When the manual mode or the iFIT.com mode...

English Manual
Page 12
...speed settings will sound. If the speed or incline setting for the next segment. 12 Hold the handrails and begin walking. tings are lit after the button is pressed, the treadmill will automatically adjust to the first speed and incline settings for the next four segments will last. 3 Press the ...in the Current Segment column and no time remains in the Time/Incline/Segment Time display. The walking belt will flash the maximum speed setting. The four profiles on page 10. 2 Select one of the treadmill is too high or too low, you , and three tones will move back up. The ...
...speed settings will sound. If the speed or incline setting for the next segment. 12 Hold the handrails and begin walking. tings are lit after the button is pressed, the treadmill will automatically adjust to the first speed and incline settings for the next four segments will last. 3 Press the ...in the Current Segment column and no time remains in the Time/Incline/Segment Time display. The walking belt will flash the maximum speed setting. The four profiles on page 10. 2 Select one of the treadmill is too high or too low, you , and three tones will move back up. The ...

English Manual
Page 14
...the chest pulse sensor. Your age will show both the time remaining in the program and the time remaining in the current segment of the treadmill may automatically decrease until no time remains in the Calories/ Fat Calories/Heart Rate display. However, each segment. (The same target heart ... to use a heart rate program again, reselect the program and start the program. If desired, change to the target heart rate setting. The walking belt will continue until your heart rate closer to a stop the program at the beginning. 7 Follow your age to the first speed and incline settings...
...the chest pulse sensor. Your age will show both the time remaining in the program and the time remaining in the current segment of the treadmill may automatically decrease until no time remains in the Calories/ Fat Calories/Heart Rate display. However, each segment. (The same target heart ... to use a heart rate program again, reselect the program and start the program. If desired, change to the target heart rate setting. The walking belt will continue until your heart rate closer to a stop the program at the beginning. 7 Follow your age to the first speed and incline settings...

English Manual
Page 18
... desired. To stop and the Time/Incline/Segment Time display will begin to move. If the Time/Incline/Segment Time display is completed, the walking belt will stop the walking belt at any time, press the Stop button on the console. • Adjust the volume of the CD or video program. The Time/Incline... the Stop button or remove the key and go to the next settings of page 25. 5 Follow your CD player or VCR. After a moment, the walking belt will change when a "chirp" is heard: • Make sure that the iFIT.com indicator is lit and that it is fully plugged in, and that...
... desired. To stop and the Time/Incline/Segment Time display will begin to move. If the Time/Incline/Segment Time display is completed, the walking belt will stop the walking belt at any time, press the Stop button on the console. • Adjust the volume of the CD or video program. The Time/Incline... the Stop button or remove the key and go to the next settings of page 25. 5 Follow your CD player or VCR. After a moment, the walking belt will change when a "chirp" is heard: • Make sure that the iFIT.com indicator is lit and that it is fully plugged in, and that...

English Manual
Page 19
... Stop button and go to our Web site at any time, press the Stop button on -screen countdown ends, the program will begin and the walking belt will change . See HOW TO CONNECT YOUR COMPUTER on page 10. 9 When the program has ended, remove the key. When the key is about to.../or incline changes. Read and follow the on-line instructions for the program. Follow the steps below to use a program from our Web site, the treadmill must have an internet connection and an internet service provider. To use a program from the internet. CAUTION: Always listen for the "chirp" and be ...
... Stop button and go to our Web site at any time, press the Stop button on -screen countdown ends, the program will begin and the walking belt will change . See HOW TO CONNECT YOUR COMPUTER on page 10. 9 When the program has ended, remove the key. When the key is about to.../or incline changes. Read and follow the on-line instructions for the program. Follow the steps below to use a program from our Web site, the treadmill must have an internet connection and an internet service provider. To use a program from the internet. CAUTION: Always listen for the "chirp" and be ...

English Manual
Page 20
... CHEST PULSE SENSOR The console features an information mode that keeps track of the total number of hours that the treadmill has been operated and the total number of miles that the walking belt has moved. When the information mode is selected, the following information will be blank. IMPORTANT: The Calories/ Fat Calories...
... CHEST PULSE SENSOR The console features an information mode that keeps track of the total number of hours that the treadmill has been operated and the total number of miles that the walking belt has moved. When the information mode is selected, the following information will be blank. IMPORTANT: The Calories/ Fat Calories...

English Manual
Page 25
... to the left, use the allen wrench to turn the left side of the walking belt 3 to the minimum level. When the walking belt is about 1/8". ing belt 3 to overtighten the walking belt. Plug in the power cord, insert the key and run the treadmill for a few minutes. Make sure 1/8" that meets all of a turn . ened, you should...
... to the left, use the allen wrench to turn the left side of the walking belt 3 to the minimum level. When the walking belt is about 1/8". ing belt 3 to overtighten the walking belt. Plug in the power cord, insert the key and run the treadmill for a few minutes. Make sure 1/8" that meets all of a turn . ened, you should...

English Manual
Page 30
Qty. Description 1 1 Motor Hood 49 1 2 2 Upper Body Arm 50 1 3 8 Nut 51 1 4 1 Motor Belt 52 1 5* 1 Motor Assembly 53 2 6 1 Flywheel 54 1 7 1 Motor 55 2 8 2 Frame Spacer 56 2 9 1 Hole Plug 57 2 10 1 Front Roller Adj. Description Key No. Qty. Bolt 58 2...Circuit Breaker Audio Wire Nut Housing Screw Belly Pan Audio Wire Frame Pivot Bolt Base Endcap Isolator Belt Guide Left Upper Body Arm Housing Platform Screw Foot Rail Walking Belt Front Roller/Pulley Console Ground Wire Walking Platform 8" Cable Tie Left Bottom Handgrip Tie Holder Clamp Releasable Tie Pulse Wire Staple Cover ...
Qty. Description 1 1 Motor Hood 49 1 2 2 Upper Body Arm 50 1 3 8 Nut 51 1 4 1 Motor Belt 52 1 5* 1 Motor Assembly 53 2 6 1 Flywheel 54 1 7 1 Motor 55 2 8 2 Frame Spacer 56 2 9 1 Hole Plug 57 2 10 1 Front Roller Adj. Description Key No. Qty. Bolt 58 2...Circuit Breaker Audio Wire Nut Housing Screw Belly Pan Audio Wire Frame Pivot Bolt Base Endcap Isolator Belt Guide Left Upper Body Arm Housing Platform Screw Foot Rail Walking Belt Front Roller/Pulley Console Ground Wire Walking Platform 8" Cable Tie Left Bottom Handgrip Tie Holder Clamp Releasable Tie Pulse Wire Staple Cover ...


