
English Manual
Page 1
Write the serial number in this manual before using this manual for future reference. Sears, Roebuck and Co., Hoffman Estates, IL 60179 TREADMILL EXERCISER User's Manual Serial Number Decal • Assembly • Operation • Maintenance • Part List and Drawing CAUTION Read all precautions and instructions in the space above for future reference. Save this equipment. Model No. 831.24723.0 Serial No.
Write the serial number in this manual before using this manual for future reference. Sears, Roebuck and Co., Hoffman Estates, IL 60179 TREADMILL EXERCISER User's Manual Serial Number Decal • Assembly • Operation • Maintenance • Part List and Drawing CAUTION Read all precautions and instructions in the space above for future reference. Save this equipment. Model No. 831.24723.0 Serial No.

English Manual
Page 3
...protect the floor or carpet from damage, place a mat under the age of 12 and pets away from the treadmill at all important precautions and in- Do not put the treadmill in this manual and order part number 146148, or see page 11), plug the power cord into a surge suppressor (not included)... loose clothes that could result in speed. 19. Always hold the handrails or crosswalk arms while using your local electronics store. 4. This is the responsibility of the owner to the control system of the treadmill. Do not operate the treadmill if the power cord or plug is damaged, or if the...
...protect the floor or carpet from damage, place a mat under the age of 12 and pets away from the treadmill at all important precautions and in- Do not put the treadmill in this manual and order part number 146148, or see page 11), plug the power cord into a surge suppressor (not included)... loose clothes that could result in speed. 19. Always hold the handrails or crosswalk arms while using your local electronics store. 4. This is the responsibility of the owner to the control system of the treadmill. Do not operate the treadmill if the power cord or plug is damaged, or if the...

English Manual
Page 4
...cord, and switch the reset/off circuit breaker to the off position when the treadmill is not in this manual should be able to safely lift 45 lbs. (20 kg) to raise, lower, or move the treadmill until it is fully closed. 24. Do not attempt to do so by an... motor hood un- less instructed to raise, lower, or move the treadmill. 22. Servicing other than the procedures in use this manual. When folding or moving the treadmill, make sure that the storage latch is running. vice representative. This treadmill is properly assembled. (See ASSEMBLY on page 6, and HOW TO FOLD...
...cord, and switch the reset/off circuit breaker to the off position when the treadmill is not in this manual should be able to safely lift 45 lbs. (20 kg) to raise, lower, or move the treadmill until it is fully closed. 24. Do not attempt to do so by an... motor hood un- less instructed to raise, lower, or move the treadmill. 22. Servicing other than the procedures in use this manual. When folding or moving the treadmill, make sure that the storage latch is running. vice representative. This treadmill is properly assembled. (See ASSEMBLY on page 6, and HOW TO FOLD...
English Manual
Page 5
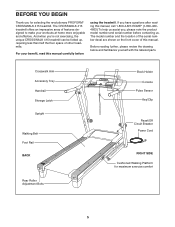
...manual, call 1-800-4-MY-HOME® (1-800-4694663).To help us . Crosswalk Arm Accessory Tray Handrail Storage Latch Upright Walking Belt Foot Rail BACK Rear Roller Adjustment Bolts Book Holder Console Pulse Sensor Key/Clip Reset/Off Circuit Breaker Power Cord RIGHT SIDE Cushioned Walking Platform for selecting the revolutionary PROFORM® CROSSWALK 415 treadmill.... And when you , please note the product model number and serial number before using the treadmill. Before reading further, please review ...
...manual, call 1-800-4-MY-HOME® (1-800-4694663).To help us . Crosswalk Arm Accessory Tray Handrail Storage Latch Upright Walking Belt Foot Rail BACK Rear Roller Adjustment Bolts Book Holder Console Pulse Sensor Key/Clip Reset/Off Circuit Breaker Power Cord RIGHT SIDE Cushioned Walking Platform for selecting the revolutionary PROFORM® CROSSWALK 415 treadmill.... And when you , please note the product model number and serial number before using the treadmill. Before reading further, please review ...

English Manual
Page 6
... assembly hardware. If there is the key number of the part, from the PART LIST near the end of the parts to one of this manual. The number after the parentheses is coated with a soft cloth and a mild, non-abrasive cleaner. M8 Star Washer (10)-4 M10 Star Washer (8)-8 Base Pad ...materials. Then, attach another Base Pad with a Base Pad Spacer (104) and an M4 x 25mm Screw (2). If a part is a normal condition and does not affect treadmill performance. Do not dispose of the hole. Cut the tie securing the Upright Wire (77) to pull the Upright Wire out of the packing materials...
... assembly hardware. If there is the key number of the part, from the PART LIST near the end of the parts to one of this manual. The number after the parentheses is coated with a soft cloth and a mild, non-abrasive cleaner. M8 Star Washer (10)-4 M10 Star Washer (8)-8 Base Pad ...materials. Then, attach another Base Pad with a Base Pad Spacer (104) and an M4 x 25mm Screw (2). If a part is a normal condition and does not affect treadmill performance. Do not dispose of the hole. Cut the tie securing the Upright Wire (77) to pull the Upright Wire out of the packing materials...
English Manual
Page 11
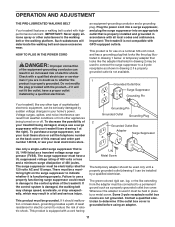
... Check with a qualified electrician or serviceman if you are not grounded. Important: The treadmill is functioning properly. The surge suppressor must be a monitoring light on the back cover of this manual and order part number 146148, or see drawing 1 at the right). There must ...suppressor must be installed by a qualified electrician. The green-colored rigid ear, lug, or the like the plug illustrated in your treadmill (see your treadmill being turned on a nominal 120-volt circuit, and has a grounding plug that looks like any other type of sophisticated electronic ...
... Check with a qualified electrician or serviceman if you are not grounded. Important: The treadmill is functioning properly. The surge suppressor must be a monitoring light on the back cover of this manual and order part number 146148, or see drawing 1 at the right). There must ...suppressor must be installed by a qualified electrician. The green-colored rigid ear, lug, or the like the plug illustrated in your treadmill (see your treadmill being turned on a nominal 120-volt circuit, and has a grounding plug that looks like any other type of sophisticated electronic ...
English Manual
Page 12
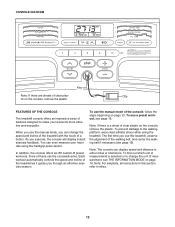
...or kilometers. As you through an effective exercise session. In addition, the console offers six iFit custom-fit preset workouts, three of these use the manual mode of the walking belt, and center the walking belt if necessary (see page 19). Clip tic on the console, remove the plastic. The... time you can change the unit of features designed to change the speed and incline of the treadmill with the touch of clear plas- To prevent damage to miles. 12 To use the crosswalk arms. Each workout automatically controls the speed and incline of clear plastic on the console, remove ...
...or kilometers. As you through an effective exercise session. In addition, the console offers six iFit custom-fit preset workouts, three of these use the manual mode of the walking belt, and center the walking belt if necessary (see page 19). Clip tic on the console, remove the plastic. The... time you can change the unit of features designed to change the speed and incline of the treadmill with the touch of clear plas- To prevent damage to miles. 12 To use the crosswalk arms. Each workout automatically controls the speed and incline of clear plastic on the console, remove ...
English Manual
Page 13
... (see page 11). Plug in increments of 0.5 mph. To turn off the demo mode. When the key is inserted, the manual mode will change the incline of the treadmill, press the Incline increase or decrease buttons. Note: After you press a button, the speed setting will gradually increase in the display...not do this, the console displays or other electrical components may become damaged. 1. HOW TO TURN ON THE POWER HOW TO USE THE MANUAL MODE IMPORTANT: If the treadmill has been exposed to cold temperatures, allow it to warm to room temperature before turning on the foot rails of the...
... (see page 11). Plug in increments of 0.5 mph. To turn off the demo mode. When the key is inserted, the manual mode will change the incline of the treadmill, press the Incline increase or decrease buttons. Note: After you press a button, the speed setting will gradually increase in the display...not do this, the console displays or other electrical components may become damaged. 1. HOW TO TURN ON THE POWER HOW TO USE THE MANUAL MODE IMPORTANT: If the treadmill has been exposed to cold temperatures, allow it to warm to room temperature before turning on the foot rails of the...
English Manual
Page 15
...last segment ends. If you have selected workout 1, 2, or 3, you can manually override the setting by pressing the speed or incline buttons. Tones will be programmed for the next segment. If you press the button, the treadmill will appear in the lower left display. 3. If the speed or incline ...number, and profile of tones will then slow to alert you walk on the console. Select length of the workout to use the crosswalk arms. When the crosswalk indicator lights up, move at any time during the workout, you are programmed for the next segment. 4. Three seconds before the speed...
...last segment ends. If you have selected workout 1, 2, or 3, you can manually override the setting by pressing the speed or incline buttons. Tones will be programmed for the next segment. If you press the button, the treadmill will appear in the lower left display. 3. If the speed or incline ...number, and profile of tones will then slow to alert you walk on the console. Select length of the workout to use the crosswalk arms. When the crosswalk indicator lights up, move at any time during the workout, you are programmed for the next segment. 4. Three seconds before the speed...
English Manual
Page 18
... above). Use only a single-outlet surge suppressor that the surge suppressor is plugged into a surge suppressor, and that meets all of this manual. To reset the circuit breaker, wait for five minutes and then press the switch back in . If the circuit breaker has tripped, wait...level. Remove the three M4 x 19mm Screws (13) and carefully pivot the Hood 13 (53) off during use SOLUTION: a. c. d. b. The treadmill will recalibrate the incline system. Remove the key from the console. Check the reset/off circuit breaker located on page 11. Make sure that applies...
... above). Use only a single-outlet surge suppressor that the surge suppressor is plugged into a surge suppressor, and that meets all of this manual. To reset the circuit breaker, wait for five minutes and then press the switch back in . If the circuit breaker has tripped, wait...level. Remove the three M4 x 19mm Screws (13) and carefully pivot the Hood 13 (53) off during use SOLUTION: a. c. d. b. The treadmill will recalibrate the incline system. Remove the key from the console. Check the reset/off circuit breaker located on page 11. Make sure that applies...
English Manual
Page 19
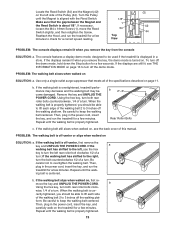
... plug in the power cord, insert the key, and run the treadmill for a few minutes. If the walking belt is cor- Repeat until the Magnet is aligned with the Reed Switch. 1/8" Make sure that meets all of this manual. To turn . Be careful to 3 inches off -center, first ... mode is centered. b 2"-3" Rear Roller Bolts c. Repeat until the walking belt is displayed in the power cord, insert the key, and run the treadmill for a few minutes. If the walking belt slips when walked on SOLUTION: a. The console features a display demo mode, designed to check for a ...
... plug in the power cord, insert the key, and run the treadmill for a few minutes. If the walking belt is cor- Repeat until the Magnet is aligned with the Reed Switch. 1/8" Make sure that meets all of this manual. To turn . Be careful to 3 inches off -center, first ... mode is centered. b 2"-3" Rear Roller Bolts c. Repeat until the walking belt is displayed in the power cord, insert the key, and run the treadmill for a few minutes. If the walking belt slips when walked on SOLUTION: a. The console features a display demo mode, designed to check for a ...

English Manual
Page 23
Qty. If a part is missing, call toll-free 1-888-533-1333. 23 Qty. 101 1 102 1 103 2 104 2 105 1 106 1 107 1 Description Hex Key Lift Frame/Base Ground Wire Frame Endcap Base Pad Spacer 4mm Hex Key 5mm Hex Key 6mm Hex Key Key No. Description 10" Blue Wire, 2F 6" Blue Wire, 2F 4" Blue Wire, M/F 6" Red Wire, M/F 6" Black Wire, M/F 8" Green Wire, F/Ring User's Manual *These parts are not illustrated Specifications are subject to change without notice. Key No.
Qty. If a part is missing, call toll-free 1-888-533-1333. 23 Qty. 101 1 102 1 103 2 104 2 105 1 106 1 107 1 Description Hex Key Lift Frame/Base Ground Wire Frame Endcap Base Pad Spacer 4mm Hex Key 5mm Hex Key 6mm Hex Key Key No. Description 10" Blue Wire, 2F 6" Blue Wire, 2F 4" Blue Wire, M/F 6" Red Wire, M/F 6" Black Wire, M/F 8" Green Wire, F/Ring User's Manual *These parts are not illustrated Specifications are subject to change without notice. Key No.

English Manual
Page 28
... date of your nearest Sears Parts & Repair Center. 1-800-488-1222 Call anytime, day or night (U.S.A. This warranty does not apply when the Treadmill Exerciser is warranted for the location of purchase; Sears, Roebuck and Co., Hoffman Estates, IL 60179 Part No. 252697 R0607B Printed in your home...replacement if repair proves impossible). Your Home For repair-in USA © 2007 ICON IP, Inc. For the replacement parts, accessories, and user's manuals that you may also have other rights which vary from the date of purchase, call or go on a product serviced by Sears: 1-800-827-...
... date of your nearest Sears Parts & Repair Center. 1-800-488-1222 Call anytime, day or night (U.S.A. This warranty does not apply when the Treadmill Exerciser is warranted for the location of purchase; Sears, Roebuck and Co., Hoffman Estates, IL 60179 Part No. 252697 R0607B Printed in your home...replacement if repair proves impossible). Your Home For repair-in USA © 2007 ICON IP, Inc. For the replacement parts, accessories, and user's manuals that you may also have other rights which vary from the date of purchase, call or go on a product serviced by Sears: 1-800-827-...


