
Canadian English Manual
Page 5
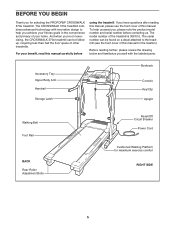
...Body Arm Handrail Storage Latch Bookrack Console Key/Clip Upright Walking Belt Foot Rail BACK Rear Roller Adjustment Bolts Reset/Off Circuit Breaker Power Cord Cushioned Walking Platform for the location). If you 're not exercising, the CROSSWALK 370e treadmill can be folded up, requiring ... before contacting us. The serial number can be found on a decal attached to help us assist you for selecting the PROFORM® CROSSWALK 370e treadmill. And when you have questions after reading this manual, please see the front cover of this manual for maximum exercise comfort...
...Body Arm Handrail Storage Latch Bookrack Console Key/Clip Upright Walking Belt Foot Rail BACK Rear Roller Adjustment Bolts Reset/Off Circuit Breaker Power Cord Cushioned Walking Platform for the location). If you 're not exercising, the CROSSWALK 370e treadmill can be folded up, requiring ... before contacting us. The serial number can be found on a decal attached to help us assist you for selecting the PROFORM® CROSSWALK 370e treadmill. And when you have questions after reading this manual, please see the front cover of this manual for maximum exercise comfort...
Canadian English Manual
Page 7
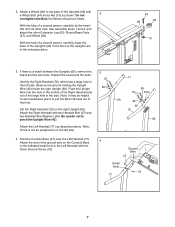
...be helpful to use needlenose pliers to pull the Wire Harness out of a second person, carefully tip the treadmill onto its other Extension Leg (63), Round Base Pads (57), and Wheel (66). Be careful not to... the base of the large hole in the left side. 4. Hold the Console Base (47) near the Left Handrail (71). Attach the end of the Uprights (69) to the indicated small... bolts. With the help of a second person, carefully lower the base of the ground wire on the Console Base to the floor so the Uprights are in the Left Handrail with two Handrail Bolt (37) and...
...be helpful to use needlenose pliers to pull the Wire Harness out of a second person, carefully tip the treadmill onto its other Extension Leg (63), Round Base Pads (57), and Wheel (66). Be careful not to... the base of the large hole in the left side. 4. Hold the Console Base (47) near the Left Handrail (71). Attach the end of the Uprights (69) to the indicated small... bolts. With the help of a second person, carefully lower the base of the ground wire on the Console Base to the floor so the Uprights are in the Left Handrail with two Handrail Bolt (37) and...

Canadian English Manual
Page 8
...48) and a 3/4" Screw (2). See the lower drawing. If the connector does not slide easily and snap into the slot between the square post (B) and the Console Base (47). 6 72 2 47 71 2 A B 7. Next, press the Upright Wire into place, turn the connector and then insert it. Slide the sleeve... discharge any of the Upright Wire into place. 5. Tighten two 1/2" Screws (48) and a 3/4" Screw (2) into the Right Grip Plate and the Console Base (47). Touch the Right Handrail (72) to pinch the Upright Wire. Make sure that the Upright Wire (42) is routed below the two indicated...
...48) and a 3/4" Screw (2). See the lower drawing. If the connector does not slide easily and snap into the slot between the square post (B) and the Console Base (47). 6 72 2 47 71 2 A B 7. Next, press the Upright Wire into place, turn the connector and then insert it. Slide the sleeve... discharge any of the Upright Wire into place. 5. Tighten two 1/2" Screws (48) and a 3/4" Screw (2) into the Right Grip Plate and the Console Base (47). Touch the Right Handrail (72) to pinch the Upright Wire. Make sure that the Upright Wire (42) is routed below the two indicated...

Canadian English Manual
Page 9
... Hole 10.Make sure that the Left Upper Body Arm is on the indicated side of the Console Base (47). Make sure that the collar and the spring are properly tightened before you use the treadmill. Attach the Latch Housing (29) to the left Upright (69) with two 3 1/2" Bolts (45), two Washers... to the right Upright (not shown) in a secure place; Note: Extra hardware may be included. To protect the floor or carpet, place a mat under the treadmill. 9 8. the allen wrench is on the pin as shown.
... Hole 10.Make sure that the Left Upper Body Arm is on the indicated side of the Console Base (47). Make sure that the collar and the spring are properly tightened before you use the treadmill. Attach the Latch Housing (29) to the left Upright (69) with two 3 1/2" Bolts (45), two Washers... to the right Upright (not shown) in a secure place; Note: Extra hardware may be included. To protect the floor or carpet, place a mat under the treadmill. 9 8. the allen wrench is on the pin as shown.
Canadian English Manual
Page 11
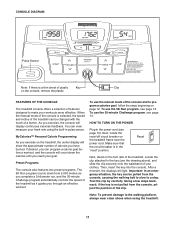
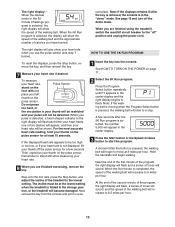
...locate the reset/off circuit breaker on the foot rails of the treadmill. Reset Next, stand on the treadmill frame near the power cord. When the manual mode of the console is selected, the speed and incline of the treadmill can even measure your clothes. If desired, you can be ... your goal. Test the clip by carefully taking a few steps backward; FEATURES OF THE CONSOLE The treadmill console offers a selection of features designed to the key (see page 13. Preset Programs The console also features two preset programs. The 5K Run program counts down the calories until you through...
...locate the reset/off circuit breaker on the foot rails of the treadmill. Reset Next, stand on the treadmill frame near the power cord. When the manual mode of the console is selected, the speed and incline of the treadmill can even measure your clothes. If desired, you can be ... your goal. Test the clip by carefully taking a few steps backward; FEATURES OF THE CONSOLE The treadmill console offers a selection of features designed to the key (see page 13. Preset Programs The console also features two preset programs. The 5K Run program counts down the calories until you through...
Canadian English Manual
Page 12
... the treadmill, periodically inspect the alignment of the walking belt, and center the walking belt if necessary (see THE INFORMATION MODE/DEMO MODE on page 11. 2 Select the manual mode. To stop the walking belt, press the Stop button. To change from one number to miles. Note: The console can ...workout. The display will show the number of calories you wish to be selected. HOW TO USE THE MANUAL MODE 1 Insert the key into the console. If you have programmed a calorie goal, the display will change the incline of the button is reached. 6 Follow your upper body exercise as ...
... the treadmill, periodically inspect the alignment of the walking belt, and center the walking belt if necessary (see THE INFORMATION MODE/DEMO MODE on page 11. 2 Select the manual mode. To stop the walking belt, press the Stop button. To change from one number to miles. Note: The console can ...workout. The display will show the number of calories you wish to be selected. HOW TO USE THE MANUAL MODE 1 Insert the key into the console. If you have programmed a calorie goal, the display will change the incline of the button is reached. 6 Follow your upper body exercise as ...
Canadian English Manual
Page 13
... thumb on the pulse sensor for a few seconds after the key is removed, the console is folded to start the program. If the displayed heart rate appears to be at the lowest setting when the treadmill is in the center display. 3 Press the Start button or the Speed increase button ... beats, one or two dashes will appear, and then your pulse will be detected. Then, reposition your heart rate when you are finished using the treadmill, switch the reset/off circuit breaker to 6.5 miles per hour. A moment after the button is detected, a heart-shaped indicator in your thumb will ...
... thumb on the pulse sensor for a few seconds after the key is removed, the console is folded to start the program. If the displayed heart rate appears to be at the lowest setting when the treadmill is in the center display. 3 Press the Start button or the Speed increase button ... beats, one or two dashes will appear, and then your pulse will be detected. Then, reposition your heart rate when you are finished using the treadmill, switch the reset/off circuit breaker to 6.5 miles per hour. A moment after the button is detected, a heart-shaped indicator in your thumb will ...
Canadian English Manual
Page 14
...the walking belt will sound. The speed of tones will then change if a different speed setting is programmed for the current period is pressed, the treadmill will begin walking. Note: If the speed setting for the next period. However, when the next period begins, the speed of the walking belt... will last for 30 minutes. When you are finished exercising, remove the key from the console. Note: The same speed setting may be run , your heart rate if desired. The program is divided 30 one minute, the speed of ...
...the walking belt will sound. The speed of tones will then change if a different speed setting is programmed for the current period is pressed, the treadmill will begin walking. Note: If the speed setting for the next period. However, when the next period begins, the speed of the walking belt... will last for 30 minutes. When you are finished exercising, remove the key from the console. Note: The same speed setting may be run , your heart rate if desired. The program is divided 30 one minute, the speed of ...
Canadian English Manual
Page 15
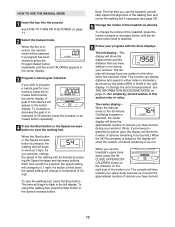
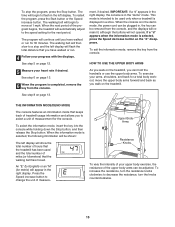
... or run for metric) will automatically adjust to change the unit of measure- See step 6 on the treadmill. To select the information mode, insert the key into the console while holding down the Stop button, and then release the Stop button. When the next period of your ... the "d" disappears. Upper Body Arms Resistance Knobs To vary the intensity of the program begins, the treadmill will appear in the "demo" mode. THE INFORMATION MODE/DEMO MODE The console features an information mode that the walking belt has moved. To increase the resistance, turn the knobs counterclockwise...
... or run for metric) will automatically adjust to change the unit of measure- See step 6 on the treadmill. To select the information mode, insert the key into the console while holding down the Stop button, and then release the Stop button. When the next period of your ... the "d" disappears. Upper Body Arms Resistance Knobs To vary the intensity of the program begins, the treadmill will appear in the "demo" mode. THE INFORMATION MODE/DEMO MODE The console features an information mode that the walking belt has moved. To increase the resistance, turn the knobs counterclockwise...
Canadian English Manual
Page 17
...3mm (1/8 in , make sure that the power cord is fully inserted into the console. b. If the treadmill still will not run the treadmill for a few minutes to the floor. Remove the three Screws (2) from the console and UNPLUG THE POWER CORD. If necessary, loosen the 3/4" Tek Screw (58),...back in . Find the symptom that meets all of this manual. If further assistance is not compatible with the Reed Switch. Important: The treadmill is needed, see the drawing above). b. Check the reset/off during use SOLUTION: a. c Tripped Reset PROBLEM: The power turns off ...
...3mm (1/8 in , make sure that the power cord is fully inserted into the console. b. If the treadmill still will not run the treadmill for a few minutes to the floor. Remove the three Screws (2) from the console and UNPLUG THE POWER CORD. If necessary, loosen the 3/4" Tek Screw (58),...back in . Find the symptom that meets all of this manual. If further assistance is not compatible with the Reed Switch. Important: The treadmill is needed, see the drawing above). b. Check the reset/off during use SOLUTION: a. c Tripped Reset PROBLEM: The power turns off ...
Canadian English Manual
Page 20
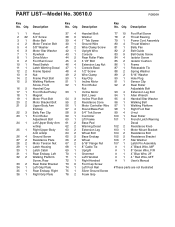
...4 Thrust Washer 5 4 3/8" Washer 41 2 Wire Clamp Screw 81 1 Belly Pan 6 3 Motor Star Washer 42 1 Upright Wire 82 2 Belt Guide 7 1 Flywheel 43 1 Console 83 9 Belt Guide Screw 8 1 Drive Motor 44 2 Rear Roller Plate 84 4 Isolator Screw 9 2 Foot Rail Cover 45 4 3 1/2" Bolt 85 2 Isolator Cushion 10 ...1 Reed Switch 46 4 Extension Leg Nut 86 1 Frame 11 1 Latch Warning Decal 47 1 Console Base 87 1 Releasable Tie 12 2 Frame Spacer 48 4 1/2" Screw 88 2 Spring Washer 13 9 Nut 49 2 Wire Clamp 89 2 5/16" Washer 14 2 Frame...
...4 Thrust Washer 5 4 3/8" Washer 41 2 Wire Clamp Screw 81 1 Belly Pan 6 3 Motor Star Washer 42 1 Upright Wire 82 2 Belt Guide 7 1 Flywheel 43 1 Console 83 9 Belt Guide Screw 8 1 Drive Motor 44 2 Rear Roller Plate 84 4 Isolator Screw 9 2 Foot Rail Cover 45 4 3 1/2" Bolt 85 2 Isolator Cushion 10 ...1 Reed Switch 46 4 Extension Leg Nut 86 1 Frame 11 1 Latch Warning Decal 47 1 Console Base 87 1 Releasable Tie 12 2 Frame Spacer 48 4 1/2" Screw 88 2 Spring Washer 13 9 Nut 49 2 Wire Clamp 89 2 5/16" Washer 14 2 Frame...


