
Canadian English Manual
Page 1
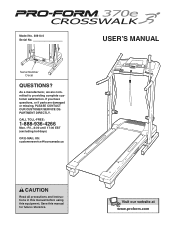
... TOLL-FREE: 1-888-936-4266 Mon.-Fri., 8:00 until 17:00 EST (excluding holidays) OR E-MAIL US: [email protected] CROSSWALK 370e CAUTION Read all precautions and instructions in this manual before using this manual for future reference. Save this equipment. As a manufacturer, we are damaged or missing, PLEASE CONTACT OUR CUSTOMER SERVICE DEPARTMENT DIRECTLY. Model No. 30610.0 Serial No. USER'S MANUAL Serial Number Decal...
... TOLL-FREE: 1-888-936-4266 Mon.-Fri., 8:00 until 17:00 EST (excluding holidays) OR E-MAIL US: [email protected] CROSSWALK 370e CAUTION Read all precautions and instructions in this manual before using this manual for future reference. Save this equipment. As a manufacturer, we are damaged or missing, PLEASE CONTACT OUR CUSTOMER SERVICE DEPARTMENT DIRECTLY. Model No. 30610.0 Serial No. USER'S MANUAL Serial Number Decal...
Canadian English Manual
Page 2
CROSSWALK 370e 2 TABLE OF CONTENTS IMPORTANT PRECAUTIONS 3 BEFORE YOU BEGIN 5 ASSEMBLY 6 OPERATION AND ADJUSTMENT 10 HOW TO FOLD AND MOVE THE TREADMILL 16 TROUBLESHOOTING 17 CONDITIONING GUIDELINES 19 ORDERING REPLACEMENT PARTS Back Cover LIMITED WARRANTY Back Cover Note: An EXPLODED DRAWING and a PART LIST are attached in the center of this manual.
CROSSWALK 370e 2 TABLE OF CONTENTS IMPORTANT PRECAUTIONS 3 BEFORE YOU BEGIN 5 ASSEMBLY 6 OPERATION AND ADJUSTMENT 10 HOW TO FOLD AND MOVE THE TREADMILL 16 TROUBLESHOOTING 17 CONDITIONING GUIDELINES 19 ORDERING REPLACEMENT PARTS Back Cover LIMITED WARRANTY Back Cover Note: An EXPLODED DRAWING and a PART LIST are attached in the center of this manual.
Canadian English Manual
Page 3
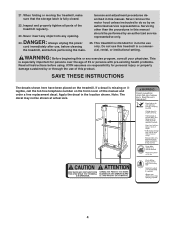
... the control system of high speeds. Do not attempt to raise, lower, or move the walking belt while the power is capable of the treadmill. Keep the power cord and the surge suppressor away from damage, place a mat under the age of this treadmill are used only by persons weighing 250 pounds (113 kg) or less. 12. The treadmill is turned off. The pulse sensor is...
... the control system of high speeds. Do not attempt to raise, lower, or move the walking belt while the power is capable of the treadmill. Keep the power cord and the surge suppressor away from damage, place a mat under the age of this treadmill are used only by persons weighing 250 pounds (113 kg) or less. 12. The treadmill is turned off. The pulse sensor is...
Canadian English Manual
Page 4
... the front cover of this or any opening. Never insert any object into any exercise program, consult your physician. Always unplug the power cord immediately after use only. If a decal is intended for in a commercial, rental, or institutional setting. This treadmill is missing or illegible, call the toll-free telephone number on the treadmill. When folding or moving the treadmill, make sure that the storage latch is...
... the front cover of this or any opening. Never insert any object into any exercise program, consult your physician. Always unplug the power cord immediately after use only. If a decal is intended for in a commercial, rental, or institutional setting. This treadmill is missing or illegible, call the toll-free telephone number on the treadmill. When folding or moving the treadmill, make sure that the storage latch is...
Canadian English Manual
Page 5
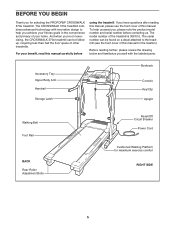
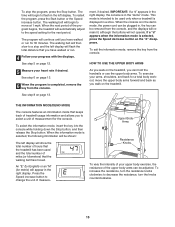
Accessory Tray Upper Body Arm Handrail Storage Latch Bookrack Console Key/Clip Upright Walking Belt Foot Rail BACK Rear Roller Adjustment Bolts Reset/Off Circuit Breaker Power Cord Cushioned Walking Platform for selecting the PROFORM® CROSSWALK 370e treadmill. If you have questions after reading this manual, please see the front cover of this manual for the location). To help you achieve your fitness goals in the convenience and privacy of other treadmills. For your home. The serial number can be...
Accessory Tray Upper Body Arm Handrail Storage Latch Bookrack Console Key/Clip Upright Walking Belt Foot Rail BACK Rear Roller Adjustment Bolts Reset/Off Circuit Breaker Power Cord Cushioned Walking Platform for selecting the PROFORM® CROSSWALK 370e treadmill. If you have questions after reading this manual, please see the front cover of this manual for the location). To help you achieve your fitness goals in the convenience and privacy of other treadmills. For your home. The serial number can be...
Canadian English Manual
Page 6
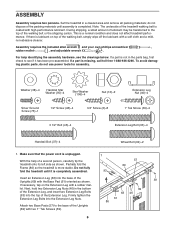
... drawings below. ASSEMBLY Assembly requires two persons. If there is lubricant on the Extension Leg with two 1" Tek Screws (39). 39 39 63 46 61 86 6 Make sure that the power cord is more stable. If a part is coated with a soft cloth and a mild, non-abrasive cleaner. Note: The underside of the treadmill walking belt is not in the parts bag, first...
... drawings below. ASSEMBLY Assembly requires two persons. If there is lubricant on the Extension Leg with two 1" Tek Screws (39). 39 39 63 46 61 86 6 Make sure that the power cord is more stable. If a part is coated with a soft cloth and a mild, non-abrasive cleaner. Note: The underside of the treadmill walking belt is not in the parts bag, first...
Canadian English Manual
Page 7
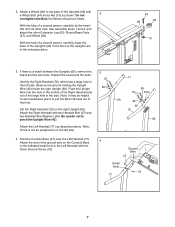
..., carefully tip the treadmill onto its other Extension Leg (63), Round Base Pads (57), and Wheel (66). Discard the board and the bolts. Note: There is a board between the Uprights (69), remove the board and the two bolts. See assembly steps 1 and 2, and attach the other side. Feed the Upright Wire into the hole in...4. Attach the Right Handrail with the Silver Ground Screw (75). 3 37 95 71 95 37 Hole 69 42 95 72 69 4 Ground Wire 47 Small Hole 75 71 7 Hold the Console Base (47) near the Left Handrail (71). Attach the end of the Uprights (69) to pull the Wire Harness ...
..., carefully tip the treadmill onto its other Extension Leg (63), Round Base Pads (57), and Wheel (66). Discard the board and the bolts. Note: There is a board between the Uprights (69), remove the board and the two bolts. See assembly steps 1 and 2, and attach the other side. Feed the Upright Wire into the hole in...4. Attach the Right Handrail with the Silver Ground Screw (75). 3 37 95 71 95 37 Hole 69 42 95 72 69 4 Ground Wire 47 Small Hole 75 71 7 Hold the Console Base (47) near the Left Handrail (71). Attach the end of the Uprights (69) to pull the Wire Harness ...

Canadian English Manual
Page 8
... the Right Grip Plate (36). Start all four Screws before tightening them; See the lower drawing. Cover the Upright Wire (42) with four 3/4" Screws (2). Tighten two 1/2" Screws (48) and a 3/4" Screw (2) into place, turn the connector and then insert it. Attach the Left Grip Plate (34) over the connector. 5 72 42 47 Sleeve Connector 42 6. Set the Console Base (47) on the Upright Wire (42) as shown in...
... the Right Grip Plate (36). Start all four Screws before tightening them; See the lower drawing. Cover the Upright Wire (42) with four 3/4" Screws (2). Tighten two 1/2" Screws (48) and a 3/4" Screw (2) into place, turn the connector and then insert it. Attach the Left Grip Plate (34) over the connector. 5 72 42 47 Sleeve Connector 42 6. Set the Console Base (47) on the Upright Wire (42) as shown in...

Canadian English Manual
Page 9
.... Insert the pin into the Latch Housing (29), and tighten the knob back onto the pin. 9 29 Knob 2 69 Spring Collar Pin Large Hole 10.Make sure that the large hole in the Latch Housing is used to the left Upright (69) with two 3/4" Screws (2). the allen wrench is on the indicated side of the Console Base (47). Attach the Left Upper Body Arm (24...
.... Insert the pin into the Latch Housing (29), and tighten the knob back onto the pin. 9 29 Knob 2 69 Spring Collar Pin Large Hole 10.Make sure that the large hole in the Latch Housing is used to the left Upright (69) with two 3/4" Screws (2). the allen wrench is on the indicated side of the Console Base (47). Attach the Left Upper Body Arm (24...
Canadian English Manual
Page 10
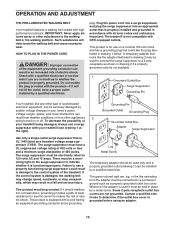
... AND ADJUSTMENT THE PRE-LUBRICATED WALKING BELT Your treadmill features a walking belt coated with GFCI-equipped outlets. IMPORTANT: Never apply silicone spray or other appliances 2 being damaged, always use a surge suppressor with your home's power. Plug the power cord into a surge suppressor, and plug the surge suppressor into an appropriate outlet that looks like the adapter illustrated in drawing 2 may result in damage to the walking belt...
... AND ADJUSTMENT THE PRE-LUBRICATED WALKING BELT Your treadmill features a walking belt coated with GFCI-equipped outlets. IMPORTANT: Never apply silicone spray or other appliances 2 being damaged, always use a surge suppressor with your home's power. Plug the power cord into a surge suppressor, and plug the surge suppressor into an appropriate outlet that looks like the adapter illustrated in drawing 2 may result in damage to the walking belt...
Canadian English Manual
Page 11
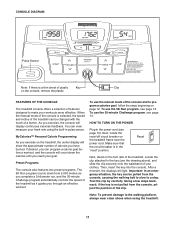
... emergency situation, the key can be pulled from the console, causing the walking belt to slow to make your heart rate using the treadmill. 11 Test the clip by carefully taking a few steps backward; FEATURES OF THE CONSOLE The treadmill console offers a selection of features designed to a stop. CONSOLE DIAGRAM Pulse Sensor Note: If there is selected, the speed and incline of the treadmill can be changed with the touch of a button.
... emergency situation, the key can be pulled from the console, causing the walking belt to slow to make your heart rate using the treadmill. 11 Test the clip by carefully taking a few steps backward; FEATURES OF THE CONSOLE The treadmill console offers a selection of features designed to a stop. CONSOLE DIAGRAM Pulse Sensor Note: If there is selected, the speed and incline of the treadmill can be changed with the touch of a button.
Canadian English Manual
Page 12
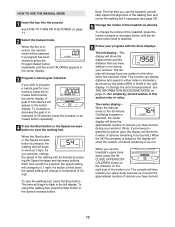
... Run program is pressed, the walking belt will change the speed of 0.5 mph. To increase or decrease the goal in increments of the walking belt as desired. To stop the walking belt, press the Stop button. To change from one number to move at 1 mph. Note: The console can display distance and speed in the right display. To change by pressing the Speed increase and decrease buttons. The center display- HOW TO USE THE MANUAL MODE 1 Insert the key into the console...
... Run program is pressed, the walking belt will change the speed of 0.5 mph. To increase or decrease the goal in increments of the walking belt as desired. To stop the walking belt, press the Stop button. To change from one number to move at 1 mph. Note: The console can display distance and speed in the right display. To change by pressing the Speed increase and decrease buttons. The center display- HOW TO USE THE MANUAL MODE 1 Insert the key into the console...
Canadian English Manual
Page 13
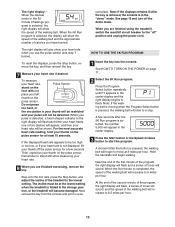
... the "off the demo mode. The right display- When the manual mode or the 30minute Challenge program is pressed, the walking belt will also show the speed of calories you are finished exercising, remove the key. The right display will begin walking. To reset the displays, press the Stop button, remove the key, and then reinsert the key. 7 Measure your heart rate. 8 When you use the pulse sensor (see step 7 below). When your left thumb on the pulse sensor for a few...
... the "off the demo mode. The right display- When the manual mode or the 30minute Challenge program is pressed, the walking belt will also show the speed of calories you are finished exercising, remove the key. The right display will begin walking. To reset the displays, press the Stop button, remove the key, and then reinsert the key. 7 Measure your heart rate. 8 When you use the pulse sensor (see step 7 below). When your left thumb on the pulse sensor for a few...
Canadian English Manual
Page 14
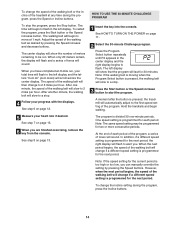
... Stop button. Hold the handrails and begin to move at any time during the program, press the Incline buttons. 14 At the end of each period. When you are finished exercising, remove the key from the console. To restart the program, press the Start button or the Speed increase button. After another minute, the walking belt will then change if a different speed setting is pressed, the treadmill will scroll across the center display. HOW TO USE...
... Stop button. Hold the handrails and begin to move at any time during the program, press the Incline buttons. 14 At the end of each period. When you are finished exercising, remove the key from the console. To restart the program, press the Start button or the Speed increase button. After another minute, the walking belt will then change if a different speed setting is pressed, the treadmill will scroll across the center display. HOW TO USE...
Canadian English Manual
Page 15
... total distance that you walk on page 13. 6 When the program is completed, remove the key from the console, and the displays will remain lit, although the buttons will not operate. The program will continue until you to a stop the program, press the Stop button. See step 5 on page 13. HOW TO USE THE UPPER BODY ARMS 5 Measure your upper body exercise, the resistance of measurement for metric) will automatically adjust to change...
... total distance that you walk on page 13. 6 When the program is completed, remove the key from the console, and the displays will remain lit, although the buttons will not operate. The program will continue until you to a stop the program, press the Stop button. See step 5 on page 13. HOW TO USE THE UPPER BODY ARMS 5 Measure your upper body exercise, the resistance of measurement for metric) will automatically adjust to change...
Canadian English Manual
Page 17
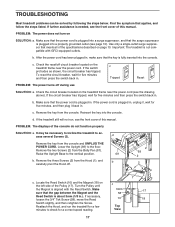
... power cord is not compatible with the Reed Switch. Important: The treadmill is plugged into the console. c Tripped Reset PROBLEM: The power turns off during use SOLUTION: a. If the power cord is plugged into the console. b. a Remove the key from the Hood (1), and carefully pivot the Hood off circuit breaker located on the left side of the console do not function properly SOLUTION: a. b. TROUBLESHOOTING Most treadmill problems can be necessary to incline the treadmill to access several Screws...
... power cord is not compatible with the Reed Switch. Important: The treadmill is plugged into the console. c Tripped Reset PROBLEM: The power turns off during use SOLUTION: a. If the power cord is plugged into the console. b. a Remove the key from the Hood (1), and carefully pivot the Hood off circuit breaker located on the left side of the console do not function properly SOLUTION: a. b. TROUBLESHOOTING Most treadmill problems can be necessary to incline the treadmill to access several Screws...
Canadian English Manual
Page 18
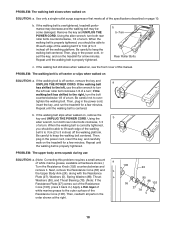
... walking belt a has shifted to turn the left rear roller bolt clockwise 1/2 of a turn both rear roller bolts clockwise, 1/4 of the Resistance Cone [108], press it . tighten the walking belt. Repeat until the walking belt is centered. PROBLEM: The upper body arms squeak during use the allen wrench to the left, use SOLUTION: a. (Note: Correcting this manual. Using the allen wrench, turn . Repeat until the walking belt is properly tightened. Be careful to keep the walking belt centered. Next, remove the Resistance...
... walking belt a has shifted to turn the left rear roller bolt clockwise 1/2 of a turn both rear roller bolts clockwise, 1/4 of the Resistance Cone [108], press it . tighten the walking belt. Repeat until the walking belt is centered. PROBLEM: The upper body arms squeak during use the allen wrench to the left, use SOLUTION: a. (Note: Correcting this manual. Using the allen wrench, turn . Repeat until the walking belt is properly tightened. Be careful to keep the walking belt centered. Next, remove the Resistance...
Canadian English Manual
Page 19
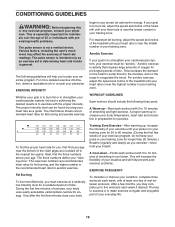
... your exercise program. A Cool-down . After a few minutes of exercise, your body uses easily accessible carbohydrate calories for individuals over the age of 35 or individuals with 5 to plan your condition, complete three workouts each workout with preexisting health problems. The pulse sensor is especially important for energy. The following three parts: A Warm-up increases your body temperature, heart rate and circulation in your heart rate is...
... your exercise program. A Cool-down . After a few minutes of exercise, your body uses easily accessible carbohydrate calories for individuals over the age of 35 or individuals with 5 to plan your condition, complete three workouts each workout with preexisting health problems. The pulse sensor is especially important for energy. The following three parts: A Warm-up increases your body temperature, heart rate and circulation in your heart rate is...
Canadian English Manual
Page 20
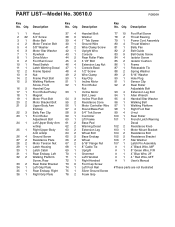
... 1 Upright Wire 82 2 Belt Guide 7 1 Flywheel 43 1 Console 83 9 Belt Guide Screw 8 1 Drive Motor 44 2 Rear Roller Plate 84 4 Isolator Screw 9 2 Foot Rail Cover 45 4 3 1/2" Bolt 85 2 Isolator Cushion 10 1 Reed Switch 46 4 Extension Leg Nut 86 1 Frame 11 1 Latch Warning Decal 47 1 Console Base 87 1 Releasable Tie 12 2 Frame Spacer 48 4 1/2" Screw 88 2 Spring Washer 13 9 Nut 49 2 Wire Clamp 89 2 5/16" Washer 14 2 Frame Pivot Bolt 50 1 Key/Clip 90 1 Hole Plug 15 2 Walking...
... 1 Upright Wire 82 2 Belt Guide 7 1 Flywheel 43 1 Console 83 9 Belt Guide Screw 8 1 Drive Motor 44 2 Rear Roller Plate 84 4 Isolator Screw 9 2 Foot Rail Cover 45 4 3 1/2" Bolt 85 2 Isolator Cushion 10 1 Reed Switch 46 4 Extension Leg Nut 86 1 Frame 11 1 Latch Warning Decal 47 1 Console Base 87 1 Releasable Tie 12 2 Frame Spacer 48 4 1/2" Screw 88 2 Spring Washer 13 9 Nut 49 2 Wire Clamp 89 2 5/16" Washer 14 2 Frame Pivot Bolt 50 1 Key/Clip 90 1 Hole Plug 15 2 Walking...
Canadian English Manual
Page 23
... this product to replacing or repairing, at - ICON is limited to be free from defects in its authorized service centers. The drive motor is limited in workmanship and material, under normal use , costs of removal or installation or other warranty beyond that specifically set forth herein. Some provinces do not allow the exclusion or limitation of this manual) LIMITED WARRANTY ICON Health & Fitness, Inc. (ICON), warrants this warranty is not responsible or liable for...
... this product to replacing or repairing, at - ICON is limited to be free from defects in its authorized service centers. The drive motor is limited in workmanship and material, under normal use , costs of removal or installation or other warranty beyond that specifically set forth herein. Some provinces do not allow the exclusion or limitation of this manual) LIMITED WARRANTY ICON Health & Fitness, Inc. (ICON), warrants this warranty is not responsible or liable for...


