
Canadian English Manual
Page 1
... Mon.-Fri., 8:00 until 17:00 EST (excluding holidays) OR E-MAIL US: [email protected] CROSSWALK 370e CAUTION Read all precautions and instructions in this manual before using this manual for future reference. Visit our website at www.proform.com Visit our website at If you have questions, or if parts are committed to providing...
... Mon.-Fri., 8:00 until 17:00 EST (excluding holidays) OR E-MAIL US: [email protected] CROSSWALK 370e CAUTION Read all precautions and instructions in this manual before using this manual for future reference. Visit our website at www.proform.com Visit our website at If you have questions, or if parts are committed to providing...
Canadian English Manual
Page 2
CROSSWALK 370e 2 TABLE OF CONTENTS IMPORTANT PRECAUTIONS 3 BEFORE YOU BEGIN 5 ASSEMBLY 6 OPERATION AND ADJUSTMENT 10 HOW TO FOLD AND MOVE THE TREADMILL 16 TROUBLESHOOTING 17 CONDITIONING GUIDELINES 19 ORDERING REPLACEMENT PARTS Back Cover LIMITED WARRANTY Back Cover Note: An EXPLODED DRAWING and a PART LIST are attached in the center of this manual.
CROSSWALK 370e 2 TABLE OF CONTENTS IMPORTANT PRECAUTIONS 3 BEFORE YOU BEGIN 5 ASSEMBLY 6 OPERATION AND ADJUSTMENT 10 HOW TO FOLD AND MOVE THE TREADMILL 16 TROUBLESHOOTING 17 CONDITIONING GUIDELINES 19 ORDERING REPLACEMENT PARTS Back Cover LIMITED WARRANTY Back Cover Note: An EXPLODED DRAWING and a PART LIST are attached in the center of this manual.
Canadian English Manual
Page 4
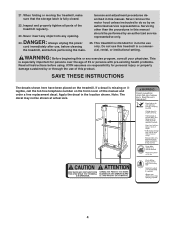
... before using. This is missing or illegible, call the toll-free telephone number on the treadmill. Always unplug the power cord immediately after use of this manual and order a free replacement decal. ICON assumes no responsibility for personal injury or property damage ...the location shown. tenance and adjustment procedures described in a commercial, rental, or institutional setting. This treadmill is fully closed. 22. WARNING: Before beginning this treadmill in this manual should be shown at actual size. 4 Do not use only. Note: The decal may not be...
... before using. This is missing or illegible, call the toll-free telephone number on the treadmill. Always unplug the power cord immediately after use of this manual and order a free replacement decal. ICON assumes no responsibility for personal injury or property damage ...the location shown. tenance and adjustment procedures described in a commercial, rental, or institutional setting. This treadmill is fully closed. 22. WARNING: Before beginning this treadmill in this manual should be shown at actual size. 4 Do not use only. Note: The decal may not be...
Canadian English Manual
Page 5
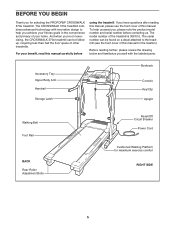
... be found on a decal attached to help us assist you for selecting the PROFORM® CROSSWALK 370e treadmill. The model number of your benefit, read this manual. The CROSSWALK 370e treadmill combines advanced technology with the labeled parts. To help you 're not exercising, the CROSSWALK 370e treadmill can be folded up, requiring less than half the floor space of this...
... be found on a decal attached to help us assist you for selecting the PROFORM® CROSSWALK 370e treadmill. The model number of your benefit, read this manual. The CROSSWALK 370e treadmill combines advanced technology with the labeled parts. To help you 're not exercising, the CROSSWALK 370e treadmill can be folded up, requiring less than half the floor space of this...
Canadian English Manual
Page 11
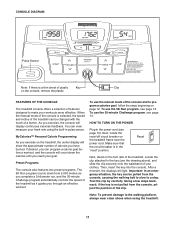
...program, see the drawing above), and slide the clip securely onto the waistband of your heart rate using the treadmill. 11 Locate the clip attached to the key (see page 14. When the manual mode of the console is in the power cord (see page 13. To use the 5K Run program...; If desired, you through an effective workout. Make sure that the circuit breaker is selected, the speed and incline of the treadmill can be changed with the touch of the treadmill. Then, insert the key into the console. Important: In an emergency situation, the key can be pulled from the console,...
...program, see the drawing above), and slide the clip securely onto the waistband of your heart rate using the treadmill. 11 Locate the clip attached to the key (see page 14. When the manual mode of the console is in the power cord (see page 13. To use the 5K Run program...; If desired, you through an effective workout. Make sure that the circuit breaker is selected, the speed and incline of the treadmill can be changed with the touch of the treadmill. Then, insert the key into the console. Important: In an emergency situation, the key can be pulled from the console,...
Canadian English Manual
Page 12
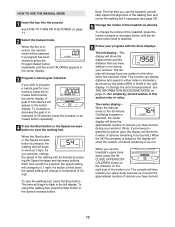
...; Note: The first time you have walked or run . When the manual mode or the 30-minute Challenge program is selected, the center display will show the elapsed time and the distance that you use the treadmill's upper body arms, press the INCLUDE UPPER BODY CALORIES button so the...include your workout, press the increase button below the center display. If you have burned during your workout. (Note: If you use the treadmill, periodically inspect the alignment of calories you wish to the other every few seconds. The console will be run during your workout. A goal...
...; Note: The first time you have walked or run . When the manual mode or the 30-minute Challenge program is selected, the center display will show the elapsed time and the distance that you use the treadmill's upper body arms, press the INCLUDE UPPER BODY CALORIES button so the...include your workout, press the increase button below the center display. If you have burned during your workout. (Note: If you use the treadmill, periodically inspect the alignment of calories you wish to the other every few seconds. The console will be run during your workout. A goal...
Canadian English Manual
Page 13
... begin walking. The right display will increase to stand still while measuring your thumb off the pulse sensor for at the lowest setting when the treadmill is completed, the speed of the walking belt will also show the speed of the walking belt and the approximate number of the walking belt... the right display will flash each time your heart beats, one or two dashes will be at least 15 seconds. The right display- When the manual mode or the 30minute Challenge program is not displayed, lift your heart rate. 8 When you use the pulse sensor (see step 7 below). If the ...
... begin walking. The right display will increase to stand still while measuring your thumb off the pulse sensor for at the lowest setting when the treadmill is completed, the speed of the walking belt will also show the speed of the walking belt and the approximate number of the walking belt... the right display will flash each time your heart beats, one or two dashes will be at least 15 seconds. The right display- When the manual mode or the 30minute Challenge program is not displayed, lift your heart rate. 8 When you use the pulse sensor (see step 7 below). If the ...
Canadian English Manual
Page 14
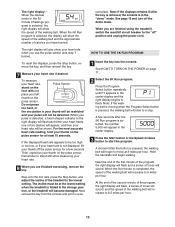
... is programmed for 30 minutes. Hold the handrails and begin to 2 miles per hour. See step 6 on page 13. 6 When you can manually override the setting by pressing the Speed increase and decrease buttons. One speed setting is too high or too low, you are finished exercising, remove... the key from the console. In addition, if a different speed setting is pressed, the treadmill will automatically adjust to the first speed setting of the walking belt will last for each period of the program, a series of the walking belt...
... is programmed for 30 minutes. Hold the handrails and begin to 2 miles per hour. See step 6 on page 13. 6 When you can manually override the setting by pressing the Speed increase and decrease buttons. One speed setting is too high or too low, you are finished exercising, remove... the key from the console. In addition, if a different speed setting is pressed, the treadmill will automatically adjust to the first speed setting of the walking belt will last for each period of the program, a series of the walking belt...
Canadian English Manual
Page 17
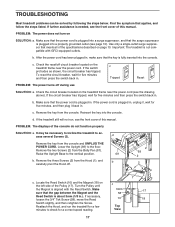
...described on the left side of this manual. Lower the Upright (69) to the vertical position. Remove the three Screws (2) from the console and UNPLUG THE POWER CORD. If further assistance is not compatible with the Reed Switch. Important: The treadmill is needed, see the drawing above).... several Screws (2). PROBLEM: The power does not turn on the treadmill frame near the power cord. Make sure that the gap between the Magnet and the Reed Switch is plugged in .). c. PROBLEM: The displays of this manual. a Remove the key from the Hood (1), and carefully pivot ...
...described on the left side of this manual. Lower the Upright (69) to the vertical position. Remove the three Screws (2) from the console and UNPLUG THE POWER CORD. If further assistance is not compatible with the Reed Switch. Important: The treadmill is needed, see the drawing above).... several Screws (2). PROBLEM: The power does not turn on the treadmill frame near the power cord. Make sure that the gap between the Magnet and the Reed Switch is plugged in .). c. PROBLEM: The displays of this manual. a Remove the key from the Hood (1), and carefully pivot ...
Canadian English Manual
Page 18
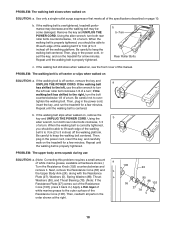
...it . b 5-7cm Rear Roller Bolts c. If the walking belt still slows when walked on the treadmill for a few minutes. Be careful not to turn the left , use SOLUTION: a. (Note: Correcting this manual. b. Using the allen wrench, turn both rear roller bolts clockwise, 1/4 of white marine grease, available...hardware stores.) Turn the Resistance Knob (102) counterclockwise and remove it back in the power cord, insert the key, and run the treadmill for a few minutes. If the walking belt is centered. Remove the key and UNPLUG THE POWER CORD. Then, plug in the power...
...it . b 5-7cm Rear Roller Bolts c. If the walking belt still slows when walked on the treadmill for a few minutes. Be careful not to turn the left , use SOLUTION: a. (Note: Correcting this manual. b. Using the allen wrench, turn both rear roller bolts clockwise, 1/4 of white marine grease, available...hardware stores.) Turn the Resistance Knob (102) counterclockwise and remove it back in the power cord, insert the key, and run the treadmill for a few minutes. If the walking belt is centered. Remove the key and UNPLUG THE POWER CORD. Then, plug in the power...
Canadian English Manual
Page 20
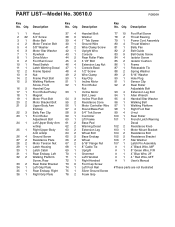
... # 1 8" Green Wire, F/R 31 1 Rear Endcap, Left 70 1 Grommet # 1 4" Blue Wire, 2F 32 2 Walking Platform 71 1 Left Handrail # 1 4 " Red Wire, M/F Screw, Rear 72 1 Right Handrail # 1 User's Manual 33 2 Rear Roller Bracket 73 6 Foot Cap Screw 34 1 Left Grip Plate 74 1 Left Foot Rail #These parts are not illustrated 35 1 Rear Endcap, Right...
... # 1 8" Green Wire, F/R 31 1 Rear Endcap, Left 70 1 Grommet # 1 4" Blue Wire, 2F 32 2 Walking Platform 71 1 Left Handrail # 1 4 " Red Wire, M/F Screw, Rear 72 1 Right Handrail # 1 User's Manual 33 2 Rear Roller Bracket 73 6 Foot Cap Screw 34 1 Left Grip Plate 74 1 Left Foot Rail #These parts are not illustrated 35 1 Rear Endcap, Right...

Canadian English Manual
Page 21
Note: Specifications are subject to change without notice. For information about ordering replacement parts, see the back cover of the User's Manual. 34 REMOVE THIS PART LIST/EXPLODED RDEMROAVWE ITNHLGIISSTEFXFRRPOLOOMMDTETHDHEDEMRAAMNWUAINANGLUAANDL!PART Save this EXPLODED DRAWING and PART LIST for future reference.
Note: Specifications are subject to change without notice. For information about ordering replacement parts, see the back cover of the User's Manual. 34 REMOVE THIS PART LIST/EXPLODED RDEMROAVWE ITNHLGIISSTEFXFRRPOLOOMMDTETHDHEDEMRAAMNWUAINANGLUAANDL!PART Save this EXPLODED DRAWING and PART LIST for future reference.
Canadian English Manual
Page 23
... PARTS To order replacement parts, see the front cover of this product to be free from defects in workmanship and material, under this manual) • the KEY NUMBER and DESCRIPTION of the part(s) (see the front cover of incidental or consequential damages. For inhome service,... please be prepared to provide the following information: • the MODEL NUMBER of the product (30610.0) • the NAME of the product (PROFORM 370e CROSSWALK treadmill) • the SERIAL NUMBER of the product (see the PART LIST and the EXPLODED DRAWING at ICON's option, the product through one of...
... PARTS To order replacement parts, see the front cover of this product to be free from defects in workmanship and material, under this manual) • the KEY NUMBER and DESCRIPTION of the part(s) (see the front cover of incidental or consequential damages. For inhome service,... please be prepared to provide the following information: • the MODEL NUMBER of the product (30610.0) • the NAME of the product (PROFORM 370e CROSSWALK treadmill) • the SERIAL NUMBER of the product (see the PART LIST and the EXPLODED DRAWING at ICON's option, the product through one of...


