
English Manual
Page 5
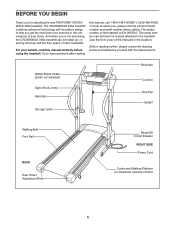
... design to the treadmill (see the front cover of your home. The CROSSWALK 365e treadmill combines advanced technology with the labeled parts. For your exercise in the convenience of this manual for selecting the new PROFORM® CROSSWALK 365e treadmill. The serial number...CROSSWALK 365e treadmill can be folded up, requiring less than half the floor space of the treadmill is 831.29533.0. BEFORE YOU BEGIN Thank you for the location). Watter Bottle Holder (bottle not included) Upper Body Arms Handrail Storage Latch Bookrack Console Key/Clip Upright Walking Belt Foot Rail...
... design to the treadmill (see the front cover of your home. The CROSSWALK 365e treadmill combines advanced technology with the labeled parts. For your exercise in the convenience of this manual for selecting the new PROFORM® CROSSWALK 365e treadmill. The serial number...CROSSWALK 365e treadmill can be folded up, requiring less than half the floor space of the treadmill is 831.29533.0. BEFORE YOU BEGIN Thank you for the location). Watter Bottle Holder (bottle not included) Upper Body Arms Handrail Storage Latch Bookrack Console Key/Clip Upright Walking Belt Foot Rail...
English Manual
Page 11
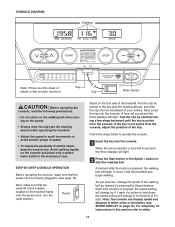
... page 10). if a button is not pulled from the console. Find the clip attached to miles. 11 Avoid spilling liquids on the foot rails of electric shock, keep the console dry. If the key is held down, the speed setting will begin walking. STEP-BY-STEP CONSOLE... OPERATION Before operating the console, make sure that the power cord is properly plugged in (see the drawing above ) while operating the treadmill. • Adjust the speed in the reset position. Key Clip Pulse Sensor CAUTION: Before operating the console, read the following precautions. •...
... page 10). if a button is not pulled from the console. Find the clip attached to miles. 11 Avoid spilling liquids on the foot rails of electric shock, keep the console dry. If the key is held down, the speed setting will begin walking. STEP-BY-STEP CONSOLE... OPERATION Before operating the console, make sure that the power cord is properly plugged in (see the drawing above ) while operating the treadmill. • Adjust the speed in the reset position. Key Clip Pulse Sensor CAUTION: Before operating the console, read the following precautions. •...
English Manual
Page 12
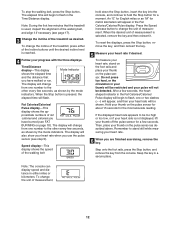
...will begin to the other every few minutes that you use the pulse sensor (see step 5). To measure your heart rate, stand on the foot rails and place your thumb on the pulse sensor. After a few seconds, as shown by the mode indicators. The display will change from the console... rate if desired. Then, place your heart rate when you have burned (see page 17). 3 Change the incline of the treadmill as described above. Step onto the foot rails, press the Stop button, and remove the key from one number to flash in a secure place. The display will begin to...
...will begin to the other every few minutes that you use the pulse sensor (see step 5). To measure your heart rate, stand on the foot rails and place your thumb on the pulse sensor. After a few seconds, as shown by the mode indicators. The display will change from the console... rate if desired. Then, place your heart rate when you have burned (see page 17). 3 Change the incline of the treadmill as described above. Step onto the foot rails, press the Stop button, and remove the key from one number to flash in a secure place. The display will begin to...
English Manual
Page 15
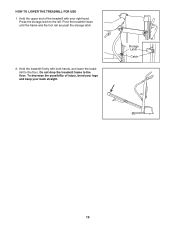
Pivot the treadmill down until the frame and the foot rail are past the storage latch. 2. Storage Latch Catch 15 Hold the upper end of injury, bend your legs and keep your right hand. Hold the treadmill firmly with your back straight. HOW TO LOWER THE TREADMILL FOR USE 1. Do not drop the treadmill frame to the floor. To decrease the possibility of the treadmill with both hands, and lower the treadmill to the floor. Press the storage latch to the left.
Pivot the treadmill down until the frame and the foot rail are past the storage latch. 2. Storage Latch Catch 15 Hold the upper end of injury, bend your legs and keep your right hand. Hold the treadmill firmly with your back straight. HOW TO LOWER THE TREADMILL FOR USE 1. Do not drop the treadmill frame to the floor. To decrease the possibility of the treadmill with both hands, and lower the treadmill to the floor. Press the storage latch to the left.
English Manual
Page 20
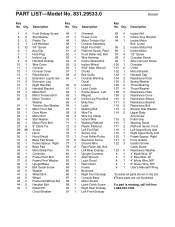
...77 1 78 2 79 1 80 1 81 1 82 1 83 1 84 1 85 1 86 1 87 1 88 1 89 1 90 1 91 1 Grommet Power Cord Motor Tension Nut Console Assembly Right Foot Rail Platform Screw, Rear Front Roller Adj. Qty. Description Key No. Qty. Bolt Wire Harness Incline Wheel Bolt Incline Wheel 5/32" Allen Wrench Choke Belt Guide... Left Magnet Incline Leg Pivot Bolt Belly Pan Latch Walking Belt Wire Tie Wire Tie Clamp Incline Wire Walking Platform Plastic Fastener Left Foot Rail Sensor Clip Front Roller/Pulley Electronic Screw Ground Wire Rear Roller Adj. PART LIST-Model No. 831.29533.0 R0305A Key No. Description ...
...77 1 78 2 79 1 80 1 81 1 82 1 83 1 84 1 85 1 86 1 87 1 88 1 89 1 90 1 91 1 Grommet Power Cord Motor Tension Nut Console Assembly Right Foot Rail Platform Screw, Rear Front Roller Adj. Qty. Description Key No. Qty. Bolt Wire Harness Incline Wheel Bolt Incline Wheel 5/32" Allen Wrench Choke Belt Guide... Left Magnet Incline Leg Pivot Bolt Belly Pan Latch Walking Belt Wire Tie Wire Tie Clamp Incline Wire Walking Platform Plastic Fastener Left Foot Rail Sensor Clip Front Roller/Pulley Electronic Screw Ground Wire Rear Roller Adj. PART LIST-Model No. 831.29533.0 R0305A Key No. Description ...
