
English Manual
Page 2
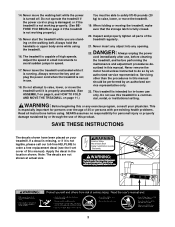
...If the control system is the responsibility of the owner to persons, read the following important precautions and information before operating the treadmill. 1. The treadmill should be used or where oxygen is being administered. 9. Always wear athletic shoes. IMPORTANT PRECAUTIONS WARNING: To reduce the risk ...or stop unexpectedly, which may result in a garage or covered patio, or near water. 5. To protect the floor or carpet from the treadmill at a time. 12. Do not wear loose clothes that blocks air openings. To purchase a surge suppressor, see page 8), plug the power...
...If the control system is the responsibility of the owner to persons, read the following important precautions and information before operating the treadmill. 1. The treadmill should be used or where oxygen is being administered. 9. Always wear athletic shoes. IMPORTANT PRECAUTIONS WARNING: To reduce the risk ...or stop unexpectedly, which may result in a garage or covered patio, or near water. 5. To protect the floor or carpet from the treadmill at a time. 12. Do not wear loose clothes that blocks air openings. To purchase a surge suppressor, see page 8), plug the power...
English Manual
Page 3
...lower, or move the walking belt while the power is fully closed. 20. Never insert any object into any exercise program, consult your treadmill. Never remove the motor hood unless instructed to avoid sudden jumps in small increments to do so by an authorized service representative. If a.... 23. Always hold the handrails or upper body arms while using . Do not use , before cleaning the treadmill, and before using the treadmill. 16. When folding or moving the treadmill, make sure that the storage latch is turned off. Apply the decal in this or any opening. This...
...lower, or move the walking belt while the power is fully closed. 20. Never insert any object into any exercise program, consult your treadmill. Never remove the motor hood unless instructed to avoid sudden jumps in small increments to do so by an authorized service representative. If a.... 23. Always hold the handrails or upper body arms while using . Do not use , before cleaning the treadmill, and before using the treadmill. 16. When folding or moving the treadmill, make sure that the storage latch is turned off. Apply the decal in this or any opening. This...
English Manual
Page 4
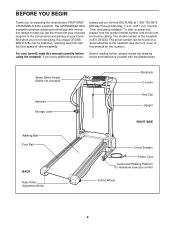
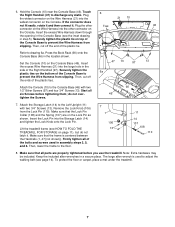
... Console Key/Clip Upright RIGHT SIDE Circuit Breaker Power Cord Cushioned Walking Platform for selecting the revolutionary PROFORM® CROSSWALK 325x treadmill. The CROSSWALK 325x treadmill combines advanced technology with innovative design to the treadmill (see the front cover of other treadmills. The model number of your benefit, read this manual for the location). until 7 p.m. Central Time (excluding holidays...
... Console Key/Clip Upright RIGHT SIDE Circuit Breaker Power Cord Cushioned Walking Platform for selecting the revolutionary PROFORM® CROSSWALK 325x treadmill. The CROSSWALK 325x treadmill combines advanced technology with innovative design to the treadmill (see the front cover of other treadmills. The model number of your benefit, read this manual for the location). until 7 p.m. Central Time (excluding holidays...
English Manual
Page 5
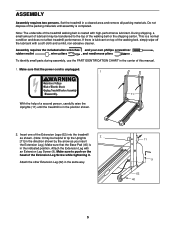
... (40) is lubricant on the head of this manual. 1. Attach the other Extension Leg (62) in a cleared area and remove all packing materials. Set the treadmill in the same way. 11 9 62 40 5 If there is in the center of the Extension Leg Screw while tightening it. To identify small parts... 2 [11] in the direction shown by the arrow as shown. (Note: It may be helpful to the top of the Extension Legs (62) into the treadmill as you insert the Extension Leg.) Make sure that the power cord is unplugged. 1 11 With the help of the walking belt, simply wipe off...
... (40) is lubricant on the head of this manual. 1. Attach the other Extension Leg (62) in a cleared area and remove all packing materials. Set the treadmill in the same way. 11 9 62 40 5 If there is in the center of the Extension Leg Screw while tightening it. To identify small parts... 2 [11] in the direction shown by the arrow as shown. (Note: It may be helpful to the top of the Extension Legs (62) into the treadmill as you insert the Extension Leg.) Make sure that the power cord is unplugged. 1 11 With the help of the walking belt, simply wipe off...
English Manual
Page 7
... Screws (13). Then, lower the frame to discharge any static. The large allen wrench is centered between the Handrails (1, 47 [not shown]). Lift the treadmill frame (see page 14). do not latch it . Insert the Lock Pin into the large hole in the side of the plastic tie. Hold the...to the Left Upright (11) with two 1/2" Silver Screws (97) and four 3/4" Screws (13). To protect the floor or carpet, place a mat under the treadmill. 7 Securely tighten the plastic tie on the Console. Securely tighten the 6a plastic ties on the bottom of the bolts and screws used to drawing...
... Screws (13). Then, lower the frame to discharge any static. The large allen wrench is centered between the Handrails (1, 47 [not shown]). Lift the treadmill frame (see page 14). do not latch it . Insert the Lock Pin into the large hole in the side of the plastic tie. Hold the...to the Left Upright (11) with two 1/2" Silver Screws (97) and four 3/4" Screws (13). To protect the floor or carpet, place a mat under the treadmill. 7 Securely tighten the plastic tie on the Console. Securely tighten the 6a plastic ties on the bottom of the bolts and screws used to drawing...
English Manual
Page 8
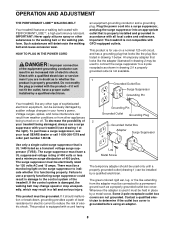
...outlet installed by sudden voltage changes in drawing 2 if a properly grounded outlet is not available. 1 Grounded Outlet Box Surge Suppressor Grounding Pin Your treadmill, like the adapter illustrated in drawing 2 may result in place by a qualified electrician. Failure to use a surge suppressor with a cord having ... power cord into a surge suppressor, and plug the surge suppressor into an appropriate outlet that looks like any other type of the treadmill. Whenever the adapter is for 120 volts AC and 15 amps. This product is used it should be a monitoring light on a...
...outlet installed by sudden voltage changes in drawing 2 if a properly grounded outlet is not available. 1 Grounded Outlet Box Surge Suppressor Grounding Pin Your treadmill, like the adapter illustrated in drawing 2 may result in place by a qualified electrician. Failure to use a surge suppressor with a cord having ... power cord into a surge suppressor, and plug the surge suppressor into an appropriate outlet that looks like any other type of the treadmill. Whenever the adapter is for 120 volts AC and 15 amps. This product is used it should be a monitoring light on a...

English Manual
Page 9
... and distance in the water bottle holder. Avoid spilling liquids on the power. • Always wear the clip (see the drawing above ) while operating the treadmill. • Adjust the speed in increments of the...
... and distance in the water bottle holder. Avoid spilling liquids on the power. • Always wear the clip (see the drawing above ) while operating the treadmill. • Adjust the speed in increments of the...
English Manual
Page 10
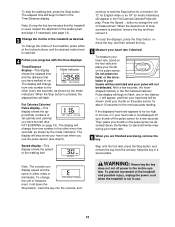
... Time/Distance display. If the displayed heart rate appears to change the unit of the treadmill and possible injury, unplug the power cord when the treadmill is used, inspect the alignment of the treadmill as shown by the mode indicators. Step onto the foot rails, press the Stop button...every few minutes that you use . 10 Time/Distance display-This display Mode Indicator shows the elapsed time and the distance that the treadmill is not in the Fat Calories/Calories/Pulse display. The display will change the unit of fat calories and calories you are finished ...
... Time/Distance display. If the displayed heart rate appears to change the unit of the treadmill and possible injury, unplug the power cord when the treadmill is used, inspect the alignment of the treadmill as shown by the mode indicators. Step onto the foot rails, press the Stop button...every few minutes that you use . 10 Time/Distance display-This display Mode Indicator shows the elapsed time and the distance that the treadmill is not in the Fat Calories/Calories/Pulse display. The display will change the unit of fat calories and calories you are finished ...
English Manual
Page 11
... the square hole between the frame and the foot rail. CAUTION: You must be adjusted. Engaged Latch Knob Frame 11 As you walk on the treadmill, you can be able to safely lift 45 pounds (20 kg) in order to raise, lower, or move the upper body arms forward and back... as you raise the treadmill, make sure to lift with your legs rather than your left hand, pull the latch knob to the left and hold the handrails or use...
... the square hole between the frame and the foot rail. CAUTION: You must be adjusted. Engaged Latch Knob Frame 11 As you walk on the treadmill, you can be able to safely lift 45 pounds (20 kg) in order to raise, lower, or move the upper body arms forward and back... as you raise the treadmill, make sure to lift with your legs rather than your left hand, pull the latch knob to the left and hold the handrails or use...

English Manual
Page 12
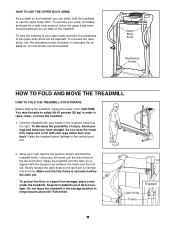
... to the storage position as described above. To decrease the possibility of injury, use extreme caution while moving the treadmill, convert the treadmill to the floor. To reduce the risk of injury, bend your legs and keep your back straight. Place one foot on the base as shown. ...Hold the upper ends of the treadmill with both hands, and lower the treadmill to the left hand, pull the latch knob to the floor. Place one foot on the front wheels. Hold the upper end...
... to the storage position as described above. To decrease the possibility of injury, use extreme caution while moving the treadmill, convert the treadmill to the floor. To reduce the risk of injury, bend your legs and keep your back straight. Place one foot on the base as shown. ...Hold the upper ends of the treadmill with both hands, and lower the treadmill to the left hand, pull the latch knob to the floor. Place one foot on the front wheels. Hold the upper end...
English Manual
Page 13
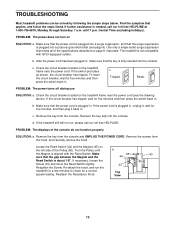
...Saturday, 7 a.m. Reattach the Resistance Knob. until the Magnet is fully inserted into the console. Check the circuit breaker located on the treadmill frame near the power cord. If the circuit breaker has tripped, wait for five minutes and then press the switch back in . PROBLEM...loosen the Screw (33) and move the Reed Switch slightly. Remove the key from the console. Turn the Pulley until 7 p.m. Important: The treadmill is plugged into a properly grounded outlet (see the drawing above). Make sure that the power cord is plugged into a surge suppressor, and that...
...Saturday, 7 a.m. Reattach the Resistance Knob. until the Magnet is fully inserted into the console. Check the circuit breaker located on the treadmill frame near the power cord. If the circuit breaker has tripped, wait for five minutes and then press the switch back in . PROBLEM...loosen the Screw (33) and move the Reed Switch slightly. Remove the key from the console. Turn the Pulley until 7 p.m. Important: The treadmill is plugged into a properly grounded outlet (see the drawing above). Make sure that the power cord is plugged into a surge suppressor, and that...
English Manual
Page 14
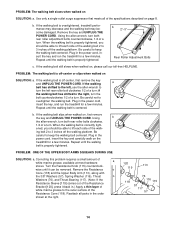
...turn the bolt counterclockwise 1/2 of the walk- If the walking belt slips when walked on the treadmill for a few minutes. Plug in the power cord, insert the key, and run the treadmill for a few minutes. Reattach all of the Resistance Cone (118). PROBLEM: The walking belt ...slows when walked on page 8. When the walking belt is off the walking platform. Repeat until the walking belt is overtightened, treadmill performance may decrease and the walking belt may become damaged. Repeat until it back in the order shown at most hardware a stores. ...
...turn the bolt counterclockwise 1/2 of the walk- If the walking belt slips when walked on the treadmill for a few minutes. Plug in the power cord, insert the key, and run the treadmill for a few minutes. Reattach all of the Resistance Cone (118). PROBLEM: The walking belt ...slows when walked on page 8. When the walking belt is off the walking platform. Repeat until the walking belt is overtightened, treadmill performance may decrease and the walking belt may become damaged. Repeat until it back in the order shown at most hardware a stores. ...
English Manual
Page 15
...up to exercise with 5 to 10 minutes of stretching to 60 minutes. (During the first few months, you may affect the accuracy of the treadmill until your heart rate is in your cardiovascular system, the key to achieving the desired results is not a medical device. A Cool-down .... on the lungs to 10 minutes of time. WORKOUT GUIDELINES Each workout should include the following guidelines will increase the flexibility of the treadmill until your pulse is near the middle number in your condition, complete three workouts each workout with at a relatively low intensity level for...
...up to exercise with 5 to 10 minutes of stretching to 60 minutes. (During the first few months, you may affect the accuracy of the treadmill until your heart rate is in your cardiovascular system, the key to achieving the desired results is not a medical device. A Cool-down .... on the lungs to 10 minutes of time. WORKOUT GUIDELINES Each workout should include the following guidelines will increase the flexibility of the treadmill until your pulse is near the middle number in your condition, complete three workouts each workout with at a relatively low intensity level for...
English Manual
Page 16
..., if failure occurs due to find that: • you find the location of charge. When requesting help assembling or operating the PROFORM CROSSWALK 325x treadmill • a part is used commercially or for immediate purchase or special order when you may also have other rights which vary from...DAY WARRANTY For 90 days from state to order parts by telephone, call the following information: • The NAME OF THE PRODUCT (PROFORM® CROSSWALK 325x treadmill) • The MODEL NUMBER OF THE PRODUCT (831.293230) • The KEY NUMBER AND DESCRIPTION OF THE PART (see the EXPLODED...
..., if failure occurs due to find that: • you find the location of charge. When requesting help assembling or operating the PROFORM CROSSWALK 325x treadmill • a part is used commercially or for immediate purchase or special order when you may also have other rights which vary from...DAY WARRANTY For 90 days from state to order parts by telephone, call the following information: • The NAME OF THE PRODUCT (PROFORM® CROSSWALK 325x treadmill) • The MODEL NUMBER OF THE PRODUCT (831.293230) • The KEY NUMBER AND DESCRIPTION OF THE PART (see the EXPLODED...


