
English Manual
Page 2
...Do not wear loose clothes that blocks air openings. When connecting the power cord (see your local SEARS dealer or call 1-800-3667278 and order part number 146148. 6. To purchase a surge suppressor, see page 8), plug the power cord into a surge suppressor (not included) and plug the ...ADJUSTMENT 8 HOW TO FOLD AND MOVE THE TREADMILL 11 TROUBLESHOOTING 13 CONDITIONING GUIDELINES 15 ORDERING REPLACEMENT PARTS Back Cover FULL 90 DAY WARRANTY Back Cover Note: An EXPLODED DRAWING and a PART LIST are attached in damage to ensure that meets all of the specifications described on page 8....
...Do not wear loose clothes that blocks air openings. When connecting the power cord (see your local SEARS dealer or call 1-800-3667278 and order part number 146148. 6. To purchase a surge suppressor, see page 8), plug the power cord into a surge suppressor (not included) and plug the ...ADJUSTMENT 8 HOW TO FOLD AND MOVE THE TREADMILL 11 TROUBLESHOOTING 13 CONDITIONING GUIDELINES 15 ORDERING REPLACEMENT PARTS Back Cover FULL 90 DAY WARRANTY Back Cover Note: An EXPLODED DRAWING and a PART LIST are attached in damage to ensure that meets all of the specifications described on page 8....
English Manual
Page 3
... a decal is missing, or if it is especially important for persons over the age of 35 or persons with pre-existing health problems. Read all parts of high speeds. Do not operate the treadmill if the power cord or plug is damaged, or if the treadmill is not working properly.) 15...
... a decal is missing, or if it is especially important for persons over the age of 35 or persons with pre-existing health problems. Read all parts of high speeds. Do not operate the treadmill if the power cord or plug is damaged, or if the treadmill is not working properly.) 15...
English Manual
Page 4
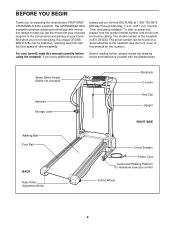
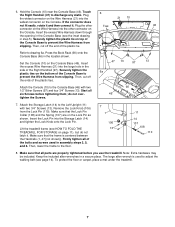
..., read this manual for the location). Central Time (excluding holidays). To help you 're not exercising, the unique CROSSWALK 325x can be folded up, requiring less than half the floor space of your exercise program in the convenience and privacy of...BACK Rear Roller Adjustment Bolts Bookrack Console Key/Clip Upright RIGHT SIDE Circuit Breaker Power Cord Cushioned Walking Platform for selecting the revolutionary PROFORM® CROSSWALK 325x treadmill. until 7 p.m. If you have additional questions, Before reading further, please review the drawing below and familiarize yourself with...
..., read this manual for the location). Central Time (excluding holidays). To help you 're not exercising, the unique CROSSWALK 325x can be folded up, requiring less than half the floor space of your exercise program in the convenience and privacy of...BACK Rear Roller Adjustment Bolts Bookrack Console Key/Clip Upright RIGHT SIDE Circuit Breaker Power Cord Cushioned Walking Platform for selecting the revolutionary PROFORM® CROSSWALK 325x treadmill. until 7 p.m. If you have additional questions, Before reading further, please review the drawing below and familiarize yourself with...
English Manual
Page 5
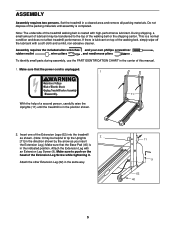
... the Base Pad (40) is in the center of the packing materials until the treadmill is in the indicated position. To identify small parts during assembly, use the PART IDENTIFICATION CHART in the position shown. 2. Do not dispose of this manual. 1. During shipping, a small amount of lubricant may be transferred to push...
... the Base Pad (40) is in the center of the packing materials until the treadmill is in the indicated position. To identify small parts during assembly, use the PART IDENTIFICATION CHART in the position shown. 2. Do not dispose of this manual. 1. During shipping, a small amount of lubricant may be transferred to push...
English Manual
Page 7
... 6. Press the Book Rack (90) onto the Console Base (46) in a secure place. Keep the included allen wrenches in the location shown. Firmly tighten all parts are on the Console Base (46). Touch 6 the Right Handrail (47) to adjust the walking belt (see page 14). Insert 47 13 97 13 the...
... 6. Press the Book Rack (90) onto the Console Base (46) in a secure place. Keep the included allen wrenches in the location shown. Firmly tighten all parts are on the Console Base (46). Touch 6 the Right Handrail (47) to adjust the walking belt (see page 14). Insert 47 13 97 13 the...
English Manual
Page 8
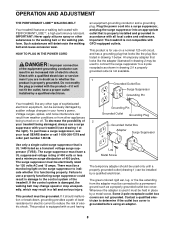
... PERFORMANT LUBETM WALKING BELT Your treadmill features a walking belt coated with your treadmill (see your local SEARS dealer or call 1-800-366-7278 and order part number 146148. The green-colored rigid ear, lug, or the like the plug illustrated in place by a qualified electrician. IMPORTANT: Never apply silicone spray or...
... PERFORMANT LUBETM WALKING BELT Your treadmill features a walking belt coated with your treadmill (see your local SEARS dealer or call 1-800-366-7278 and order part number 146148. The green-colored rigid ear, lug, or the like the plug illustrated in place by a qualified electrician. IMPORTANT: Never apply silicone spray or...
English Manual
Page 14
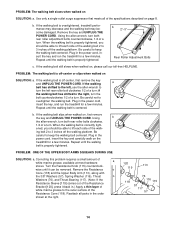
... properly tightened, you should be removed. If the walking belt still slows when walked on SOLUTION: a. Use only a single-outlet surge suppressor that meets all parts in the power cord, insert the key and run the treadmill for a few minutes. ing belt 2 to overtighten the walking belt. Reattach all of a turn...
... properly tightened, you should be removed. If the walking belt still slows when walked on SOLUTION: a. Use only a single-outlet surge suppressor that meets all parts in the power cord, insert the key and run the treadmill for a few minutes. ing belt 2 to overtighten the walking belt. Reattach all of a turn...
English Manual
Page 15
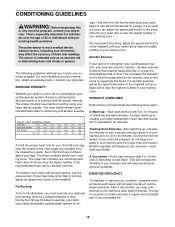
... first few minutes of time. Fat Burning To burn fat effectively, you , first find the three numbers above your breath. The following three parts: A Warm-up , increase the intensity of your exercise until your heart rate is near the bottom of stretching to cool down -Finish each...and circulation in your training zone for longer than 20 minutes.) Breathe regularly and deeply as you to make exercise a regular and enjoyable part of the treadmill. The chart below shows recommended heart rates for en- If your condition, complete three workouts each workout with the proper...
... first few minutes of time. Fat Burning To burn fat effectively, you , first find the three numbers above your breath. The following three parts: A Warm-up , increase the intensity of your exercise until your heart rate is near the bottom of stretching to cool down -Finish each...and circulation in your training zone for longer than 20 minutes.) Breathe regularly and deeply as you to make exercise a regular and enjoyable part of the treadmill. The chart below shows recommended heart rates for en- If your condition, complete three workouts each workout with the proper...
English Manual
Page 16
...the following information: • The NAME OF THE PRODUCT (PROFORM® CROSSWALK 325x treadmill) • The MODEL NUMBER OF THE PRODUCT (831.293230) • The KEY NUMBER AND DESCRIPTION OF THE PART (see the EXPLODED DRAWING and PART LIST in the center of this manual) FULL 90 DAY...have other rights which vary from the date of your nearest SEARS Service Center. When requesting help assembling or operating the PROFORM CROSSWALK 325x treadmill • a part is used commercially or for immediate purchase or special order when you need to defect in material or workmanship in USA ...
...the following information: • The NAME OF THE PRODUCT (PROFORM® CROSSWALK 325x treadmill) • The MODEL NUMBER OF THE PRODUCT (831.293230) • The KEY NUMBER AND DESCRIPTION OF THE PART (see the EXPLODED DRAWING and PART LIST in the center of this manual) FULL 90 DAY...have other rights which vary from the date of your nearest SEARS Service Center. When requesting help assembling or operating the PROFORM CROSSWALK 325x treadmill • a part is used commercially or for immediate purchase or special order when you need to defect in material or workmanship in USA ...
English Manual
Page 17
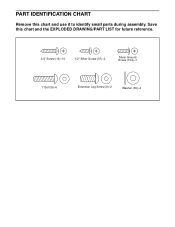
PART IDENTIFICATION CHART Remove this chart and the EXPLODED DRAWING/PART LIST for future reference. 3/4" Screw (13)-10 1/2" Silver Screw (97)-2 Silver Ground Screw (104)-1 1" Bolt (8)-6 Extension Leg Screw (9)-2 Washer (39)-4 Save this chart and use it to identify small parts during assembly.
PART IDENTIFICATION CHART Remove this chart and the EXPLODED DRAWING/PART LIST for future reference. 3/4" Screw (13)-10 1/2" Silver Screw (97)-2 Silver Ground Screw (104)-1 1" Bolt (8)-6 Extension Leg Screw (9)-2 Washer (39)-4 Save this chart and use it to identify small parts during assembly.
English Manual
Page 18
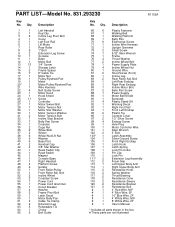
... Sleeve Resistance Bracket Resistance Bolt 4" Red Wire, M/F 4" Blue Wire, 2F 10" Blue Wire, 2F 4" White Wire, M/F 8" White Wire, 2F User's Manual * Includes all parts shown in the box # These parts are not illustrated R1102A Qty. 1 1 2 1 3 2 4 1 5 1 6 1 7 1 8 6 9 2 10 1 11 1 12 1 13 13 14 1 15 2 16 7 17 1 18 1 19 1 20* 1 21 1 22 4 23 1 24 1 25...Base Pad Handrail Cap 3/8" Star Washer Reed Switch Clip Reed Switch Magnet Console Base Right Handrail Platform Screw Isolator Front Roller/Pulley Front Roller Adj. PART LIST-Model No. 831.293230 Key No.
... Sleeve Resistance Bracket Resistance Bolt 4" Red Wire, M/F 4" Blue Wire, 2F 10" Blue Wire, 2F 4" White Wire, M/F 8" White Wire, 2F User's Manual * Includes all parts shown in the box # These parts are not illustrated R1102A Qty. 1 1 2 1 3 2 4 1 5 1 6 1 7 1 8 6 9 2 10 1 11 1 12 1 13 13 14 1 15 2 16 7 17 1 18 1 19 1 20* 1 21 1 22 4 23 1 24 1 25...Base Pad Handrail Cap 3/8" Star Washer Reed Switch Clip Reed Switch Magnet Console Base Right Handrail Platform Screw Isolator Front Roller/Pulley Front Roller Adj. PART LIST-Model No. 831.293230 Key No.


