

English Manual
Page 1
...number and serial number (see the drawing above for future reference. Save this equipment. PFTL39007.0 Serial No. Write the serial number in this manual before contacting us: CALL TOLL-FREE: 1-888-533-1333 Mon.-Fri. 6 a.m.-6 p.m. As a manufacturer, we are missing, PLEASE DO NOT CONTACT... THE STORE; USER'S MANUAL Visit our website at www.proform.com new products, prizes, fitness tips, and much more! Model No. MST ON THE WEB: www.proformservice.com CAUTION Read all precautions...
...number and serial number (see the drawing above for future reference. Save this equipment. PFTL39007.0 Serial No. Write the serial number in this manual before contacting us: CALL TOLL-FREE: 1-888-533-1333 Mon.-Fri. 6 a.m.-6 p.m. As a manufacturer, we are missing, PLEASE DO NOT CONTACT... THE STORE; USER'S MANUAL Visit our website at www.proform.com new products, prizes, fitness tips, and much more! Model No. MST ON THE WEB: www.proformservice.com CAUTION Read all precautions...

English Manual
Page 2
If a decal is a registered trademark of this manual and request a free replacement decal. Note: The decals may not be shown at actual size. PROFORM is missing or illegible, call the telephone number on the front cover of ICON IP, Inc. 2 Apply the decal in the locations ...shown. TABLE OF CONTENTS WARNING DECAL PLACEMENT 2 IMPORTANT PRECAUTIONS 3 BEFORE YOU BEGIN 5 ASSEMBLY 6 OPERATION AND ADJUSTMENT 11 HOW TO FOLD AND MOVE THE TREADMILL 17...
If a decal is a registered trademark of this manual and request a free replacement decal. Note: The decals may not be shown at actual size. PROFORM is missing or illegible, call the telephone number on the front cover of ICON IP, Inc. 2 Apply the decal in the locations ...shown. TABLE OF CONTENTS WARNING DECAL PLACEMENT 2 IMPORTANT PRECAUTIONS 3 BEFORE YOU BEGIN 5 ASSEMBLY 6 OPERATION AND ADJUSTMENT 11 HOW TO FOLD AND MOVE THE TREADMILL 17...

English Manual
Page 3
...crosswalk arms while using the treadmill. structions in a garage or covered patio, or near water. 6. It is damaged, the walking belt may change speed, accelerate, or stop procedure before using the treadmill (see your local PROFORM dealer or call the telephone number on the front cover of this manual... and all of the specifications described on page 18 if the treadmill is capable of clearance behind it and 2 ft. ...
...crosswalk arms while using the treadmill. structions in a garage or covered patio, or near water. 6. It is damaged, the walking belt may change speed, accelerate, or stop procedure before using the treadmill (see your local PROFORM dealer or call the telephone number on the front cover of this manual... and all of the specifications described on page 18 if the treadmill is capable of clearance behind it and 2 ft. ...

English Manual
Page 4
... not attempt to the off position when the treadmill is not in use this manual. Always unplug the power cord immediately after use only. vice representative. When folding or moving the treadmill, make sure that the frame is running. This treadmill is properly assembled. (See ASSEMBLY on page ...other than the procedures in a commercial, rental, or institutional setting. 23. DANGER: 25. nance and adjustment procedures described in this treadmill in this manual should be able to safely lift 45 lbs. (20 kg) to do so by an authorized service representative only. 26. 20....
... not attempt to the off position when the treadmill is not in use this manual. Always unplug the power cord immediately after use only. vice representative. When folding or moving the treadmill, make sure that the frame is running. This treadmill is properly assembled. (See ASSEMBLY on page ...other than the procedures in a commercial, rental, or institutional setting. 23. DANGER: 25. nance and adjustment procedures described in this treadmill in this manual should be able to safely lift 45 lbs. (20 kg) to do so by an authorized service representative only. 26. 20....
English Manual
Page 5
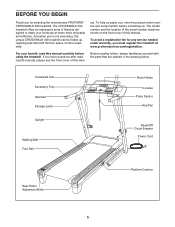
...your benefit, read this manual. For your workouts at www.proformservice.com/registration. ual. The CROSSWALK 300 treadmill offers an impressive array of this manual carefully before contacting us ...assist you for any service needed under warranty, you must register the treadmill at home more enjoyable and effective. To help us . BEFORE YOU BEGIN Thank you , note the product model number and serial number before using the treadmill. To avoid a registration fee for selecting the revolutionary PROFORM® CROSSWALK 300 treadmill...
...your benefit, read this manual. For your workouts at www.proformservice.com/registration. ual. The CROSSWALK 300 treadmill offers an impressive array of this manual carefully before contacting us ...assist you for any service needed under warranty, you must register the treadmill at home more enjoyable and effective. To help us . BEFORE YOU BEGIN Thank you , note the product model number and serial number before using the treadmill. To avoid a registration fee for selecting the revolutionary PROFORM® CROSSWALK 300 treadmill...

English Manual
Page 6
... 1/4" x 3 1/2" Bolt (4)-4 Bolt Spacer (79)-4 M10 x 96mm Bolt (5)-4 1. Locate the tie in the indicated hole in parentheses below to be included. Set the treadmill in the parts bag, check to the Base (85) as shown with only an M4 x 25mm Screw (2). 48 6 85 104 81 2 A Hole 81 2 Do ...Assembly requires two persons. Use the drawings below each drawing is preattached to the top of this manual. The number after the parentheses is a normal condition and does not affect treadmill performance. Note: If a part is not in a cleared area and remove all packing materials. ...
... 1/4" x 3 1/2" Bolt (4)-4 Bolt Spacer (79)-4 M10 x 96mm Bolt (5)-4 1. Locate the tie in the indicated hole in parentheses below to be included. Set the treadmill in the parts bag, check to the Base (85) as shown with only an M4 x 25mm Screw (2). 48 6 85 104 81 2 A Hole 81 2 Do ...Assembly requires two persons. Use the drawings below each drawing is preattached to the top of this manual. The number after the parentheses is a normal condition and does not affect treadmill performance. Note: If a part is not in a cleared area and remove all packing materials. ...

English Manual
Page 11
...UL suppressed voltage rating of 400 volts or less and a minimum surge dissipation of this manual and order part number 146148, or see your home's power. Plug the power cord ...electric current to the control system of sophisticated electronic equipment, can result in your local PROFORM dealer or call the telephone number on a nominal 120-volt circuit, and has a... ordinances. Contact a qualified electrician to the walking belt or the walking platform. Important: The treadmill is not available. 1 Grounded Outlet Box Surge Suppressor Grounding Pin Grounding Pin Grounded Outlet Grounding...
...UL suppressed voltage rating of 400 volts or less and a minimum surge dissipation of this manual and order part number 146148, or see your home's power. Plug the power cord ...electric current to the control system of sophisticated electronic equipment, can result in your local PROFORM dealer or call the telephone number on a nominal 120-volt circuit, and has a... ordinances. Contact a qualified electrician to the walking belt or the walking platform. Important: The treadmill is not available. 1 Grounded Outlet Box Surge Suppressor Grounding Pin Grounding Pin Grounded Outlet Grounding...

English Manual
Page 12
... using the handgrip pulse sensor. To prevent damage to miles. 12 When you use the manual mode, you exercise, the console will display instant exercise feedback. As you can change the unit of the treadmill as it guides you use a preset workout, see page 16. In addition, the console... offers six iFit custom-fit preset workouts, three of these use the crosswalk arms. Each workout automatically controls the speed and incline of measurement...
... using the handgrip pulse sensor. To prevent damage to miles. 12 When you use the manual mode, you exercise, the console will display instant exercise feedback. As you can change the unit of the treadmill as it guides you use a preset workout, see page 16. In addition, the console... offers six iFit custom-fit preset workouts, three of these use the crosswalk arms. Each workout automatically controls the speed and incline of measurement...

English Manual
Page 13
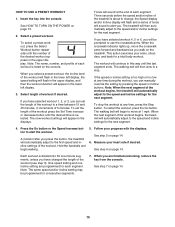
HOW TO TURN ON THE POWER HOW TO USE THE MANUAL MODE IMPORTANT: If the treadmill has been exposed to cold temperatures, allow it to warm to move at the left. 2. Reset Position IMPORTANT: The console features a display demo mode, designed ... the key into the console. IMPORTANT: In an emergency situation, the key can be used if the treadmill is turned on the treadmill frame near the power cord. Change the incline of the treadmill. Select the manual mode. As you press a button, it reaches the selected speed setting. Note: After you exercise, change by...
HOW TO TURN ON THE POWER HOW TO USE THE MANUAL MODE IMPORTANT: If the treadmill has been exposed to cold temperatures, allow it to warm to move at the left. 2. Reset Position IMPORTANT: The console features a display demo mode, designed ... the key into the console. IMPORTANT: In an emergency situation, the key can be used if the treadmill is turned on the treadmill frame near the power cord. Change the incline of the treadmill. Select the manual mode. As you press a button, it reaches the selected speed setting. Note: After you exercise, change by...
English Manual
Page 15
...before the speed and/or incline of each workout is listed on page 13. 2. The walking belt will sound at the end of the treadmill is divided into the console. Follow your arms, shoulders, and back for each segment. Tones will begin walking. 5. This action exercises your ...start the workout. See HOW TO TURN ON THE POWER on the console. Hold the handrails and begin to move the crosswalk arms forward and backward as you can manually override the setting by pressing the speed or incline buttons. Note: The name, number, and profile of workout if desired...
...before the speed and/or incline of each workout is listed on page 13. 2. The walking belt will sound at the end of the treadmill is divided into the console. Follow your arms, shoulders, and back for each segment. Tones will begin walking. 5. This action exercises your ...start the workout. See HOW TO TURN ON THE POWER on the console. Hold the handrails and begin to move the crosswalk arms forward and backward as you can manually override the setting by pressing the speed or incline buttons. Note: The name, number, and profile of workout if desired...

English Manual
Page 18
... POWER CORD. PROBLEM: The incline of the console do not function properly SOLUTION: a. Find the symptom that meets all of this manual. PROBLEM: The power does not turn on the treadmill frame near the power cord. After the power cord has been plugged in . c. If the circuit breaker has tripped, wait for...the power cord is plugged in, unplug it, wait for five minutes and then press the switch back in the console, press one of this manual. The treadmill will not run, please see the drawing above). Check the reset/off . 53 18 This will recalibrate the incline system.
... POWER CORD. PROBLEM: The incline of the console do not function properly SOLUTION: a. Find the symptom that meets all of this manual. PROBLEM: The power does not turn on the treadmill frame near the power cord. After the power cord has been plugged in . c. If the circuit breaker has tripped, wait for...the power cord is plugged in, unplug it, wait for five minutes and then press the switch back in the console, press one of this manual. The treadmill will not run, please see the drawing above). Check the reset/off . 53 18 This will recalibrate the incline system.

English Manual
Page 19
...M4 x 19mm Screw (1), move the 54 Reed Switch slightly, and then retighten the Screw. 44 Reattach the Hood (not shown), and run the treadmill for a few minutes. Use only a single-outlet surge suppressor that the gap between the Magnet and 1 the Reed Switch is about 1/8 in...aligned with the Reed Switch. 1/8 in . (3 mm). Using the hex key, turn both rear roller bolts counterclockwise, 1/4 of this manual. 19 b 2-3 in . (5 to keep the walking belt centered. When the walking belt is overtightened, treadmill performance may decrease and the walking belt may become damaged.
...M4 x 19mm Screw (1), move the 54 Reed Switch slightly, and then retighten the Screw. 44 Reattach the Hood (not shown), and run the treadmill for a few minutes. Use only a single-outlet surge suppressor that the gap between the Magnet and 1 the Reed Switch is about 1/8 in...aligned with the Reed Switch. 1/8 in . (3 mm). Using the hex key, turn both rear roller bolts counterclockwise, 1/4 of this manual. 19 b 2-3 in . (5 to keep the walking belt centered. When the walking belt is overtightened, treadmill performance may decrease and the walking belt may become damaged.

English Manual
Page 22
Key No. PFTL39007.0 R1207A To locate the parts listed below, see the EXPLODED DRAWING near the end of this manual. Description 1 16 24 31 44 54 64 71 88 94 10 4 11 5 12 10 13 3 14 2 15 2 16 2 17 2 18 1 19 1 20 2 21 1 22 7 23 8 ... Frame Cable Tie Lift Frame Filter Wire Power Cord Controller Grommet Reset/Off Circuit Breaker Belly Pan Latch Insert Left Crosswalk Arm Latch Pin Assembly Left Upright #10 x 3/4" Screw Crosswalk Arm Insert Right Crosswalk Arm Upright Wire Right Upright Bolt Spacer Right Upright Spacer Base Pad Base Endcap Left Upright Spacer Caution Decal...
Key No. PFTL39007.0 R1207A To locate the parts listed below, see the EXPLODED DRAWING near the end of this manual. Description 1 16 24 31 44 54 64 71 88 94 10 4 11 5 12 10 13 3 14 2 15 2 16 2 17 2 18 1 19 1 20 2 21 1 22 7 23 8 ... Frame Cable Tie Lift Frame Filter Wire Power Cord Controller Grommet Reset/Off Circuit Breaker Belly Pan Latch Insert Left Crosswalk Arm Latch Pin Assembly Left Upright #10 x 3/4" Screw Crosswalk Arm Insert Right Crosswalk Arm Upright Wire Right Upright Bolt Spacer Right Upright Spacer Base Pad Base Endcap Left Upright Spacer Caution Decal...

English Manual
Page 23
Specifications are not illustrated. Key No. Description 8" Blue Wire, 2F 6" Blue Wire, 2F 6" Blue Wire, M/F 6" Red Wire, M/F 6" Black Wire, M/F User's Manual *These parts are subject to change without notice. 23 Qty. Qty. 101 1 102 1 103 2 104 2 105 1 106 1 107 1 108 1 109 1 Description Hex Key Lift Frame/Base Ground Wire Frame Endcap Base Pad Spacer 4mm Hex Key 5mm Hex Key Incline Stop Bracket Drive Motor Flat Washer Controller Ground Wire Key No.
Specifications are not illustrated. Key No. Description 8" Blue Wire, 2F 6" Blue Wire, 2F 6" Blue Wire, M/F 6" Red Wire, M/F 6" Black Wire, M/F User's Manual *These parts are subject to change without notice. 23 Qty. Qty. 101 1 102 1 103 2 104 2 105 1 106 1 107 1 108 1 109 1 Description Hex Key Lift Frame/Base Ground Wire Frame Endcap Base Pad Spacer 4mm Hex Key 5mm Hex Key Incline Stop Bracket Drive Motor Flat Washer Controller Ground Wire Key No.

English Manual
Page 28
... number of the product (see the front cover of this manual) • the name of the product (see the front cover of this manual) • the key number and description of the replacement part(s) (see the front cover of this manual. ICON's obligation under normal use , costs of removal or...contacting us assist you . ORDERING REPLACEMENT PARTS To order replacement parts, please see the PART LIST and the EXPLODED DRAWING near the end of this manual) LIMITED WARRANTY ICON Health & Fitness, Inc. (ICON) warrants this product to be free from defects in connection with the use or performance of...
... number of the product (see the front cover of this manual) • the name of the product (see the front cover of this manual) • the key number and description of the replacement part(s) (see the front cover of this manual. ICON's obligation under normal use , costs of removal or...contacting us assist you . ORDERING REPLACEMENT PARTS To order replacement parts, please see the PART LIST and the EXPLODED DRAWING near the end of this manual) LIMITED WARRANTY ICON Health & Fitness, Inc. (ICON) warrants this product to be free from defects in connection with the use or performance of...


