
English Manual
Page 2
... properly. (See BEFORE YOU BEGIN on the same circuit. 11. It is not working properly.) 2 Do not put the treadmill in length. Never move the walking belt while the power is being administered. 6. Always wear athletic shoes. Do not operate the treadmill if the power cord or plug is damaged, or if...
... properly. (See BEFORE YOU BEGIN on the same circuit. 11. It is not working properly.) 2 Do not put the treadmill in length. Never move the walking belt while the power is being administered. 6. Always wear athletic shoes. Do not operate the treadmill if the power cord or plug is damaged, or if...
English Manual
Page 3
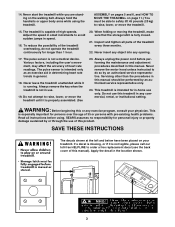
... exercise program, consult your treadmill. Do not use . 19. SAVE THESE INSTRUCTIONS The decals shown at the left and below have been placed on the walking belt. This treadmill is intended for longer than the procedures in this treadmill in any commercial, rental, or institutional setting. To reduce the possibility of high...
... exercise program, consult your treadmill. Do not use . 19. SAVE THESE INSTRUCTIONS The decals shown at the left and below have been placed on the walking belt. This treadmill is intended for longer than the procedures in this treadmill in any commercial, rental, or institutional setting. To reduce the possibility of high...
English Manual
Page 4
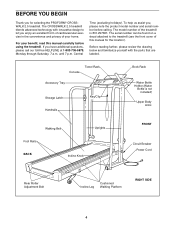
... Bottle Holder (Water Bottle is 831.297381. The CROSSWALK 2.5 treadmill blends advanced technology with the parts that are labeled. The model number of the treadmill is not included) Upper Body Arms Walking Belt Foot Rails BACK Incline Knob Uprights FRONT Circuit Breaker...Bolt Incline Leg Cushioned Walking Platform RIGHT SIDE 4 Before reading further, please review the drawing below and familiarize yourself with innovative design to the treadmill (see the front cover of your benefit, read this manual for selecting the PROFORM® CROSSWALK 2.5 treadmill. Central...
... Bottle Holder (Water Bottle is 831.297381. The CROSSWALK 2.5 treadmill blends advanced technology with the parts that are labeled. The model number of the treadmill is not included) Upper Body Arms Walking Belt Foot Rails BACK Incline Knob Uprights FRONT Circuit Breaker...Bolt Incline Leg Cushioned Walking Platform RIGHT SIDE 4 Before reading further, please review the drawing below and familiarize yourself with innovative design to the treadmill (see the front cover of your benefit, read this manual for selecting the PROFORM® CROSSWALK 2.5 treadmill. Central...
English Manual
Page 7
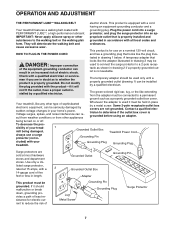
...wear. This product is for electric current to determine if the outlet box cover is properly installed and substances to the walking belt or the walking plat- A temporary adapter that looks like any other propriate outlet that is grounded before using an adapter. Check with all... and form. Do not modify the plug provided with a 14-gauge cord of electric shock. OPERATION AND ADJUSTMENT THE PERFORMANT LUBETM WALKING BELT electric shock. They will The temporary adapter should malfunction or break down, grounding provides a path of your treadmill. Some 2-pole ...
...wear. This product is for electric current to determine if the outlet box cover is properly installed and substances to the walking belt or the walking plat- A temporary adapter that looks like any other propriate outlet that is grounded before using an adapter. Check with all... and form. Do not modify the plug provided with a 14-gauge cord of electric shock. OPERATION AND ADJUSTMENT THE PERFORMANT LUBETM WALKING BELT electric shock. They will The temporary adapter should malfunction or break down, grounding provides a path of your treadmill. Some 2-pole ...

English Manual
Page 8
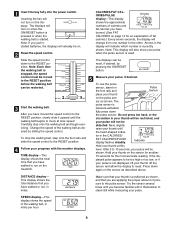
... increments. • The training zones marked beside the speed control are general guidelines only. When the key is removed from the console, the walking belt will stop. • Adjust the speed in . (See HOW TO PLUG IN THE POWER CORD on the face of the console, remove it.... Avoid spilling liquids on walking belt when starting treadmill. • Read User's Manual and follow warnings and operating instructions. • Keep fluids off electronic console. BATTERY INSTALLATION The console...
... increments. • The training zones marked beside the speed control are general guidelines only. When the key is removed from the console, the walking belt will stop. • Adjust the speed in . (See HOW TO PLUG IN THE POWER CORD on the face of the console, remove it.... Avoid spilling liquids on walking belt when starting treadmill. • Read User's Manual and follow warnings and operating instructions. • Keep fluids off electronic console. BATTERY INSTALLATION The console...
English Manual
Page 9
...measuring your thumb on Pulse the foot rails and Sensor place your pulse. DISTANCE display- Remember to the pulse sensor. Carefully step onto the walking belt and begin exercising. After 5 to 10 seconds, your thumb off the sensor and allow the display to the RESET position 5 Measure your ...one number to move at this level. stopped, the speed control must be on page 14 for the most accurate reading. The 3 Start the walking belt. tor in your thumb will also show your pulse, if desired. Press down the pulse sensor. Arrows in miles per hour. 9 Change ...
...measuring your thumb on Pulse the foot rails and Sensor place your pulse. DISTANCE display- Remember to the pulse sensor. Carefully step onto the walking belt and begin exercising. After 5 to 10 seconds, your thumb off the sensor and allow the display to the RESET position 5 Measure your ...one number to move at this level. stopped, the speed control must be on page 14 for the most accurate reading. The 3 Start the walking belt. tor in your thumb will also show your pulse, if desired. Press down the pulse sensor. Arrows in miles per hour. 9 Change ...
English Manual
Page 10
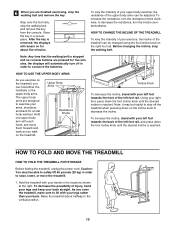
... back of the treadmill can hold either the handrails or the upper body arms. The upper body arms are finished exercising, stop the walking belt and remove the key. Raise the treadmill about five minutes. To increase the resistance, turn the knobs counterclockwise. Using your upper body ...to conserve the batteries. To increase the incline, stand with each hand, and move the treadmill. 1. Before changing the incline, stop the walking belt, and remove the key from the console. Hold one upper body arm with your hands in order to raise, lower, or move them forward...
... back of the treadmill can hold either the handrails or the upper body arms. The upper body arms are finished exercising, stop the walking belt and remove the key. Raise the treadmill about five minutes. To increase the resistance, turn the knobs counterclockwise. Using your upper body ...to conserve the batteries. To increase the incline, stand with each hand, and move the treadmill. 1. Before changing the incline, stop the walking belt, and remove the key from the console. Hold one upper body arm with your hands in order to raise, lower, or move them forward...
English Manual
Page 12
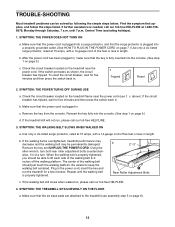
... 4. b. Using the allen wrench, turn both rear roller adjustment bolts counterclockwise, 1/4 of the walking belt 2-3 inches off the walking platform. Repeat until 7 p.m. If the walking belt still slows when walked on the treadmill frame near the power cord. c. If the circuit breaker has tripped, wait ... problems can be permanently damaged. If the switch protrudes as shown, the circuit breaker has tripped. c. SYMPTOM: THE WALKING BELT SLOWS WHEN WALKED ON a. Remove the key and UNPLUG THE POWER CORD. Be careful to the treadmill (see 1. Find the symptom ...
... 4. b. Using the allen wrench, turn both rear roller adjustment bolts counterclockwise, 1/4 of the walking belt 2-3 inches off the walking platform. Repeat until 7 p.m. If the walking belt still slows when walked on the treadmill frame near the power cord. c. If the circuit breaker has tripped, wait ... problems can be permanently damaged. If the switch protrudes as shown, the circuit breaker has tripped. c. SYMPTOM: THE WALKING BELT SLOWS WHEN WALKED ON a. Remove the key and UNPLUG THE POWER CORD. Be careful to the treadmill (see 1. Find the symptom ...
English Manual
Page 13
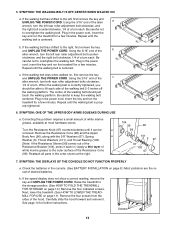
...white marine grease, available at the right. 104 99 96 98 101 5 97 67 102 67 7. c. When the walking belt is centered. Be careful to overtighten the walking belt. b. b. Plug in the console. (See BATTERY INSTALLATION on page 10.) Remove the four indicated screws. Correcting this ...TREADMILL FOR STORAGE on page 8.) Most problems are the result of the Resistance Cone (98). If the walking belt has shifted to overtighten the walking belt. Repeat until the walking belt is centered. The center of a turn the left , first remove the key and a UNPLUG THE POWER...
...white marine grease, available at the right. 104 99 96 98 101 5 97 67 102 67 7. c. When the walking belt is centered. Be careful to overtighten the walking belt. b. b. Plug in the console. (See BATTERY INSTALLATION on page 10.) Remove the four indicated screws. Correcting this ...TREADMILL FOR STORAGE on page 8.) Most problems are the result of the Resistance Cone (98). If the walking belt has shifted to overtighten the walking belt. Repeat until the walking belt is centered. The center of a turn the left , first remove the key and a UNPLUG THE POWER...

English Manual
Page 17
...14 Screw 1 Allen Wrench 1 Adhesive Clip 1 Rear Roller Endcap 1 Rear Roller 1 Incline Shock 1 Latch Decal 1 Battery Cover 4 8" Cable Tie 1 Walking Belt 1 Walking Platform 8 Platform Screw 8 Isolator 1 Incline Lever 1 Shock 1 Front Roller/Pulley 3 Releasable Cable Tie 1 Storage Latch Bracket 2 Handrail Bolt 2 Frame Guide... 1 Speed Knob 8 128093 1 Speed Potentiometer 9 131606 1 Console Base 10* 133961 1 Console 11 119038 1 Key/Clip 12 135866 1 Motor Belt 13 124669 1 Power Cord 14 122812 1 Motor Tension Washer 15 014117 1 Motor Tension Star Washer 16 012056 2 Incline Wheel Nut 17 120867 1...
...14 Screw 1 Allen Wrench 1 Adhesive Clip 1 Rear Roller Endcap 1 Rear Roller 1 Incline Shock 1 Latch Decal 1 Battery Cover 4 8" Cable Tie 1 Walking Belt 1 Walking Platform 8 Platform Screw 8 Isolator 1 Incline Lever 1 Shock 1 Front Roller/Pulley 3 Releasable Cable Tie 1 Storage Latch Bracket 2 Handrail Bolt 2 Frame Guide... 1 Speed Knob 8 128093 1 Speed Potentiometer 9 131606 1 Console Base 10* 133961 1 Console 11 119038 1 Key/Clip 12 135866 1 Motor Belt 13 124669 1 Power Cord 14 122812 1 Motor Tension Washer 15 014117 1 Motor Tension Star Washer 16 012056 2 Incline Wheel Nut 17 120867 1...


