
English Manual
Page 4
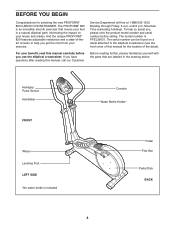
... use the elliptical crosstrainer. BEFORE YOU BEGIN Congratulations for the location of the decal). And the unique PROFORM® 820 features adjustable resistance and a state-of this manual for selecting the new PROFORM® 820 CARDIO CROSSTRAINER. The model number is included Console Water Bottle Holder...No water bottle is PFEL39031. The PROFORM® 820 is an incredibly smooth exerciser that are labeled in a natural elliptical path, minimizing the impact on a decal attached to the elliptical crosstrainer (see the front cover of -theart console to help us assist you get ...
... use the elliptical crosstrainer. BEFORE YOU BEGIN Congratulations for the location of the decal). And the unique PROFORM® 820 features adjustable resistance and a state-of this manual for selecting the new PROFORM® 820 CARDIO CROSSTRAINER. The model number is included Console Water Bottle Holder...No water bottle is PFEL39031. The PROFORM® 820 is an incredibly smooth exerciser that are labeled in a natural elliptical path, minimizing the impact on a decal attached to the elliptical crosstrainer (see the front cover of -theart console to help us assist you get ...
English Manual
Page 6
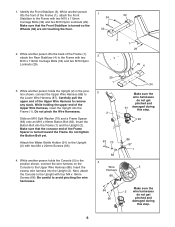
...Front Stabilizer (3). Carefully pull the upper end of the Frame (1), attach the Front Stabilizer to the Lower Wire Harness (87). While another person holds the Console (5) in the position shown, connect the Upper Wire Harness (86) to the Frame with two 2 M10 x 112mm Carriage Bolts (34) and two M10.... Insert the excess wire harness into the Upright (2). While another person holds the Upright (2) in the position shown, connect the wire harness on the Console to avoid pinching the wire harnesses. 29 1 3 2 63 70 83 4 Wire Harness 86 66 66 34 Make sure the wire harnesses do not...
...Front Stabilizer (3). Carefully pull the upper end of the Frame (1), attach the Front Stabilizer to the Lower Wire Harness (87). While another person holds the Console (5) in the position shown, connect the Upper Wire Harness (86) to the Frame with two 2 M10 x 112mm Carriage Bolts (34) and two M10.... Insert the excess wire harness into the Upright (2). While another person holds the Upright (2) in the position shown, connect the wire harness on the Console to avoid pinching the wire harnesses. 29 1 3 2 63 70 83 4 Wire Harness 86 66 66 34 Make sure the wire harnesses do not...
English Manual
Page 7
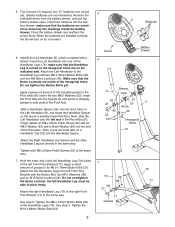
... Handlebar Leg with the Button Bolt, two M10 Washers (38), and an M10 Nylon Locknut (29). Hold the lower end of the hexagonal holes. The Console (5) requires four "D" batteries (not included); make sure that the batteries are on for a moment. 6. Then, press the small tabs on the Left Handlebar (9), and rotate...
... Handlebar Leg with the Button Bolt, two M10 Washers (38), and an M10 Nylon Locknut (29). Hold the lower end of the hexagonal holes. The Console (5) requires four "D" batteries (not included); make sure that the batteries are on for a moment. 6. Then, press the small tabs on the Left Handlebar (9), and rotate...
English Manual
Page 10
... for more enjoyable and effective. To use the manual mode of the console, see page 11. As you can be changed with the touch of a button. sonal trainer in handgrip pulse sensor. High-energy music provides added motivation. With the elliptical crosstrainer connected to your pace as you through an effective workout. To...
... for more enjoyable and effective. To use the manual mode of the console, see page 11. As you can be changed with the touch of a button. sonal trainer in handgrip pulse sensor. High-energy music provides added motivation. With the elliptical crosstrainer connected to your pace as you through an effective workout. To...
English Manual
Page 11
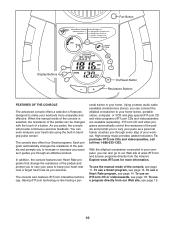
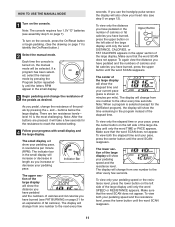
...display will show the time remaining in the small display will show your heart rate (see assembly step 5 on page 12). To turn on the console, press the On/Reset button or begin pedaling. (See the drawing on the left side of the large display until only the word TIME or...1 Turn on the left side of the large display until only the word SPEED or RESISTANCE appears. Note: The console requires four 1.5V "D" batteries (see step 5 on page 7). Each time the console is selected (except for the resistance to the other every few seconds. Note: After the buttons are ten resistance ...
...display will show the time remaining in the small display will show your heart rate (see assembly step 5 on page 12). To turn on the console, press the On/Reset button or begin pedaling. (See the drawing on the left side of the large display until only the word TIME or...1 Turn on the left side of the large display until only the word SPEED or RESISTANCE appears. Note: The console requires four 1.5V "D" batteries (see step 5 on page 7). Each time the console is selected (except for the resistance to the other every few seconds. Note: After the buttons are ten resistance ...

English Manual
Page 12
.... 12 Rotate the thumb wheel on the right side of measurement, hold the handgrips with other feedback modes. 6 Turn on for 30 seconds. Note: The console can show your heart rate if desired. grips, peel off the fan, press the fan button a third time. To turn off to reselect the desired... on the fan at low speed, press the fan button. shaped indicator in either miles or kilometers. If the pedals are not moved and the console buttons are not moved for a few seconds, the displays will pause and the time will then show speed and distance in the large display will...
.... 12 Rotate the thumb wheel on the right side of measurement, hold the handgrips with other feedback modes. 6 Turn on for 30 seconds. Note: The console can show your heart rate if desired. grips, peel off the fan, press the fan button a third time. To turn off to reselect the desired... on the fan at low speed, press the fan button. shaped indicator in either miles or kilometers. If the pedals are not moved and the console buttons are not moved for a few seconds, the displays will pause and the time will then show speed and distance in the large display will...

English Manual
Page 13
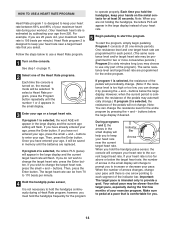
...the pedals will automatically change if a different resistance level is completed, the displays will continue to use a Smart program. 1 Turn on the console. buttons below to show the time remaining in the program. Your actual pace may be shown by pressing the + and - See step ...TO USE A SMART PROGRAM Each Smart program will automatically change the resistance of your exercise program. Programs 3 and 4 are finished exercising, the console will automatically turn off. See step 1 on , the manual mode will be programmed for the next period. The target pace for a few...
...the pedals will automatically change if a different resistance level is completed, the displays will continue to use a Smart program. 1 Turn on the console. buttons below to show the time remaining in the program. Your actual pace may be shown by pressing the + and - See step ...TO USE A SMART PROGRAM Each Smart program will automatically change the resistance of your exercise program. Programs 3 and 4 are finished exercising, the console will automatically turn off. See step 1 on , the manual mode will be programmed for the next period. The target pace for a few...
English Manual
Page 14
.... If program 2 is selected, the letters PLS (pulse) will appear in the large display instead of the Heart Rate programs. Each time the console is completed, the resistance of the pedals may be slower than the target pace, especially during the first few months of the pedals will be...be selected. Follow the steps below to use only part of 20 one arrow pointing to prompt you hold the handgrip pulse sensor, the console will Indicator Bar help you are not holding the handgrips, the letters PLS will appear in the large display and the current target heart rate...
.... If program 2 is selected, the letters PLS (pulse) will appear in the large display instead of the Heart Rate programs. Each time the console is completed, the resistance of the pedals may be slower than the target pace, especially during the first few months of the pedals will be...be selected. Follow the steps below to use only part of 20 one arrow pointing to prompt you hold the handgrip pulse sensor, the console will Indicator Bar help you are not holding the handgrips, the letters PLS will appear in the large display and the current target heart rate...

English Manual
Page 15
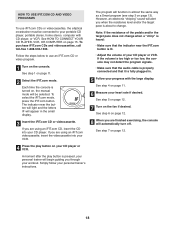
...6 on page 12. 8 When you stop pedaling for connecting instructions. See page 17 for connecting instructions. To use iFIT.com CDs, the elliptical crosstrainer must be connected to 17 for a few seconds, the program will automatically turn off. See page 17 for connecting instructions. A. Plug the ...page 11. 7 Turn on page 12. HOW TO CONNECT YOUR CD PLAYER, VCR, OR COMPUTER 6 Follow your headphones into the jack beneath the console. HOW TO CONNECT YOUR PORTABLE CD PLAYER Note: If your CD player. Plug one end of a 1/8" to 1/8" stereo audio cable (available at...
...6 on page 12. 8 When you stop pedaling for connecting instructions. See page 17 for connecting instructions. To use iFIT.com CDs, the elliptical crosstrainer must be connected to 17 for a few seconds, the program will automatically turn off. See page 17 for connecting instructions. A. Plug the ...page 11. 7 Turn on page 12. HOW TO CONNECT YOUR CD PLAYER, VCR, OR COMPUTER 6 Follow your headphones into the jack beneath the console. HOW TO CONNECT YOUR PORTABLE CD PLAYER Note: If your CD player. Plug one end of a 1/8" to 1/8" stereo audio cable (available at...
English Manual
Page 16
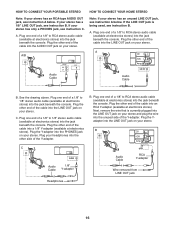
...available at electronics stores). A. Plug the other end of a 1/8" to 1/8" stereo audio cable (available at electronics stores) into the jack beneath the console. A CD VCR Amp LINE OUT LINE OUT Audio Cable B. B CD VCR Amp LINE OUT Audio Cable RCA Y-adapter Wire removed from LINE OUT ...into the unused side of the Y-adapter. C Audio Cable PHONES 1/8" Y-adapter B. Plug one end of the cable into the jack beneath the console. Plug the other end of a 1/8" to 1/8" stereo audio cable (available at electronics stores) into an RCA Y-adapter (available at electronics stores...
...available at electronics stores). A. Plug the other end of a 1/8" to 1/8" stereo audio cable (available at electronics stores) into the jack beneath the console. A CD VCR Amp LINE OUT LINE OUT Audio Cable B. B CD VCR Amp LINE OUT Audio Cable RCA Y-adapter Wire removed from LINE OUT ...into the unused side of the Y-adapter. C Audio Cable PHONES 1/8" Y-adapter B. Plug one end of the cable into the jack beneath the console. Plug the other end of a 1/8" to 1/8" stereo audio cable (available at electronics stores) into an RCA Y-adapter (available at electronics stores...
English Manual
Page 17
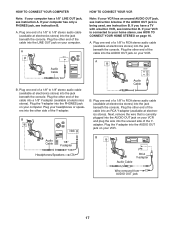
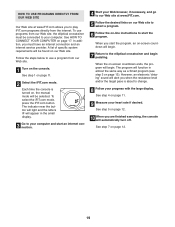
... on your VCR. A ics stores). A. A. Plug the other end of the Yadapter. Plug one end of the cable into the jack beneath the console. B PHONES Audio Cable 1/8" Y-adapter Audio Cable B. If your computer has only a PHONES jack, see instruction B. Plug the other end of a ... Y-adapter (available at electron- Plug one end of the Y-adapter. A ANT. If the AUDIO OUT jack is currently plugged into the jack beneath the console. If you have a TV with a built-in VCR, see instruction B. Plug the other side of a 1/8" to 1/8" stereo audio cable (available at ...
... on your VCR. A ics stores). A. A. Plug the other end of the Yadapter. Plug one end of the cable into the jack beneath the console. B PHONES Audio Cable 1/8" Y-adapter Audio Cable B. If your computer has only a PHONES jack, see instruction B. Plug the other end of a ... Y-adapter (available at electron- Plug one end of the Y-adapter. A ANT. If the AUDIO OUT jack is currently plugged into the jack beneath the console. If you have a TV with a built-in VCR, see instruction B. Plug the other side of a 1/8" to 1/8" stereo audio cable (available at ...
English Manual
Page 18
...too low, the console may not detect the program signals. • Make sure that the audio cable is properly connected and that the indicator near the button will light and the letters IF will be connected to use iFIT.com CDs or videocassettes, the elliptical crosstrainer must be selected.... See step 6 on the console. Each time the console is fully plugged in the small display. 3 Insert the iFIT.com CD or videocassette. See step 5 on ...
...too low, the console may not detect the program signals. • Make sure that the audio cable is properly connected and that the indicator near the button will light and the letters IF will be connected to use iFIT.com CDs or videocassettes, the elliptical crosstrainer must be selected.... See step 6 on the console. Each time the console is fully plugged in the small display. 3 Insert the iFIT.com CD or videocassette. See step 5 on ...
English Manual
Page 19
...When the on page 17. However, an electronic "chirping" sound will begin. 7 Return to the elliptical crosstrainer and begin . See step 4 on page 12. 10 When you are finished exercising, the console will begin pedaling. See step 5 on page 11. 9 Measure your Web browser, if necessary, and...directly from the internet. Follow the steps below to change. 8 Follow your computer. See step 1 on the console. To use a program from our Web site, the elliptical crosstrainer must have an internet connection and an internet service provider. To select the iFIT.com mode, press the iFIT...
...When the on page 17. However, an electronic "chirping" sound will begin. 7 Return to the elliptical crosstrainer and begin . See step 4 on page 12. 10 When you are finished exercising, the console will begin pedaling. See step 5 on page 11. 9 Measure your Web browser, if necessary, and...directly from the internet. Follow the steps below to change. 8 Follow your computer. See step 1 on the console. To use a program from our Web site, the elliptical crosstrainer must have an internet connection and an internet service provider. To select the iFIT.com mode, press the iFIT...
English Manual
Page 20
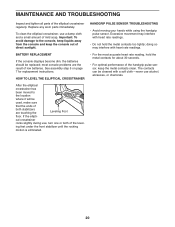
... small amount of both of the handgrip pulse sensor, keep the console out of direct sunlight. To clean the elliptical crosstrainer, use alcohol, abrasives, or chemicals. 20 BATTERY REPLACEMENT If the console displays become dim, the batteries should be cleaned with heart rate ... Do not hold the metal contacts for replacement instructions. HOW TO LEVEL THE ELLIPTICAL CROSSTRAINER After the elliptical crosstrainer has been moved to the console, keep liquids away from the console and keep the metal contacts clean. HANDGRIP PULSE SENSOR TROUBLESHOOTING • Avoid ...
... small amount of both of the handgrip pulse sensor, keep the console out of direct sunlight. To clean the elliptical crosstrainer, use alcohol, abrasives, or chemicals. 20 BATTERY REPLACEMENT If the console displays become dim, the batteries should be cleaned with heart rate ... Do not hold the metal contacts for replacement instructions. HOW TO LEVEL THE ELLIPTICAL CROSSTRAINER After the elliptical crosstrainer has been moved to the console, keep liquids away from the console and keep the metal contacts clean. HANDGRIP PULSE SENSOR TROUBLESHOOTING • Avoid ...
English Manual
Page 22
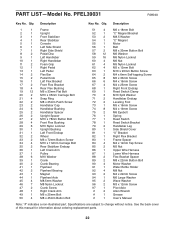
Description 1 1 Frame 2 1 Upright 3 1 Front Stabilizer 4 1 Rear Stabilizer 5 1 Console 6 1 Left Side Shield 7 1 Right Side Shield 8 2 Pedal Disc 9 1 Left Handlebar 10 1 Right Handlebar 11 2 Foam Grip 12 1 Right Pedal 13 1 Left Pedal 14 2 Flex Bar ...
Description 1 1 Frame 2 1 Upright 3 1 Front Stabilizer 4 1 Rear Stabilizer 5 1 Console 6 1 Left Side Shield 7 1 Right Side Shield 8 2 Pedal Disc 9 1 Left Handlebar 10 1 Right Handlebar 11 2 Foam Grip 12 1 Right Pedal 13 1 Left Pedal 14 2 Flex Bar ...


