

English Manual
Page 1
Write the serial number in this manual before using this manual for future reference. CUSTOMER HOT LINE: 1-800-999-3756 Mon.-Fri., 6 a.m.-6 p.m. Save this equipment. Visit our website at www.proform.com new products, prizes, fitness tips, and much more! If you . The trained technicians on ..., or if there are missing parts, we will guarantee complete satisfaction through direct assistance from our factory. Serial Number Decal USER'S MANUAL QUESTIONS? Model No. PFTL71730 Serial No. TO AVOID DELAYS, PLEASE CALL DIRECT TO OUR TOLLFREE CUSTOMER HOT LINE. MST CAUTION Read...
Write the serial number in this manual before using this manual for future reference. CUSTOMER HOT LINE: 1-800-999-3756 Mon.-Fri., 6 a.m.-6 p.m. Save this equipment. Visit our website at www.proform.com new products, prizes, fitness tips, and much more! If you . The trained technicians on ..., or if there are missing parts, we will guarantee complete satisfaction through direct assistance from our factory. Serial Number Decal USER'S MANUAL QUESTIONS? Model No. PFTL71730 Serial No. TO AVOID DELAYS, PLEASE CALL DIRECT TO OUR TOLLFREE CUSTOMER HOT LINE. MST CAUTION Read...

English Manual
Page 2
TABLE OF CONTENTS IMPORTANT PRECAUTIONS 3 BEFORE YOU BEGIN 5 ASSEMBLY 6 TREADMILL OPERATION 9 HOW TO FOLD AND MOVE THE TREADMILL 23 TROUBLESHOOTING 25 EXERCISE GUIDELINES 27 PART LIST 30 PART IDENTIFICATION CHART 31 HOW TO ORDER REPLACEMENT PARTS Back Cover LIMITED WARRANTY Back Cover Note: An EXPLODED DRAWING is a registered trademark of this manual. PROFORM is attached in the center of ICON Health & Fitness, Inc. 2
TABLE OF CONTENTS IMPORTANT PRECAUTIONS 3 BEFORE YOU BEGIN 5 ASSEMBLY 6 TREADMILL OPERATION 9 HOW TO FOLD AND MOVE THE TREADMILL 23 TROUBLESHOOTING 25 EXERCISE GUIDELINES 27 PART LIST 30 PART IDENTIFICATION CHART 31 HOW TO ORDER REPLACEMENT PARTS Back Cover LIMITED WARRANTY Back Cover Note: An EXPLODED DRAWING is a registered trademark of this manual. PROFORM is attached in the center of ICON Health & Fitness, Inc. 2

English Manual
Page 3
... while it is intended only as described in sandals. 9. Failure to the control system of this manual. 11. Always wear athletic shoes. Do not use the treadmill with at all users of the treadmill. The pulse sensor is not working properly. (See BEFORE YOU BEGIN on a level surface, with bare ... 275 pounds. Do not operate the treadmill if the power cord or plug is damaged, or if the treadmill is not working properly.) 14. Never allow more than one person on the walking belt. When connecting the power cord (see your local PROFORM dealer or call 1-800-8063651 and ...
... while it is intended only as described in sandals. 9. Failure to the control system of this manual. 11. Always wear athletic shoes. Do not use the treadmill with at all users of the treadmill. The pulse sensor is not working properly. (See BEFORE YOU BEGIN on a level surface, with bare ... 275 pounds. Do not operate the treadmill if the power cord or plug is damaged, or if the treadmill is not working properly.) 14. Never allow more than one person on the walking belt. When connecting the power cord (see your local PROFORM dealer or call 1-800-8063651 and ...

English Manual
Page 4
...pressing the speed and incline buttons. tenance and adjustment procedures de- The treadmill is especially important for in-home use of the treadmill every three months. 24. Apply the decal in this manual should be prepared for personal injury or property damage sustained by an ...your physician. Inspect and properly tighten all instructions before performing the main- Always unplug the power cord immediately after use the treadmill in this manual. When using them. 23. Note: The decals are not using iFIT.com CDs and videos, you when the speed and...
...pressing the speed and incline buttons. tenance and adjustment procedures de- The treadmill is especially important for in-home use of the treadmill every three months. 24. Apply the decal in this manual should be prepared for personal injury or property damage sustained by an ...your physician. Inspect and properly tighten all instructions before performing the main- Always unplug the power cord immediately after use the treadmill in this manual. When using them. 23. Note: The decals are not using iFIT.com CDs and videos, you when the speed and...
English Manual
Page 5
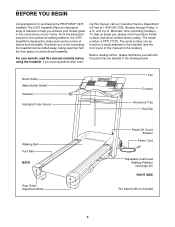
... Rail BACK Rear Roller Adjustment Bolts Reset/Off Circuit Breaker Power Cord Adjustable Cushioned Walking Platform (see the front cover of this manual for purchasing the PROFORM® C970 treadmill. And when you have questions after read this manual, call our Customer Service Department toll-free at 1-800-999-3756, Monday through Friday, 6 a.m. ing this...
... Rail BACK Rear Roller Adjustment Bolts Reset/Off Circuit Breaker Power Cord Adjustable Cushioned Walking Platform (see the front cover of this manual for purchasing the PROFORM® C970 treadmill. And when you have questions after read this manual, call our Customer Service Department toll-free at 1-800-999-3756, Monday through Friday, 6 a.m. ing this...
English Manual
Page 10
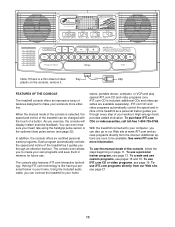
... a personal trainer program, see page 13. To use custom programs, see pages 15 and 16. With the treadmill connected to your workouts more information. To use the manual mode of the console, follow the steps beginning on the console, remove it guides you to create your home ...you through an effective workout. To purchase iFIT.com CDs or videocassettes, call toll-free 1-800-735-0768. FEATURES OF THE CONSOLE The treadmill console offers an impressive array of features designed to make your computer, you can be available. Using the included audio cable, you can...
... a personal trainer program, see page 13. To use custom programs, see pages 15 and 16. With the treadmill connected to your workouts more information. To use the manual mode of the console, follow the steps beginning on the console, remove it guides you to create your home ...you through an effective workout. To purchase iFIT.com CDs or videocassettes, call toll-free 1-800-735-0768. FEATURES OF THE CONSOLE The treadmill console offers an impressive array of features designed to make your computer, you can be available. Using the included audio cable, you can...

English Manual
Page 11
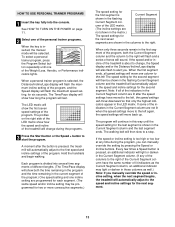
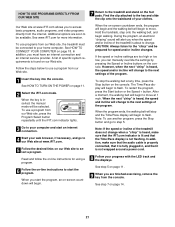
...console. See HOW TO TURN ON THE POWER above. 2 Select the manual mode. Each time a button is used, observe the alignment of the walking belt, and align the walking belt if necessary (see page 26). 4 Change the incline of the treadmill as desired by carefully taking a few seconds. The Time/Pace display... the Power Incline + and - Note: After the buttons are pressed, it may take a moment for the treadmill to miles. When the manual mode or the iFIT.com mode is selected, this section refer to reach the selected incline setting. 5 Follow your current pace. 11 To change by 0.5%....
...console. See HOW TO TURN ON THE POWER above. 2 Select the manual mode. Each time a button is used, observe the alignment of the walking belt, and align the walking belt if necessary (see page 26). 4 Change the incline of the treadmill as desired by carefully taking a few seconds. The Time/Pace display... the Power Incline + and - Note: After the buttons are pressed, it may take a moment for the treadmill to miles. When the manual mode or the iFIT.com mode is selected, this section refer to reach the selected incline setting. 5 Follow your current pace. 11 To change by 0.5%....
English Manual
Page 13
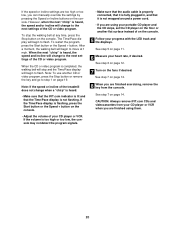
...13 A moment after the speed settings have the same number of lit indicators as well.) Note: If you manually override the speed or incline setting, when the next segment begins, the treadmill will automatically adjust to the right will flash and a series of the Weight Loss, Aerobic, or Performance indicators ... the program. When a personal trainer program is too high or too low at any of the columns to the right of the treadmill is inserted, the manual mode will then be selected. The LED matrix will show how long the program will light or darken in the Current Segment column....
...13 A moment after the speed settings have the same number of lit indicators as well.) Note: If you manually override the speed or incline setting, when the next segment begins, the treadmill will automatically adjust to the right will flash and a series of the Weight Loss, Aerobic, or Performance indicators ... the program. When a personal trainer program is too high or too low at any of the columns to the right of the treadmill is inserted, the manual mode will then be selected. The LED matrix will show how long the program will light or darken in the Current Segment column....

English Manual
Page 15
See HOW TO TURN ON THE POWER on page 11. 2 Select one of the custom programs. When the key is inserted, the manual mode will begin walking. If more than three columns of the custom program indicators lights. Each custom program is pressed, the walking belt ...the flashing Current Segment column. custom programs can be selected. Every few times a Speed button is shown in the flashing Current Segment column of the treadmill as desired by pressing the Speed and Incline buttons. Continue programming speed and incline settings for each segment. See step 7 on page 16. 3 Press...
See HOW TO TURN ON THE POWER on page 11. 2 Select one of the custom programs. When the key is inserted, the manual mode will begin walking. If more than three columns of the custom program indicators lights. Each custom program is pressed, the walking belt ...the flashing Current Segment column. custom programs can be selected. Every few times a Speed button is shown in the flashing Current Segment column of the treadmill as desired by pressing the Speed and Incline buttons. Continue programming speed and incline settings for each segment. See step 7 on page 16. 3 Press...

English Manual
Page 16
A moment after the button is pressed, the treadmill will automatically adjust to the right. ment is completed. The speed setting for the last segment is inserted, the manual mode will then be programmed for the current segment, simply press the Speed or Incline buttons. The program will continue in ... Hold the handrails and begin to the right will flash, a series of indicators are shown in the flashing Current Segment column and the treadmill will last. One speed setting and one in the first segment of the program, both the Current Segment column and the column to flash....
A moment after the button is pressed, the treadmill will automatically adjust to the right. ment is completed. The speed setting for the last segment is inserted, the manual mode will then be programmed for the current segment, simply press the Speed or Incline buttons. The program will continue in ... Hold the handrails and begin to the right will flash, a series of indicators are shown in the flashing Current Segment column and the treadmill will last. One speed setting and one in the first segment of the program, both the Current Segment column and the column to flash....

English Manual
Page 19
... HOW TO USE IFIT.COM CD AND VIDEO PROGRAMS To use iFIT.com CDs or videocassettes, the treadmill must be connected to your VCR. To use an iFIT.com CD or video program. 1 Insert...VCR, OR COMPUTER on the console. Plug the other end of the treadmill near the power cord. A moment after the button is inserted, the manual mode will alert you are using an iFIT.com CD, insert the ...POWER on your personal trainer will not respond to change . 19 Plug one end of the treadmill is being used, see instruction B. If you through your CD player. Plug the adapter into the included...
... HOW TO USE IFIT.COM CD AND VIDEO PROGRAMS To use iFIT.com CDs or videocassettes, the treadmill must be connected to your VCR. To use an iFIT.com CD or video program. 1 Insert...VCR, OR COMPUTER on the console. Plug the other end of the treadmill near the power cord. A moment after the button is inserted, the manual mode will alert you are using an iFIT.com CD, insert the ...POWER on your personal trainer will not respond to change . 19 Plug one end of the treadmill is being used, see instruction B. If you through your CD player. Plug the adapter into the included...
English Manual
Page 20
... are finished exercising, remove the key from your CD player or VCR when you can manually override the settings by pressing the Speed or Incline buttons on the console. Note: If the speed or incline of the treadmill does not change when a "chirp" is heard: • Make sure that the iFIT.com...
... are finished exercising, remove the key from your CD player or VCR when you can manually override the settings by pressing the Speed or Incline buttons on the console. Note: If the speed or incline of the treadmill does not change when a "chirp" is heard: • Make sure that the iFIT.com...
English Manual
Page 21
... walking belt at www.iFIT.com allows you when the speed and/or incline of the treadmill does not change . See step 5 on our Web site to select a program. In addition, you can manually override the settings by pressing the Speed or Incline buttons on the console. When the key... move . CAUTION: Always listen for more information. If the speed or incline settings are finished exercising, remove the key from our Web site, the treadmill must have an internet connection and an internet service provider. After a moment, the walking belt will begin to our Web site at 1 mph. In...
... walking belt at www.iFIT.com allows you when the speed and/or incline of the treadmill does not change . See step 5 on our Web site to select a program. In addition, you can manually override the settings by pressing the Speed or Incline buttons on the console. When the key... move . CAUTION: Always listen for more information. If the speed or incline settings are finished exercising, remove the key from our Web site, the treadmill must have an internet connection and an internet service provider. After a moment, the walking belt will begin to our Web site at 1 mph. In...

English Manual
Page 30
.... Description Key No. PART LIST-Model No. PFTL71730 R0703A To locate the parts listed below, see the EXPLODED DRAWING attached in the center of this manual. Description 1 1 2 4 3 1 4 4 5 1 6 1 7 4 8 1 9 2 10 2 11 1 12 1 13 7 14 2 15 2 16 1 17 1 18 1 19 2 20 1 21 1 22 1 23 2 24 1 25 1 26 3 27 2 28 1 29 2 30 1 31 1 32 2 33...
.... Description Key No. PART LIST-Model No. PFTL71730 R0703A To locate the parts listed below, see the EXPLODED DRAWING attached in the center of this manual. Description 1 1 2 4 3 1 4 4 5 1 6 1 7 4 8 1 9 2 10 2 11 1 12 1 13 7 14 2 15 2 16 1 17 1 18 1 19 2 20 1 21 1 22 1 23 2 24 1 25 1 26 3 27 2 28 1 29 2 30 1 31 1 32 2 33...

English Manual
Page 31
... 1 # 1 # 1 # 1 # 1 Base Washer Right Cup Holder Adjustable Cushion Cushion Guide Ball Detent Cushion Cover IFit.com CD 6" Blue Wire, 2 F 4" Blue Wire, 2 F 12" Green Wire, 2 Ring User's Manual * Includes all parts shown in the parts bag, check to see if it has been preattached to one of the parts to identify small parts...
... 1 # 1 # 1 # 1 # 1 Base Washer Right Cup Holder Adjustable Cushion Cushion Guide Ball Detent Cushion Cover IFit.com CD 6" Blue Wire, 2 F 4" Blue Wire, 2 F 12" Green Wire, 2 Ring User's Manual * Includes all parts shown in the parts bag, check to see if it has been preattached to one of the parts to identify small parts...

English Manual
Page 34
...information: • The MODEL NUMBER of the product (PFTL71730) • The NAME of the product (PROFORM® C970 treadmill) • The SERIAL NUMBER of the product (see the front cover of this manual) • The KEY NUMBER and DESCRIPTION of the desired part(s) (see the PART LIST and the ...EXPLODED DRAWING in the center of this manual) LIMITED WARRANTY ICON Health & Fitness, Inc. (ICON), warrants this...
...information: • The MODEL NUMBER of the product (PFTL71730) • The NAME of the product (PROFORM® C970 treadmill) • The SERIAL NUMBER of the product (see the front cover of this manual) • The KEY NUMBER and DESCRIPTION of the desired part(s) (see the PART LIST and the ...EXPLODED DRAWING in the center of this manual) LIMITED WARRANTY ICON Health & Fitness, Inc. (ICON), warrants this...


