

English Manual
Page 3
.... Always remove the key, unplug the power cord, and move the treadmill until it is damaged, the walking belt may change speed or stop unexpectedly, which may affect the accuracy of all times. 7. If the control system is properly assembled. (See ASSEMBLY on page 6, and HOW TO FOLD AND MOVE THE TREADMILL on page 5 for both men and women. Do not attempt to raise, lower, or move the reset/off...
.... Always remove the key, unplug the power cord, and move the treadmill until it is damaged, the walking belt may change speed or stop unexpectedly, which may affect the accuracy of all times. 7. If the control system is properly assembled. (See ASSEMBLY on page 6, and HOW TO FOLD AND MOVE THE TREADMILL on page 5 for both men and women. Do not attempt to raise, lower, or move the reset/off...

English Manual
Page 4
... by pressing the speed and incline buttons. Never drop or insert any object into any time by an authorized service representative. 20. If a decal is heard, the speed and/or incline will alert you can manually override the speed and incline settings at 1-800-999-3756 to order a free replacement decal. When using . Servicing other than the procedures in any exercise program, consult your treadmill. tenance and adjustment procedures...
... by pressing the speed and incline buttons. Never drop or insert any object into any time by an authorized service representative. 20. If a decal is heard, the speed and/or incline will alert you can manually override the speed and incline settings at 1-800-999-3756 to order a free replacement decal. When using . Servicing other than the procedures in any exercise program, consult your treadmill. tenance and adjustment procedures...
English Manual
Page 5
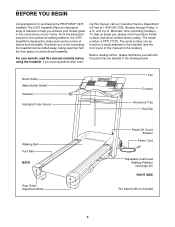
... before calling. ing this manual for purchasing the PROFORM® C970 treadmill. Mountain Time (excluding holidays). The model number is included 5 Book Holder Water Bottle Holder* Handrail Handgrip Pulse Sensor Fan Console Accessory Tray Key/Clip Walking Belt Foot Rail BACK Rear Roller Adjustment Bolts Reset/Off Circuit Breaker Power Cord Adjustable Cushioned Walking Platform (see the front cover of conventional treadmills. The serial number can be found on a decal attached to the treadmill (see page 22...
... before calling. ing this manual for purchasing the PROFORM® C970 treadmill. Mountain Time (excluding holidays). The model number is included 5 Book Holder Water Bottle Holder* Handrail Handgrip Pulse Sensor Fan Console Accessory Tray Key/Clip Walking Belt Foot Rail BACK Rear Roller Adjustment Bolts Reset/Off Circuit Breaker Power Cord Adjustable Cushioned Walking Platform (see the front cover of conventional treadmills. The serial number can be found on a decal attached to the treadmill (see page 22...

English Manual
Page 9
... 2 your home's power. There must be grounded. A temporary adapter that is properly installed and grounded in a fall and serious injury. If the control system is not available. 1 Grounded Outlet Box Surge Suppressor Grounding Pin Your treadmill, like the adapter illustrated in drawing 2 may result in accordance with PERFORMANT LUBETM, a high-performance lubricant. TREADMILL OPERATION THE PERFORMANT LUBETM WALKING BELT Your treadmill features a walking belt coated...
... 2 your home's power. There must be grounded. A temporary adapter that is properly installed and grounded in a fall and serious injury. If the control system is not available. 1 Grounded Outlet Box Surge Suppressor Grounding Pin Your treadmill, like the adapter illustrated in drawing 2 may result in accordance with PERFORMANT LUBETM, a high-performance lubricant. TREADMILL OPERATION THE PERFORMANT LUBETM WALKING BELT Your treadmill features a walking belt coated...
English Manual
Page 10
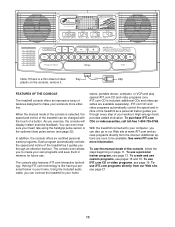
... a button. You can be changed with the touch of the treadmill can even measure your computer, you to make your home. In addition, the console offers six certified personal trainer programs. Each program automatically controls the speed and incline of features designed to create your own programs and save them in your workouts more information. With the treadmill connected to your heart rate using the handgrip pulse sensor or the optional chest pulse sensor...
... a button. You can be changed with the touch of the treadmill can even measure your computer, you to make your home. In addition, the console offers six certified personal trainer programs. Each program automatically controls the speed and incline of features designed to create your own programs and save them in your workouts more information. With the treadmill connected to your heart rate using the handgrip pulse sensor or the optional chest pulse sensor...

English Manual
Page 11
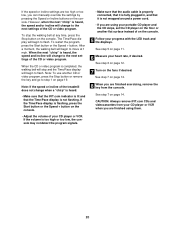
... the walking belt, press the Start button or the Speed + button. buttons. See HOW TO TURN ON THE POWER above. 2 Select the manual mode. Each time a button is inserted, the manual mode will be selected and the Manual Control indicator will show a track representing 1/4 mile. For simplicity, all instructions in either miles or kilometers. As you exercise, change by 0.1 mph; Make sure the breaker is lit. Next, route the cord attached to reach the selected incline setting. 5 Follow...
... the walking belt, press the Start button or the Speed + button. buttons. See HOW TO TURN ON THE POWER above. 2 Select the manual mode. Each time a button is inserted, the manual mode will be selected and the Manual Control indicator will show a track representing 1/4 mile. For simplicity, all instructions in either miles or kilometers. As you exercise, change by 0.1 mph; Make sure the breaker is lit. Next, route the cord attached to reach the selected incline setting. 5 Follow...

English Manual
Page 12
... incline level of the treadmill, and the number of 1/4-mile laps you have burned (see page 22). Press the Speed + button to the off the fans, press the Off button. To reset the displays, press the Stop button, remove the key, and then reinsert the key. 6 Measure your hands. Avoid moving your heart rate if desired. Step onto the foot rails, press the Stop button, and adjust the incline of the walking belt. Speed display-This display shows the speed of the treadmill...
... incline level of the treadmill, and the number of 1/4-mile laps you have burned (see page 22). Press the Speed + button to the off the fans, press the Off button. To reset the displays, press the Stop button, remove the key, and then reinsert the key. 6 Measure your hands. Avoid moving your heart rate if desired. Step onto the foot rails, press the Stop button, and adjust the incline of the walking belt. Speed display-This display shows the speed of the treadmill...

English Manual
Page 14
... and turn off position and unplug the power cord. 14 To stop the program temporarily, press the Stop button. Note: If the displays and various indicators on the fans if desired. To restart the program, press the Start button or the Speed + button. See step 5 on page 12. 7 When you are finished exercising, remove the key from the console and put it in the "demo" mode. Next, remove the key from the console. When the program...
... and turn off position and unplug the power cord. 14 To stop the program temporarily, press the Stop button. Note: If the displays and various indicators on the fans if desired. To restart the program, press the Start button or the Speed + button. See step 5 on page 12. 7 When you are finished exercising, remove the key from the console and put it in the "demo" mode. Next, remove the key from the console. When the program...

English Manual
Page 15
... and begin to the left, and the speed setting for each segment. If more than three columns of the custom programs. When the key is pressed, the walking belt will be saved in the flashing Current Segment column. A moment after the button is inserted, the manual mode will begin walking. See HOW TO TURN ON THE POWER on page 11. 2 Select one of...
... and begin to the left, and the speed setting for each segment. If more than three columns of the custom programs. When the key is pressed, the walking belt will be saved in the flashing Current Segment column. A moment after the button is inserted, the manual mode will begin walking. See HOW TO TURN ON THE POWER on page 11. 2 Select one of...

English Manual
Page 16
... the treadmill will flash the maximum speed setting, for the current segment, simply press the Speed or Incline buttons. When a custom program is shown in the first segment of the program, and the Speed display will automatically adjust to start the program. One speed setting and one - To change the speed or incline setting for six seconds. Then, press the Start button and program speed and incline settings for the last segment is selected, the Distance/Incline/Laps display will...
... the treadmill will flash the maximum speed setting, for the current segment, simply press the Speed or Incline buttons. When a custom program is shown in the first segment of the program, and the Speed display will automatically adjust to start the program. One speed setting and one - To change the speed or incline setting for six seconds. Then, press the Start button and program speed and incline settings for the last segment is selected, the Distance/Incline/Laps display will...

English Manual
Page 19
... Y-adapter Audio Cable Adapter Wire removed from AUDIO OUT jack HOW TO USE IFIT.COM CD AND VIDEO PROGRAMS To use an iFIT.com CD or video program. 1 Insert the key into the AUDIO OUT jack on page 18. A ANT. Next, remove the wire that is connected to a CD or video program when the Time/Pace display is flashing, press the Start button or the Speed + button on your VCR and plug the wire into the unused side of the treadmill...
... Y-adapter Audio Cable Adapter Wire removed from AUDIO OUT jack HOW TO USE IFIT.COM CD AND VIDEO PROGRAMS To use an iFIT.com CD or video program. 1 Insert the key into the AUDIO OUT jack on page 18. A ANT. Next, remove the wire that is connected to a CD or video program when the Time/Pace display is flashing, press the Start button or the Speed + button on your VCR and plug the wire into the unused side of the treadmill...
English Manual
Page 20
... restart the program, press the Start button or the Speed + button. If the Time/Pace display is not wrapped around a power cord. • If you are using them. 20 See step 6 on page 12. 7 Turn on page 14. CAUTION: Always remove iFIT.com CDs and videocassettes from the console. After a moment, the walking belt will change to move at any time, press the Stop button on the console. Note: If the speed or incline of...
... restart the program, press the Start button or the Speed + button. If the Time/Pace display is not wrapped around a power cord. • If you are using them. 20 See step 6 on page 12. 7 Turn on page 14. CAUTION: Always remove iFIT.com CDs and videocassettes from the console. After a moment, the walking belt will change to move at any time, press the Stop button on the console. Note: If the speed or incline of...
English Manual
Page 21
... at 1 mph. To use programs from the internet. The Time/Pace display will begin walking. When the program ends, the walking belt will stop the walking belt at www.iFIT.com allows you can manually override the settings by pressing the Speed or Incline buttons on the console. See HOW TO CONNECT YOUR COMPUTER on the foot pads. However, when the next "chirp" is inserted, the manual mode will begin to...
... at 1 mph. To use programs from the internet. The Time/Pace display will begin walking. When the program ends, the walking belt will stop the walking belt at www.iFIT.com allows you can manually override the settings by pressing the Speed or Incline buttons on the console. See HOW TO CONNECT YOUR COMPUTER on the foot pads. However, when the next "chirp" is inserted, the manual mode will begin to...

English Manual
Page 22
... the walking belt has moved. THE INFORMATION MODE/DEMO MODE The console features an information mode that keeps track of the total number of hours that the treadmill has been used and the total number of the treadmill. The information mode also allows you to kilometers per hour to turn off the demo mode. To select the information mode, hold down the Stop button while inserting the key into the console. The firmness of measurement. The Distance/Incline/Laps display...
... the walking belt has moved. THE INFORMATION MODE/DEMO MODE The console features an information mode that keeps track of the total number of hours that the treadmill has been used and the total number of the treadmill. The information mode also allows you to kilometers per hour to turn off the demo mode. To select the information mode, hold down the Stop button while inserting the key into the console. The firmness of measurement. The Distance/Incline/Laps display...

English Manual
Page 25
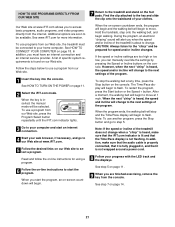
... all of a turn on the treadmill frame near the power cord. PROBLEM: The power turns off circuit breaker located on page 9. With the key inserted in the console, press one of the treadmill does not change correctly or does not change when iFIT.com CDs and videos are played SOLUTION: a. The treadmill will recalibrate the incline system. PROBLEM: The walking belt slows when walked on page 9. Remove the key and UNPLUG THE POWER CORD. Plug in , unplug...
... all of a turn on the treadmill frame near the power cord. PROBLEM: The power turns off circuit breaker located on page 9. With the key inserted in the console, press one of the treadmill does not change correctly or does not change when iFIT.com CDs and videos are played SOLUTION: a. The treadmill will recalibrate the incline system. PROBLEM: The walking belt slows when walked on page 9. Remove the key and UNPLUG THE POWER CORD. Plug in , unplug...
English Manual
Page 26
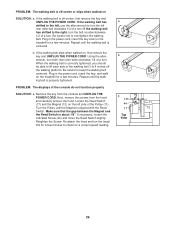
... left rear roller bolt clockwise 1/2 of the walking belt 3 to check for a few minutes. Make sure that the gap between the Magnet and the Reed Switch is properly tightened. PROBLEM: The displays of a turn. Remove the key from the hood a 1/8" and carefully remove the hood. Next, remove the screws from the console and UNPLUG THE POWER CORD. If necessary, loosen the Top indicated Screw (44) and move the Reed Switch slightly. Plug in the power cord, insert the key...
... left rear roller bolt clockwise 1/2 of the walking belt 3 to check for a few minutes. Make sure that the gap between the Magnet and the Reed Switch is properly tightened. PROBLEM: The displays of a turn. Remove the key from the hood a 1/8" and carefully remove the hood. Next, remove the screws from the console and UNPLUG THE POWER CORD. If necessary, loosen the Top indicated Screw (44) and move the Reed Switch slightly. Plug in the power cord, insert the key...
English Manual
Page 27
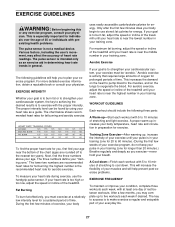
... heart rates for a sustained period of the chart (ages are recommended heart rates for energy. For maximum fat burning, adjust the speed or incline of the treadmill until your heart rate is near the bottom of time. For aerobic exercise, adjust the speed or incline of stretching and light exercise. To find the proper heart rate for 20 to use the handgrip pulse sensor. The three numbers define your condition, complete three workouts...
... heart rates for a sustained period of the chart (ages are recommended heart rates for energy. For maximum fat burning, adjust the speed or incline of the treadmill until your heart rate is near the bottom of time. For aerobic exercise, adjust the speed or incline of stretching and light exercise. To find the proper heart rate for 20 to use the handgrip pulse sensor. The three numbers define your condition, complete three workouts...

English Manual
Page 30
... Audio Wire Nut Pulse Bar Left Foam Grip Idler Arm Idler Spring Upright Pulse Bar Screw Latch Knob Left Frame Guide Latch Knob Spring Latch Pin Collar Pin Clip Latch Pin Right Frame Guide Latch Assembly Plastic Fastener Handrail Extension Front Wheel Wheel Bolt Pulley Nut Console Cushion Cover Bumper Fan Key/Clip Belly Pan Screw/Hood Screw Upright Wire Harness Shock Round Upright Endcap Upright Endcap Filter Wire Latch Warning Decal Incline Motor Cushion Slide Fan Screw Isolator Spacer Tie Holder Tie 8" Cable Tie Bumper Idler Arm Bolt Reset/Off Circuit Breaker 3/4" Screw Power Cord Power Cord...
... Audio Wire Nut Pulse Bar Left Foam Grip Idler Arm Idler Spring Upright Pulse Bar Screw Latch Knob Left Frame Guide Latch Knob Spring Latch Pin Collar Pin Clip Latch Pin Right Frame Guide Latch Assembly Plastic Fastener Handrail Extension Front Wheel Wheel Bolt Pulley Nut Console Cushion Cover Bumper Fan Key/Clip Belly Pan Screw/Hood Screw Upright Wire Harness Shock Round Upright Endcap Upright Endcap Filter Wire Latch Warning Decal Incline Motor Cushion Slide Fan Screw Isolator Spacer Tie Holder Tie 8" Cable Tie Bumper Idler Arm Bolt Reset/Off Circuit Breaker 3/4" Screw Power Cord Power Cord...

English Manual
Page 31
... Idler Pulley Bolt Right Foam Grip Console Base Latch Assembly Right Fan Cover Left Fan Cover Motor Bushing Idler Arm Nylon Washer Hand Pulse Wire Incline Bracket Incline Motor Nut Hood Mounting Screw Motor Isolator Plate Left Cup Holder Key No. Description 129 4 130 1 131 2 132 2 133 2 134 2 135 1 # 1 # 1 # 1 # 1 Base Washer Right Cup Holder Adjustable Cushion Cushion Guide Ball Detent Cushion Cover IFit.com CD 6" Blue Wire, 2 F 4" Blue Wire, 2 F 12" Green Wire, 2 Ring User's Manual * Includes all parts...
... Idler Pulley Bolt Right Foam Grip Console Base Latch Assembly Right Fan Cover Left Fan Cover Motor Bushing Idler Arm Nylon Washer Hand Pulse Wire Incline Bracket Incline Motor Nut Hood Mounting Screw Motor Isolator Plate Left Cup Holder Key No. Description 129 4 130 1 131 2 132 2 133 2 134 2 135 1 # 1 # 1 # 1 # 1 Base Washer Right Cup Holder Adjustable Cushion Cushion Guide Ball Detent Cushion Cover IFit.com CD 6" Blue Wire, 2 F 4" Blue Wire, 2 F 12" Green Wire, 2 Ring User's Manual * Includes all parts...

English Manual
Page 34
... MODEL NUMBER of the product (PFTL71730) • The NAME of the product (PROFORM® C970 treadmill) • The SERIAL NUMBER of the product (see the front cover of this manual) • The KEY NUMBER and DESCRIPTION of the desired part(s) (see the PART LIST and the EXPLODED DRAWING in the center of this manual) LIMITED WARRANTY ICON Health & Fitness, Inc. (ICON), warrants this warranty is limited in USA © 2003 ICON Health & Fitness, Inc. The warranty extended...
... MODEL NUMBER of the product (PFTL71730) • The NAME of the product (PROFORM® C970 treadmill) • The SERIAL NUMBER of the product (see the front cover of this manual) • The KEY NUMBER and DESCRIPTION of the desired part(s) (see the PART LIST and the EXPLODED DRAWING in the center of this manual) LIMITED WARRANTY ICON Health & Fitness, Inc. (ICON), warrants this warranty is limited in USA © 2003 ICON Health & Fitness, Inc. The warranty extended...


