
English Manual
Page 4
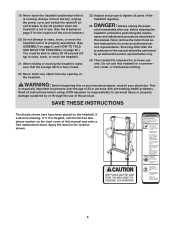
... decals shown here have been placed on page 5 for personal injury or property damage sustained by an authorized ser- When folding or moving the treadmill, make sure that the storage latch is illegible, call the toll-free telephone number on the front cover of the circuit breaker.) 20. Always...in a commercial, rental, or institutional setting. 22. Inspect and properly tighten all instructions before performing the mainte- 19. Do not use , before cleaning the treadmill, and before using. Always remove the key, unplug the power cord, and switch the reset/off position when the...
... decals shown here have been placed on page 5 for personal injury or property damage sustained by an authorized ser- When folding or moving the treadmill, make sure that the storage latch is illegible, call the toll-free telephone number on the front cover of the circuit breaker.) 20. Always...in a commercial, rental, or institutional setting. 22. Inspect and properly tighten all instructions before performing the mainte- 19. Do not use , before cleaning the treadmill, and before using. Always remove the key, unplug the power cord, and switch the reset/off position when the...
English Manual
Page 5
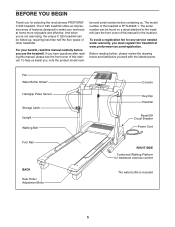
... workouts at www.proformservice.com/registration. To avoid a registration fee for selecting the revolutionary PROFORM® C 525 treadmill. And when you , note the product model num- Fan Water Bottle Holder* Handgrip Pulse Sensor Storage Latch Upright Walking Belt Console Key/Clip Handrail Reset/Off Circuit Breaker Power Cord Foot Rail BACK Rear Roller Adjustment...
... workouts at www.proformservice.com/registration. To avoid a registration fee for selecting the revolutionary PROFORM® C 525 treadmill. And when you , note the product model num- Fan Water Bottle Holder* Handgrip Pulse Sensor Storage Latch Upright Walking Belt Console Key/Clip Handrail Reset/Off Circuit Breaker Power Cord Foot Rail BACK Rear Roller Adjustment...
English Manual
Page 6
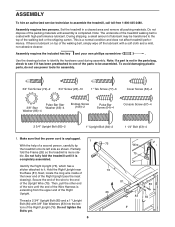
...(81). Thread a 2 3/4" Upright Bolt (85) and a 1" Upright Bolt (84) with 3/8" Star Washers (83) into the bottom of the treadmill wHaalknindgrabileBltoilst (64)-4 coated with a soft cloth and a mild, non-abrasive cleaner. Assembly requires two persons. Identify the Right Upright (76), which has...it. Star WashAesr sembly requires the included hex key and your own phillips screwdriver Extension Leg Bo.lt (96)-4 (84)-2 Use the drawiEnxgtsenbseiloonwLteogidBeonlttif(y96th)e-4hardware usWedhdeuerliNnguta(s1s3e)m-2bly. Do not fully fold the treadmill until the end of the Wire Harness is ...
...(81). Thread a 2 3/4" Upright Bolt (85) and a 1" Upright Bolt (84) with 3/8" Star Washers (83) into the bottom of the treadmill wHaalknindgrabileBltoilst (64)-4 coated with a soft cloth and a mild, non-abrasive cleaner. Assembly requires two persons. Identify the Right Upright (76), which has...it. Star WashAesr sembly requires the included hex key and your own phillips screwdriver Extension Leg Bo.lt (96)-4 (84)-2 Use the drawiEnxgtsenbseiloonwLteogidBeonlttif(y96th)e-4hardware usWedhdeuerliNnguta(s1s3e)m-2bly. Do not fully fold the treadmill until the end of the Wire Harness is ...
English Manual
Page 11
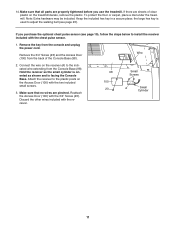
...to install the receiver included with the two included small screws. 3. To protect the floor or carpet, place a mat under the treadmill. the large hex key is facing the Console Base. Attach the receiver to the indicated wire extending from the back of clear plastic on the Access Door...place; Note: Extra hardware may be included. Wire 2. Connect the wire on the receiver (A) to the plastic posts on the treadmill decals, remove the plastic. 14. Remove the key from the console and unplug the power cord. Reattach the Access Door (100) with the receiver. 98 100 23 Small Screws...
...to install the receiver included with the two included small screws. 3. To protect the floor or carpet, place a mat under the treadmill. the large hex key is facing the Console Base. Attach the receiver to the indicated wire extending from the back of clear plastic on the Access Door...place; Note: Extra hardware may be included. Wire 2. Connect the wire on the receiver (A) to the plastic posts on the treadmill decals, remove the plastic. 14. Remove the key from the console and unplug the power cord. Reattach the Access Door (100) with the receiver. 98 100 23 Small Screws...

English Manual
Page 13
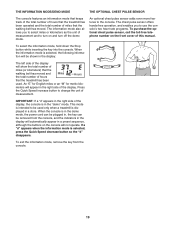
...is a sheet of clear plastic on page 14. You can be changed with the touch of a button. FEATURES OF THE CONSOLE The treadmill console offers an impressive array of features designed to make your workouts. In addition, the console features six preset programs. Each program automatically ...the console, remove it guides you exercise, the console will display continuous exercise feedback. CONSOLE DIAGRAM Key Clip Note: If there is selected, the speed and incline of the treadmill can even measure your heart rate using the built-in handgrip pulse sensor or the optional chest pulse...
...is a sheet of clear plastic on page 14. You can be changed with the touch of a button. FEATURES OF THE CONSOLE The treadmill console offers an impressive array of features designed to make your workouts. In addition, the console features six preset programs. Each program automatically ...the console, remove it guides you exercise, the console will display continuous exercise feedback. CONSOLE DIAGRAM Key Clip Note: If there is selected, the speed and incline of the treadmill can even measure your heart rate using the built-in handgrip pulse sensor or the optional chest pulse...
English Manual
Page 14
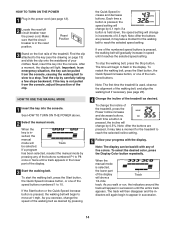
... pressed, the speed setting will Track be backlit with the display. To change the speed of the treadmill. Find the clip attached to the key (see page 12). 2 Locate the reset/off circuit breaker near the power cord. To start the walking belt, press the Start button, ...press the Stop button. Reset Position 3 Stand on page 13) and slide the clip onto the waistband of the treadmill, press the Power Incline increase and decrease buttons. Next, insert the key into the console. Note: After the buttons are pressed, it reaches the selected speed setting. Note: After the ...
... pressed, the speed setting will Track be backlit with the display. To change the speed of the treadmill. Find the clip attached to the key (see page 12). 2 Locate the reset/off circuit breaker near the power cord. To start the walking belt, press the Start button, ...press the Stop button. Reset Position 3 Stand on page 13) and slide the clip onto the waistband of the treadmill, press the Power Incline increase and decrease buttons. Next, insert the key into the console. Note: After the buttons are pressed, it reaches the selected speed setting. Note: After the ...
English Manual
Page 15
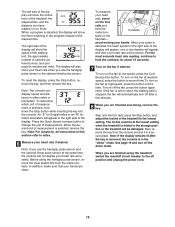
... display will also show the incline level of measurement is folded to the storage position or the treadmill will be damaged. To reset the display, press the Stop button, remove the key, and then reinsert the key. An "E" for English miles or an "M" for about 15 seconds. 7 Turn on the fan... of the display. Contacts tacts on the fan at the lowest setting when the treadmill is selected, remove the key. Note: If the display remains lit after a few minutes. 8 When you are finished exercising, remove the key. When you are clean. To determine which unit of the elapsed time. For ...
... display will also show the incline level of measurement is folded to the storage position or the treadmill will be damaged. To reset the display, press the Stop button, remove the key, and then reinsert the key. An "E" for English miles or an "M" for about 15 seconds. 7 Turn on the fan... of the display. Contacts tacts on the fan at the lowest setting when the treadmill is selected, remove the key. Note: If the display remains lit after a few minutes. 8 When you are finished exercising, remove the key. When you are clean. To determine which unit of the elapsed time. For ...
English Manual
Page 16
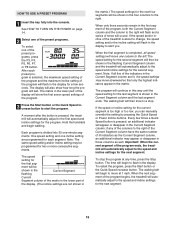
...the program at 1 mph. To restart the program, press the Start button or the Quick Speed increase button. HOW TO USE A PRESET PROGRAM 1 Insert the key fully into 30 one column to the left. When only three seconds remain in this way until the speed setting for the last segment is...last. The display will also show the first seven speed settings of the display will be shown in the flashing Current Segment column and the treadmill will continue in the first segment of the program, both the Current Segment column and the column to the speed and incline settings for the...
...the program at 1 mph. To restart the program, press the Start button or the Quick Speed increase button. HOW TO USE A PRESET PROGRAM 1 Insert the key fully into 30 one column to the left. When only three seconds remain in this way until the speed setting for the last segment is...last. The display will also show the first seven speed settings of the display will be shown in the flashing Current Segment column and the treadmill will continue in the first segment of the program, both the Current Segment column and the column to the speed and incline settings for the...

English Manual
Page 17
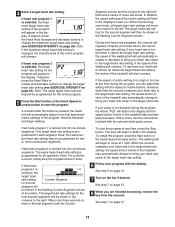
...desired. Heart rate program 2 will show which program ("P1" or "P2") is in a safe place. Next, remove the key from the console. CAUTION: If you are over 60 years of the treadmill to use a heart rate program. 1 Put on page 14. 5 Measure your progress with the display. lems, or if...page 15. The display will keep your physician to use a heart rate program. 2 Insert the key into the console. If heart rate program 1 is selected, a profile of the target heart rate settings of the treadmill is selected, a heart symbol will appear in the matrix. 17 If heart rate program 2 ...
...desired. Heart rate program 2 will show which program ("P1" or "P2") is in a safe place. Next, remove the key from the console. CAUTION: If you are over 60 years of the treadmill to use a heart rate program. 1 Put on page 14. 5 Measure your progress with the display. lems, or if...page 15. The display will keep your physician to use a heart rate program. 2 Insert the key into the console. If heart rate program 1 is selected, a profile of the target heart rate settings of the treadmill is selected, a heart symbol will appear in the matrix. 17 If heart rate program 2 ...
English Manual
Page 18
...button. If your heart rate to alert you are finished exercising, remove the key from the console. When the console compares your heart rate to the target heart rate setting, the speed and/or incline of the treadmill may automatically change to bring your progress with the display. Note: If ...main in the first segment, both heart rate programs, the console will flash in the display and the speed and/or incline of the treadmill may be programmed for the first segment will be programmed for the second segment will also increase. The target heart rate setting for the entire...
...button. If your heart rate to alert you are finished exercising, remove the key from the console. When the console compares your heart rate to the target heart rate setting, the speed and/or incline of the treadmill may automatically change to bring your progress with the display. Note: If ...main in the first segment, both heart rate programs, the console will flash in the display and the speed and/or incline of the treadmill may be programmed for the first segment will be programmed for the second segment will also increase. The target heart rate setting for the entire...
English Manual
Page 19
... Press the Quick Speed increase button to turn off the demo mode. To select the information mode, hold down the Stop button while inserting the key into the console. This mode is intended to be shown in the display: The left side of the display will appear in a store. meters... The console features an information mode that keeps track of the total number of hours that the treadmill has been operated and the total number of miles that the treadmill has been used only when a treadmill is displayed in the right side of the display. When the information mode is selected, press...
... Press the Quick Speed increase button to turn off the demo mode. To select the information mode, hold down the Stop button while inserting the key into the console. This mode is intended to be shown in the display: The left side of the display will appear in a store. meters... The console features an information mode that keeps track of the total number of hours that the treadmill has been operated and the total number of miles that the treadmill has been used only when a treadmill is displayed in the right side of the display. When the information mode is selected, press...
English Manual
Page 22
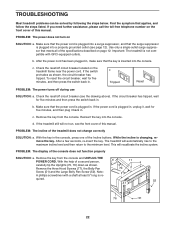
... down as shown, the circuit breaker has tripped. TROUBLESHOOTING Most treadmill problems can be solved by following the steps below. Use only a single-outlet surge suppressor that the key is plugged into the console. Remove the key from the console. PROBLEM: The power does not turn on... and that applies, and follow the steps listed. Reinsert the key into the console. Note: A phillips screwdriver with GFCI-equipped outlets. If the treadmill still will not run, see the drawing above). Important: The treadmill is not compatible with a shaft at least 5" long is ...
... down as shown, the circuit breaker has tripped. TROUBLESHOOTING Most treadmill problems can be solved by following the steps below. Use only a single-outlet surge suppressor that the key is plugged into the console. Remove the key from the console. PROBLEM: The power does not turn on... and that applies, and follow the steps listed. Reinsert the key into the console. Note: A phillips screwdriver with GFCI-equipped outlets. If the treadmill still will not run, see the drawing above). Important: The treadmill is not compatible with a shaft at least 5" long is ...
English Manual
Page 23
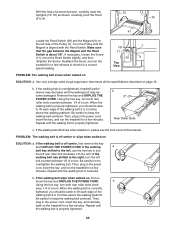
... When the walking belt is off-center or slips when walked on page 12. Then, plug in the power cord, insert the key, and run the treadmill for a few minutes. move the Reed Switch slightly, and then 39 6 retighten the Screw. If the walking belt is aligned ...with the Reed Switch. Using the hex key, turn both rear roller bolts clock- Repeat until the Magnet is overtightened, treadmill performance may decrease and the walking belt may become damaged. b. wise, 1/4 of the walking belt 2 to ...
... When the walking belt is off-center or slips when walked on page 12. Then, plug in the power cord, insert the key, and run the treadmill for a few minutes. move the Reed Switch slightly, and then 39 6 retighten the Screw. If the walking belt is aligned ...with the Reed Switch. Using the hex key, turn both rear roller bolts clock- Repeat until the Magnet is overtightened, treadmill performance may decrease and the walking belt may become damaged. b. wise, 1/4 of the walking belt 2 to ...

English Manual
Page 24
...a relatively low intensity level for energy. WORKOUT GUIDELINES Each workout should include the following guidelines will help you to 10 minutes of the treadmill until your exercise program. Next, find your heart rate as an exercise aid in determining heart rate trends in your goal is activity ... do not keep your heart rate in your "training zone." After a few weeks of your exercise until your breath. The key to success is to make exercise a regular and enjoyable part of the treadmill until your heart rate is in your training zone for 20 to oxygenate the blood.
...a relatively low intensity level for energy. WORKOUT GUIDELINES Each workout should include the following guidelines will help you to 10 minutes of the treadmill until your exercise program. Next, find your heart rate as an exercise aid in determining heart rate trends in your goal is activity ... do not keep your heart rate in your "training zone." After a few weeks of your exercise until your breath. The key to success is to make exercise a regular and enjoyable part of the treadmill until your heart rate is in your training zone for 20 to oxygenate the blood.
English Manual
Page 27
.... Qty. PART LIST-Model No. Description Key No. PFTL49406.1 R0507A To locate the parts listed below, see the EXPLODED DRAWING on pages... Roller Bracket 20 2 Rear Roller Bolt 21 2 Rear Roller Star Washer 22 1 Left Rear Endcap 23 24 3/4" Screw 24 1 Hex Key 25 1 Right Rear Endcap 26 1 Frame 27 1 Right Foot Rail 28 1 Hood 29 2 Motor Bolt 30 2 Motor Nut 31 ... Nut 53 1 Belly Pan 94 1 Photo Switch 54 3 Belly Pan Clip 95 1 Photo Switch Bolt 55 1 Reset/Off 96 1 Key/Clip Circuit Breaker 97 1 Photo Switch Wire 56 1 Power Cord Grommet 98 1 Console Base 57 1 Power Cord 99 1 Console 58 ...
.... Qty. PART LIST-Model No. Description Key No. PFTL49406.1 R0507A To locate the parts listed below, see the EXPLODED DRAWING on pages... Roller Bracket 20 2 Rear Roller Bolt 21 2 Rear Roller Star Washer 22 1 Left Rear Endcap 23 24 3/4" Screw 24 1 Hex Key 25 1 Right Rear Endcap 26 1 Frame 27 1 Right Foot Rail 28 1 Hood 29 2 Motor Bolt 30 2 Motor Nut 31 ... Nut 53 1 Belly Pan 94 1 Photo Switch 54 3 Belly Pan Clip 95 1 Photo Switch Bolt 55 1 Reset/Off 96 1 Key/Clip Circuit Breaker 97 1 Photo Switch Wire 56 1 Power Cord Grommet 98 1 Console Base 57 1 Power Cord 99 1 Console 58 ...
English Manual
Page 32
... the following information: • the MODEL NUMBER of the product (PFTL49406.1) • the NAME of the product (PROFORM C 525 treadmill) • the SERIAL NUMBER of the product (see the front cover of this manual) • the KEY NUMBER and DESCRIPTION of the part(s) (see the front cover of incidental or consequential damages. The warranty...
... the following information: • the MODEL NUMBER of the product (PFTL49406.1) • the NAME of the product (PROFORM C 525 treadmill) • the SERIAL NUMBER of the product (see the front cover of this manual) • the KEY NUMBER and DESCRIPTION of the part(s) (see the front cover of incidental or consequential damages. The warranty...


