
English Manual
Page 1
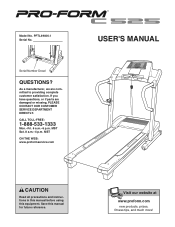
...: www.proformservice.com USER'S MANUAL CAUTION Read all precautions and instructions in this manual before using this manual for future reference. Serial Number Decal QUESTIONS? CALL TOLL-FREE: 1-888-533-1333 Mon.-Fri. 6 a.m.-6 p.m. Model No. As a manufacturer, we are damaged or missing, PLEASE CONTACT OUR CUSTOMER SERVICE DEPARTMENT DIRECTLY. PFTL49406.1 Serial No. Visit our website at www.proform.com new products, prizes, fitness tips, and...
...: www.proformservice.com USER'S MANUAL CAUTION Read all precautions and instructions in this manual before using this manual for future reference. Serial Number Decal QUESTIONS? CALL TOLL-FREE: 1-888-533-1333 Mon.-Fri. 6 a.m.-6 p.m. Model No. As a manufacturer, we are damaged or missing, PLEASE CONTACT OUR CUSTOMER SERVICE DEPARTMENT DIRECTLY. PFTL49406.1 Serial No. Visit our website at www.proform.com new products, prizes, fitness tips, and...
English Manual
Page 3
... in speed. 18. Adjust the speed in small increments to use a properly functioning surge suppressor could become caught in the treadmill. Never use an extension cord. 11. Wear appropriate exercise clothes when using the treadmill. 17. Never move the walking belt while the power is the responsibility of the owner to persons, read the following important precautions and information before using the treadmill (see page 12), plug the power cord into...
... in speed. 18. Adjust the speed in small increments to use a properly functioning surge suppressor could become caught in the treadmill. Never use an extension cord. 11. Wear appropriate exercise clothes when using the treadmill. 17. Never move the walking belt while the power is the responsibility of the owner to persons, read the following important precautions and information before using the treadmill (see page 12), plug the power cord into...
English Manual
Page 4
... pre-existing health problems. Read all parts of this manual. 19. Never leave the treadmill unattended while it is not in the location shown. 50% 4 Always remove the key, unplug the power cord, and switch the reset/off circuit breaker to do so by an authorized ser- When folding or moving the treadmill, make sure that the storage latch is running. nance and adjustment procedures described in -home use of...
... pre-existing health problems. Read all parts of this manual. 19. Never leave the treadmill unattended while it is not in the location shown. 50% 4 Always remove the key, unplug the power cord, and switch the reset/off circuit breaker to do so by an authorized ser- When folding or moving the treadmill, make sure that the storage latch is running. nance and adjustment procedures described in -home use of...
English Manual
Page 5
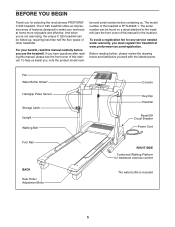
... Holder* Handgrip Pulse Sensor Storage Latch Upright Walking Belt Console Key/Clip Handrail Reset/Off Circuit Breaker Power Cord Foot Rail BACK Rear Roller Adjustment Bolts RIGHT SIDE Cushioned Walking Platform for selecting the revolutionary PROFORM® C 525 treadmill. Before reading further, please review the drawing below and familiarize yourself with the labeled parts. The model number of this manual for any service needed under warranty, you must register the treadmill at home more enjoyable and effective. The serial number can be...
... Holder* Handgrip Pulse Sensor Storage Latch Upright Walking Belt Console Key/Clip Handrail Reset/Off Circuit Breaker Power Cord Foot Rail BACK Rear Roller Adjustment Bolts RIGHT SIDE Cushioned Walking Platform for selecting the revolutionary PROFORM® C 525 treadmill. Before reading further, please review the drawing below and familiarize yourself with the labeled parts. The model number of this manual for any service needed under warranty, you must register the treadmill at home more enjoyable and effective. The serial number can be...
English Manual
Page 6
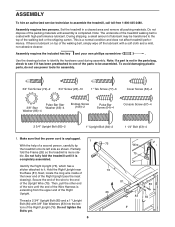
... amount of lubricant may be assembled. Note: If a part is completely assembled. To avoid damaging plastic parts, do not use power tools for assembly. 3/4" Tek Screw (72)-2 3/4" Screw (23)-10 1" Tek Screw (77)-6 Cover Screw (52)-4 Pulse Bar Star 3/8" Star Washer (65)-4 Washer (83)-4 Endcap Screw (108)-2 Pulse Bar Screw (64)-4 Console Screw (67)-4 2 3/4" Upright Bolt (85)-2 1" Upright Bolt (84)-2 1 1/4" Bolt (63)-4 1. Do not dispose of the packing materials until assembly is lubricant on top of the wire until...
... amount of lubricant may be assembled. Note: If a part is completely assembled. To avoid damaging plastic parts, do not use power tools for assembly. 3/4" Tek Screw (72)-2 3/4" Screw (23)-10 1" Tek Screw (77)-6 Cover Screw (52)-4 Pulse Bar Star 3/8" Star Washer (65)-4 Washer (83)-4 Endcap Screw (108)-2 Pulse Bar Screw (64)-4 Console Screw (67)-4 2 3/4" Upright Bolt (85)-2 1" Upright Bolt (84)-2 1 1/4" Bolt (63)-4 1. Do not dispose of the packing materials until assembly is lubricant on top of the wire until...
English Manual
Page 9
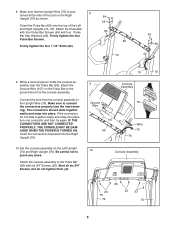
... tighten them yet. Attach the console assembly to the Upright Wire (75). 8. While a second person holds the console assembly near the Pulse Bar (66), attach the Ground Wire (107) on the Pulse Bar to the ground wire from the console assembly to the Pulse Bar (66) with four Pulse Bar Screws (64) and four Pulse Bar Star Washers (65). Insert the connectors downward into the Right Upright (76). 9 Console Assembly Ground Wire 107 66 75 Wire 75 76 10.Set...
... tighten them yet. Attach the console assembly to the Upright Wire (75). 8. While a second person holds the console assembly near the Pulse Bar (66), attach the Ground Wire (107) on the Pulse Bar to the ground wire from the console assembly to the Pulse Bar (66) with four Pulse Bar Screws (64) and four Pulse Bar Star Washers (65). Insert the connectors downward into the Right Upright (76). 9 Console Assembly Ground Wire 107 66 75 Wire 75 76 10.Set...
English Manual
Page 11
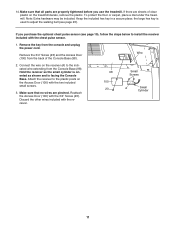
... treadmill. Attach the receiver to the indicated wire extending from the Console Base (98). Make sure that all parts are properly tightened before you purchase the optional chest pulse sensor (see page 23). If there are pinched. Wire 2. Hold the receiver so the small cylinder is oriented as shown and is used to adjust the walking belt (see page 19), follow the steps below to install...
... treadmill. Attach the receiver to the indicated wire extending from the Console Base (98). Make sure that all parts are properly tightened before you purchase the optional chest pulse sensor (see page 23). If there are pinched. Wire 2. Hold the receiver so the small cylinder is oriented as shown and is used to adjust the walking belt (see page 19), follow the steps below to install...
English Manual
Page 12
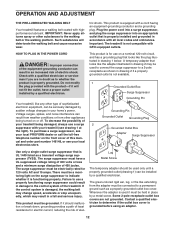
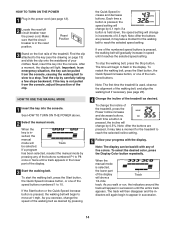
... will not fit the outlet, have a UL suppressed voltage rating of 400 volts or less and a minimum surge dissipation of this manual and order part number 146148, or see your treadmill (see drawing 1 at the right). Important: The treadmill is equipped with highperformance lubricant. HOW TO PLUG IN THE POWER CORD DANGER: Improper connection of your treadmill being turned on the front cover of 450...
... will not fit the outlet, have a UL suppressed voltage rating of 400 volts or less and a minimum surge dissipation of this manual and order part number 146148, or see your treadmill (see drawing 1 at the right). Important: The treadmill is equipped with highperformance lubricant. HOW TO PLUG IN THE POWER CORD DANGER: Improper connection of your treadmill being turned on the front cover of 450...

English Manual
Page 13
... a button. The console also offers two heart rate programs that control the speed and incline of the treadmill to use the heart rate programs. To use the manual mode of the console, follow the steps beginning on the face of the console, remove it guides you exercise, the console will display continuous exercise feedback. To use a preset program, see page 16. Note: You must wear the optional chest pulse sensor to keep your heart rate near a target heart rate during your workouts more effective. CONSOLE DIAGRAM Key Clip...
... a button. The console also offers two heart rate programs that control the speed and incline of the treadmill to use the heart rate programs. To use the manual mode of the console, follow the steps beginning on the face of the console, remove it guides you exercise, the console will display continuous exercise feedback. To use a preset program, see page 16. Note: You must wear the optional chest pulse sensor to keep your heart rate near a target heart rate during your workouts more effective. CONSOLE DIAGRAM Key Clip...
English Manual
Page 14
... indicators around the track will begin to flash in - To restart the walking belt, press the Start button, the Quick Speed increase button, or one of the treadmill, press the Power Incline increase and decrease buttons. Each time a button is selected, the lower part of the walking belt as desired. When the manual mode is pressed, the incline will show a 1/4-mile track. As you exercise, change the speed of the display Track will change the incline of the speed buttons numbered 1 to a stop the walking belt, press the Stop button.
... indicators around the track will begin to flash in - To restart the walking belt, press the Start button, the Quick Speed increase button, or one of the treadmill, press the Power Incline increase and decrease buttons. Each time a button is selected, the lower part of the walking belt as desired. When the manual mode is pressed, the incline will show a 1/4-mile track. As you exercise, change the speed of the display Track will change the incline of the speed buttons numbered 1 to a stop the walking belt, press the Stop button.
English Manual
Page 15
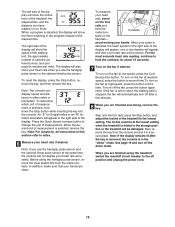
... Fan button. Note: The console can display speed and distance in the "demo" mode. In addition, make sure that your hands. Next, remove the key from the metal contacts. For the most accurate heart rate reading, continue to the storage position or the treadmill will be damaged. The incline must be shown. Note: When a program is selected, the display will show the speed of the walking belt, the approximate number...
... Fan button. Note: The console can display speed and distance in the "demo" mode. In addition, make sure that your hands. Next, remove the key from the metal contacts. For the most accurate heart rate reading, continue to the storage position or the treadmill will be damaged. The incline must be shown. Note: When a program is selected, the display will show the speed of the walking belt, the approximate number...
English Manual
Page 16
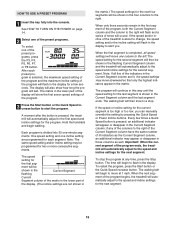
... preset programs, press the P3, P4, P5, P6, P7, or P8 button. One speed setting and one column to start the program. When the first segment is divided into the console. Important: When the current segment of the program ends, the treadmill will automatically adjust to the right will last. HOW TO USE A PRESET PROGRAM 1 Insert the key fully into 30 one of the display...
... preset programs, press the P3, P4, P5, P6, P7, or P8 button. One speed setting and one column to start the program. When the first segment is divided into the console. Important: When the current segment of the program ends, the treadmill will automatically adjust to the right will last. HOW TO USE A PRESET PROGRAM 1 Insert the key fully into 30 one of the display...

English Manual
Page 17
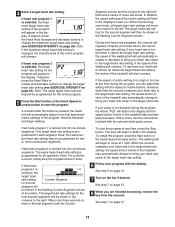
... of the program will appear in a safe place. You must wear the optional chest pulse sensor (see page 15) to use a heart rate program. 2 Insert the key into the console. Next, remove the key from the console. If heart rate program 1 is selected, a heart symbol will appear in the "demo" mode. lems, or if you select. 4 Follow your exercise heart rate. Note: If the display remains lit after the key is removed, the console is at...
... of the program will appear in a safe place. You must wear the optional chest pulse sensor (see page 15) to use a heart rate program. 2 Insert the key into the console. Next, remove the key from the console. If heart rate program 1 is selected, a heart symbol will appear in the "demo" mode. lems, or if you select. 4 Follow your exercise heart rate. Note: If the display remains lit after the key is removed, the console is at...
English Manual
Page 18
... target heart rate setting of the treadmill may automatically change the maximum target heart rate setting (see the instructions included with the optional chest pulse sensor. To restart the program, press the Start button or the Quick Speed increase button. When the console compares your heart rate to the target heart rate setting, the speed and/or incline of the matrix. See step 7 on page 15. 8 When you can adjust the setting with the display. Note: The same target heart rate setting may...
... target heart rate setting of the treadmill may automatically change the maximum target heart rate setting (see the instructions included with the optional chest pulse sensor. To restart the program, press the Start button or the Quick Speed increase button. When the console compares your heart rate to the target heart rate setting, the speed and/or incline of the matrix. See step 7 on page 15. 8 When you can adjust the setting with the display. Note: The same target heart rate setting may...
English Manual
Page 19
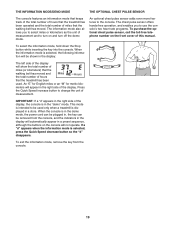
... the key into the console. Press the Quick Speed increase button to change the unit of measurement and to be removed from the console. 19 If a "d" appears when the information mode is displayed in a store. IMPORTANT: If a "d" appears in the right side of miles that the walking belt has moved. THE INFORMATION MODE/DEMO MODE THE OPTIONAL CHEST PULSE SENSOR The console features an information mode that keeps track of the total number of hours that the treadmill...
... the key into the console. Press the Quick Speed increase button to change the unit of measurement and to be removed from the console. 19 If a "d" appears when the information mode is displayed in a store. IMPORTANT: If a "d" appears in the right side of miles that the walking belt has moved. THE INFORMATION MODE/DEMO MODE THE OPTIONAL CHEST PULSE SENSOR The console features an information mode that keeps track of the total number of hours that the treadmill...
English Manual
Page 22
... you need further assistance, please call the toll-free telephone number on page 12. After the power cord has been plugged in . b. Remove the key from the console and UNPLUG THE a POWER CORD. PROBLEM: The incline of this manual. The treadmill will recalibrate the incline system. With the help of the console does not function properly SOLUTION: a. c Tripped Reset PROBLEM: The power turns off circuit breaker (see the front cover of the Incline buttons...
... you need further assistance, please call the toll-free telephone number on page 12. After the power cord has been plugged in . b. Remove the key from the console and UNPLUG THE a POWER CORD. PROBLEM: The incline of this manual. The treadmill will recalibrate the incline system. With the help of the console does not function properly SOLUTION: a. c Tripped Reset PROBLEM: The power turns off circuit breaker (see the front cover of the Incline buttons...
English Manual
Page 23
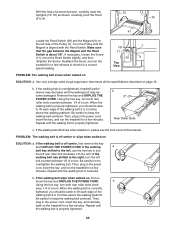
... the Screw (11), move the key and UNPLUG THE POWER CORD. if the walking belt has shifted to 3 inches above the walking platform. Carefully pivot the Hood (41) off -center or slips when walked on , first re- Turn the Pulley until the walking belt is aligned with the Reed Switch. Reattach the Hood, and run the treadmill for a few minutes. Top View PROBLEM: The walking belt slows when walked on the left rear roller bolt clockwise...
... the Screw (11), move the key and UNPLUG THE POWER CORD. if the walking belt has shifted to 3 inches above the walking platform. Carefully pivot the Hood (41) off -center or slips when walked on , first re- Turn the Pulley until the walking belt is aligned with the Reed Switch. Reattach the Hood, and run the treadmill for a few minutes. Top View PROBLEM: The walking belt slows when walked on the left rear roller bolt clockwise...

English Manual
Page 24
... condition, complete three workouts each workout with preexisting health problems. The pulse sensor is in your training zone. Aerobic Exercise If your training zone for energy. Aerobic exercise is near the lowest number in your heart rate is not a medical device. The three numbers define your physician. After a few weeks of rest between workouts. For aerobic exercise, adjust the speed and incline of the treadmill until your heart rate is activity that...
... condition, complete three workouts each workout with preexisting health problems. The pulse sensor is in your training zone. Aerobic Exercise If your training zone for energy. Aerobic exercise is near the lowest number in your heart rate is not a medical device. The three numbers define your physician. After a few weeks of rest between workouts. For aerobic exercise, adjust the speed and incline of the treadmill until your heart rate is activity that...
English Manual
Page 27
... Switch Bolt 55 1 Reset/Off 96 1 Key/Clip Circuit Breaker 97 1 Photo Switch Wire 56 1 Power Cord Grommet 98 1 Console Base 57 1 Power Cord 99 1 Console 58 1 Controller Board 100 1 Access Door 59 9 1/2" Screw 101 1 Console Fan 60 1 Controller 102 2 Fan Screw 61 2 Small Star Washer 103 1 Static Decal 62 2 Handrail 104 1 Rear Roller 63 4 1.25" Bolt 105 1 Controller Wire 64 4 Pulse Bar Screw 106 2 Roller Bracket 65 4 Pulse Bar Star Washer Star Washer 66 1 Pulse Bar 107 1 Ground Wire 67 4 Console Screw...
... Switch Bolt 55 1 Reset/Off 96 1 Key/Clip Circuit Breaker 97 1 Photo Switch Wire 56 1 Power Cord Grommet 98 1 Console Base 57 1 Power Cord 99 1 Console 58 1 Controller Board 100 1 Access Door 59 9 1/2" Screw 101 1 Console Fan 60 1 Controller 102 2 Fan Screw 61 2 Small Star Washer 103 1 Static Decal 62 2 Handrail 104 1 Rear Roller 63 4 1.25" Bolt 105 1 Controller Wire 64 4 Pulse Bar Screw 106 2 Roller Bracket 65 4 Pulse Bar Star Washer Star Washer 66 1 Pulse Bar 107 1 Ground Wire 67 4 Console Screw...
English Manual
Page 32
... specifically set forth herein. This warranty gives you , please be prepared to give the following information: • the MODEL NUMBER of the product (PFTL49406.1) • the NAME of the product (PROFORM C 525 treadmill) • the SERIAL NUMBER of the product (see the front cover of this manual) • the KEY NUMBER and DESCRIPTION of purchase. For inhome service, the customer will be pre-authorized by an ICON...
... specifically set forth herein. This warranty gives you , please be prepared to give the following information: • the MODEL NUMBER of the product (PFTL49406.1) • the NAME of the product (PROFORM C 525 treadmill) • the SERIAL NUMBER of the product (see the front cover of this manual) • the KEY NUMBER and DESCRIPTION of purchase. For inhome service, the customer will be pre-authorized by an ICON...


