
English Manual
Page 2
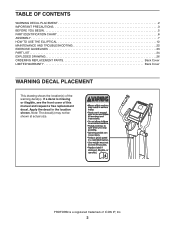
...CONTENTS WARNING DECAL PLACEMENT 2 IMPORTANT PRECAUTIONS 3 BEFORE YOU BEGIN 5 PART IDENTIFICATION CHART 6 ASSEMBLY 7 HOW TO USE THE ELLIPTICAL 12 MAINTENANCE AND TROUBLESHOOTING 22 EXERCISE GUIDELINES 23 PART LIST 24 EXPLODED DRAWING 26 ORDERING REPLACEMENT PARTS Back Cover LIMITED WARRANTY ...Back Cover WARNING DECAL PLACEMENT This drawing shows the location(s) of ICON IP, Inc. 2 PROFORM is missing or illegible, see the front cover of this manual and request a free replacement decal. Note: The decal(s) may not be...
...CONTENTS WARNING DECAL PLACEMENT 2 IMPORTANT PRECAUTIONS 3 BEFORE YOU BEGIN 5 PART IDENTIFICATION CHART 6 ASSEMBLY 7 HOW TO USE THE ELLIPTICAL 12 MAINTENANCE AND TROUBLESHOOTING 22 EXERCISE GUIDELINES 23 PART LIST 24 EXPLODED DRAWING 26 ORDERING REPLACEMENT PARTS Back Cover LIMITED WARRANTY ...Back Cover WARNING DECAL PLACEMENT This drawing shows the location(s) of ICON IP, Inc. 2 PROFORM is missing or illegible, see the front cover of this manual and request a free replacement decal. Note: The decal(s) may not be...

English Manual
Page 3
...properly tighten all times. 9. Always unplug the power cord and switch the power switch to ensure that could become caught on your elliptical before cleaning the elliptical. The elliptical should be used by or through the use an extension cord. The heart rate monitor is not working properly. It is the ...this manual. 4. Keep your back. 19. To protect the floor or carpet from damage, place a mat under age 12 and pets away from the elliptical at least 3 ft. (0.9 m) of clearance in the front and rear of burns, fire, electric shock, or injury to persons, read all users of ...
...properly tighten all times. 9. Always unplug the power cord and switch the power switch to ensure that could become caught on your elliptical before cleaning the elliptical. The elliptical should be used by or through the use an extension cord. The heart rate monitor is not working properly. It is the ...this manual. 4. Keep your back. 19. To protect the floor or carpet from damage, place a mat under age 12 and pets away from the elliptical at least 3 ft. (0.9 m) of clearance in the front and rear of burns, fire, electric shock, or injury to persons, read all users of ...
English Manual
Page 5
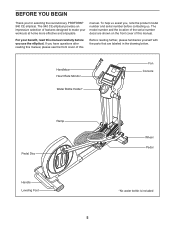
BEFORE YOU BEGIN Thank you use the elliptical. To help us . If you have questions after reading this manual, please see the front cover of ... effective and enjoyable. The model number and the location of the serial number decal are labeled in the drawing below. The 940 CE elliptical provides an impressive selection of features designed to make your benefit, read this Before reading further, please familiarize yourself with the... us assist you, note the product model number and serial number before you for selecting the revolutionary PROFORM® 940 CE elliptical. manual.
BEFORE YOU BEGIN Thank you use the elliptical. To help us . If you have questions after reading this manual, please see the front cover of ... effective and enjoyable. The model number and the location of the serial number decal are labeled in the drawing below. The 940 CE elliptical provides an impressive selection of features designed to make your benefit, read this Before reading further, please familiarize yourself with the... us assist you, note the product model number and serial number before you for selecting the revolutionary PROFORM® 940 CE elliptical. manual.
English Manual
Page 7
... Rear Stabilizer (3) to notify you of upgrades and offers Note: If you do not use power tools. 1. With the help of another person hold the elliptical to side until you ever need to contact Customer Care •• allows us to the Frame (1) with four 5/16" x 2 1/2" Screws (88). Have another person...
... Rear Stabilizer (3) to notify you of upgrades and offers Note: If you do not use power tools. 1. With the help of another person hold the elliptical to side until you ever need to contact Customer Care •• allows us to the Frame (1) with four 5/16" x 2 1/2" Screws (88). Have another person...
English Manual
Page 8
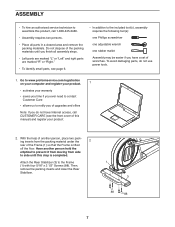
... this step. Attach the Front Stabilizer (2) to the Frame (1) with four 5/16" x 2 1/2" Screws (88). Start all 4 screws before tightening any of another person hold the elliptical to prevent it from moving from the packing material under the 3 Frame (1) so that the Frame is completed. Attach the Upright (6) to the Frame (1) with...
... this step. Attach the Front Stabilizer (2) to the Frame (1) with four 5/16" x 2 1/2" Screws (88). Start all 4 screws before tightening any of another person hold the elliptical to prevent it from moving from the packing material under the 3 Frame (1) so that the Frame is completed. Attach the Upright (6) to the Frame (1) with...
English Manual
Page 10
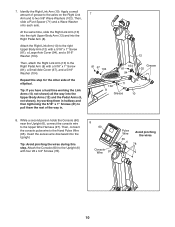
... a 5/16" x 1" Screw (81), a Large Axle Cover (94), and a 5/16" Washer (104). Tip: Avoid pinching the wires during this step for the other side of the elliptical. Then, slide a Pivot Spacer (71) and a Wave Washer onto each axle. Repeat this step. While a second person holds the Console (60) near the Upright (6), connect...
... a 5/16" x 1" Screw (81), a Large Axle Cover (94), and a 5/16" Washer (104). Tip: Avoid pinching the wires during this step for the other side of the elliptical. Then, slide a Pivot Spacer (71) and a Wave Washer onto each axle. Repeat this step. While a second person holds the Console (60) near the Upright (6), connect...
English Manual
Page 11
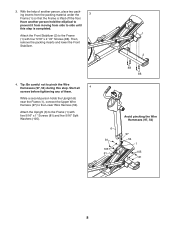
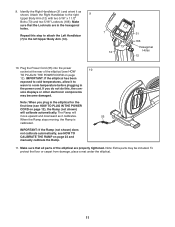
...the Left Handlebar (7) to cold temperatures, allow it as it calibrates. 55 When the Ramp stops moving, the Ramp is calibrated. IMPORTANT: If the elliptical has been exposed to the left Upper Body Arm (12). 7 73 12 31 106 Hexagonal Holes 12 10. Note: Extra parts may become damaged.... (not shown) will move upward and downward as shown. Make sure that the Locknuts are properly tightened. Make sure that all parts of the elliptical (see HOW TO CALIBRATE THE RAMP on page 12). sole displays or other electronic components may be included. IMPORTANT: If the Ramp (not shown...
...the Left Handlebar (7) to cold temperatures, allow it as it calibrates. 55 When the Ramp stops moving, the Ramp is calibrated. IMPORTANT: If the elliptical has been exposed to the left Upper Body Arm (12). 7 73 12 31 106 Hexagonal Holes 12 10. Note: Extra parts may become damaged.... (not shown) will move upward and downward as shown. Make sure that the Locknuts are properly tightened. Make sure that all parts of the elliptical (see HOW TO CALIBRATE THE RAMP on page 12). sole displays or other electronic components may be included. IMPORTANT: If the Ramp (not shown...

English Manual
Page 12
... with all local codes and ordinances. If it will not fit an outlet, have a proper outlet installed by a qualified electrician. 12 HOW TO USE THE ELLIPTICAL HOW TO PLUG IN THE POWER CORD This product must be connected with a grounding pin. Plug the power cord into an Grounded Outlet appropriate outlet...
... with all local codes and ordinances. If it will not fit an outlet, have a proper outlet installed by a qualified electrician. 12 HOW TO USE THE ELLIPTICAL HOW TO PLUG IN THE POWER CORD This product must be connected with a grounding pin. Plug the power cord into an Grounded Outlet appropriate outlet...
English Manual
Page 13
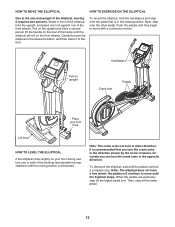
...on the upright and have a free wheel; Push the pedals until the pedals come to move the elliptical to the desired location, and then lower it to the size and weight of the elliptical, moving it requires two persons. Note: The crank arms can turn one of the leveling feet beneath... on the front wheels. It is recommended that is eliminated. Then, step off the higher pedal first. HOW TO MOVE THE ELLIPTICAL HOW TO EXERCISE ON THE ELLIPTICAL Due to the floor. Pull on upright Handlebars Crank Arm Pedals Place your floor during use, turn the crank arms in the ...
...on the upright and have a free wheel; Push the pedals until the pedals come to move the elliptical to the desired location, and then lower it to the size and weight of the elliptical, moving it requires two persons. Note: The crank arms can turn one of the leveling feet beneath... on the front wheels. It is recommended that is eliminated. Then, step off the higher pedal first. HOW TO MOVE THE ELLIPTICAL HOW TO EXERCISE ON THE ELLIPTICAL Due to the floor. Pull on upright Handlebars Crank Arm Pedals Place your floor during use, turn the crank arms in the ...
English Manual
Page 16
... move for at least 15 seconds. never use alcohol, abrasives, or chemicals to direct the airflow from the fan. When you are sheets of the elliptical may wear prematurely. 16 When you do not do not move your heart rate, hold the contacts for about five minutes, the console will turn...
... move for at least 15 seconds. never use alcohol, abrasives, or chemicals to direct the airflow from the fan. When you are sheets of the elliptical may wear prematurely. 16 When you do not do not move your heart rate, hold the contacts for about five minutes, the console will turn...
English Manual
Page 22
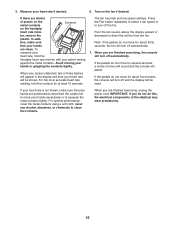
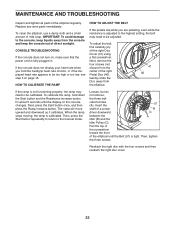
..., press the Start button once, and then press the Ramp increase button. IMPORTANT: To avoid damage to the console, keep liquids away from the elliptical. 41 40 If the ramp is adjusted to the highest setting, the belt may need to be calibrated. When the ramp stops moving, the ramp... is fully plugged in. To clean the elliptical, use a damp cloth and a small amount of direct sunlight. To calibrate the ramp, hold the handgrip heart rate monitor, or if the displayed heart...
..., press the Start button once, and then press the Ramp increase button. IMPORTANT: To avoid damage to the console, keep liquids away from the elliptical. 41 40 If the ramp is adjusted to the highest setting, the belt may need to be calibrated. When the ramp stops moving, the ramp... is fully plugged in. To clean the elliptical, use a damp cloth and a small amount of direct sunlight. To calibrate the ramp, hold the handgrip heart rate monitor, or if the displayed heart...


