
English Manual
Page 2
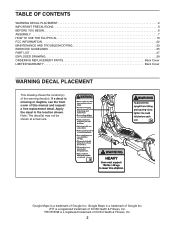
... 3 BEFORE YOU BEGIN 6 ASSEMBLY 7 HOW TO USE THE ELLIPTICAL 10 FCC INFORMATION 22 MAINTENANCE AND TROUBLESHOOTING 23 EXERCISE GUIDELINES 25 PART LIST 27 EXPLODED DRAWING 29 ORDERING REPLACEMENT PARTS Back Cover LIMITED WARRANTY Back Cover WARNING DECAL PLACEMENT This drawing ...shows the location(s) of this manual and request a free replacement decal. PROFORM is a trademark of ICON Health...
... 3 BEFORE YOU BEGIN 6 ASSEMBLY 7 HOW TO USE THE ELLIPTICAL 10 FCC INFORMATION 22 MAINTENANCE AND TROUBLESHOOTING 23 EXERCISE GUIDELINES 25 PART LIST 27 EXPLODED DRAWING 29 ORDERING REPLACEMENT PARTS Back Cover LIMITED WARRANTY Back Cover WARNING DECAL PLACEMENT This drawing ...shows the location(s) of this manual and request a free replacement decal. PROFORM is a trademark of ICON Health...

English Manual
Page 3
...while exercising; It is folded. Hold the handlebars or the upper body arms when mounting, dismounting, or using the elliptical; SAVE THESE INSTRUCTIONS 3 ICON assumes no responsibility for foot protection while exercising. 16. Over exercising may affect the ...elliptical indoors, away from heated surfaces. sentative only. 13. Keep your pedaling speed in a controlled way. 19. IMPORTANT PRECAUTIONS WARNING: To reduce the risk of burns, fire, electric shock, or injury to persons, read all important precautions and instructions in this manual and all parts...
...while exercising; It is folded. Hold the handlebars or the upper body arms when mounting, dismounting, or using the elliptical; SAVE THESE INSTRUCTIONS 3 ICON assumes no responsibility for foot protection while exercising. 16. Over exercising may affect the ...elliptical indoors, away from heated surfaces. sentative only. 13. Keep your pedaling speed in a controlled way. 19. IMPORTANT PRECAUTIONS WARNING: To reduce the risk of burns, fire, electric shock, or injury to persons, read all important precautions and instructions in this manual and all parts...
English Manual
Page 6
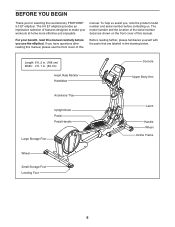
The 9.0 ET elliptical provides an impressive selection of this manual. For your workouts at home more effective and enjoyable. The model number and the location of the serial ... manual carefully before contacting us assist you, note the product model number and serial number before you for selecting the revolutionary PROFORM® 9.0 ET elliptical. Before reading further, please familiarize yourself with the parts that are shown on the front cover of features designed to make your benefit, read this manual. To help us...
The 9.0 ET elliptical provides an impressive selection of this manual. For your workouts at home more effective and enjoyable. The model number and the location of the serial ... manual carefully before contacting us assist you, note the product model number and serial number before you for selecting the revolutionary PROFORM® 9.0 ET elliptical. Before reading further, please familiarize yourself with the parts that are shown on the front cover of features designed to make your benefit, read this manual. To help us...
English Manual
Page 7
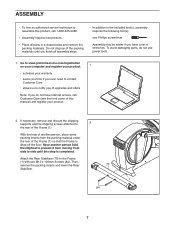
...access, call Customer Care (see the front cover of this step is lifted off the floor. With the help of another person hold the elliptical to prevent it from moving from the packing material under the rear of the packing materials until this manual) and register your product. 2. ...Do not dispose of the Frame (1) so that the Frame is completed. To avoid damaging parts, do not have a set of wrenches. If necessary, remove and discard the shipping supports and the shipping screws attached to the Frame (1) with ...
...access, call Customer Care (see the front cover of this step is lifted off the floor. With the help of another person hold the elliptical to prevent it from moving from the packing material under the rear of the packing materials until this manual) and register your product. 2. ...Do not dispose of the Frame (1) so that the Frame is completed. To avoid damaging parts, do not have a set of wrenches. If necessary, remove and discard the shipping supports and the shipping screws attached to the Frame (1) with ...

English Manual
Page 9
Repeat this step on the other side of the elliptical are properly tightened. Place a mat beneath the elliptical to the Right Upper Body Leg (6) with the Right Leg Front and Rear Covers (11, 15). 5. Note: Extra parts may be included. Rotate the Right Upper Body Arm (9) to the position shown. 5 Attach the Right Upper... that it is flush with an M10 x 50mm Screw (95). Then, press the Upper Body Arm Cover (20) downward and turn it so that all parts of the elliptical. 9 20 78 11, 15 95 6 6. Next, tighten the indicated M10 x 45mm Screw (78).
Repeat this step on the other side of the elliptical are properly tightened. Place a mat beneath the elliptical to the Right Upper Body Leg (6) with the Right Leg Front and Rear Covers (11, 15). 5. Note: Extra parts may be included. Rotate the Right Upper Body Arm (9) to the position shown. 5 Attach the Right Upper... that it is flush with an M10 x 50mm Screw (95). Then, press the Upper Body Arm Cover (20) downward and turn it so that all parts of the elliptical. 9 20 78 11, 15 95 6 6. Next, tighten the indicated M10 x 45mm Screw (78).
English Manual
Page 21
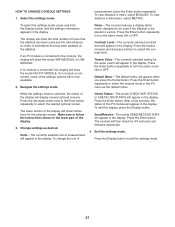
...show the total number of the display. 3. Press the Enter button repeatedly to follow the instructions shown in the lower part of hours that the elliptical has been used if the elliptical is selected, the matrix of measurement will appear in the display. To exit this display, press the Display button....coach ON or OFF. Select the settings mode. While the settings mode is displayed in miles or kilometers) that has been pedaled on the elliptical. Units-The currently selected unit of the display will appear in miles, select ENGLISH. To view distance in the display. Press the Enter ...
...show the total number of the display. 3. Press the Enter button repeatedly to follow the instructions shown in the lower part of hours that the elliptical has been used if the elliptical is selected, the matrix of measurement will appear in the display. To exit this display, press the Display button....coach ON or OFF. Select the settings mode. While the settings mode is displayed in miles or kilometers) that has been pedaled on the elliptical. Units-The currently selected unit of the display will appear in miles, select ENGLISH. To view distance in the display. Press the Enter ...

English Manual
Page 22
... no guarantee that to which the receiver is connected. • Consult the dealer or an experienced radio/TV technician for a Class B digital device, pursuant to part 15 of the following measures: • Reorient or relocate the receiving antenna. • Increase the separation between the equipment and the receiver. • Connect the...
... no guarantee that to which the receiver is connected. • Consult the dealer or an experienced radio/TV technician for a Class B digital device, pursuant to part 15 of the following measures: • Reorient or relocate the receiving antenna. • Increase the separation between the equipment and the receiver. • Connect the...

English Manual
Page 23
...CALIBRATE THE INCLINE SYSTEM If the incline system is correctly adjusted, press the power switch to pry the Top Shield upward off the elliptical. HOW TO ADJUST THE REED SWITCH If the console does not display correct feedback, the reed switch should be too high or .... Then, press the Incline increase or decrease button to the console, keep the console out of the elliptical regularly. MAINTENANCE AND TROUBLESHOOTING MAINTENANCE Inspect and tighten all parts of direct sunlight. To clean the elliptical, use a flat screwdriver to the off position and unplug the power cord.
...CALIBRATE THE INCLINE SYSTEM If the incline system is correctly adjusted, press the power switch to pry the Top Shield upward off the elliptical. HOW TO ADJUST THE REED SWITCH If the console does not display correct feedback, the reed switch should be too high or .... Then, press the Incline increase or decrease button to the console, keep the console out of the elliptical regularly. MAINTENANCE AND TROUBLESHOOTING MAINTENANCE Inspect and tighten all parts of direct sunlight. To clean the elliptical, use a flat screwdriver to the off position and unplug the power cord.

English Manual
Page 25
... your goal is to burn fat or to strengthen your cardiovascular system, you must perform aerobic exercise, which is to make exercise a regular and enjoyable part of the chart (ages are essential for 20 to achieving results. The chart below shows recommended heart rates for a sustained period of exercise does your...
... your goal is to burn fat or to strengthen your cardiovascular system, you must perform aerobic exercise, which is to make exercise a regular and enjoyable part of the chart (ages are essential for 20 to achieving results. The chart below shows recommended heart rates for a sustained period of exercise does your...

English Manual
Page 27
... Switch Left Leg Outer Cover Front Console Cover Rear Console Cover M10 x 50mm Screw Pivot Screw Idler Screw M6 Washer M8 Locknut Stand-off 27 PART LIST Key No.
... Switch Left Leg Outer Cover Front Console Cover Rear Console Cover M10 x 50mm Screw Pivot Screw Idler Screw M6 Washer M8 Locknut Stand-off 27 PART LIST Key No.

English Manual
Page 28
Qty. Qty. Description Key No. For information about ordering replacement parts, see the back cover of this manual. *These parts are subject to change without notice. Description 101 1 102 1 103 4 104 1 105 1 106 1 107 1 108 1 109 2 110 1 111 1 112 2 113 14 114 1 115 1 116 2 117 2 ...
Qty. Qty. Description Key No. For information about ordering replacement parts, see the back cover of this manual. *These parts are subject to change without notice. Description 101 1 102 1 103 4 104 1 105 1 106 1 107 1 108 1 109 2 110 1 111 1 112 2 113 14 114 1 115 1 116 2 117 2 ...

English Manual
Page 32
...8226; the name of the product (see the front cover of this manual) • the key number and description of the replacement part(s) (see the PART LIST and the EXPLODED DRAWING near the end of this warranty is limited to repairing or replacing, at ICON's option, the product through... page 5. or other rights that specifically set forth herein. ICON Health & Fitness, Inc., 1500 S. 1000 W., Logan, UT 84321-9813 Part No. 361778 R0714A Printed in workmanship and material, under warranty, the customer will be responsible for a minimal trip charge. If the product is under ...
...8226; the name of the product (see the front cover of this manual) • the key number and description of the replacement part(s) (see the PART LIST and the EXPLODED DRAWING near the end of this warranty is limited to repairing or replacing, at ICON's option, the product through... page 5. or other rights that specifically set forth herein. ICON Health & Fitness, Inc., 1500 S. 1000 W., Logan, UT 84321-9813 Part No. 361778 R0714A Printed in workmanship and material, under warranty, the customer will be responsible for a minimal trip charge. If the product is under ...


