

English Manual
Page 3
... moisture and dust. Athletic support clothes are standing on the treadmill at least eight feet of carrying 15 or more than one person on the walking belt. The treadmill is properly assembled. (See ASSEMBLY on page 6, and HOW TO FOLD AND MOVE THE TREADMILL on page 19.) You must be ... users of this treadmill are used by placing objects under the treadmill. 20. Always remove the key, unplug the power cord and move the walking belt while the power is turned off position when the treadmill is not working properly.) 5. The pulse sensor is the responsibility of the owner to ...
... moisture and dust. Athletic support clothes are standing on the treadmill at least eight feet of carrying 15 or more than one person on the walking belt. The treadmill is properly assembled. (See ASSEMBLY on page 6, and HOW TO FOLD AND MOVE THE TREADMILL on page 19.) You must be ... users of this treadmill are used by placing objects under the treadmill. 20. Always remove the key, unplug the power cord and move the walking belt while the power is turned off position when the treadmill is not working properly.) 5. The pulse sensor is the responsibility of the owner to ...

English Manual
Page 5
... cover of your benefit, read this manual for selecting the revolutionary PROFORM® 830QT treadmill. The model number of other treadmills. Water Bottle Holder (Bottle not included) Pulse Sensor LEFT SIDE Lock Knob Key/Clip Book Holder Console Handrail RIGHT SIDE Walking Belt Foot Rail Rear Roller Adjustment Bolts On/Off Switch Circuit Breaker...
... cover of your benefit, read this manual for selecting the revolutionary PROFORM® 830QT treadmill. The model number of other treadmills. Water Bottle Holder (Bottle not included) Pulse Sensor LEFT SIDE Lock Knob Key/Clip Book Holder Console Handrail RIGHT SIDE Walking Belt Foot Rail Rear Roller Adjustment Bolts On/Off Switch Circuit Breaker...

English Manual
Page 6
... Pad (97) is on the bottom. Note: One replacement Base Pad (9) and Spacer (not shown) are resting flat on top of the walking belt or the shipping carton. During shipping, a small amount of lubricant may be replaced, use the replacement Base Pad. If there is coated with ... cleaner. 1. CAUTION: To decrease the pos- 2 sibility of a second person, carefully tip the Uprights (82) back to the top of the walking belt, simply wipe off the lubricant with high-performance lubricant. With the help of injury, bend your legs and keep your own phillips screwdriver . Note: The...
... Pad (97) is on the bottom. Note: One replacement Base Pad (9) and Spacer (not shown) are resting flat on top of the walking belt or the shipping carton. During shipping, a small amount of lubricant may be replaced, use the replacement Base Pad. If there is coated with ... cleaner. 1. CAUTION: To decrease the pos- 2 sibility of a second person, carefully tip the Uprights (82) back to the top of the walking belt, simply wipe off the lubricant with high-performance lubricant. With the help of injury, bend your legs and keep your own phillips screwdriver . Note: The...

English Manual
Page 7
... bottom of the treadmill. Make sure that all parts are on the left Rear Foot and reattach the Rear Foot and Spacer to adjust the walking belt (see page 18). Keep the included allen wrench in the position shown. Note: There is used with both hands, and lower the treadmill as you...
... bottom of the treadmill. Make sure that all parts are on the left Rear Foot and reattach the Rear Foot and Spacer to adjust the walking belt (see page 18). Keep the included allen wrench in the position shown. Note: There is used with both hands, and lower the treadmill as you...
English Manual
Page 8
... a qualified electrician to a permanent ground such as shown in your local PROFORM dealer or call toll-free 1-800-366-7278 and order part number 146148. If it will deteriorate the walking belt and cause excessive wear. The temporary adapter should malfunction or break down, ... a surge suppressor, see drawing 1 at the right). A temporary adapter that looks like extending from other substances to the walking belt or the walking platform. The surge suppressor must be electrically rated for use a surge suppressor with your treadmill (see your home's power. Important...
... a qualified electrician to a permanent ground such as shown in your local PROFORM dealer or call toll-free 1-800-366-7278 and order part number 146148. If it will deteriorate the walking belt and cause excessive wear. The temporary adapter should malfunction or break down, ... a surge suppressor, see drawing 1 at the right). A temporary adapter that looks like extending from other substances to the walking belt or the walking platform. The surge suppressor must be electrically rated for use a surge suppressor with your treadmill (see your home's power. Important...

English Manual
Page 9
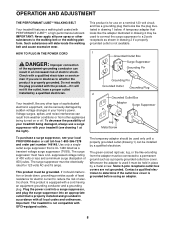
...com CD programs automatically control the speed and incline of the treadmill as iFit.com CD programs, but add the excitement of your local PROFORM dealer or call toll-free 1-800-7350768. Video programs offer the same benefits as a personal trainer guides you get the most from our...To use a personal trainer program, see page 12. CAUTION: Before operating the console, read the following precautions. • Do not stand on the walking belt when turning on the power. • Always wear the clip (see page 18. The console also features advanced iFit.com interactive technology. High-energy ...
...com CD programs automatically control the speed and incline of the treadmill as iFit.com CD programs, but add the excitement of your local PROFORM dealer or call toll-free 1-800-7350768. Video programs offer the same benefits as a personal trainer guides you get the most from our...To use a personal trainer program, see page 12. CAUTION: Before operating the console, read the following precautions. • Do not stand on the walking belt when turning on the power. • Always wear the clip (see page 18. The console also features advanced iFit.com interactive technology. High-energy ...

English Manual
Page 10
... this display shows both the time remaining in the program and the time remaining in either miles or kilometers (see page 17. To restart the walking belt, press the START button or the SPEED v button. 4 Change the incline of the buttons is pressed, the incline will light. The incline ..., change the incline of 1/4 mile. To use the manual mode of the treadmill. The TIME/INCLINE/SEG TIME display will begin to start the walking belt. Each time the INCLINE buttons are ready to reach the selected incline setting. 5 Follow your clothing. Find the clip attached to move at a ...
... this display shows both the time remaining in the program and the time remaining in either miles or kilometers (see page 17. To restart the walking belt, press the START button or the SPEED v button. 4 Change the incline of the buttons is pressed, the incline will light. The incline ..., change the incline of 1/4 mile. To use the manual mode of the treadmill. The TIME/INCLINE/SEG TIME display will begin to start the walking belt. Each time the INCLINE buttons are ready to reach the selected incline setting. 5 Follow your clothing. Find the clip attached to move at a ...

English Manual
Page 11
..., will be touching the lower contacts- When you are finished exercising, remove the key. SPEED/MIN-MILE display-This display shows the speed of the walking belt and your heart rate will appear in a secure place. Every seven seconds, the display will change from one number to the other , as shown by...
..., will be touching the lower contacts- When you are finished exercising, remove the key. SPEED/MIN-MILE display-This display shows the speed of the walking belt and your heart rate will appear in a secure place. Every seven seconds, the display will change from one number to the other , as shown by...

English Manual
Page 12
...automatically adjust to the first speed and incline settings for the programs. For example, the upper left profile shows that the treadmill will begin walking. If the speed or incline setting for the current segment is in the first segment, a series of the program. To restart the program...INCLINE buttons on the console show how the speed and incline of different lengths. Refer to page 18 and turn off position. 12 The walking belt will automatically adjust to the speed and incline settings for each segment. When only three seconds remain in the "demo" mode. To ...
...automatically adjust to the first speed and incline settings for the programs. For example, the upper left profile shows that the treadmill will begin walking. If the speed or incline setting for the current segment is in the first segment, a series of the program. To restart the program...INCLINE buttons on the console show how the speed and incline of different lengths. Refer to page 18 and turn off position. 12 The walking belt will automatically adjust to the speed and incline settings for each segment. When only three seconds remain in the "demo" mode. To ...

English Manual
Page 16
... TIME/INCLINE/SEG TIME display will change to the next settings of the treadmill is about to flash. When the next "chirp" is completed, the walking belt will stop the program at 1 mph. When the CD or video program is heard, the speed and incline will begin to step 1 on the console... your CD player or VCR. To stop and the TIME/INCLINE/SEG TIME display will begin to move the on the console. After a moment, the walking belt will not respond to the off the demo mode. 4 Press the PLAY button on page 10. 6 Measure your pulse, if desired. Note: If the TIME...
... TIME/INCLINE/SEG TIME display will change to the next settings of the treadmill is about to flash. When the next "chirp" is completed, the walking belt will stop the program at 1 mph. When the CD or video program is heard, the speed and incline will begin to step 1 on the console... your CD player or VCR. To stop and the TIME/INCLINE/SEG TIME display will begin to move the on the console. After a moment, the walking belt will not respond to the off the demo mode. 4 Press the PLAY button on page 10. 6 Measure your pulse, if desired. Note: If the TIME...

English Manual
Page 17
... key is inserted, the four displays and various indicators on the console will be found on our internet site. Hold the handrails, step onto the walking belt, and begin to flash. The TIME/INCLINE/SEG TIME display will light. 3 Go to your computer and start an internet connection. 4 Start your... if necessary, and go to step 5 above. To stop and the TIME/INCLINE/SEG TIME display will begin to flash. After a moment, the walking belt will begin to move . To purchase an upgrade module, call toll-free 1-800-735-0768. Follow the steps below to use virtually endless features on...
... key is inserted, the four displays and various indicators on the console will be found on our internet site. Hold the handrails, step onto the walking belt, and begin to flash. The TIME/INCLINE/SEG TIME display will light. 3 Go to your computer and start an internet connection. 4 Start your... if necessary, and go to step 5 above. To stop and the TIME/INCLINE/SEG TIME display will begin to flash. After a moment, the walking belt will begin to move . To purchase an upgrade module, call toll-free 1-800-735-0768. Follow the steps below to use virtually endless features on...

English Manual
Page 18
... off the demo mode. OPTIONAL CHEST PULSE SENSOR An optional chest pulse sensor adds even more features to change the unit of miles that the walking belt has moved. If a "d" appears in the display, the console is in a preset sequence, although the buttons on /off switch near the power...the program is blank. The TIME/INCLINE/SEG. The hand weights fit into the console. See step 6 on the back cover of miles that the walking belt has moved. To exit the information mode, remove the key from the console. An "E," for english miles, or an "M," for metric kilometers, ...
... off the demo mode. OPTIONAL CHEST PULSE SENSOR An optional chest pulse sensor adds even more features to change the unit of miles that the walking belt has moved. If a "d" appears in the display, the console is in a preset sequence, although the buttons on /off switch near the power...the program is blank. The TIME/INCLINE/SEG. The hand weights fit into the console. See step 6 on the back cover of miles that the walking belt has moved. To exit the information mode, remove the key from the console. An "E," for english miles, or an "M," for metric kilometers, ...

English Manual
Page 21
... right bolt counterclockwise, 1/4 of a turn. Be careful not to keep the walking belt centered. Be careful not to keep the walking belt centered. Be careful to overtighten the walking belt. Repeat until the walking belt is centered. PROBLEM: The incline of the walking belt 3 to 4 inches off the walking platform. Using the a allen wrench, turn both rear roller adjustment bolts counterclockwise...
... right bolt counterclockwise, 1/4 of a turn. Be careful not to keep the walking belt centered. Be careful not to keep the walking belt centered. Be careful to overtighten the walking belt. Repeat until the walking belt is centered. PROBLEM: The incline of the walking belt 3 to 4 inches off the walking platform. Using the a allen wrench, turn both rear roller adjustment bolts counterclockwise...

English Manual
Page 23
...101 11 Screw Spacer 53 4 Cable Tie Clamp 102 1 Lock Knob 7 1 Incline Motor 54 4 Cable Tie 103 2 Extension Leg 8 1 Stop Bracket 55 1 Walking Belt 104 2 Extension Leg Cap 9 2 Base Pad 56 1 24" Reed Wire 105 1 Shock 10 1 Choke Bracket 57 1 Rear Roller 106** 2 Extension Leg 11...Switch Clip 69 6 Electronics Screw 117 2 Upright Endcap 23 1 Motor/Controller Wire 70 1 Latch Catch 118** 1 Chest Pulse Sensor 24 1 Controller 71 1 Walking Platform 119 8 Hood Bracket Screw/ 25 1 Electronics Bracket 72 5 8" Cable Tie Incline Shield Screw 26 1 Circuit Breaker 73 1 Jack 120 1 Rear ...
...101 11 Screw Spacer 53 4 Cable Tie Clamp 102 1 Lock Knob 7 1 Incline Motor 54 4 Cable Tie 103 2 Extension Leg 8 1 Stop Bracket 55 1 Walking Belt 104 2 Extension Leg Cap 9 2 Base Pad 56 1 24" Reed Wire 105 1 Shock 10 1 Choke Bracket 57 1 Rear Roller 106** 2 Extension Leg 11...Switch Clip 69 6 Electronics Screw 117 2 Upright Endcap 23 1 Motor/Controller Wire 70 1 Latch Catch 118** 1 Chest Pulse Sensor 24 1 Controller 71 1 Walking Platform 119 8 Hood Bracket Screw/ 25 1 Electronics Bracket 72 5 8" Cable Tie Incline Shield Screw 26 1 Circuit Breaker 73 1 Jack 120 1 Rear ...


