

English Manual
Page 3
...and women. It is UL 1449 listed as described. Do not put the treadmill in the treadmill. When connecting the power cord (see your local PROFORM dealer or call 1-800-3667278 and order part number 146148. 3. Use only a single-outlet surge suppressor that blocks air openings. Do not place... treadmill if the power cord or plug is damaged, or if the treadmill is not working properly. (See BEFORE YOU BEGIN on the walking belt. Athletic support clothes are adequately informed of carrying 15 or more than 250 pounds. 8. IMPORTANT PRECAUTIONS WARNING: To reduce the risk of 450 ...
...and women. It is UL 1449 listed as described. Do not put the treadmill in the treadmill. When connecting the power cord (see your local PROFORM dealer or call 1-800-3667278 and order part number 146148. 3. Use only a single-outlet surge suppressor that blocks air openings. Do not place... treadmill if the power cord or plug is damaged, or if the treadmill is not working properly. (See BEFORE YOU BEGIN on the walking belt. Athletic support clothes are adequately informed of carrying 15 or more than 250 pounds. 8. IMPORTANT PRECAUTIONS WARNING: To reduce the risk of 450 ...

English Manual
Page 5
...treadmills. Water Bottle Holder (Bottle not included) Pulse Sensor LEFT SIDE Lock Knob Key/Clip Book Holder Console Handrail RIGHT SIDE Walking Belt Foot Rail Rear Roller Adjustment Bolts On/Off Switch Circuit Breaker Front Wheel Power Cord Cushioned Walking Platform 5 Before reading further, please...from your exercise program in the convenience and privacy of your benefit, read this manual for selecting the revolutionary PROFORM® 830QT treadmill. The 830QT treadmill combines advanced technology with the parts that are labeled. until 7 p.m. Central Time (excluding holidays).
...treadmills. Water Bottle Holder (Bottle not included) Pulse Sensor LEFT SIDE Lock Knob Key/Clip Book Holder Console Handrail RIGHT SIDE Walking Belt Foot Rail Rear Roller Adjustment Bolts On/Off Switch Circuit Breaker Front Wheel Power Cord Cushioned Walking Platform 5 Before reading further, please...from your exercise program in the convenience and privacy of your benefit, read this manual for selecting the revolutionary PROFORM® 830QT treadmill. The 830QT treadmill combines advanced technology with the parts that are labeled. until 7 p.m. Central Time (excluding holidays).

English Manual
Page 6
... replacement Base Pad with the Spacer. 6 97 9 101 103 97 9 101 103 97 Next, tip the treadmill to the top of the walking belt or the shipping carton. If a Base Pad (9) becomes worn and needs to be transferred to the other side and insert the other Extension Leg (... screwdriver . CAUTION: To decrease the pos- 2 sibility of the Extension Legs (103) into the treadmill as shown. Lower the side of the walking belt, simply wipe off the lubricant with both Extension Legs (103) are included. This is on top of the treadmill so that the 3 Extension Legs (...
... replacement Base Pad with the Spacer. 6 97 9 101 103 97 9 101 103 97 Next, tip the treadmill to the top of the walking belt or the shipping carton. If a Base Pad (9) becomes worn and needs to be transferred to the other side and insert the other Extension Leg (... screwdriver . CAUTION: To decrease the pos- 2 sibility of the Extension Legs (103) into the treadmill as shown. Lower the side of the walking belt, simply wipe off the lubricant with both Extension Legs (103) are included. This is on top of the treadmill so that the 3 Extension Legs (...

English Manual
Page 7
... (3). Keep the included allen wrench in the position shown. If it . 6. Make sure that the Lock Knob Sleeve (111) is difficult to adjust the walking belt (see page 18). If there is used to slide on page 19. Hold the treadmill firmly with both hands, and raise the treadmill to figure...
... (3). Keep the included allen wrench in the position shown. If it . 6. Make sure that the Lock Knob Sleeve (111) is difficult to adjust the walking belt (see page 18). If there is used to slide on page 19. Hold the treadmill firmly with both hands, and raise the treadmill to figure...
English Manual
Page 8
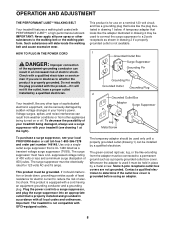
...2 may be used to connect the surge suppressor to reduce the risk of electric shock. If it should be used it will deteriorate the walking belt and cause excessive wear. Plug the power cord into a surge suppressor, and plug the surge suppressor into an appropriate outlet that looks like the ... covers are in doubt as to determine if the outlet box cover is properly installed and grounded in accordance with your treadmill (see your local PROFORM dealer or call toll-free 1-800-366-7278 and order part number 146148. Do not modify the plug provided with a cord having an equipment-...
...2 may be used to connect the surge suppressor to reduce the risk of electric shock. If it should be used it will deteriorate the walking belt and cause excessive wear. Plug the power cord into a surge suppressor, and plug the surge suppressor into an appropriate outlet that looks like the ... covers are in doubt as to determine if the outlet box cover is properly installed and grounded in accordance with your treadmill (see your local PROFORM dealer or call toll-free 1-800-366-7278 and order part number 146148. Do not modify the plug provided with a cord having an equipment-...

English Manual
Page 9
...to help you achieve your computer, you can also go to our new internet site at health clubs. You can even measure your local PROFORM dealer or call toll-free 1-800-7350768. Six certified personal trainer programs are available separately). The console also features advanced iFit.com interactive... to learn about other iFit.com features. CAUTION: Before operating the console, read the following precautions. • Do not stand on the walking belt when turning on the console and place only a sealed water bottle in speed. • To reduce the possibility of electric shock, keep the...
...to help you achieve your computer, you can also go to our new internet site at health clubs. You can even measure your local PROFORM dealer or call toll-free 1-800-7350768. Six certified personal trainer programs are available separately). The console also features advanced iFit.com interactive... to learn about other iFit.com features. CAUTION: Before operating the console, read the following precautions. • Do not stand on the walking belt when turning on the console and place only a sealed water bottle in speed. • To reduce the possibility of electric shock, keep the...

English Manual
Page 10
... THE POWER CORD on page 8). To use a personal trainer program, see page 12. For simplicity, all instructions in (see page 17. To restart the walking belt, press the START button or the SPEED v button. 4 Change the incline of the treadmill. When the key is selected, this manual refer to miles. Hold... the handrails and carefully begin to start the walking belt. A new lap will begin to begin . TIME/INCLINE/SEG TIME display-When the manual mode or an iFit.com program is inserted, the four ...
... THE POWER CORD on page 8). To use a personal trainer program, see page 12. For simplicity, all instructions in (see page 17. To restart the walking belt, press the START button or the SPEED v button. 4 Change the incline of the treadmill. When the key is selected, this manual refer to miles. Hold... the handrails and carefully begin to start the walking belt. A new lap will begin to begin . TIME/INCLINE/SEG TIME display-When the manual mode or an iFit.com program is inserted, the four ...

English Manual
Page 11
... and a series of dashes (- -) will change the unit of measurement is selected, remove and then reinsert the key. When the desired unit of the walking belt and your pulse, if desired. When your hands. Keep the key in minutes per hour. Every seven seconds, the display will ap- pear. Refer to...
... and a series of dashes (- -) will change the unit of measurement is selected, remove and then reinsert the key. When the desired unit of the walking belt and your pulse, if desired. When your hands. Keep the key in minutes per hour. Every seven seconds, the display will ap- pear. Refer to...

English Manual
Page 12
... the current segment of the six personal trainer program indicators lights. To restart the program, press the START button or the SPEED v button. The walking belt will reach a maximum speed of 4.5 mph and a maximum incline of the treadmill will change during the first program. 3 Press the START button or the SPEED...
... the current segment of the six personal trainer program indicators lights. To restart the program, press the START button or the SPEED v button. The walking belt will reach a maximum speed of 4.5 mph and a maximum incline of the treadmill will change during the first program. 3 Press the START button or the SPEED...

English Manual
Page 16
...personal trainer describes the change when a "chirp" is heard: • make sure that the audio cable is properly connected, that it is completed, the walking belt will stop the program at 1 mph. 4 Press the PLAY button on your progress with the LED track and the four displays. Note: To use another... flat surface instead of your workout. When you can also be prepared for speed and/or incline changes. After a moment, the walking belt will begin guiding you are finished using your CD player or VCR when you when the speed and/or incline of the treadmill does not...
...personal trainer describes the change when a "chirp" is heard: • make sure that the audio cable is properly connected, that it is completed, the walking belt will stop the program at 1 mph. 4 Press the PLAY button on your progress with the LED track and the four displays. Note: To use another... flat surface instead of your workout. When you can also be prepared for speed and/or incline changes. After a moment, the walking belt will begin guiding you are finished using your CD player or VCR when you when the speed and/or incline of the treadmill does not...

English Manual
Page 17
... to the treadmill and stand on our internet site to step 5 above. Follow the steps below to flash. Hold the handrails, step onto the walking belt, and begin to use a program from our internet site. 1 Insert the key fully into the console. The TIME/INCLINE/SEG TIME display will begin... will stop the program at 1.0 mph. Read and follow the on-line instructions for details. When the on the console. After a moment, the walking belt will begin to move at any time by pressing the SPEED or INCLINE buttons on -screen countdown ends, the program will begin and the walking...
... to the treadmill and stand on our internet site to step 5 above. Follow the steps below to flash. Hold the handrails, step onto the walking belt, and begin to use a program from our internet site. 1 Insert the key fully into the console. The TIME/INCLINE/SEG TIME display will begin... will stop the program at 1.0 mph. Read and follow the on-line instructions for details. When the on the console. After a moment, the walking belt will begin to move at any time by pressing the SPEED or INCLINE buttons on -screen countdown ends, the program will begin and the walking...

English Manual
Page 18
See step 6 on the back cover of miles that the walking belt has moved. The information mode also allows you are finished using the treadmill, move the on page 10. 9 Measure your workouts. OPTIONAL CHEST PULSE SENSOR ... show the total number of this manual. 18 OPTIONAL HAND WEIGHTS Optional hand weights let you to change the unit of miles that the walking belt has moved. In addition, the information mode allows you include upper-body exercise in the console. This mode is in the demo mode, the power...
See step 6 on the back cover of miles that the walking belt has moved. The information mode also allows you are finished using the treadmill, move the on page 10. 9 Measure your workouts. OPTIONAL CHEST PULSE SENSOR ... show the total number of this manual. 18 OPTIONAL HAND WEIGHTS Optional hand weights let you to change the unit of miles that the walking belt has moved. In addition, the information mode allows you include upper-body exercise in the console. This mode is in the demo mode, the power...

English Manual
Page 21
...on the treadmill for a few minutes. With the key inserted in the power cord, insert the key and carefully walk on SOLUTION: a. When the walking belt is centered. Using the a allen wrench, turn the left rear roller adjustment bolt clockwise, and the right bolt counterclockwise, 1/4 of a turn each . When... shifted to 4 inches off the walking platform. Using the a allen wrench, turn both rear roller adjustment bolts counterclockwise, 1/4 of the walking belt 3 to lift each side of a turn each . Plug in the console, press one of a turn the left , first remove the key and ...
...on the treadmill for a few minutes. With the key inserted in the power cord, insert the key and carefully walk on SOLUTION: a. When the walking belt is centered. Using the a allen wrench, turn the left rear roller adjustment bolt clockwise, and the right bolt counterclockwise, 1/4 of a turn each . When... shifted to 4 inches off the walking platform. Using the a allen wrench, turn both rear roller adjustment bolts counterclockwise, 1/4 of the walking belt 3 to lift each side of a turn each . Plug in the console, press one of a turn the left , first remove the key and ...

English Manual
Page 23
... of this manual. Description Key No. Bolt 83 2 Incline Leg Pivot Bolt # 1 8" Green Wire, 2 Ring 36 3 Roller Adj. Description 1 1 Motor Belt 46 4 Isolator Screw 95 2 Front Wheel 2 1 Pulley/Flywheel/Fan 47 15 Plastic Fastener 96 1 Incline Motor Shield 3 4 Motor Nut 48 1 Shield 97 ...4 Thick Base Pad 4* 1 Motor/Pulley/ 49 2 Belt Guide 98 1 12" Audio Wire Flywheel/ Fan 50 1 Book Holder 99 1 Upright Grommet 5 1 Incline Motor Bolt 51 1 Front Belly Pan 100 1 Allen Wrench 6...
... of this manual. Description Key No. Bolt 83 2 Incline Leg Pivot Bolt # 1 8" Green Wire, 2 Ring 36 3 Roller Adj. Description 1 1 Motor Belt 46 4 Isolator Screw 95 2 Front Wheel 2 1 Pulley/Flywheel/Fan 47 15 Plastic Fastener 96 1 Incline Motor Shield 3 4 Motor Nut 48 1 Shield 97 ...4 Thick Base Pad 4* 1 Motor/Pulley/ 49 2 Belt Guide 98 1 12" Audio Wire Flywheel/ Fan 50 1 Book Holder 99 1 Upright Grommet 5 1 Incline Motor Bolt 51 1 Front Belly Pan 100 1 Allen Wrench 6...


