
English Manual
Page 2
¨ TABLE OF CONTENTS IMPORTANT PRECAUTIONS 3 BEFORE YOU BEGIN 5 ASSEMBLY 6 OPERATION AND ADJUSTMENT 8 HOW TO FOLD AND MOVE THE TREADMILL 19 TROUBLE-SHOOTING 20 CONDITIONING GUIDELINES 22 PART LIST 23 ORDERING REPLACEMENT PARTS Back Cover LIMITED WARRANTY Back Cover Note: An EXPLODED DRAWING is attached in the center of this manual. 2
¨ TABLE OF CONTENTS IMPORTANT PRECAUTIONS 3 BEFORE YOU BEGIN 5 ASSEMBLY 6 OPERATION AND ADJUSTMENT 8 HOW TO FOLD AND MOVE THE TREADMILL 19 TROUBLE-SHOOTING 20 CONDITIONING GUIDELINES 22 PART LIST 23 ORDERING REPLACEMENT PARTS Back Cover LIMITED WARRANTY Back Cover Note: An EXPLODED DRAWING is attached in the center of this manual. 2
English Manual
Page 3
... remove the key, unplug the power cord and move the walking belt while the power is turned off. Place the treadmill on /off switch to persons, read the following important precautions and information before operating the treadmill. 1. less in general. 8. The pulse sensor is intended only as described in this treadmill are standing on the walking belt. The pulse sensor is running. Wear appropriate exercise clothing when using the treadmill. 15. Do not use...
... remove the key, unplug the power cord and move the walking belt while the power is turned off. Place the treadmill on /off switch to persons, read the following important precautions and information before operating the treadmill. 1. less in general. 8. The pulse sensor is intended only as described in this treadmill are standing on the walking belt. The pulse sensor is running. Wear appropriate exercise clothing when using the treadmill. 15. Do not use...
English Manual
Page 4
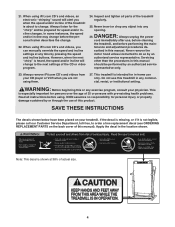
... and tighten all instructions before using iFit.com CDÕs and videos, you can manually override the speed and incline settings at 38% of the CD or video program. 24. Always unplug the power cord immediately after use this manual). tenance and adjustment procedures de- ICON assumes no responsibility for personal injury or property damage sustained by pressing the speed and incline buttons. This treadmill is not legible, please call our Customer Service...
... and tighten all instructions before using iFit.com CDÕs and videos, you can manually override the speed and incline settings at 38% of the CD or video program. 24. Always unplug the power cord immediately after use this manual). tenance and adjustment procedures de- ICON assumes no responsibility for personal injury or property damage sustained by pressing the speed and incline buttons. This treadmill is not legible, please call our Customer Service...
English Manual
Page 5
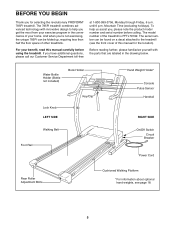
... product model number and serial number before using the treadmill. To help you get the most from your exercise program in the drawing below. Water Bottle Holder (Bottle not included) Book Holder Lock Knob LEFT SIDE Key/Clip Hand Weight Holder* Console Pulse Sensor Handrail RIGHT SIDE Walking Belt Foot Rail On/Off Switch Circuit Breaker Power Cord Rear Roller Adjustment Bolts Cushioned Walking Platform *For information about optional hand weights, see the front cover of this manual...
... product model number and serial number before using the treadmill. To help you get the most from your exercise program in the drawing below. Water Bottle Holder (Bottle not included) Book Holder Lock Knob LEFT SIDE Key/Clip Hand Weight Holder* Console Pulse Sensor Handrail RIGHT SIDE Walking Belt Foot Rail On/Off Switch Circuit Breaker Power Cord Rear Roller Adjustment Bolts Cushioned Walking Platform *For information about optional hand weights, see the front cover of this manual...

English Manual
Page 6
... Leg (not shown) in the Uprights. With the help of the treadmill so that the Extension Legs (102) remain in the same way. Note: The underside of the Extension Legs (102) into the post as shown. Using the included allen wrench, tighten the Pulse Bar Bolt (78) on the floor. 102 99 2. Set the treadmill in the left side for the Pulse Bar (76). Use...
... Leg (not shown) in the Uprights. With the help of the treadmill so that the Extension Legs (102) remain in the same way. Note: The underside of the Extension Legs (102) into the post as shown. Using the included allen wrench, tighten the Pulse Bar Bolt (78) on the floor. 102 99 2. Set the treadmill in the left side for the Pulse Bar (76). Use...

English Manual
Page 8
... like extending from other type of Grounded Outlet Grounding Pin 2 Grounded Outlet Box Adapter Grounding Pin Grounding Plug Lug Metal Screw Surge Protector 8 This product is grounded before using an adapter. not fit the outlet, have a proper outlet installed by a metal screw. Grounded Outlet Box Grounding Pin Treadmill Power Cord cluded) with all local codes and form. A temporary adapter that is properly grounded. Contact a qualified electrician to...
... like extending from other type of Grounded Outlet Grounding Pin 2 Grounded Outlet Box Adapter Grounding Pin Grounding Plug Lug Metal Screw Surge Protector 8 This product is grounded before using an adapter. not fit the outlet, have a proper outlet installed by a metal screw. Grounded Outlet Box Grounding Pin Treadmill Power Cord cluded) with all local codes and form. A temporary adapter that is properly grounded. Contact a qualified electrician to...
English Manual
Page 9
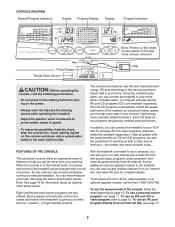
... display continuous exercise feedback. Eight certified personal trainer programs are available separately). Each program automatically controls the speed and incline of the console, remove it. See www.iFit.com for information about an optional chest pulse sensor. Clip CAUTION: Before operating the console, read the following precautions. ¥ Do not stand on the walking belt when turning on the power. ¥ Always wear the clip (see page 17. 9 With the treadmill connected...
... display continuous exercise feedback. Eight certified personal trainer programs are available separately). Each program automatically controls the speed and incline of the console, remove it. See www.iFit.com for information about an optional chest pulse sensor. Clip CAUTION: Before operating the console, read the following precautions. ¥ Do not stand on the walking belt when turning on the power. ¥ Always wear the clip (see page 17. 9 With the treadmill connected...
English Manual
Page 10
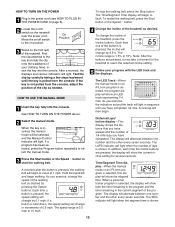
... the walking belt, press the Start button or the Speed v button. 2 Locate the on/off switch to move at 1 mph. HOW TO USE THE MANUAL MODE 1 Insert the key fully into the console. Hold the handrails and begin to the on the treadmill near the power cord. As you exercise, the indicators around the track will alternate between one number and the other every seven seconds. Each time a button is pressed, the incline will...
... the walking belt, press the Start button or the Speed v button. 2 Locate the on/off switch to move at 1 mph. HOW TO USE THE MANUAL MODE 1 Insert the key fully into the console. Hold the handrails and begin to the on the treadmill near the power cord. As you exercise, the indicators around the track will alternate between one number and the other every seven seconds. Each time a button is pressed, the incline will...
English Manual
Page 11
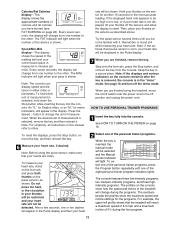
...). Note: The console can display speed and distance in a secure place. To reset the displays, press the Stop button, remove the key, and then reinsert the key. 6 Measure your hands are finished, remove the key. To measure your thumbs off the sensors and allow the display to the off the demo mode. Step onto the foot rails, press the Stop button, and remove the key from one of the personal trainer programs, press the Program button repeatedly until you...
...). Note: The console can display speed and distance in a secure place. To reset the displays, press the Stop button, remove the key, and then reinsert the key. 6 Measure your hands are finished, remove the key. To measure your thumbs off the sensors and allow the display to the off the demo mode. Step onto the foot rails, press the Stop button, and remove the key from one of the personal trainer programs, press the Program button repeatedly until you...
English Manual
Page 12
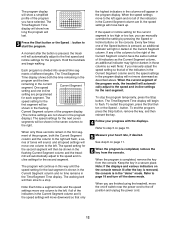
... . The speed setting for each segment. The walking belt will last. 3 Press the Start button or the Speed v button to page 18 and turn off the demo mode. Refer to start the program. The program display will move back up. The Time/Segment Time display will show a simplified profile of the program ends, the treadmill will automatically adjust to a stop the program temporarily, press the Stop button. Each program is completed, remove the key from the console. The speed setting for the...
... . The speed setting for each segment. The walking belt will last. 3 Press the Start button or the Speed v button to page 18 and turn off the demo mode. Refer to start the program. The program display will move back up. The Time/Segment Time display will show a simplified profile of the program ends, the treadmill will automatically adjust to a stop the program temporarily, press the Stop button. Each program is completed, remove the key from the console. The speed setting for the...
English Manual
Page 15
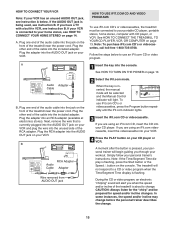
..., press the Program button repeatedly until the iFit.com indicator lights. 3 Insert the iFit.com CD or videocassette. Plug the adapter into the console. B ANT. To use an iFit.com CD or video program. If you through your CD player or VCR. CAUTION: Always listen for speed and/or incline changes. Follow the steps below . A ANT. IN VIDEO AUDIO IN CH 34 OUT RF OUT RCA Adapter Audio Cable Adapter Wire removed from AUDIO OUT...
..., press the Program button repeatedly until the iFit.com indicator lights. 3 Insert the iFit.com CD or videocassette. Plug the adapter into the console. B ANT. To use an iFit.com CD or video program. If you through your CD player or VCR. CAUTION: Always listen for speed and/or incline changes. Follow the steps below . A ANT. IN VIDEO AUDIO IN CH 34 OUT RF OUT RCA Adapter Audio Cable Adapter Wire removed from AUDIO OUT...
English Manual
Page 16
..., remove the key. If the Time/Segment Time display is heard, the speed and/or incline will begin to move the on/off switch near the power cord to the off the demo mode. However, when the next ÒchirpÓ is flashing, press the Start button or the Speed v button on the console. 5 Follow your heart rate, if desired. The program can manually override the settings at any time by pressing the Stop button...
..., remove the key. If the Time/Segment Time display is heard, the speed and/or incline will begin to move the on/off switch near the power cord to the off the demo mode. However, when the next ÒchirpÓ is flashing, press the Start button or the Speed v button on the console. 5 Follow your heart rate, if desired. The program can manually override the settings at any time by pressing the Stop button...
English Manual
Page 17
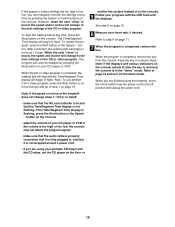
..., you can play iFit.com audio and video programs directly from our internet site, press the Program button repeatedly until the iFit.com indicator lights. 3 Go to the next settings of the program. Explore www.iFit.com for using the treadmill, move . CAUTION: Always listen for speed and/or incline changes. After a moment, the walking belt will begin to page 18 and turn off position and unplug the power cord. 17 Refer to...
..., you can play iFit.com audio and video programs directly from our internet site, press the Program button repeatedly until the iFit.com indicator lights. 3 Go to the next settings of the program. Explore www.iFit.com for using the treadmill, move . CAUTION: Always listen for speed and/or incline changes. After a moment, the walking belt will begin to page 18 and turn off position and unplug the power cord. 17 Refer to...
English Manual
Page 18
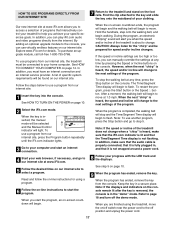
... optional chest pulse sensor, call the toll-free telephone number listed on the back cover of this manual. If a ÒdÓ appears in the Calories/Fat Calories display when the information mode is selected, press the Speed w button so the Calories/ Fat Calories display is in the demo mode, the power cord can be plugged in, the key can be used . The hand weights fit into the console. To purchase hand weights, call the toll-free telephone number listed...
... optional chest pulse sensor, call the toll-free telephone number listed on the back cover of this manual. If a ÒdÓ appears in the Calories/Fat Calories display when the information mode is selected, press the Speed w button so the Calories/ Fat Calories display is in the demo mode, the power cord can be plugged in, the key can be used . The hand weights fit into the console. To purchase hand weights, call the toll-free telephone number listed...

English Manual
Page 19
... knob is past the pin on the lock knob. CAUTION: To decrease the possibility of direct sunlight. Never move the treadmill over an uneven surface. 3. Base Front Wheels HOW TO LOWER THE TREADMILL FOR USE 1. Hold the treadmill with your legs rather than your right hand as described above 85¡ Fahrenheit. As you tip the treadmill. 2. Move your hands in the storage position. Pulse Bar...
... knob is past the pin on the lock knob. CAUTION: To decrease the possibility of direct sunlight. Never move the treadmill over an uneven surface. 3. Base Front Wheels HOW TO LOWER THE TREADMILL FOR USE 1. Hold the treadmill with your legs rather than your right hand as described above 85¡ Fahrenheit. As you tip the treadmill. 2. Move your hands in the storage position. Pulse Bar...
English Manual
Page 20
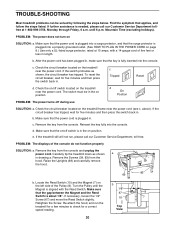
... Reset PROBLEM: The power turns off switch located on the left side of the Pulley (8). If the circuit breaker has tripped, wait for five minutes and then press the switch back in. c. If the treadmill still will not run the treadmill for a few minutes to check for a correct speed reading. Remove the key from the hood. Locate the Reed Switch (10) and the Magnet (7) on the treadmill near the power cord...
... Reset PROBLEM: The power turns off switch located on the left side of the Pulley (8). If the circuit breaker has tripped, wait for five minutes and then press the switch back in. c. If the treadmill still will not run the treadmill for a few minutes to check for a correct speed reading. Remove the key from the hood. Locate the Reed Switch (10) and the Magnet (7) on the treadmill near the power cord...

English Manual
Page 21
..., keep the pulse sensor clean using the pulse sensor. Use only a UL-listed surge protector, rated at 15 amps, with a 14-gauge cord of mild detergent. b. Repeat until the walking belt is off the walking platform. terclockwise, and the right bolt clockwise, 1/4 of the walking belt 3 to the left rear roller adjustment bolt coun- Plug in the power cord, insert the key and run the treadmill for a few minutes. PROBLEM: The thumb pulse sensor does not function...
..., keep the pulse sensor clean using the pulse sensor. Use only a UL-listed surge protector, rated at 15 amps, with a 14-gauge cord of mild detergent. b. Repeat until the walking belt is off the walking platform. terclockwise, and the right bolt clockwise, 1/4 of the walking belt 3 to the left rear roller adjustment bolt coun- Plug in the power cord, insert the key and run the treadmill for a few minutes. PROBLEM: The thumb pulse sensor does not function...

English Manual
Page 22
... workouts each week, with preexisting health problems. The pulse sensor is too high or too low, adjust the speed and incline of time. Fat Burning Exercise Frequency To maintain or improve your goal is near the highest number in general. Only after the first few months, you , first find the proper heart rate for a sustained period of time. The chart below shows recommended heart rates...
... workouts each week, with preexisting health problems. The pulse sensor is too high or too low, adjust the speed and incline of time. Fat Burning Exercise Frequency To maintain or improve your goal is near the highest number in general. Only after the first few months, you , first find the proper heart rate for a sustained period of time. The chart below shows recommended heart rates...

English Manual
Page 23
... Roller/Pulley Frame Pivot Nut Reed Switch/Sensor Wire Latch Assembly Reed Switch Clip Lift Frame Star Washer Motor Assembly Motor Pulley/Flywheel/Fan Motor Belt Motor Pivot Nut Motor Tension Nut Motor Tension Bolt Motor Pivot Bolt Hood Incline Motor Bolt Plastic Stand-Off Power Board Screw Choke Controller Electronics Plate 8Ó Wire Harness Front Roller Adj. Qty. PFTL79192 R0100A To locate the parts listed below, refer to the EXPLODED DRAWING attached in box **For information about the optional chest pulse sensor and hand weights, see page 18 # These parts...
... Roller/Pulley Frame Pivot Nut Reed Switch/Sensor Wire Latch Assembly Reed Switch Clip Lift Frame Star Washer Motor Assembly Motor Pulley/Flywheel/Fan Motor Belt Motor Pivot Nut Motor Tension Nut Motor Tension Bolt Motor Pivot Bolt Hood Incline Motor Bolt Plastic Stand-Off Power Board Screw Choke Controller Electronics Plate 8Ó Wire Harness Front Roller Adj. Qty. PFTL79192 R0100A To locate the parts listed below, refer to the EXPLODED DRAWING attached in box **For information about the optional chest pulse sensor and hand weights, see page 18 # These parts...

English Manual
Page 26
.... The warranty extended hereunder is limited in the center of this manual) ¥ The KEY NUMBER AND DESCRIPTION OF THE PART(S) (see the front cover of this manual). All returns must be prepared to give the following information: ¥ The MODEL NUMBER OF THE PRODUCT (PFTL79192) ¥ The NAME OF THE PRODUCT (PROFORM¨ 785Pi treadmill) ¥ The SERIAL NUMBER OF THE PRODUCT (see the PART LIST on...
.... The warranty extended hereunder is limited in the center of this manual) ¥ The KEY NUMBER AND DESCRIPTION OF THE PART(S) (see the front cover of this manual). All returns must be prepared to give the following information: ¥ The MODEL NUMBER OF THE PRODUCT (PFTL79192) ¥ The NAME OF THE PRODUCT (PROFORM¨ 785Pi treadmill) ¥ The SERIAL NUMBER OF THE PRODUCT (see the PART LIST on...

