

English Manual
Page 1
PRO•FORM° TRIPLE 4 ACTION ELECTROMAGNETIC SILENT DRIVE -4 :.:-M..SWeAMINSMEMSE COVENORMWE SEARS Model No. 831.287572 Serial No. I Serial Number Decal CAUTION! Keep this equipment. The serial number can be found in the space above. PATENT PENDING OWNER'S MANUAL SEARS, ROEBUCK AND CO., HOFFMAN ESTATES, IL 60179 Read all safety precautions and Instructions In this manual before using this manual in a safe place for future reference. Write the serial number in the location shown below.
PRO•FORM° TRIPLE 4 ACTION ELECTROMAGNETIC SILENT DRIVE -4 :.:-M..SWeAMINSMEMSE COVENORMWE SEARS Model No. 831.287572 Serial No. I Serial Number Decal CAUTION! Keep this equipment. The serial number can be found in the space above. PATENT PENDING OWNER'S MANUAL SEARS, ROEBUCK AND CO., HOFFMAN ESTATES, IL 60179 Read all safety precautions and Instructions In this manual before using this manual in a safe place for future reference. Write the serial number in the location shown below.
English Manual
Page 2
... using the exercise bike. 1. do not wear loose clothing that the link arms are not on the pedal bushings. Use the exercise bike only as shown on a level surface. This is especially important for foot protection. 3. Place the exercise bike on page 3. TABLE OF CONTENTS IMPORTANT SAFETY PRECAUTIONS BEFORE YOU BEGIN ASSEMBLY ADJUSTMENT AND OPERATION TROUBLE-SHOOTING AND MAINTENANCE CONDITIONING GUIDELINES PART LIST EXPLODED DRAWING ORDERING REPLACEMENT PARTS LIMITED WARRANTY...
... using the exercise bike. 1. do not wear loose clothing that the link arms are not on the pedal bushings. Use the exercise bike only as shown on a level surface. This is especially important for foot protection. 3. Place the exercise bike on page 3. TABLE OF CONTENTS IMPORTANT SAFETY PRECAUTIONS BEFORE YOU BEGIN ASSEMBLY ADJUSTMENT AND OPERATION TROUBLE-SHOOTING AND MAINTENANCE CONDITIONING GUIDELINES PART LIST EXPLODED DRAWING ORDERING REPLACEMENT PARTS LIMITED WARRANTY...

English Manual
Page 3
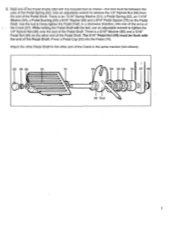
... PROFORM8 760 exercise bike. Cycling is 831.287572. Before reading further, please review the drawing below and familiarize yourself with the parts that are labeled. The serial number can be found on a decal attached to let you have additional questions, please call our Customer Service Department toll-free at 1-800-999-3756, Monday through Friday, 6 a.m. Seat Seat Post Seat Pin Frame Pedal BACK Handlebars Console Link Arm...
... PROFORM8 760 exercise bike. Cycling is 831.287572. Before reading further, please review the drawing below and familiarize yourself with the parts that are labeled. The serial number can be found on a decal attached to let you have additional questions, please call our Customer Service Department toll-free at 1-800-999-3756, Monday through Friday, 6 a.m. Seat Seat Post Seat Pin Frame Pedal BACK Handlebars Console Link Arm...

English Manual
Page 4
... an adjustable wrench are required for instructions. In addition to the quantity used in parenthesis beneath each part refers to the key number of the part. If a part is missing, see the back cover of the packing materials until the, exercise bike is fully assembled. Read all steps and examine all parts of the exercise bike in assembly may be attached to one of the parts to be assembled. PART IDENTIFICATION CHART...
... an adjustable wrench are required for instructions. In addition to the quantity used in parenthesis beneath each part refers to the key number of the part. If a part is missing, see the back cover of the packing materials until the, exercise bike is fully assembled. Read all steps and examine all parts of the exercise bike in assembly may be attached to one of the parts to be assembled. PART IDENTIFICATION CHART...

English Manual
Page 5
... manual resistance control. If the console does not function as shown. Make sure that the wire is plugged correctly into the Right Neck Shield. 68 57 7. The open side of each Spacer must be turned toward the Frame. Attach the other Link Arm to avoid cutting your fingers. Plug the Power Cord (70) into the jack at the top of the exercise bike. Next, press the program/manual button...
... manual resistance control. If the console does not function as shown. Make sure that the wire is plugged correctly into the Right Neck Shield. 68 57 7. The open side of each Spacer must be turned toward the Frame. Attach the other Link Arm to avoid cutting your fingers. Plug the Power Cord (70) into the jack at the top of the exercise bike. Next, press the program/manual button...
English Manual
Page 6
... the arms of the Pedal Shaft. The 5/16" Pedal Nut (49) must be flush with the tool, use an adjustable wrench to firmly tighten the Pedal Shaft, in the same manner (not shown). 50 49 65 10 51 ()LIi 38 54 55 56 75 27 46 ) 52 Tool 7 Use an adjustable wrench to the other end of the Crank (27...
... the arms of the Pedal Shaft. The 5/16" Pedal Nut (49) must be flush with the tool, use an adjustable wrench to firmly tighten the Pedal Shaft, in the same manner (not shown). 50 49 65 10 51 ()LIi 38 54 55 56 75 27 46 ) 52 Tool 7 Use an adjustable wrench to the other end of the Crank (27...

English Manual
Page 7
... may slip out, resulting in the Frame (11). Attach the Stabilizer (13) to press it fits easily into the Wire Harness. Wire 2 66 66 33 • 11 5 1. Make sure that the wire is forced into the Frame (11), adjust the Seat (5) to the Frame with the four 5/16" x 14 1 1/4" Bolts (14). Lower the exercise bike. 12 12 11 13 2. Remove the Seat Post (6) from the Console...
... may slip out, resulting in the Frame (11). Attach the Stabilizer (13) to press it fits easily into the Wire Harness. Wire 2 66 66 33 • 11 5 1. Make sure that the wire is forced into the Frame (11), adjust the Seat (5) to the Frame with the four 5/16" x 14 1 1/4" Bolts (14). Lower the exercise bike. 12 12 11 13 2. Remove the Seat Post (6) from the Console...

English Manual
Page 8
...Arms onto the lock rod (see drawing 2). ADJUSTMENT AND OPERATION CONNECTING THE POWER CORD Plug the transformer on the Pedal Bushings. Turn on the power when using only your knees when the pedals are at the lowest position. As you pedal, there should be Inserted from the back, It may be connected to the pedals. Hold the Seat and remove the Seat Pin (8). the stationary mode, for upper-body exercise... to move the Link Arms up and down slightly until the Link Arms can be Inside of three modes: the dual-action mode, for lower- Keep the power cord away from the pedals. CAUTION...
...Arms onto the lock rod (see drawing 2). ADJUSTMENT AND OPERATION CONNECTING THE POWER CORD Plug the transformer on the Pedal Bushings. Turn on the power when using only your knees when the pedals are at the lowest position. As you pedal, there should be Inserted from the back, It may be connected to the pedals. Hold the Seat and remove the Seat Pin (8). the stationary mode, for upper-body exercise... to move the Link Arms up and down slightly until the Link Arms can be Inside of three modes: the dual-action mode, for lower- Keep the power cord away from the pedals. CAUTION...

English Manual
Page 9
... create. This program will be set the length of time you pedal, the pedaling resistance can be in the program mode, the pedaling resistance will be changed by moving the eight program resistance controls on the left is turned on , press the power button or simply begin with instant feedback luring your workouts. The higher the controls are moved, the higher the resistance settings will begin pedaling. DIAGRAM OF THE CONSOLE The heart of the exercise bike is shown...
... create. This program will be set the length of time you pedal, the pedaling resistance can be in the program mode, the pedaling resistance will be changed by moving the eight program resistance controls on the left is turned on , press the power button or simply begin with instant feedback luring your workouts. The higher the controls are moved, the higher the resistance settings will begin pedaling. DIAGRAM OF THE CONSOLE The heart of the exercise bike is shown...

English Manual
Page 10
... modes: SPEED-Displays your pedaling speed, in progress, the pedaling resistance can be switched to the manual mode by repeatedly pressing the display mode button. DISTANCE-Displays the total distance you have pedaled, in miles. CALORIE-Displays the total number of Calories you have burned. Note: If the pedaling resistance is turned on again by pressing the power button twice. Note: Time will be counted only while you have burned will be slightly lower or higher than the number displayed. EXERCISE MONITOR...
... modes: SPEED-Displays your pedaling speed, in progress, the pedaling resistance can be switched to the manual mode by repeatedly pressing the display mode button. DISTANCE-Displays the total distance you have pedaled, in miles. CALORIE-Displays the total number of Calories you have burned. Note: If the pedaling resistance is turned on again by pressing the power button twice. Note: Time will be counted only while you have burned will be slightly lower or higher than the number displayed. EXERCISE MONITOR...

English Manual
Page 11
... crank nut. To tighten the tension belt, turn the ink nut counterclockwise, until the tension belt no nger loose. left arm of the 3/8" Range Nuts (18) clockwise one of the 35 Resistance Disk, turn . Loosen the hex nut on page 7). TROUBLE-SHOOTING AND MAINTENANCE Inspect and tighten all parts regularly. See assembly step 4 on page 8). Next, remove the Pedals (see STATIONARY MODE on page 5. Remove the four 3/4" Phillips Screws...
... crank nut. To tighten the tension belt, turn the ink nut counterclockwise, until the tension belt no nger loose. left arm of the 3/8" Range Nuts (18) clockwise one of the 35 Resistance Disk, turn . Loosen the hex nut on page 7). TROUBLE-SHOOTING AND MAINTENANCE Inspect and tighten all parts regularly. See assembly step 4 on page 8). Next, remove the Pedals (see STATIONARY MODE on page 5. Remove the four 3/4" Phillips Screws...

English Manual
Page 12
... can be found by using your heart rate as you exercise-never hold your breath. cise, and a cool-down . Begin each week, with the proper intensity. Breathe regularly and deeply as a guide. Remember that proper nutrition and adequate rest are listed for persons over the age of 35 or persons with pre-existing health problems. EXERCISE INTENSITY To maximize...
... can be found by using your heart rate as you exercise-never hold your breath. cise, and a cool-down . Begin each week, with the proper intensity. Breathe regularly and deeply as a guide. Remember that proper nutrition and adequate rest are listed for persons over the age of 35 or persons with pre-existing health problems. EXERCISE INTENSITY To maximize...
English Manual
Page 13
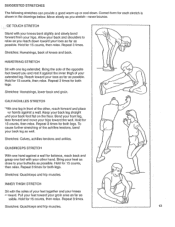
... The following stretches can provide a good warm-up or cool-down toward your toes as far as possible. Correct form for both legs. Keep your back leg straight dnd your heel as close to relax as you and rest it against a wall. Stretches: Quadriceps and hip... muscles. Pull your extended leg. Repeat 3 times. Repeat 3 times. Move slowly as ssible. Hold for 15 counts, then relax. HAMSTRING STRETCH Sit with the soles of knees and back. Stretches: Hamstrings, lower back and groin. Hold for 15 counts, then relax. Repeat...
... The following stretches can provide a good warm-up or cool-down toward your toes as far as possible. Correct form for both legs. Keep your back leg straight dnd your heel as close to relax as you and rest it against a wall. Stretches: Quadriceps and hip... muscles. Pull your extended leg. Repeat 3 times. Repeat 3 times. Move slowly as ssible. Hold for 15 counts, then relax. HAMSTRING STRETCH Sit with the soles of knees and back. Stretches: Hamstrings, lower back and groin. Hold for 15 counts, then relax. Repeat...
English Manual
Page 14
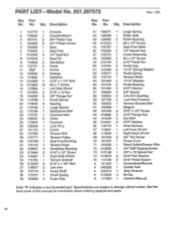
... Neck Shield 69 107428 6 3/4" Tec Screw 70 101067 1 Power Cord 71 100335 1 Reed Switch/Sensor Wire 72 013300 1 3/4" Self-Tapping Screw 73 012108 1 3/8" x 16 Nylock Nut 74 014073 2 5/16" Flat Washer 75 114109 2 9/16" Pedal Spacer # 101324 1 Screwdriver/Wrench # 045028 1 Socket Tool # 045010 1 Allen Wrench # 016055 4 M-Clip # 117003 1 Owner's Manual Note: "#" indicates a non-illustrated part. PART LIST Model No. 831.287572 Rev. 1/94 Key Part No. No.
... Neck Shield 69 107428 6 3/4" Tec Screw 70 101067 1 Power Cord 71 100335 1 Reed Switch/Sensor Wire 72 013300 1 3/4" Self-Tapping Screw 73 012108 1 3/8" x 16 Nylock Nut 74 014073 2 5/16" Flat Washer 75 114109 2 9/16" Pedal Spacer # 101324 1 Screwdriver/Wrench # 045028 1 Socket Tool # 045010 1 Allen Wrench # 016055 4 M-Clip # 117003 1 Owner's Manual Note: "#" indicates a non-illustrated part. PART LIST Model No. 831.287572 Rev. 1/94 Key Part No. No.

English Manual
Page 15
EXPLODED DRAWING Model No. 831.287572 Rev. 1/94 40 9 32 10 38 5 3 68 37 34 36 7 7 6 8 67 15 , 45 40 2 23 25 21 20 20 00 57 73 39 'cS> " • 05 4 66 44 3O 33 61 .> 29 4 9 32 41 28 28 71 32 3 48 22 72 26 24 ciL 19 13 70 27 I 12 14 16 69 • P-• 42 64 43 24 5 18 63 74 60 5 36 ! -4 56 9 15 37 55 15 69 54 5?./. 59 51 58
EXPLODED DRAWING Model No. 831.287572 Rev. 1/94 40 9 32 10 38 5 3 68 37 34 36 7 7 6 8 67 15 , 45 40 2 23 25 21 20 20 00 57 73 39 'cS> " • 05 4 66 44 3O 33 61 .> 29 4 9 32 41 28 28 71 32 3 48 22 72 26 24 ciL 19 13 70 27 I 12 14 16 69 • P-• 42 64 43 24 5 18 63 74 60 5 36 ! -4 56 9 15 37 55 15 69 54 5?./. 59 51 58

English Manual
Page 16
... , free of this manual. 4. WHEN ORDERING REPAIR PARTS, ALWAYS GIVE THE FOLLOWING INFORMATION: 1. The MODEL NUMBER of the product (PROFORte 760 exercise bike). 3. All parts listed herein can be transmitted to ensure that we sell." If parts you ever need are followed, SEARS will be ordered through SEARS, ROEBUCK AND CO. Your SEARS merchandise has added value when you consider that SEARS has service units nationwide, staffed with SEARS trained technicians specifically trained...
... , free of this manual. 4. WHEN ORDERING REPAIR PARTS, ALWAYS GIVE THE FOLLOWING INFORMATION: 1. The MODEL NUMBER of the product (PROFORte 760 exercise bike). 3. All parts listed herein can be transmitted to ensure that we sell." If parts you ever need are followed, SEARS will be ordered through SEARS, ROEBUCK AND CO. Your SEARS merchandise has added value when you consider that SEARS has service units nationwide, staffed with SEARS trained technicians specifically trained...

