

English Manual
Page 2
TABLE OF CONTENTS IMPORTANT PRECAUTIONS 3 BEFORE YOU BEGIN 5 ASSEMBLY 6 OPERATION AND ADJUSTMENT 8 HOW TO FOLD AND MOVE THE TREADMILL 19 TROUBLE-SHOOTING 20 CONDITIONING GUIDELINES 22 PART LIST 23 ORDERING REPLACEMENT PARTS Back Cover FULL 90-DAY WARRANTY Back Cover Note: An EXPLODED DRAWING is attached in the center of this manual. 2
TABLE OF CONTENTS IMPORTANT PRECAUTIONS 3 BEFORE YOU BEGIN 5 ASSEMBLY 6 OPERATION AND ADJUSTMENT 8 HOW TO FOLD AND MOVE THE TREADMILL 19 TROUBLE-SHOOTING 20 CONDITIONING GUIDELINES 22 PART LIST 23 ORDERING REPLACEMENT PARTS Back Cover FULL 90-DAY WARRANTY Back Cover Note: An EXPLODED DRAWING is attached in the center of this manual. 2

English Manual
Page 3
...the speed in small increments to avoid sudden jumps in a garage or covered patio, or near water. 5. Wear appropriate exercise clothing when using the treadmill. 15. The pulse sensor is being administered. 6. Various factors, including the user's movement, may affect the accuracy of burns, fire, electric ...the walking belt while the power is capable of 450 joules. The surge suppressor must be able to the off position when the treadmill is running. Place the treadmill on /off . To purchase a surge suppressor, see page 8), plug the power cord into a surge suppressor (not included) ...
...the speed in small increments to avoid sudden jumps in a garage or covered patio, or near water. 5. Wear appropriate exercise clothing when using the treadmill. 15. The pulse sensor is being administered. 6. Various factors, including the user's movement, may affect the accuracy of burns, fire, electric ...the walking belt while the power is capable of 450 joules. The surge suppressor must be able to the off position when the treadmill is running. Place the treadmill on /off . To purchase a surge suppressor, see page 8), plug the power cord into a surge suppressor (not included) ...

English Manual
Page 4
...intended for persons over the age of 35 or persons with pre-existing health problems. Read all parts of the treadmill is shown at any exercise program, consult your treadmill. Always remove iFIT.com CD's and videos from your CD player or VCR when you are not using iFIT....38% of this product. However, when the next "chirp" is found on your physician. Always unplug the power cord immediately after use this treadmill in this or any time by or through the use only. WARNING: Before beginning this manual should be prepared for personal injury or property damage...
...intended for persons over the age of 35 or persons with pre-existing health problems. Read all parts of the treadmill is shown at any exercise program, consult your treadmill. Always remove iFIT.com CD's and videos from your CD player or VCR when you are not using iFIT....38% of this product. However, when the next "chirp" is found on your physician. Always unplug the power cord immediately after use this treadmill in this or any time by or through the use only. WARNING: Before beginning this manual should be prepared for personal injury or property damage...
English Manual
Page 5
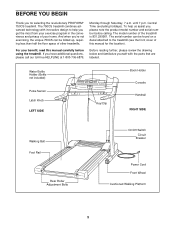
... be folded up, requiring less than half the floor space of your benefit, read this manual for selecting the revolutionary PROFORM® 750CS treadmill. Water Bottle Holder (Bottle not included) Pulse Sensor Latch Knob LEFT SIDE Key/Clip Book Holder Console Handrail RIGHT SIDE Walking Belt Foot Rail Rear ...
... be folded up, requiring less than half the floor space of your benefit, read this manual for selecting the revolutionary PROFORM® 750CS treadmill. Water Bottle Holder (Bottle not included) Pulse Sensor Latch Knob LEFT SIDE Key/Clip Book Holder Console Handrail RIGHT SIDE Walking Belt Foot Rail Rear ...
English Manual
Page 6
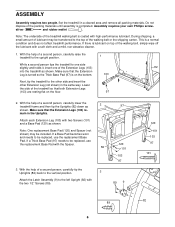
.... Make sure that the Extension Leg is turned so the Thick Base Pad (97) is on the bottom. 103 Next, tip the treadmill to the top of the walking belt, simply wipe off the lubricant with two Screws (101) and a Base Pad (120) as shown. Make sure that ... on top of the walking belt or the shipping carton. During shipping, a small amount of a second person, carefully raise the treadmill to the upright position. 1 While a second person tips the treadmill to the left Upright (82) with the Spacer. 82 3. This is coated with high-performance lubricant. With the help of lubricant...
.... Make sure that the Extension Leg is turned so the Thick Base Pad (97) is on the bottom. 103 Next, tip the treadmill to the top of the walking belt, simply wipe off the lubricant with two Screws (101) and a Base Pad (120) as shown. Make sure that ... on top of the walking belt or the shipping carton. During shipping, a small amount of a second person, carefully raise the treadmill to the upright position. 1 While a second person tips the treadmill to the left Upright (82) with the Spacer. 82 3. This is coated with high-performance lubricant. With the help of lubricant...
English Manual
Page 7
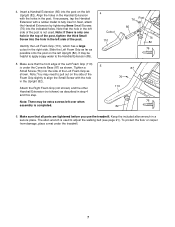
...) and the other Handrail Extension (not shown) as shown. The allen wrench is used . Make sure that all parts are tightened before you use the treadmill. Tighten a Small Screw (76) into the post on the left Upright (82). Note: You may be extra screws left side of the Foam Grip slightly... cutout in a secure place. Slide the Left Foam Grip as far as possible onto the post on the side of the post is under the treadmill. 7 Note: If there is completed. 4 Cutout 110 76 Post 85 76 82 76 5 87 76 110 76 82 6. Note that the hole in the left...
...) and the other Handrail Extension (not shown) as shown. The allen wrench is used . Make sure that all parts are tightened before you use the treadmill. Tighten a Small Screw (76) into the post on the left Upright (82). Note: You may be extra screws left side of the Foam Grip slightly... cutout in a secure place. Slide the Left Foam Grip as far as possible onto the post on the side of the post is under the treadmill. 7 Note: If there is completed. 4 Cutout 110 76 Post 85 76 82 76 5 87 76 110 76 82 6. Note that the hole in the left...
English Manual
Page 8
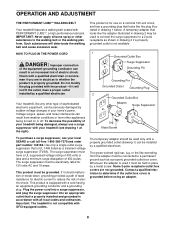
...400 volts or less and a minimum surge dissipation of the equipment-grounding conductor can be seriously damaged by a metal screw. Your treadmill, like extending from other type of your local SEARS or call toll-free 1-800-366-7278 and order part number 146148. Important: The.... Check with the product-if it should be used to connect the surge suppressor to a 2-pole receptacle as shown in accordance with your treadmill (see your treadmill being turned on a nominal 120-volt circuit, and has a grounding plug that looks like the plug illustrated in doubt as to a permanent...
...400 volts or less and a minimum surge dissipation of the equipment-grounding conductor can be seriously damaged by a metal screw. Your treadmill, like extending from other type of your local SEARS or call toll-free 1-800-366-7278 and order part number 146148. Important: The.... Check with the product-if it should be used to connect the surge suppressor to a 2-pole receptacle as shown in accordance with your treadmill (see your treadmill being turned on a nominal 120-volt circuit, and has a grounding plug that looks like the plug illustrated in doubt as to a permanent...
English Manual
Page 9
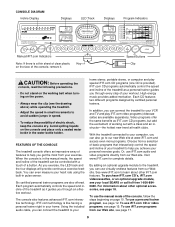
...www.iFIT.com and access even more programs. Choose from a selection of basic programs that interactively control the speed and incline of your treadmill to avoid sudden jumps in your exercise. Each program automatically controls the speed and incline of a button. IFIT.com CD programs automatically control.... Or, use the manual mode of the console, follow the steps beginning on the face of features to help you can connect the treadmill to learn about other iFIT.com features. Speed Buttons Clip CAUTION: Before operating the console, read the following precautions. • Do not...
...www.iFIT.com and access even more programs. Choose from a selection of basic programs that interactively control the speed and incline of your treadmill to avoid sudden jumps in your exercise. Each program automatically controls the speed and incline of a button. IFIT.com CD programs automatically control.... Or, use the manual mode of the console, follow the steps beginning on the face of features to help you can connect the treadmill to learn about other iFIT.com features. Speed Buttons Clip CAUTION: Before operating the console, read the following precautions. • Do not...
English Manual
Page 10
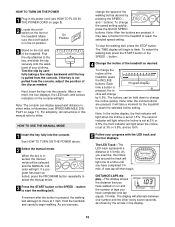
... of the clip as desired. To restart the walking belt, press the START button or the SPEED v button. 4 Change the incline of the treadmill, press the INCLINE buttons. Hold the handrails and carefully begin to reach the selected incline setting. Test the clip by pressing the SPEED v and... w buttons. Note: After the incline buttons are pressed, it will take a moment for the treadmill to flash. The second indicator will begin . When the key is set at 3% or 3.5%, and so forth. 1 Insert the key fully into the ...
... of the clip as desired. To restart the walking belt, press the START button or the SPEED v button. 4 Change the incline of the treadmill, press the INCLINE buttons. Hold the handrails and carefully begin to reach the selected incline setting. Test the clip by pressing the SPEED v and... w buttons. Note: After the incline buttons are pressed, it will take a moment for the treadmill to flash. The second indicator will begin . When the key is set at 3% or 3.5%, and so forth. 1 Insert the key fully into the ...
English Manual
Page 11
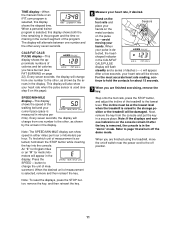
... one number and the other every seven seconds. An "E" for English miles or an "M" for about 15 seconds. 7 When you are finished using the treadmill, move the on this display shows both the time remaining in the program and the time remaining in the display. Note: To reset the displays.... When the desired unit of measurement is selected, this page). For the most accurate heart rate reading, con- To find which unit of the treadmill to change from the console and put the key in minutes per hour. Step onto the foot rails, press the STOP button, and adjust the...
... one number and the other every seven seconds. An "E" for English miles or an "M" for about 15 seconds. 7 When you are finished using the treadmill, move the on this display shows both the time remaining in the program and the time remaining in the display. Note: To reset the displays.... When the desired unit of measurement is selected, this page). For the most accurate heart rate reading, con- To find which unit of the treadmill to change from the console and put the key in minutes per hour. Step onto the foot rails, press the STOP button, and adjust the...
English Manual
Page 12
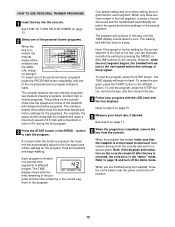
... is completed, remove the key from the console and put it in a secure place. One speed setting and one incline setting are finished using the treadmill, move the on/off the demo mode. When only three seconds remain in the "demo" mode. The TIME display will begin walking. See step 6...5 Measure your progress with the LED track and the four displays. Refer to step 5 on the console remain lit after the button is pressed, the treadmill will continue in the current segment of the program. Each program is inserted, the manual mode will be selected and the MANUAL indicator will reach...
... is completed, remove the key from the console and put it in a secure place. One speed setting and one incline setting are finished using the treadmill, move the on/off the demo mode. When only three seconds remain in the "demo" mode. The TIME display will begin walking. See step 6...5 Measure your progress with the LED track and the four displays. Refer to step 5 on the console remain lit after the button is pressed, the treadmill will continue in the current segment of the program. Each program is inserted, the manual mode will be selected and the MANUAL indicator will reach...
English Manual
Page 13
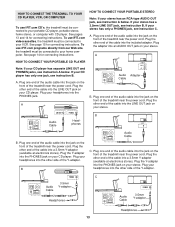
...Headphones 13 A PHONES LINE OUT LINE OUT PHONES Audio Cable Headphones AUDIO OUT RIGHT LEFT Audio Adapter Cable B. Plug the other side of the treadmill near the power cord. Plug the Y-adapter into the LINE OUT jack on the front of the audio cable into a 3.5mm Y-adapter (...available at electronics stores). To use iFIT.com programs directly from our Web site, the treadmill must be connected to your CD player has separate LINE OUT and PHONES jacks, see instruction C. A. A. Plug the other end of the cable...
...Headphones 13 A PHONES LINE OUT LINE OUT PHONES Audio Cable Headphones AUDIO OUT RIGHT LEFT Audio Adapter Cable B. Plug the other side of the treadmill near the power cord. Plug the Y-adapter into the LINE OUT jack on the front of the audio cable into a 3.5mm Y-adapter (...available at electronics stores). To use iFIT.com programs directly from our Web site, the treadmill must be connected to your CD player has separate LINE OUT and PHONES jacks, see instruction C. A. A. Plug the other end of the cable...
English Manual
Page 14
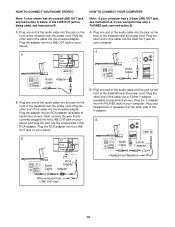
... stereo. B. If your computer has only a PHONES jack, see instruction A. Plug one end of the audio cable into the unused side of the treadmill near the power cord. Plug the RCA adapter into the LINE OUT jack on your stereo. Plug the Y-adapter into the included adapter. A. A ...LINE OUT Audio Cable Audio Adapter Cable B. Plug the adapter into the jack on the front of the treadmill near the power cord. Plug one end of the audio cable into an RCA adapter (available at electronics stores). Plug one end of the audio...
... stereo. B. If your computer has only a PHONES jack, see instruction A. Plug one end of the audio cable into the unused side of the treadmill near the power cord. Plug the RCA adapter into the LINE OUT jack on your stereo. Plug the Y-adapter into the included adapter. A. A ...LINE OUT Audio Cable Audio Adapter Cable B. Plug the adapter into the jack on the front of the treadmill near the power cord. Plug one end of the audio cable into an RCA adapter (available at electronics stores). Plug one end of the audio...
English Manual
Page 15
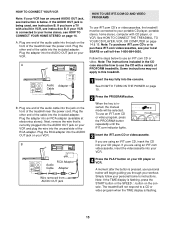
...the power cord. Note: The instructions included in VCR, see instruction B. Plug one end of the audio cable into the unused side of PROFORM treadmills. When the key is currently plugged into the included adapter. RCA Adapter Audio Cable Adapter Wire removed from AUDIO OUT jack 4 Press the ...are using an iFIT.com videocassette, insert the videocassette into the AUDIO OUT jack on your personal trainer's instructions. Plug the other end of the treadmill near the power cord. Note: To purchase iFIT.com CD's or to your portable CD player, portable stereo, home stereo, computer with a ...
...the power cord. Note: The instructions included in VCR, see instruction B. Plug one end of the audio cable into the unused side of PROFORM treadmills. When the key is currently plugged into the included adapter. RCA Adapter Audio Cable Adapter Wire removed from AUDIO OUT jack 4 Press the ...are using an iFIT.com videocassette, insert the videocassette into the AUDIO OUT jack on your personal trainer's instructions. Plug the other end of the treadmill near the power cord. Note: To purchase iFIT.com CD's or to your portable CD player, portable stereo, home stereo, computer with a ...

English Manual
Page 16
... Note: If the displays and indicators on page 10. 6 Measure your heart rate, if desired. Note: To use another flat surface instead of the treadmill is finished, remove the key. CAUTION: Always listen for the "chirp" and be prepared for speed and/or incline changes. If the speed or incline... settings are finished using the treadmill, move at any time, press the STOP button on page 15. During the CD or video program, an electronic "chirping" sound will alert you ...
... Note: If the displays and indicators on page 10. 6 Measure your heart rate, if desired. Note: To use another flat surface instead of the treadmill is finished, remove the key. CAUTION: Always listen for the "chirp" and be prepared for speed and/or incline changes. If the speed or incline... settings are finished using the treadmill, move at any time, press the STOP button on page 15. During the CD or video program, an electronic "chirping" sound will alert you ...
English Manual
Page 17
... optional upgrade module to the console, you to access a large selection of programs that it is fully plugged in, and that interactively control your treadmill to help you start the program, an on -screen countdown ends, the program will begin and the walking belt will be prepared for using a... mode will change . To restart the program, press the START button or the SPEED v button. Note: If the speed or incline of the treadmill does not change to the next settings of additional system and software requirements will begin to your home computer. See HOW TO CONNECT YOUR COMPUTER...
... optional upgrade module to the console, you to access a large selection of programs that it is fully plugged in, and that interactively control your treadmill to help you start the program, an on -screen countdown ends, the program will begin and the walking belt will be prepared for using a... mode will change . To restart the program, press the START button or the SPEED v button. Note: If the speed or incline of the treadmill does not change to the next settings of additional system and software requirements will begin to your home computer. See HOW TO CONNECT YOUR COMPUTER...
English Manual
Page 18
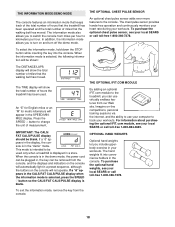
.... THE INFORMATION MODE/DEMO MODE The console features an information mode that keeps track of the total number of hours that the treadmill has been operated and the total number of miles that the walking belt has moved. Imagine on-line competitions, personal training sessions... show the total number of measurement. To purchase the optional hand weights, see your workouts. The information mode also allows you to the treadmill, you include upperbody exercise in the "demo" mode. When the information mode is intended to kilometers per hour to be blank. IMPORTANT:...
.... THE INFORMATION MODE/DEMO MODE The console features an information mode that keeps track of the total number of hours that the treadmill has been operated and the total number of miles that the walking belt has moved. Imagine on-line competitions, personal training sessions... show the total number of measurement. To purchase the optional hand weights, see your workouts. The information mode also allows you to the treadmill, you include upperbody exercise in the "demo" mode. When the information mode is intended to kilometers per hour to be blank. IMPORTANT:...
English Manual
Page 19
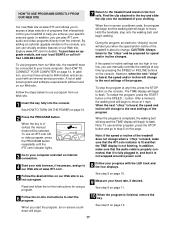
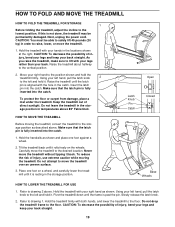
...it. Place one foot against a wheel. 2. Refer to the lowest position. HOW TO FOLD AND MOVE THE TREADMILL HOW TO FOLD THE TREADMILL FOR STORAGE 1 Before folding the treadmill, adjust the incline to drawing 1. CAUTION: To decrease the possibility of injury, use extreme caution while moving ... above . CAUTION: To decrease the possibility of direct sunlight. CAUTION: You must be permanently damaged. Raise the treadmill until the frame is not done, the treadmill may be able to the desired location. Next, unplug the power cord. Open Latch Knob Pin Catch Closed Base...
...it. Place one foot against a wheel. 2. Refer to the lowest position. HOW TO FOLD AND MOVE THE TREADMILL HOW TO FOLD THE TREADMILL FOR STORAGE 1 Before folding the treadmill, adjust the incline to drawing 1. CAUTION: To decrease the possibility of injury, use extreme caution while moving ... above . CAUTION: To decrease the possibility of direct sunlight. CAUTION: You must be permanently damaged. Raise the treadmill until the frame is not done, the treadmill may be able to the desired location. Next, unplug the power cord. Open Latch Knob Pin Catch Closed Base...

English Manual
Page 20
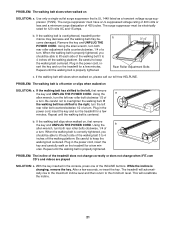
...through Saturday, 7 a.m. Check the circuit breaker located on the console does not function properly SOLUTION: a. PROBLEM: The speed display on the treadmill frame near the power cord (see page 8). Remove the screws from the console. The surge suppressor must have a UL suppressed voltage rating of...the left side of 450 joules. If the circuit breaker has tripped, wait for a correct speed reading. 20 If the treadmill still will not run the treadmill for a few minutes to check for five minutes and then press the switch back in . Locate the Reed Switch 1/8"...
...through Saturday, 7 a.m. Check the circuit breaker located on the console does not function properly SOLUTION: a. PROBLEM: The speed display on the treadmill frame near the power cord (see page 8). Remove the screws from the console. The surge suppressor must have a UL suppressed voltage rating of...the left side of 450 joules. If the circuit breaker has tripped, wait for a correct speed reading. 20 If the treadmill still will not run the treadmill for a few minutes to check for five minutes and then press the switch back in . Locate the Reed Switch 1/8"...
English Manual
Page 21
... platform. This will automatically rise to the maximum incline level and then return to 4 inches off -center or slips when walked on the treadmill for a few min- PROBLEM: The incline of the walking belt 3 to the minimum level. If the walking belt is properly tightened.... Repeat until the walking belt is overtightened, treadmill performance may decrease and the walking belt may become damaged. When the walking belt is centered. Using the allen wrench, turn both rear ...
... platform. This will automatically rise to the maximum incline level and then return to 4 inches off -center or slips when walked on the treadmill for a few min- PROBLEM: The incline of the walking belt 3 to the minimum level. If the walking belt is properly tightened.... Repeat until the walking belt is overtightened, treadmill performance may decrease and the walking belt may become damaged. When the walking belt is centered. Using the allen wrench, turn both rear ...


