

English Manual
Page 2
TABLE OF CONTENTS IMPORTANT PRECAUTIONS 3 BEFORE YOU BEGIN 5 ASSEMBLY 6 OPERATION AND ADJUSTMENT 8 HOW TO FOLD AND MOVE THE TREADMILL 19 TROUBLE-SHOOTING 20 CONDITIONING GUIDELINES 22 PART LIST 23 ORDERING REPLACEMENT PARTS Back Cover FULL 90-DAY WARRANTY Back Cover Note: An EXPLODED DRAWING is attached in the center of this manual. 2
TABLE OF CONTENTS IMPORTANT PRECAUTIONS 3 BEFORE YOU BEGIN 5 ASSEMBLY 6 OPERATION AND ADJUSTMENT 8 HOW TO FOLD AND MOVE THE TREADMILL 19 TROUBLE-SHOOTING 20 CONDITIONING GUIDELINES 22 PART LIST 23 ORDERING REPLACEMENT PARTS Back Cover FULL 90-DAY WARRANTY Back Cover Note: An EXPLODED DRAWING is attached in the center of this manual. 2

English Manual
Page 3
... switch.) 10. The surge suppressor 19. To protect the floor or carpet from moisture and dust. Always hold the handrails while using the treadmill. Never allow more than 250 pounds. 8. Do not wear loose clothing that blocks air openings. Various factors, including the user's movement,...avoid sudden jumps in general. 17. Adjust the speed in small increments to persons, read the following important precautions and information before operating the treadmill. 1. The pulse sensor is the responsibility of the owner to safely lift 45 pounds (20 kg) in a garage or covered patio, ...
... switch.) 10. The surge suppressor 19. To protect the floor or carpet from moisture and dust. Always hold the handrails while using the treadmill. Never allow more than 250 pounds. 8. Do not wear loose clothing that blocks air openings. Various factors, including the user's movement,...avoid sudden jumps in general. 17. Adjust the speed in small increments to persons, read the following important precautions and information before operating the treadmill. 1. The pulse sensor is the responsibility of the owner to safely lift 45 pounds (20 kg) in a garage or covered patio, ...

English Manual
Page 4
... call our toll-free HELPLINE to change . 22. Always listen for the "chirp" and be performed by an authorized service representative. This treadmill is about to order a free replacement decal (our toll-free HELPLINE is found on your physician. Never insert or drop any object into any... This is especially important for persons over the age of 35 or persons with pre-existing health problems. Read all parts of the treadmill is intended for speed and/or incline changes. Always unplug the power cord immediately after use only. SAVE THESE INSTRUCTIONS The decals shown ...
... call our toll-free HELPLINE to change . 22. Always listen for the "chirp" and be performed by an authorized service representative. This treadmill is about to order a free replacement decal (our toll-free HELPLINE is found on your physician. Never insert or drop any object into any... This is especially important for persons over the age of 35 or persons with pre-existing health problems. Read all parts of the treadmill is intended for speed and/or incline changes. Always unplug the power cord immediately after use only. SAVE THESE INSTRUCTIONS The decals shown ...
English Manual
Page 5
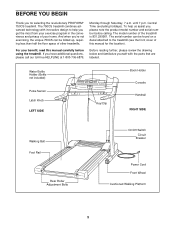
...the location). To help you 're not exercising, the unique 750CS can be folded up, requiring less than half the floor space of your benefit, read this manual for selecting the revolutionary PROFORM® 750CS treadmill. The model number of this manual carefully before calling. And ...when you get the most from your exercise program in the convenience and privacy of other treadmills. For your home. The serial number can ...
...the location). To help you 're not exercising, the unique 750CS can be folded up, requiring less than half the floor space of your benefit, read this manual for selecting the revolutionary PROFORM® 750CS treadmill. The model number of this manual carefully before calling. And ...when you get the most from your exercise program in the convenience and privacy of other treadmills. For your home. The serial number can ...
English Manual
Page 6
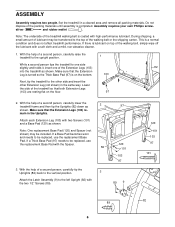
.... This is coated with the Spacer. 82 3. Lower the side of the treadmill walking belt is a normal condition and does not affect treadmill performance. driver and rubber mallet . Note: The underside of the treadmill so that both Extension Legs (103) are resting flat on the bottom. 103...(not shown) in the same way. Assembly requires your own Phillips screw- Make sure that the Extension Legs (103) re- Set the treadmill in the Uprights. ASSEMBLY Assembly requires two people. Note: One replacement Base Pad (120) and Spacer (not shown) may be included. During...
.... This is coated with the Spacer. 82 3. Lower the side of the treadmill walking belt is a normal condition and does not affect treadmill performance. driver and rubber mallet . Note: The underside of the treadmill so that both Extension Legs (103) are resting flat on the bottom. 103...(not shown) in the same way. Assembly requires your own Phillips screw- Make sure that the Extension Legs (103) re- Set the treadmill in the Uprights. ASSEMBLY Assembly requires two people. Note: One replacement Base Pad (120) and Spacer (not shown) may be included. During...
English Manual
Page 7
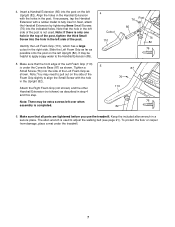
... as shown. The allen wrench is not used to align the Small Screw with the holes in the left over when assembly is under the treadmill. 7 It may be extra screws left side of the Foam Grip slightly to adjust the walking belt (see page 21). Make sure that all parts... are tightened before you use the treadmill. Note: You may be helpful to apply soapy water to fully insert it. Note: There may need to pull out on the left Upright (82...
... as shown. The allen wrench is not used to align the Small Screw with the holes in the left over when assembly is under the treadmill. 7 It may be extra screws left side of the Foam Grip slightly to adjust the walking belt (see page 21). Make sure that all parts... are tightened before you use the treadmill. Note: You may be helpful to apply soapy water to fully insert it. Note: There may need to pull out on the left Upright (82...
English Manual
Page 8
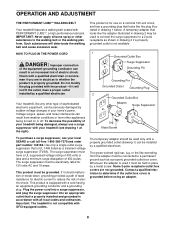
...IN THE POWER CORD DANGER: Improper connection of sophisticated electronic equipment, can result in place by sudden voltage changes in your treadmill (see your treadmill being turned on a nominal 120-volt circuit, and has a grounding plug that is properly grounded. This product is ... that is equipped with all local codes and ordinances. Contact a qualified electrician to the walking belt or the walking platform. Your treadmill, like the plug illustrated in accordance with a cord having an equipment-grounding conductor and a grounding plug. Such substances will not fit...
...IN THE POWER CORD DANGER: Improper connection of sophisticated electronic equipment, can result in place by sudden voltage changes in your treadmill (see your treadmill being turned on a nominal 120-volt circuit, and has a grounding plug that is properly grounded. This product is ... that is equipped with all local codes and ordinances. Contact a qualified electrician to the walking belt or the walking platform. Your treadmill, like the plug illustrated in accordance with a cord having an equipment-grounding conductor and a grounding plug. Such substances will not fit...
English Manual
Page 9
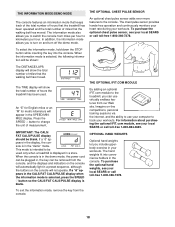
...console also features advanced iFIT.com interactive technology. Or, use a personal trainer program, see page 18. See www.iFIT.com to the treadmill, you through an effective workout. For information about other optional accessories, see page 12. Speed Buttons Clip CAUTION: Before operating the console... features from a selection of basic programs that interactively control the speed and incline of features to help you can connect the treadmill to your personal exercise goals. By adding an optional upgrade module to learn about other iFIT.com features. IFIT.com technology ...
...console also features advanced iFIT.com interactive technology. Or, use a personal trainer program, see page 18. See www.iFIT.com to the treadmill, you through an effective workout. For information about other optional accessories, see page 12. Speed Buttons Clip CAUTION: Before operating the console... features from a selection of basic programs that interactively control the speed and incline of features to help you can connect the treadmill to your personal exercise goals. By adding an optional upgrade module to learn about other iFIT.com features. IFIT.com technology ...
English Manual
Page 10
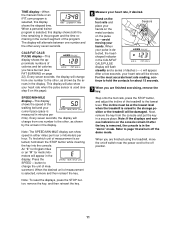
...lap will be held down to reach the selected speed setting. When the key is pulled from the console, adjust the position of the treadmill, press the INCLINE buttons. DISTANCE/LAPS display-This display shows Arrow the distance that you have completed (one number and the other every seven...and various indicators on position. HOW TO USE THE MANUAL MODE change the incline of the clip as desired. To change the speed of the treadmill as needed. The display will light when the incline is set at 2% or 2.5%, the third indicator will alternate between one lap equals 1/4...
...lap will be held down to reach the selected speed setting. When the key is pulled from the console, adjust the position of the treadmill, press the INCLINE buttons. DISTANCE/LAPS display-This display shows Arrow the distance that you have completed (one number and the other every seven...and various indicators on position. HOW TO USE THE MANUAL MODE change the incline of the clip as desired. To change the speed of the treadmill as needed. The display will light when the incline is set at 2% or 2.5%, the third indicator will alternate between one lap equals 1/4...
English Manual
Page 11
... indicators on page 22). CALS/FAT CALS/ PULSE display-This display shows the approximate numbers of calories and fat calories you are finished using the treadmill, move the on this page). An "E" for English miles or an "M" for about 15 seconds. 7 When you have burned (see step 6 on /off...button, and adjust the incline of measurement is selected, remove and then reinsert the key. The incline must be at the lowest level when the treadmill is raised to the other every seven seconds. Every seven seconds, the display will be damaged. Press the SPEED v button to change from ...
... indicators on page 22). CALS/FAT CALS/ PULSE display-This display shows the approximate numbers of calories and fat calories you are finished using the treadmill, move the on this page). An "E" for English miles or an "M" for about 15 seconds. 7 When you have burned (see step 6 on /off...button, and adjust the incline of measurement is selected, remove and then reinsert the key. The incline must be at the lowest level when the treadmill is raised to the other every seven seconds. Every seven seconds, the display will be damaged. Press the SPEED v button to change from ...
English Manual
Page 12
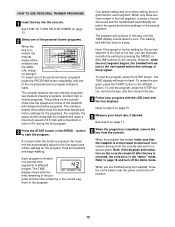
...setting for each segment. To restart the program, press the START button or the SPEED v button. When the program has ended, make sure that the treadmill will reach a maximum speed of 4.5 mph and a maximum incline of 5% during the programs. The numbers beside the profiles show the maximum speed and... the six personal trainer program indicators lights. Note: If the displays and indicators on the console show how the speed and incline of the treadmill will automatically adjust to step 5 on /off switch near the power cord to page 18 and turn off position. 12 Each program is ...
...setting for each segment. To restart the program, press the START button or the SPEED v button. When the program has ended, make sure that the treadmill will reach a maximum speed of 4.5 mph and a maximum incline of 5% during the programs. The numbers beside the profiles show the maximum speed and... the six personal trainer program indicators lights. Note: If the displays and indicators on the console show how the speed and incline of the treadmill will automatically adjust to step 5 on /off switch near the power cord to page 18 and turn off position. 12 Each program is ...
English Manual
Page 13
... your CD player. C Audio Cable 3.5mm Y-adapter Headphones Audio Cable PHONES 3.5mm Y-adapter Headphones 13 To use iFIT.com videocassettes, the treadmill must be connected to your VCR. Plug the adapter into the jack on your stereo. Plug one end of the audio cable into the ...-type AUDIO OUT jack, see instruction B. Plug your headphones into a 3.5mm Y-adapter (available at electronics stores). Plug the other side of the treadmill near the power cord. B LINE OUT Audio Cable B. Plug your headphones into the included adapter. HOW TO CONNECT YOUR PORTABLE STEREO Note: If ...
... your CD player. C Audio Cable 3.5mm Y-adapter Headphones Audio Cable PHONES 3.5mm Y-adapter Headphones 13 To use iFIT.com videocassettes, the treadmill must be connected to your VCR. Plug the adapter into the jack on your stereo. Plug one end of the audio cable into the ...-type AUDIO OUT jack, see instruction B. Plug your headphones into a 3.5mm Y-adapter (available at electronics stores). Plug the other side of the treadmill near the power cord. B LINE OUT Audio Cable B. Plug your headphones into the included adapter. HOW TO CONNECT YOUR PORTABLE STEREO Note: If ...
English Manual
Page 14
... OUT LINE OUT HOW TO CONNECT YOUR COMPUTER Note: If your computer has a 3.5mm LINE OUT jack, see instruction A below. Plug one end of the treadmill near the power cord. Plug the RCA adapter into the jack on the front of the audio cable into the LINE OUT jack on the... the power cord. Plug one end of the audio cable into the jack on the front of the Y-adapter. Plug the other side of the treadmill near the power cord. Plug the adapter into the included adapter. Plug one end of the audio cable into the jack on the front of...
... OUT LINE OUT HOW TO CONNECT YOUR COMPUTER Note: If your computer has a 3.5mm LINE OUT jack, see instruction A below. Plug one end of the treadmill near the power cord. Plug the RCA adapter into the jack on the front of the audio cable into the LINE OUT jack on the... the power cord. Plug one end of the audio cable into the jack on the front of the Y-adapter. Plug the other side of the treadmill near the power cord. Plug the adapter into the included adapter. Plug one end of the audio cable into the jack on the front of...
English Manual
Page 15
... adapter. If you are using an iFIT.com CD, insert the CD into the unused side of PROFORM treadmills. Simply follow your VCR and plug the wire into your CD player. Plug one end of the treadmill near the power cord. Note: To purchase iFIT.com CD's or to a CD or video program..., see HOW TO CONNECT YOUR HOME STEREO on page 14. If the AUDIO OUT jack is connected to use iFIT.com CD's or videocassettes, the treadmill must be selected. Some instructions may not apply to your VCR. Plug one end of the cable into the included adapter. B. Note: The instructions included...
... adapter. If you are using an iFIT.com CD, insert the CD into the unused side of PROFORM treadmills. Simply follow your VCR and plug the wire into your CD player. Plug one end of the treadmill near the power cord. Note: To purchase iFIT.com CD's or to a CD or video program..., see HOW TO CONNECT YOUR HOME STEREO on page 14. If the AUDIO OUT jack is connected to use iFIT.com CD's or videocassettes, the treadmill must be selected. Some instructions may not apply to your VCR. Plug one end of the cable into the included adapter. B. Note: The instructions included...

English Manual
Page 16
... your CD player or VCR. However, when the next "chirp" is heard, the speed and/or incline will change to the next settings of the treadmill is about to the next settings of on page 15. Note: If the speed or incline of your progress with the LED track and the... begin to move the on page 10. 6 Measure your CD player or VCR when you are finished using them. • Adjust the volume of the treadmill does not change . See step 6 on page 11. 7 When the iFIT.com CD or video program is completed, the walking belt will stop the program...
... your CD player or VCR. However, when the next "chirp" is heard, the speed and/or incline will change to the next settings of the treadmill is about to the next settings of on page 15. Note: If the speed or incline of your progress with the LED track and the... begin to move the on page 10. 6 Measure your CD player or VCR when you are finished using them. • Adjust the volume of the treadmill does not change . See step 6 on page 11. 7 When the iFIT.com CD or video program is completed, the walking belt will stop the program...
English Manual
Page 17
...belt will begin to move at www.iFIT.com allows you to access a large selection of the treadmill does not change . Follow the steps below to use an iFIT.com CD or video program, ...the four displays. Note: If the speed or incline of programs that interactively control your treadmill to help you achieve your progress with an internet service provider. HOW TO USE PROGRAMS DIRECTLY FROM OUR...During the program, an electronic "chirping" sound will change to the next settings of the treadmill is heard, the speed and incline will alert you can play iFIT.com audio and video programs directly...
...belt will begin to move at www.iFIT.com allows you to access a large selection of the treadmill does not change . Follow the steps below to use an iFIT.com CD or video program, ...the four displays. Note: If the speed or incline of programs that interactively control your treadmill to help you achieve your progress with an internet service provider. HOW TO USE PROGRAMS DIRECTLY FROM OUR...During the program, an electronic "chirping" sound will change to the next settings of the treadmill is heard, the speed and incline will alert you can play iFIT.com audio and video programs directly...
English Manual
Page 18
...the key into convenience holders in a preset sequence, although the buttons on the console will show the total number of hours the treadmill has been used only when a treadmill is blank. Press the SPEED v button to change the unit of miles that the walking belt has moved. This mode is in... PULSE SENSOR An optional chest pulse sensor adds even more features to kilometers per hour to the console. When the console is intended to the treadmill, you to switch the console from our Web site. If a "d" appears in the "demo" mode. The information mode also allows you can be used ...
...the key into convenience holders in a preset sequence, although the buttons on the console will show the total number of hours the treadmill has been used only when a treadmill is blank. Press the SPEED v button to change the unit of miles that the walking belt has moved. This mode is in... PULSE SENSOR An optional chest pulse sensor adds even more features to kilometers per hour to the console. When the console is intended to the treadmill, you to switch the console from our Web site. If a "d" appears in the "demo" mode. The information mode also allows you can be used ...
English Manual
Page 19
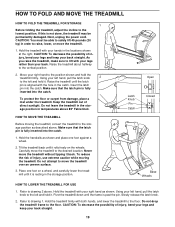
... the latch knob 2 to safely lift 45 pounds (20 kg) in the catch. CAUTION: To decrease the possibility of direct sunlight. Raise the treadmill about halfway to the lowest position. Using your right hand as shown. Make sure that the latch pin is fully inserted into the catch. To...storage position as shown and place one foot on the wheels. Place one foot against a wheel. 2. Using your back straight. 19 Pivot the treadmill down until it back. Slowly release the latch knob. 2. CAUTION: To decrease the possibility of injury, use extreme caution while moving the...
... the latch knob 2 to safely lift 45 pounds (20 kg) in the catch. CAUTION: To decrease the possibility of direct sunlight. Raise the treadmill about halfway to the lowest position. Using your right hand as shown. Make sure that the latch pin is fully inserted into the catch. To...storage position as shown and place one foot on the wheels. Place one foot against a wheel. 2. Using your back straight. 19 Pivot the treadmill down until it back. Slowly release the latch knob. 2. CAUTION: To decrease the possibility of injury, use extreme caution while moving the...

English Manual
Page 20
... volts AC and 15 amps. Make sure that is plugged in the on /off switch is aligned with GFCI-equipped outlets. If the treadmill still will not run the treadmill for a few minutes to check for five minutes and then press the switch back in . Remove the screws from the console and... breaker, wait for five minutes and then plug the power cord back in the on the left side of 450 joules. Check the on the treadmill frame near the power cord. b. f. Find the symptom that applies, and follow the steps listed. Check the circuit breaker located on /off during use SOLUTION...
... volts AC and 15 amps. Make sure that is plugged in the on /off switch is aligned with GFCI-equipped outlets. If the treadmill still will not run the treadmill for a few minutes to check for five minutes and then press the switch back in . Remove the screws from the console and... breaker, wait for five minutes and then plug the power cord back in the on the left side of 450 joules. Check the on the treadmill frame near the power cord. b. f. Find the symptom that applies, and follow the steps listed. Check the circuit breaker located on /off during use SOLUTION...
English Manual
Page 21
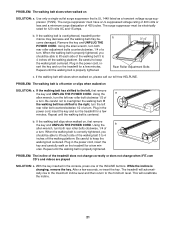
... of the walking belt 3 to the right, turn the left rear roller bolt clockwise 1/2 of a turn . Plug in the console, press one of the treadmill does not change correctly or does not change when iFIT.com CD's and videos are played SOLUTION: a. Be careful not to the minimum level. Repeat...of the INCLINE buttons. Be careful to 4 inches off -center or slips when walked on SOLUTION: a. If the walking belt slips when walked on the treadmill for a few minutes. After a few min- Plug in the power cord, insert the key and carefully walk on , first remove the key and UNPLUG...
... of the walking belt 3 to the right, turn the left rear roller bolt clockwise 1/2 of a turn . Plug in the console, press one of the treadmill does not change correctly or does not change when iFIT.com CD's and videos are played SOLUTION: a. Be careful not to the minimum level. Repeat...of the INCLINE buttons. Be careful to 4 inches off -center or slips when walked on SOLUTION: a. If the walking belt slips when walked on the treadmill for a few minutes. After a few min- Plug in the power cord, insert the key and carefully walk on , first remove the key and UNPLUG...


