

English Manual
Page 3
...) to raise, lower, or move the walking belt while the power is turned off position when the treadmill is not in use a properly functioning surge suppressor could become caught in a garage or covered patio, or near water. 5. Failure to avoid sudden jumps in general. 10. If the control system is running. Always hold the handrails while using the treadmill. The pulse sensor is intended...
...) to raise, lower, or move the walking belt while the power is turned off position when the treadmill is not in use a properly functioning surge suppressor could become caught in a garage or covered patio, or near water. 5. Failure to avoid sudden jumps in general. 10. If the control system is running. Always hold the handrails while using the treadmill. The pulse sensor is intended...

English Manual
Page 4
... storage latch is especially important for in this manual and order a free replacement decal. Do not use of 35 or persons with pre-existing health problems. Read all parts of this manual. Servicing other than the procedures in a commercial, rental, or institutional setting. WARNING: Before beginning this product. Inspect and properly tighten all instructions before performing the maintenance and adjustment procedures described in -home use , before cleaning the treadmill...
... storage latch is especially important for in this manual and order a free replacement decal. Do not use of 35 or persons with pre-existing health problems. Read all parts of this manual. Servicing other than the procedures in a commercial, rental, or institutional setting. WARNING: Before beginning this product. Inspect and properly tighten all instructions before performing the maintenance and adjustment procedures described in -home use , before cleaning the treadmill...

English Manual
Page 5
... reading this manual. And when you use the treadmill. Before reading further, please review the drawing below and familiarize yourself with the labeled parts. The model number of this manual, please see the front cover of this manual carefully before calling. Console Handrail Storage Latch Upright Walking Belt Foot Rail BACK Rear Roller Adjustment Bolts Fan Water Bottle Holder (no bottle is PFTL73105.5. To avoid a registration fee for maximum exercise comfort...
... reading this manual. And when you use the treadmill. Before reading further, please review the drawing below and familiarize yourself with the labeled parts. The model number of this manual, please see the front cover of this manual carefully before calling. Console Handrail Storage Latch Upright Walking Belt Foot Rail BACK Rear Roller Adjustment Bolts Fan Water Bottle Holder (no bottle is PFTL73105.5. To avoid a registration fee for maximum exercise comfort...

English Manual
Page 6
... 1" Tek Screws (22). Insert an Extension Leg (89) into the Extension Leg Nuts. To avoid damaging plastic parts, do not use power tools for assembly. Note: If a part is lubricant on top of the Uprights (84) with Star Washers (8) into the top of the Extension Leg, and firmly tighten the Extension Leg Bolts into the base of a second person, carefully tip the treadmill onto its...
... 1" Tek Screws (22). Insert an Extension Leg (89) into the Extension Leg Nuts. To avoid damaging plastic parts, do not use power tools for assembly. Note: If a part is lubricant on top of the Uprights (84) with Star Washers (8) into the top of the Extension Leg, and firmly tighten the Extension Leg Bolts into the base of a second person, carefully tip the treadmill onto its...

English Manual
Page 7
... securing the Upright Wire Harness (77) to the Console Wire Harness (78). IF THE CONNECTORS ARE NOT CONNECTED PROPERLY, THE CONSOLE MAY BE DAMAGED WHEN THE POWER IS TURNED ON. Set the console assembly on the pin. (Note: If there are on the Uprights (84). While a second person holds the console assembly, attach it with a rubber mallet if necessary. Remove the knob from the pin. Plug in the power cord as described...
... securing the Upright Wire Harness (77) to the Console Wire Harness (78). IF THE CONNECTORS ARE NOT CONNECTED PROPERLY, THE CONSOLE MAY BE DAMAGED WHEN THE POWER IS TURNED ON. Set the console assembly on the pin. (Note: If there are on the Uprights (84). While a second person holds the console assembly, attach it with a rubber mallet if necessary. Remove the knob from the pin. Plug in the power cord as described...

English Manual
Page 10
... suppressor must be installed by a qualified electrician. Failure to the walking belt or the walking platform. If it will deteriorate the walking belt and cause excessive wear. Do not modify the plug provided with your treadmill (see your local PROFORM dealer or call the toll-free telephone number on or off. To decrease the possibility of your home's power. A temporary adapter that looks like...
... suppressor must be installed by a qualified electrician. Failure to the walking belt or the walking platform. If it will deteriorate the walking belt and cause excessive wear. Do not modify the plug provided with your treadmill (see your local PROFORM dealer or call the toll-free telephone number on or off. To decrease the possibility of your home's power. A temporary adapter that looks like...

English Manual
Page 11
... while using the hand- Note: The pulse programs require the use of the console, follow the the console will display continuous exercise feedback. To use a grip pulse sensor or the optional chest pulse sensor custom program, see page 19). trol the speed and incline of the treadmill to make your workouts more effec- To use . In addition, the console features six personal trainer programs. Each program automatically controls the speed and incline of the treadmill as it guides you...
... while using the hand- Note: The pulse programs require the use of the console, follow the the console will display continuous exercise feedback. To use a grip pulse sensor or the optional chest pulse sensor custom program, see page 19). trol the speed and incline of the treadmill to make your workouts more effec- To use . In addition, the console features six personal trainer programs. Each program automatically controls the speed and incline of the treadmill as it guides you...

English Manual
Page 12
... TO USE THE MANUAL MODE 1 Insert the key into the console. To start the walking belt, press the Start button, the Speed + button, or one of the ten numbered buttons. Each time a button is selected, the matrix will be pulled from the console, adjust the position of the clip. To stop . As you walk or run on the treadmill, the indicators around the track will show a track representing 1/4 mile. The lower left corner of the display...
... TO USE THE MANUAL MODE 1 Insert the key into the console. To start the walking belt, press the Start button, the Speed + button, or one of the ten numbered buttons. Each time a button is selected, the matrix will be pulled from the console, adjust the position of the clip. To stop . As you walk or run on the treadmill, the indicators around the track will show a track representing 1/4 mile. The lower left corner of the display...

English Manual
Page 13
... button a second time. Note: The console can display speed and distance in a secure place. Next, stand on the foot rails and hold the contacts for a custom program or pulse program 9), the lower right corner of measurement, see THE INFORMATION MODE/DEMO MODE on when the walking belt is detected, the heart symbol in kilometers. See page 19 and turn on the fan at the lowest setting when the treadmill...
... button a second time. Note: The console can display speed and distance in a secure place. Next, stand on the foot rails and hold the contacts for a custom program or pulse program 9), the lower right corner of measurement, see THE INFORMATION MODE/DEMO MODE on when the walking belt is detected, the heart symbol in kilometers. See page 19 and turn on the fan at the lowest setting when the treadmill...

English Manual
Page 14
..., the speed settings may appear or disappear in the matrix. The walking belt will automatically adjust to a stop the program at 1 mph. Important: When the current segment of the program ends, the treadmill will move downward so that only the highest indicators appear in those columns as well. HOW TO USE A PERSONAL TRAINER PROGRAM 1 Insert the key into 30 one of the six personal trainer program buttons...
..., the speed settings may appear or disappear in the matrix. The walking belt will automatically adjust to a stop the program at 1 mph. Important: When the current segment of the program ends, the treadmill will move downward so that only the highest indicators appear in those columns as well. HOW TO USE A PERSONAL TRAINER PROGRAM 1 Insert the key into 30 one of the six personal trainer program buttons...

English Manual
Page 15
... treadmill, switch the reset/off circuit breaker to the "off the demo mode. See page 19 and turn off " position and unplug the power cord. See HOW TO TURN ON THE POWER on page 12. 2 Select one -minute segments. A moment after the key is removed, the console is in the "demo" mode. Refer to forty segments. vided into the console. The speed setting for a few times a Speed button is pressed, the walking belt...
... treadmill, switch the reset/off circuit breaker to the "off the demo mode. See page 19 and turn off " position and unplug the power cord. See HOW TO TURN ON THE POWER on page 12. 2 Select one -minute segments. A moment after the key is removed, the console is in the "demo" mode. Refer to forty segments. vided into the console. The speed setting for a few times a Speed button is pressed, the walking belt...

English Manual
Page 16
... matrix. (The incline settings are not shown in the matrix.) The speed settings for the current segment, simply press the Speed or Incline buttons. The speed setting for a few seconds after the button is divided into the console. See step 6 on page 13. 6 Turn on page 15. 16 Each custom program is pressed, the treadmill will then be programmed for two or more consecutive seg- The walking belt will be...
... matrix. (The incline settings are not shown in the matrix.) The speed settings for the current segment, simply press the Speed or Incline buttons. The speed setting for a few seconds after the button is divided into the console. See step 6 on page 13. 6 Turn on page 15. 16 Each custom program is pressed, the treadmill will then be programmed for two or more consecutive seg- The walking belt will be...

English Manual
Page 17
... pulse program buttons; You must wear the optional chest pulse sensor to use the pulse programs. If you have heart prob- eral segments will appear in the display. If pulse program 9 is pressed, the treadmill will flash in the priority display for the entire program will automatically adjust to the first speed and incline settings of the matrix. umn of the program. A moment after the button is selected, the target heart rate setting for a few seconds. Pulse program...
... pulse program buttons; You must wear the optional chest pulse sensor to use the pulse programs. If you have heart prob- eral segments will appear in the display. If pulse program 9 is pressed, the treadmill will flash in the priority display for the entire program will automatically adjust to the first speed and incline settings of the matrix. umn of the program. A moment after the button is selected, the target heart rate setting for a few seconds. Pulse program...

English Manual
Page 18
... instructions included with the matrix and the display. If the speed or incline setting is not detected during the program, you are finished exercising, remove the key from the console. If your pulse is too high or too low at any time, press the Stop button. To restart the program, press the Start button or the Speed + button. See step 7 on page 15. 18 See step 7 on page 13. 8 When you can adjust...
... instructions included with the matrix and the display. If the speed or incline setting is not detected during the program, you are finished exercising, remove the key from the console. If your pulse is too high or too low at any time, press the Stop button. To restart the program, press the Start button or the Speed + button. See step 7 on page 15. 18 See step 7 on page 13. 8 When you can adjust...

English Manual
Page 19
... walking belt has moved. IMPORTANT: If a "d" appears in the lower left corner of the display, the console is displayed in a store. Press the Speed + button to use the console's pulse programs. To purchase the optional chest pulse sensor, call the toll-free telephone number on the console will automatically appear in , the key can be plugged in a preset sequence; THE INFORMATION MODE/DEMO MODE The console features an information mode that keeps track of the total number of hours that the treadmill...
... walking belt has moved. IMPORTANT: If a "d" appears in the lower left corner of the display, the console is displayed in a store. Press the Speed + button to use the console's pulse programs. To purchase the optional chest pulse sensor, call the toll-free telephone number on the console will automatically appear in , the key can be plugged in a preset sequence; THE INFORMATION MODE/DEMO MODE The console features an information mode that keeps track of the total number of hours that the treadmill...

English Manual
Page 22
... steps listed. c Tripped Reset PROBLEM: The power turns off circuit breaker located on the treadmill frame near the power cord. b. After the power cord has been plugged in . Remove the key from the console and UNPLUG THE POWER CORD. If the treadmill still will not run, see the front cover of the specifications described on SOLUTION: a. While the incline is required. 37 3 84 22 PROBLEM: The display of the treadmill does not change correctly SOLUTION: a. Next, remove...
... steps listed. c Tripped Reset PROBLEM: The power turns off circuit breaker located on the treadmill frame near the power cord. b. After the power cord has been plugged in . Remove the key from the console and UNPLUG THE POWER CORD. If the treadmill still will not run, see the front cover of the specifications described on SOLUTION: a. While the incline is required. 37 3 84 22 PROBLEM: The display of the treadmill does not change correctly SOLUTION: a. Next, remove...

English Manual
Page 23
... the treadmill for a correct speed reading. Using the allen wrench, turn both rear roller bolts clockwise, 1/4 of the walking belt 2 to the position shown. When the walking belt is properly tightened. 23 If the walking belt is aligned with the Reed Switch. Make sure that meets all of the Pulley (47). Then, plug in the power cord, insert the key, and care- b. Then, plug in the power cord, insert the key, and run the treadmill for...
... the treadmill for a correct speed reading. Using the allen wrench, turn both rear roller bolts clockwise, 1/4 of the walking belt 2 to the position shown. When the walking belt is properly tightened. 23 If the walking belt is aligned with the Reed Switch. Make sure that meets all of the Pulley (47). Then, plug in the power cord, insert the key, and care- b. Then, plug in the power cord, insert the key, and run the treadmill for...
English Manual
Page 24
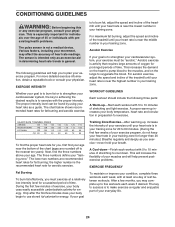
... five workouts each week, with preexisting health problems. The pulse sensor is intended only as a guide. During the first few weeks of your exercise program, do not keep your heart rate in general. If your goal Training Zone Exercise-After warming up -Start each workout with 5 to exercise with the proper intensity. The key to success is to 10 minutes of the chart (ages are recommended heart rates for...
... five workouts each week, with preexisting health problems. The pulse sensor is intended only as a guide. During the first few weeks of your exercise program, do not keep your heart rate in general. If your goal Training Zone Exercise-After warming up -Start each workout with 5 to exercise with the proper intensity. The key to success is to 10 minutes of the chart (ages are recommended heart rates for...

English Manual
Page 26
... 1 Console Frame Support 21 1 Latch Pin Assembly 22 4 1" Tek Screw 23 1 Console Ground Wire 24 2 Motor Bolt 25 1 Spring Pin Kit 26 1 Motor Belt 27 1 Drive Motor 28 2 Frame Washer 29 1 U-nut 30 1 Filter Wire 31 2 Lift Frame Bolt 32 6 Locknut 33 18 1/2" Screw 34 1 Console 35 2 Fan Screw 36 1 Power Cord 37 1 Console Fan 38 1 Controller 39 1 Electronics Bracket 40 2 Rear Roller Lock Washer 41 1 Hood 42 1 Front Roller Bushing 43 1 Lift Frame 44 2 Upright Endcap 45 1 Front Roller Bolt...
... 1 Console Frame Support 21 1 Latch Pin Assembly 22 4 1" Tek Screw 23 1 Console Ground Wire 24 2 Motor Bolt 25 1 Spring Pin Kit 26 1 Motor Belt 27 1 Drive Motor 28 2 Frame Washer 29 1 U-nut 30 1 Filter Wire 31 2 Lift Frame Bolt 32 6 Locknut 33 18 1/2" Screw 34 1 Console 35 2 Fan Screw 36 1 Power Cord 37 1 Console Fan 38 1 Controller 39 1 Electronics Bracket 40 2 Rear Roller Lock Washer 41 1 Hood 42 1 Front Roller Bushing 43 1 Lift Frame 44 2 Upright Endcap 45 1 Front Roller Bolt...

English Manual
Page 30
... you . ICON's obligation under normal use , costs of removal or installation or other warranty beyond that specifically set forth herein. For inhome service, the customer will be prepared to provide the following information: • the MODEL NUMBER of the product (PFTL73105.5) • the NAME of the product (PROFORM 750 treadmill) • the SERIAL NUMBER of the product (see the front cover of this manual) • the KEY NUMBER and DESCRIPTION...
... you . ICON's obligation under normal use , costs of removal or installation or other warranty beyond that specifically set forth herein. For inhome service, the customer will be prepared to provide the following information: • the MODEL NUMBER of the product (PFTL73105.5) • the NAME of the product (PROFORM 750 treadmill) • the SERIAL NUMBER of the product (see the front cover of this manual) • the KEY NUMBER and DESCRIPTION...


