
English Manual
Page 2
TABLE OF CONTENTS IMPORTANT PRECAUTIONS 3 BEFORE YOU BEGIN 4 ASSEMBLY 5 HOW TO USE THE ELLIPTICAL CROSSTRAINER 9 MAINTENANCE AND TROUBLESHOOTING 20 CONDITIONING GUIDELINES 21 PART LIST 22 EXPLODED DRAWING 23 HOW TO ORDER REPLACEMENT PARTS Back Cover LIMITED WARRANTY Back Cover PROFORM is a registered trademark of ICON Health & Fitness, Inc. 2
TABLE OF CONTENTS IMPORTANT PRECAUTIONS 3 BEFORE YOU BEGIN 4 ASSEMBLY 5 HOW TO USE THE ELLIPTICAL CROSSTRAINER 9 MAINTENANCE AND TROUBLESHOOTING 20 CONDITIONING GUIDELINES 21 PART LIST 22 EXPLODED DRAWING 23 HOW TO ORDER REPLACEMENT PARTS Back Cover LIMITED WARRANTY Back Cover PROFORM is a registered trademark of ICON Health & Fitness, Inc. 2
English Manual
Page 3
... shoes for home use only. If you stop exercising, allow the pedals to slowly come to a stop immediately and begin cooling down. 12. WARNING: Before beginning this product. 3 Keep your back straight when using the elliptical crosstrainer. Wear appropriate exercise clothing when using the elliptical crosstrainer; The pulse sensor is intended only as an exercise aid in determining heart rate trends in a commercial, rental, or institutional setting. do not...
... shoes for home use only. If you stop exercising, allow the pedals to slowly come to a stop immediately and begin cooling down. 12. WARNING: Before beginning this product. 3 Keep your back straight when using the elliptical crosstrainer. Wear appropriate exercise clothing when using the elliptical crosstrainer; The pulse sensor is intended only as an exercise aid in determining heart rate trends in a commercial, rental, or institutional setting. do not...
English Manual
Page 4
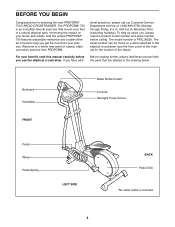
... Service Department toll-free at 1-800-999-3756, Monday through Friday, 6 a.m. The model number is included 4 If you , please note the product model number and serial number before you get the most from PROFORM. Before reading further, please familiarize yourself with the parts that moves your benefit, read this manual for selecting the new PROFORM® 750 CARDIO CROSSTRAINER. Bookrack Handlebar FRONT Water Bottle Holder* Console Handgrip Pulse Sensor Pedal...
... Service Department toll-free at 1-800-999-3756, Monday through Friday, 6 a.m. The model number is included 4 If you , please note the product model number and serial number before you get the most from PROFORM. Before reading further, please familiarize yourself with the parts that moves your benefit, read this manual for selecting the new PROFORM® 750 CARDIO CROSSTRAINER. Bookrack Handlebar FRONT Water Bottle Holder* Console Handgrip Pulse Sensor Pedal...
English Manual
Page 5
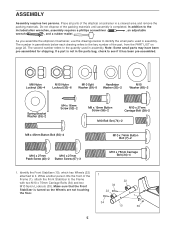
... adjustable wrench , and a rubber mallet . In addition to the key number of the elliptical crosstrainer in assembly. M8 Nylon Locknut (38)-4 M10 Nylon Locknut (33)-6 M10 Split Handlebar Washer (59)-5 Washer (55)-2 M10 Washer (65)-2 Spring Bracket Washer (35)-2 M4 x 16mm Screw (52)-2 M8 x 19mm Button Screw (56)-2 M10 x 27mm Carriage Bolt (28)-2 M10 Bolt Set (74)-2 M8 x 45mm Button Bolt (50)-4 M10 x 74mm Button Bolt...
... adjustable wrench , and a rubber mallet . In addition to the key number of the elliptical crosstrainer in assembly. M8 Nylon Locknut (38)-4 M10 Nylon Locknut (33)-6 M10 Split Handlebar Washer (59)-5 Washer (55)-2 M10 Washer (65)-2 Spring Bracket Washer (35)-2 M4 x 16mm Screw (52)-2 M8 x 19mm Button Screw (56)-2 M10 x 27mm Carriage Bolt (28)-2 M10 Bolt Set (74)-2 M8 x 45mm Button Bolt (50)-4 M10 x 74mm Button Bolt...
English Manual
Page 6
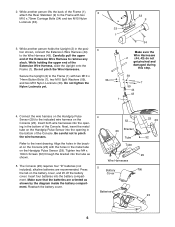
... Nylon Locknuts (33). Tighten two M4 x 16mm Screws (52) through the bracket into the battery compartment. Make sure that the batteries are recommended. Reattach the battery cover. 4 52 23 29 23 Bracket Tube 52 Tube Wire Harnesses 5 Battery Cover 29 Tab Batteries 23 6 Connect the wire harness on the Handgrip Pulse Sensor into the opening in the bottom of the Console. Secure the Upright (2) to the indicated...
... Nylon Locknuts (33). Tighten two M4 x 16mm Screws (52) through the bracket into the battery compartment. Make sure that the batteries are recommended. Reattach the battery cover. 4 52 23 29 23 Bracket Tube 52 Tube Wire Harnesses 5 Battery Cover 29 Tab Batteries 23 6 Connect the wire harness on the Handgrip Pulse Sensor into the opening in the bottom of the Console. Secure the Upright (2) to the indicated...
English Manual
Page 7
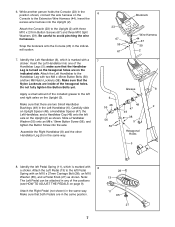
... 7 Attach the Right Pedal (not shown) in the indicated location. 23 67 59 67 Bookrack Wire Harness 44 67 59 2 7. Snap the bookrack onto the Console (23) in the same way. Attach the Console (23) to the left Pedal Spring (11), which is turned so the hexagonal holes are in any of the Handlebar Legs (5); Do not fully tighten the Button Bolts yet...
... 7 Attach the Right Pedal (not shown) in the indicated location. 23 67 59 67 Bookrack Wire Harness 44 67 59 2 7. Snap the bookrack onto the Console (23) in the same way. Attach the Console (23) to the left Pedal Spring (11), which is turned so the hexagonal holes are in any of the Handlebar Legs (5); Do not fully tighten the Button Bolts yet...
English Manual
Page 9
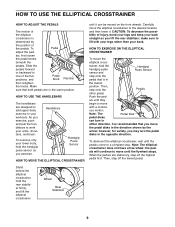
... the elliptical crosstrainer Wheel Rear Stabilizer 9 Make sure that is in either direction. als until the flywheel stops. To Pedal adjust the ped- Carefully move with your legs rather than your workouts. HOW TO EXERCISE ON THE ELLIPTICAL CROSSTRAINER To mount the elliptical cross- It is recommended that you may turn in the lowest position. Then, step off the highest pedal first. als, first loosen the pedal knobs beneath the pedals...
... the elliptical crosstrainer Wheel Rear Stabilizer 9 Make sure that is in either direction. als until the flywheel stops. To Pedal adjust the ped- Carefully move with your legs rather than your workouts. HOW TO EXERCISE ON THE ELLIPTICAL CROSSTRAINER To mount the elliptical cross- It is recommended that you may turn in the lowest position. Then, step off the highest pedal first. als, first loosen the pedal knobs beneath the pedals...
English Manual
Page 10
... of working out with a touch of the console is like having a personal trainer right in handgrip pulse sensor. In addition, the console features two Heart Rate workout programs that automatically change the resistance of the elliptical crosstrainer and prompt you to vary your pace as it guides you can connect the elliptical crosstrainer to your home stereo, portable stereo, or computer and play iFIT.com video programs (videocassettes are available separately). Using a stereo audio...
... of working out with a touch of the console is like having a personal trainer right in handgrip pulse sensor. In addition, the console features two Heart Rate workout programs that automatically change the resistance of the elliptical crosstrainer and prompt you to vary your pace as it guides you can connect the elliptical crosstrainer to your home stereo, portable stereo, or computer and play iFIT.com video programs (videocassettes are available separately). Using a stereo audio...
English Manual
Page 11
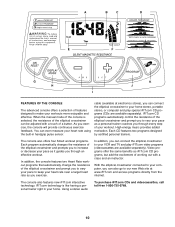
... program, a Heart Rate program, or the iFIT.com mode is used to exercise at the left pace indicator represents your current speed, the elapsed time (or the time remaining in either miles or kilometers. Make sure to select the unit of the elliptical crosstrainer. Display Mode button-This button is selected, both the resistance and the pace will appear. When the console is selected. These buttons are also used ). The mode...
... program, a Heart Rate program, or the iFIT.com mode is used to exercise at the left pace indicator represents your current speed, the elapsed time (or the time remaining in either miles or kilometers. Make sure to select the unit of the elliptical crosstrainer. Display Mode button-This button is selected, both the resistance and the pace will appear. When the console is selected. These buttons are also used ). The mode...
English Manual
Page 12
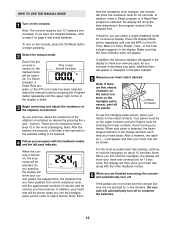
... heart beats. Press the Display Mode button repeatedly until the upper right corner of the display is detected, the heartshaped indicator in the program instead of the elliptical crosstrainer. If the pedals are not moved and the console buttons are not pressed for a few seconds for about 15 seconds. If desired, you use the handgrip pulse sensor, place your hands. When your pulse is blank. 3 Begin exercising and adjust the resistance...
... heart beats. Press the Display Mode button repeatedly until the upper right corner of the display is detected, the heartshaped indicator in the program instead of the elliptical crosstrainer. If the pedals are not moved and the console buttons are not pressed for a few seconds for about 15 seconds. If desired, you use the handgrip pulse sensor, place your hands. When your pulse is blank. 3 Begin exercising and adjust the resistance...
English Manual
Page 13
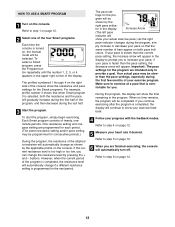
..., the display will automatically turn off. fortable for the program are finished exercising, the console will continue to exercise at a pace that the same number of the elliptical crosstrainer will appear. If you continue exercising after the program is too high or too low, you to step 6 on the console. One resistance setting and one of the program, and then decrease during the last half. 3 Start the program...
..., the display will automatically turn off. fortable for the program are finished exercising, the console will continue to exercise at a pace that the same number of the elliptical crosstrainer will appear. If you continue exercising after the program is too high or too low, you to step 6 on the console. One resistance setting and one of the program, and then decrease during the last half. 3 Start the program...
English Manual
Page 14
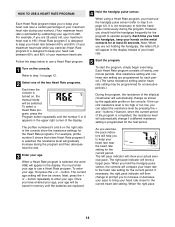
... hold the handgrips, keep your heart rate between 65% and 80% of the elliptical crosstrainer will appear in the display. When using a Heart Rate program, you hold the handgrip pulse sensor, the console will appear in the display instead of the display. You must use a Heart Rate program. 1 Turn on the right side of twenty, oneminute periods. The current age setting will automatically change if a different resistance setting is designed to prompt you...
... hold the handgrips, keep your heart rate between 65% and 80% of the elliptical crosstrainer will appear in the display. When using a Heart Rate program, you hold the handgrip pulse sensor, the console will appear in the display instead of the display. You must use a Heart Rate program. 1 Turn on the right side of twenty, oneminute periods. The current age setting will automatically change if a different resistance setting is designed to prompt you...
English Manual
Page 15
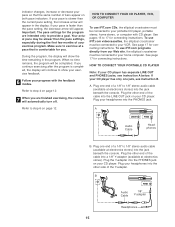
... 15 to 17 for the program are finished exercising, the console will automatically turn off. If you . If your progress with CD player. A. Important: The pace settings for connecting instructions. During the program, the display will be connected to 1/8" stereo audio cable (available at electronics stores). To use iFIT.com programs directly from our Web site, the elliptical crosstrainer must be completed. Plug your VCR. Plug the other end of...
... 15 to 17 for the program are finished exercising, the console will automatically turn off. If you . If your progress with CD player. A. Important: The pace settings for connecting instructions. During the program, the display will be connected to 1/8" stereo audio cable (available at electronics stores). To use iFIT.com programs directly from our Web site, the elliptical crosstrainer must be completed. Plug your VCR. Plug the other end of...
English Manual
Page 16
... stores). Plug the Yadapter into the PHONES jack on your stereo. If your stereo has an unused LINE OUT jack, see instruction B. Plug the other side of the cable into a 1/8" Y-adapter (available at electronics stores) into the other end of the Y-adapter. A CD VCR Amp LINE OUT LINE OUT Audio Cable B. C. Next, remove the wire that is being used, see instruction A below...
... stores). Plug the Yadapter into the PHONES jack on your stereo. If your stereo has an unused LINE OUT jack, see instruction B. Plug the other side of the cable into a 1/8" Y-adapter (available at electronics stores) into the other end of the Y-adapter. A CD VCR Amp LINE OUT LINE OUT Audio Cable B. C. Next, remove the wire that is being used, see instruction A below...
English Manual
Page 18
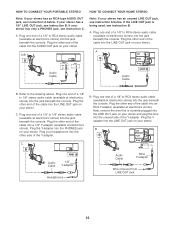
... TO USE IFIT.COM CD AND VIDEO PROGRAMS To use an iFIT.com CD or video program. 1 Turn on the console. Refer to change when a "chirp" is heard: • Make sure that it is lit. • Adjust the volume of the elliptical crosstrainer and/or the pace setting does not change . If you are using an iFIT.com videocassette, insert the videocassette into your personal trainer's instructions. See HOW TO CONNECT...
... TO USE IFIT.COM CD AND VIDEO PROGRAMS To use an iFIT.com CD or video program. 1 Turn on the console. Refer to change when a "chirp" is heard: • Make sure that it is lit. • Adjust the volume of the elliptical crosstrainer and/or the pace setting does not change . If you are using an iFIT.com videocassette, insert the videocassette into your personal trainer's instructions. See HOW TO CONNECT...
English Manual
Page 19
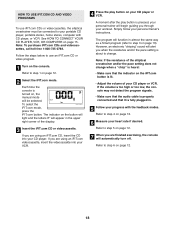
To select the iFIT.com mode, press the iFIT.com button. To use a program from the internet. In addition, you when the resistance and/or the pace setting is turned on, the manual mode will be connected to start the program. Each time the console is about to play iFIT.com audio and video programs directly from our Web site. 1 Turn on the console. When you start an internet connection. 4 Start your home computer. When the on-screen...
To select the iFIT.com mode, press the iFIT.com button. To use a program from the internet. In addition, you when the resistance and/or the pace setting is turned on, the manual mode will be connected to start the program. Each time the console is about to play iFIT.com audio and video programs directly from our Web site. 1 Turn on the console. When you start an internet connection. 4 Start your home computer. When the on-screen...
English Manual
Page 20
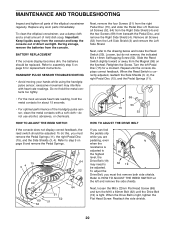
... Flat Head Screw (68) and turn the M10 x 60mm Bolt (62) until the console displays correct feedback. When the Drive Belt is adjusted to 62 19 be adjusted. HANDGRIP PULSE SENSOR TROUBLESHOOTING • Avoid moving your hands while using the handgrip pulse sensor; HOW TO ADJUST THE REED SWITCH If the console does not display correct feedback, the reed switch should be adjusted. Next, refer to assembly step 5 on page 6 for a moment. During storage, remove the batteries from the...
... Flat Head Screw (68) and turn the M10 x 60mm Bolt (62) until the console displays correct feedback. When the Drive Belt is adjusted to 62 19 be adjusted. HANDGRIP PULSE SENSOR TROUBLESHOOTING • Avoid moving your hands while using the handgrip pulse sensor; HOW TO ADJUST THE REED SWITCH If the console does not display correct feedback, the reed switch should be adjusted. Next, refer to assembly step 5 on page 6 for a moment. During storage, remove the batteries from the...
English Manual
Page 21
... key to achieving the desired results is to exercise with pre-existing health problems. • The pulse sensor is near the middle number in your training zone for longer than 20 minutes.) To find the proper heart rate for you, first find the three numbers above your age. If your goal is to strengthen your cardiovascular system, your heart rate as a guide. Aerobic Exercise If...
... key to achieving the desired results is to exercise with pre-existing health problems. • The pulse sensor is near the middle number in your training zone for longer than 20 minutes.) To find the proper heart rate for you, first find the three numbers above your age. If your goal is to strengthen your cardiovascular system, your heart rate as a guide. Aerobic Exercise If...
English Manual
Page 22
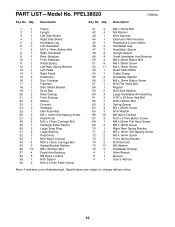
....5mm Bolt 37 4 Pedal Arm Bushing 38 5 M8 Nylon Locknut 39 1 M10 Spacer 40 2 M10 x 27mm Patch Screw 41 2 M6 x 72mm Bolt 42 4 M5 Washer 43 1 Wire Harness 44 1 Extension Wire Harness 45 1 Resistance Control Motor 46 2 Handlebar Cap 47 2 Handlebar Spacer 48 2 Upright Spacer 49 4 Small Handlebar Arm Bushing 50 4 M8 x 45mm Button Bolt 51 8 M6 x 28mm Screw 52 11 M4 x 16mm Screw 53 1 Reed Switch/Wire 54 1 Cable...
....5mm Bolt 37 4 Pedal Arm Bushing 38 5 M8 Nylon Locknut 39 1 M10 Spacer 40 2 M10 x 27mm Patch Screw 41 2 M6 x 72mm Bolt 42 4 M5 Washer 43 1 Wire Harness 44 1 Extension Wire Harness 45 1 Resistance Control Motor 46 2 Handlebar Cap 47 2 Handlebar Spacer 48 2 Upright Spacer 49 4 Small Handlebar Arm Bushing 50 4 M8 x 45mm Button Bolt 51 8 M6 x 28mm Screw 52 11 M4 x 16mm Screw 53 1 Reed Switch/Wire 54 1 Cable...
English Manual
Page 24
... you specific legal rights. This warranty gives you , please be prepared to give the following information when calling: • The MODEL NUMBER of the product (PFEL38020) • The NAME of the product (PROFORM® 750 CARDIO CROSSTRAINER) • The SERIAL NUMBER of the product (see the front cover of this manual) • The KEY NUMBER and DESCRIPTION of the part(s) (see page 22 of this manual) LIMITED WARRANTY ICON Health & Fitness, Inc. (ICON...
... you specific legal rights. This warranty gives you , please be prepared to give the following information when calling: • The MODEL NUMBER of the product (PFEL38020) • The NAME of the product (PROFORM® 750 CARDIO CROSSTRAINER) • The SERIAL NUMBER of the product (see the front cover of this manual) • The KEY NUMBER and DESCRIPTION of the part(s) (see page 22 of this manual) LIMITED WARRANTY ICON Health & Fitness, Inc. (ICON...

