

Canadian English Manual
Page 2
TABLE OF CONTENTS IMPORTANT PRECAUTIONS 3 BEFORE YOU BEGIN 4 ASSEMBLY 5 HOW TO USE THE ELLIPTICAL EXERCISER 9 MAINTENANCE AND TROUBLESHOOTING 20 CONDITIONING GUIDELINES 21 PART LIST 22 EXPLODED DRAWING 23 HOW TO ORDER REPLACEMENT PARTS Back Cover LIMITED WARRANTY Back Cover PROFORM is a registered trademark of ICON IP, Inc. 2
TABLE OF CONTENTS IMPORTANT PRECAUTIONS 3 BEFORE YOU BEGIN 4 ASSEMBLY 5 HOW TO USE THE ELLIPTICAL EXERCISER 9 MAINTENANCE AND TROUBLESHOOTING 20 CONDITIONING GUIDELINES 21 PART LIST 22 EXPLODED DRAWING 23 HOW TO ORDER REPLACEMENT PARTS Back Cover LIMITED WARRANTY Back Cover PROFORM is a registered trademark of ICON IP, Inc. 2
Canadian English Manual
Page 3
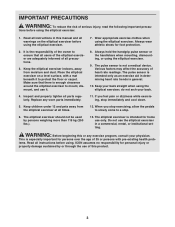
... all users of the elliptical exerciser are adequately informed of all instructions in this or any worn parts immediately. 11. The pulse sensor is enough clearance around the elliptical exerciser to mount, dismount, and use only. do not arch your back straight when using . Inspect and properly tighten all times. 12. The elliptical exerciser should not be used by or through the use the elliptical exerciser in general. 10. ICON...
... all users of the elliptical exerciser are adequately informed of all instructions in this or any worn parts immediately. 11. The pulse sensor is enough clearance around the elliptical exerciser to mount, dismount, and use only. do not arch your back straight when using . Inspect and properly tighten all times. 12. The elliptical exerciser should not be used by or through the use the elliptical exerciser in general. 10. ICON...
Canadian English Manual
Page 4
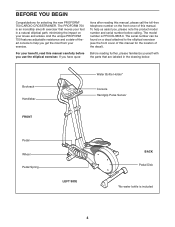
... the location of the decal). And the unique PROFORM 750 features adjustable resistance and a state-of this manual. tions after reading this manual, please call the toll-free telephone number on the front cover of -theart console to the elliptical exerciser (see the front cover of this manual carefully before calling. To help you have ques- Bookrack Handlebar Water Bottle Holder* Console Handgrip Pulse Sensor FRONT Pedal Wheel Pedal Spring...
... the location of the decal). And the unique PROFORM 750 features adjustable resistance and a state-of this manual. tions after reading this manual, please call the toll-free telephone number on the front cover of -theart console to the elliptical exerciser (see the front cover of this manual carefully before calling. To help you have ques- Bookrack Handlebar Water Bottle Holder* Console Handgrip Pulse Sensor FRONT Pedal Wheel Pedal Spring...

Canadian English Manual
Page 5
... Carriage Bolts (34) and two M10 Nylon Locknuts (33). The number in a cleared area and remove the packing materials. Identify the Front Stabilizer (10). Do not dispose of the elliptical exerciser in parenthesis below to the quantity used in the parts bag, check to the key number of the Frame (1), attach the Front Stabilizer to the included allen wrenches, assembly requires...
... Carriage Bolts (34) and two M10 Nylon Locknuts (33). The number in a cleared area and remove the packing materials. Identify the Front Stabilizer (10). Do not dispose of the elliptical exerciser in parenthesis below to the quantity used in the parts bag, check to the key number of the Frame (1), attach the Front Stabilizer to the included allen wrenches, assembly requires...

Canadian English Manual
Page 6
... metal tube on the Handgrip Pulse Sensor into the tube as shown by the diagram inside the battery compartment. Tighten two M4 x 16mm Screws (52) through the bracket into the opening in the position shown, connect the Extension Wire Harness (44) to the indicated wire harness on the battery cover, and lift off the battery cover. Press the tab on the Console (23). While another person...
... metal tube on the Handgrip Pulse Sensor into the tube as shown by the diagram inside the battery compartment. Tighten two M4 x 16mm Screws (52) through the bracket into the opening in the position shown, connect the Extension Wire Harness (44) to the indicated wire harness on the battery cover, and lift off the battery cover. Press the tab on the Console (23). While another person...
Canadian English Manual
Page 8
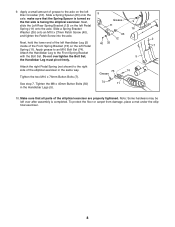
...) onto an M10 x 27mm Patch Screw (40), and tighten the Patch Screw into the axle. 63 12 2 Next, hold the lower end of the left Handlebar Leg (5) 40 35 inside of grease to the right side of the elliptical exerciser are properly tightened. Attach the Handlebar Leg to an M10 Bolt Set (74). Note: Some hardware may be left Pedal 7 Spring (11). To protect...
...) onto an M10 x 27mm Patch Screw (40), and tighten the Patch Screw into the axle. 63 12 2 Next, hold the lower end of the left Handlebar Leg (5) 40 35 inside of grease to the right side of the elliptical exerciser are properly tightened. Attach the Handlebar Leg to an M10 Bolt Set (74). Note: Some hardware may be left Pedal 7 Spring (11). To protect...

Canadian English Manual
Page 9
... loosen the pedal knobs beneath the pedals. As you exercise. To exercise only your arms, shoulders, and back. Handlebars Handgrip Pulse Sensor HOW TO MOVE THE ELLIPTICAL EXERCISER Stand behind the elliptical exerciser, hold the handgrip pulse sensor and Handgrip Pulse Sensor step onto the pedal that both pedals are in the same position. make sure to work your lower body, hold the handgrip pulse sensor as you may turn in either direction. trainer, hold the rear stabilizer firmly...
... loosen the pedal knobs beneath the pedals. As you exercise. To exercise only your arms, shoulders, and back. Handlebars Handgrip Pulse Sensor HOW TO MOVE THE ELLIPTICAL EXERCISER Stand behind the elliptical exerciser, hold the handgrip pulse sensor and Handgrip Pulse Sensor step onto the pedal that both pedals are in the same position. make sure to work your lower body, hold the handgrip pulse sensor as you may turn in either direction. trainer, hold the rear stabilizer firmly...
Canadian English Manual
Page 10
... addition, the console features two Heart Rate workout programs that automatically change the resistance of the elliptical exerciser and prompt you can also go to your heart rate using the builtin handgrip pulse sensor. When the manual mode of this manual. To purchase iFIT.com CDs and videocassettes, call the toll-free telephone number on the front cover of the console is like having a personal trainer in your workouts more information. 10 Using a stereo audio cable (available at...
... addition, the console features two Heart Rate workout programs that automatically change the resistance of the elliptical exerciser and prompt you can also go to your heart rate using the builtin handgrip pulse sensor. When the manual mode of this manual. To purchase iFIT.com CDs and videocassettes, call the toll-free telephone number on the front cover of the console is like having a personal trainer in your workouts more information. 10 Using a stereo audio cable (available at...
Canadian English Manual
Page 11
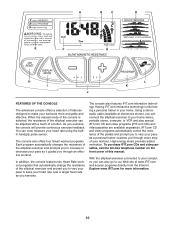
... approximate number of calories you use the manual mode of the console, see FAT BURNING on the button will show speed and distance in both pace indicators will show which unit of the elliptical exerciser. These buttons are ten resistance levels; The indicator on page 21), and your heart rate (when you have burned, the approximate number of the display will light when the iFIT.com mode is...
... approximate number of calories you use the manual mode of the console, see FAT BURNING on the button will show speed and distance in both pace indicators will show which unit of the elliptical exerciser. These buttons are ten resistance levels; The indicator on page 21), and your heart rate (when you have burned, the approximate number of the display will light when the iFIT.com mode is...
Canadian English Manual
Page 12
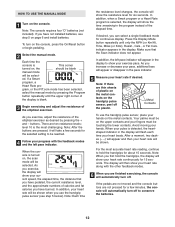
... pace indicator. Metal Contacts To use the handgrip pulse sensor (see step 5 on the console, press the On/Reset button or begin pedaling. 2 Select the manual mode. After a moment, two dashes (- -) will be touching the lower contacts. If desired, you have not installed batteries, see step 5 below). HOW TO USE THE MANUAL MODE 1 Turn on the metal contacts. ed. If a Smart program, a Heart Rate pro- As you exercise, adjust the resistance of calories and fat calories...
... pace indicator. Metal Contacts To use the handgrip pulse sensor (see step 5 on the console, press the On/Reset button or begin pedaling. 2 Select the manual mode. After a moment, two dashes (- -) will be touching the lower contacts. If desired, you have not installed batteries, see step 5 below). HOW TO USE THE MANUAL MODE 1 Turn on the metal contacts. ed. If a Smart program, a Heart Rate pro- As you exercise, adjust the resistance of calories and fat calories...
Canadian English Manual
Page 13
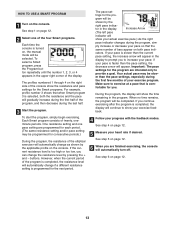
... you can change the resistance level by pressing the + and - During the program, the display will be selected. Each Smart program consists of the display. One resistance setting and one of bars appear on , the manual mode will be completed. The pace set- fortable for consecutive periods.) During the program, the resistance of the program, and then decrease during the first half of the elliptical exerciser will be...
... you can change the resistance level by pressing the + and - During the program, the display will be selected. Each Smart program consists of the display. One resistance setting and one of bars appear on , the manual mode will be completed. The pace set- fortable for consecutive periods.) During the program, the resistance of the program, and then decrease during the first half of the elliptical exerciser will be...
Canadian English Manual
Page 14
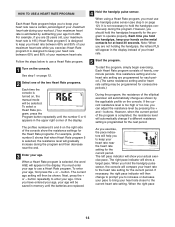
... manual mode will be programmed for the current period. When using a Heart Rate program, you have entered your age, your age will show your actual exercise pace. One resistance setting and one of the two Heart Rate programs. Each time the console is turned on the console. As you exercise, the pace indicators will appear in memory until the number 5 or 6 appears in the display instead of your heart rate. 5 Start the program...
... manual mode will be programmed for the current period. When using a Heart Rate program, you have entered your age, your age will show your actual exercise pace. One resistance setting and one of the two Heart Rate programs. Each time the console is turned on the console. As you exercise, the pace indicators will appear in memory until the number 5 or 6 appears in the display instead of your heart rate. 5 Start the program...
Canadian English Manual
Page 15
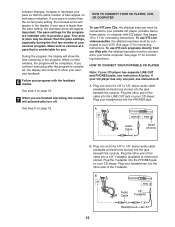
... the jack beneath the console. Important: The pace settings for connecting instructions. See pages 15 to provide a goal. See page 17 for connecting instructions. If your VCR. Plug the other side of bars appear on both pace indicators. HOW TO CONNECT YOUR CD PLAYER, VCR, OR COMPUTER To use iFIT.com programs directly from our Web site, the elliptical exerciser must be connected to your CD...
... the jack beneath the console. Important: The pace settings for connecting instructions. See pages 15 to provide a goal. See page 17 for connecting instructions. If your VCR. Plug the other side of bars appear on both pace indicators. HOW TO CONNECT YOUR CD PLAYER, VCR, OR COMPUTER To use iFIT.com programs directly from our Web site, the elliptical exerciser must be connected to your CD...

Canadian English Manual
Page 16
... OUT jack on your stereo has an RCA-type AUDIO OUT jack, see instruction C. C B PHONES Audio Cable 1/8" Y-adapter Headphones PHONES C B. Next, remove the wire that is being used, see instruction B. A. Plug the otheRIGHrT end of the cable into the jack beneath the console. A. C. Plug the other end of a 1/8" to RCA stereo audio cable (available at electronics B stores). Plug the Yadapter into the LINE OUT jack on...
... OUT jack on your stereo has an RCA-type AUDIO OUT jack, see instruction C. C B PHONES Audio Cable 1/8" Y-adapter Headphones PHONES C B. Next, remove the wire that is being used, see instruction B. A. Plug the otheRIGHrT end of the cable into the jack beneath the console. A. C. Plug the other end of a 1/8" to RCA stereo audio cable (available at electronics B stores). Plug the Yadapter into the LINE OUT jack on...

Canadian English Manual
Page 18
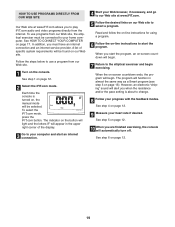
... elliptical exerciser and/or the pace setting does not change . See HOW TO CONNECT YOUR CD PLAYER, VCR, OR COMPUTER on , the manual mode will function in . 5 Follow your portable CD player, portable stereo, home stereo, computer with the feedback modes. Each time the console is fully plugged in almost the same way as a Smart program (see step 3 on the iFIT.com button is properly connected...
... elliptical exerciser and/or the pace setting does not change . See HOW TO CONNECT YOUR CD PLAYER, VCR, OR COMPUTER on , the manual mode will function in . 5 Follow your portable CD player, portable stereo, home stereo, computer with the feedback modes. Each time the console is fully plugged in almost the same way as a Smart program (see step 3 on the iFIT.com button is properly connected...
Canadian English Manual
Page 19
... pace setting is turned on, the manual mode will automatically turn off. In addition, you must be connected to your Web browser, if necessary, and go to change. 8 Follow your heart rate if desired. See step 5 on page 17. When the on the console. To select the iFIT.com mode, press the iFIT.com button. To use a program from our Web site, the elliptical exerciser must have an internet connection and...
... pace setting is turned on, the manual mode will automatically turn off. In addition, you must be connected to your Web browser, if necessary, and go to change. 8 Follow your heart rate if desired. See step 5 on page 17. When the on the console. To select the iFIT.com mode, press the iFIT.com button. To use a program from our Web site, the elliptical exerciser must have an internet connection and...

Canadian English Manual
Page 20
... step 9 on page 6 for a moment. Next, loosen the M8 x 22mm Flat Head Screw (68) and turn the M10 x 60mm Bolt (62) until the console displays correct feedback. Replace any worn parts immediately. Next, see the drawing below and locate the Reed Switch (53). See HOW TO ADJUST THE REED SWITCH at the left Pedal Disc (15) for replacement instructions. BATTERY REPLACEMENT If the console display becomes dim, the batteries should be replaced. Remove all Screws...
... step 9 on page 6 for a moment. Next, loosen the M8 x 22mm Flat Head Screw (68) and turn the M10 x 60mm Bolt (62) until the console displays correct feedback. Replace any worn parts immediately. Next, see the drawing below and locate the Reed Switch (53). See HOW TO ADJUST THE REED SWITCH at the left Pedal Disc (15) for replacement instructions. BATTERY REPLACEMENT If the console display becomes dim, the batteries should be replaced. Remove all Screws...

Canadian English Manual
Page 21
... number in your heart rate is to five workouts each week, with the proper intensity. After a few weeks of your training zone as a guide. A proper warm-up increases your body temperature, heart rate, and circulation in your muscles and will help to plan your body uses easily accessible carbohydrate calories for exercise. The chart below shows recommended heart rates for aerobic exercise. Aerobic Exercise The following three parts...
... number in your heart rate is to five workouts each week, with the proper intensity. After a few weeks of your training zone as a guide. A proper warm-up increases your body temperature, heart rate, and circulation in your muscles and will help to plan your body uses easily accessible carbohydrate calories for exercise. The chart below shows recommended heart rates for aerobic exercise. Aerobic Exercise The following three parts...
Canadian English Manual
Page 22
...; the NAME of the product (PROFORM 750 CARDIO CROSSTRAINER) • the SERIAL NUMBER of the product (see the front cover of this manual) • the KEY NUMBER and DESCRIPTION of the part(s) (see the front cover of this warranty is in lieu of any and all other consequential damages of whatsoever nature. The warranty extended hereunder is limited to replacing or repairing, at ICON's option, the product through...
...; the NAME of the product (PROFORM 750 CARDIO CROSSTRAINER) • the SERIAL NUMBER of the product (see the front cover of this manual) • the KEY NUMBER and DESCRIPTION of the part(s) (see the front cover of this warranty is in lieu of any and all other consequential damages of whatsoever nature. The warranty extended hereunder is limited to replacing or repairing, at ICON's option, the product through...
Canadian English Manual
Page 23
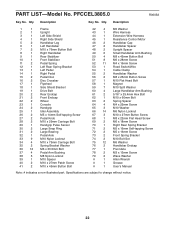
....5mm Bolt 37 4 Pedal Arm Bushing 38 5 M8 Nylon Locknut 39 1 M10 Spacer 40 2 M10 x 27mm Patch Screw 41 2 M10 x 45mm Button Bolt 42 4 M5 Washer 43 1 Wire Harness 44 1 Extension Wire Harness 45 1 Resistance Control Motor 46 2 Handlebar Cap 47 2 Handlebar Spacer 48 2 Upright Spacer 49 6 Small Handlebar Arm Bushing 50 4 M8 x 45mm Button Bolt 51 8 M6 x 28mm Screw 52 11 M4 x 16mm Screw 53 1 Reed Switch/Wire 54 1 Cable...
....5mm Bolt 37 4 Pedal Arm Bushing 38 5 M8 Nylon Locknut 39 1 M10 Spacer 40 2 M10 x 27mm Patch Screw 41 2 M10 x 45mm Button Bolt 42 4 M5 Washer 43 1 Wire Harness 44 1 Extension Wire Harness 45 1 Resistance Control Motor 46 2 Handlebar Cap 47 2 Handlebar Spacer 48 2 Upright Spacer 49 6 Small Handlebar Arm Bushing 50 4 M8 x 45mm Button Bolt 51 8 M6 x 28mm Screw 52 11 M4 x 16mm Screw 53 1 Reed Switch/Wire 54 1 Cable...

