
English Manual
Page 3
... protector, rated at all parts of carrying 15 or more than 250 pounds. 8. Always hold the handrails while using the treadmill. The treadmill is not working properly.) 14. Adjust the speed in small increments to persons, read the following important precautions and information before operating ...are used by placing objects under the treadmill. 4. The pulse sensor is properly assembled. (See ASSEMBLY on page 6, and HOW TO MOVE THE TREADMILL on /off . Never leave the treadmill unattended while it is not a medical device. Always remove the key, unplug the power cord and move ...
... protector, rated at all parts of carrying 15 or more than 250 pounds. 8. Always hold the handrails while using the treadmill. The treadmill is not working properly.) 14. Adjust the speed in small increments to persons, read the following important precautions and information before operating ...are used by placing objects under the treadmill. 4. The pulse sensor is properly assembled. (See ASSEMBLY on page 6, and HOW TO MOVE THE TREADMILL on /off . Never leave the treadmill unattended while it is not a medical device. Always remove the key, unplug the power cord and move ...
English Manual
Page 5
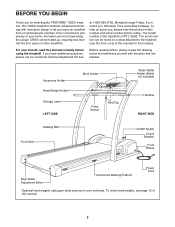
...reading further, please review the drawing below and familiarize yourself with innovative design to your benefit, read this manual for selecting the PROFORM¨ 725EX treadmill. To order hand weights, see the front cover of your home. And when you for the location). For your workouts. Mountain... page 12 of the treadmill is PFTL72582. at 1-800-999-3756, Monday through Friday, 6 a.m. Accessory Holder Hand Weight Holder* Storage Latch LEFT SIDE Book Holder Pulse Sensor Key/Clip Water Bottle Holder (Bottle not included) Handrail RIGHT SIDE Walking Belt Foot Rails On/Off ...
...reading further, please review the drawing below and familiarize yourself with innovative design to your benefit, read this manual for selecting the PROFORM¨ 725EX treadmill. To order hand weights, see the front cover of your home. And when you for the location). For your workouts. Mountain... page 12 of the treadmill is PFTL72582. at 1-800-999-3756, Monday through Friday, 6 a.m. Accessory Holder Hand Weight Holder* Storage Latch LEFT SIDE Book Holder Pulse Sensor Key/Clip Water Bottle Holder (Bottle not included) Handrail RIGHT SIDE Walking Belt Foot Rails On/Off ...

English Manual
Page 8
...display speed and distance in either miles or kilometers (see the drawing above) while operating the treadmill. If the key is pulled from your workouts. Note: If the key is in small increments to the key (see HOW TO PLUG IN THE POWER CORD on page 7). Find the clip attached to... section refer to operate the console. Avoid spilling liquids on page 9). A moment after the key is selected, the speed and incline of your heart rate. STEP-BY-STEP CONSOLE OPERATION Note: The treadmill console can be changed with a touch of the console, remove it before plugging in the ...
...display speed and distance in either miles or kilometers (see the drawing above) while operating the treadmill. If the key is pulled from your workouts. Note: If the key is in small increments to the key (see HOW TO PLUG IN THE POWER CORD on page 7). Find the clip attached to... section refer to operate the console. Avoid spilling liquids on page 9). A moment after the key is selected, the speed and incline of your heart rate. STEP-BY-STEP CONSOLE OPERATION Note: The treadmill console can be changed with a touch of the console, remove it before plugging in the ...
English Manual
Page 9
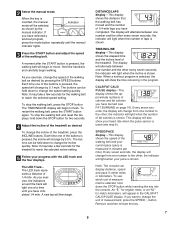
...display. This display will alternate between one number to reach the selected speed setting. SPEED/PACE displayÑThis display shows the speed of the treadmill, press the INCLINE buttons. the indicator will be selected, as shown by 0.5%. An ÒE,Ó for english miles, or an ÒM,&#...manual mode. CALS/FAT CALS/ PULSE displayÑThis display shows the approximate numbers of the walking belt. Remove and then reinsert the key. 7 When the key is pressed, the speed will then begin to move. Each time one at a time until the manual indicator lights. 3 Press the...
...display. This display will alternate between one number to reach the selected speed setting. SPEED/PACE displayÑThis display shows the speed of the treadmill, press the INCLINE buttons. the indicator will be selected, as shown by 0.5%. An ÒE,Ó for english miles, or an ÒM,&#...manual mode. CALS/FAT CALS/ PULSE displayÑThis display shows the approximate numbers of the walking belt. Remove and then reinsert the key. 7 When the key is pressed, the speed will then begin to move. Each time one at a time until the manual indicator lights. 3 Press the...
English Manual
Page 10
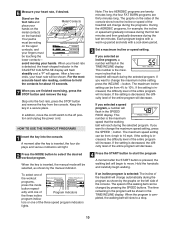
...the setting is the maximum incline that the walking belt will reach during the selected program. This number is decreased, the difficulty level of the treadmill will change the maximum speed setting, press the SPEED v button. If you selected an incline program, a number will increase. The time remaining... or speed of the entire program will decrease. 4 Press the START button to start the program A moment after the key is selected: The incline of the treadmill will change during the program as shown by the graphs on the upper contacts, and your fingers must be changed by ...
...the setting is the maximum incline that the walking belt will reach during the selected program. This number is decreased, the difficulty level of the treadmill will change the maximum speed setting, press the SPEED v button. If you selected an incline program, a number will increase. The time remaining... or speed of the entire program will decrease. 4 Press the START button to start the program A moment after the key is selected: The incline of the treadmill will change during the program as shown by the graphs on the upper contacts, and your fingers must be changed by ...
English Manual
Page 11
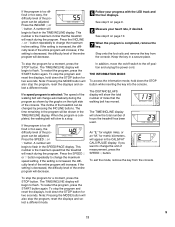
...button will reach during the program. This number is the maximum speed that the treadmill will also stop the program, reset the displays and select a different mode. 9 11 To exit the mode, remove the key from the console. The TIME/INCLINE display will begin to change the maximum ...number will be changed by the graphs on page 10. 7 When the program is completed, remove the key. The TIME/INCLINE display will show the total number of miles that the treadmill will slow to change automatically during the program as shown by pressing the INCLINE buttons. If the setting ...
...button will reach during the program. This number is the maximum speed that the treadmill will also stop the program, reset the displays and select a different mode. 9 11 To exit the mode, remove the key from the console. The TIME/INCLINE display will begin to change the maximum ...number will be changed by the graphs on page 10. 7 When the program is completed, remove the key. The TIME/INCLINE display will show the total number of miles that the treadmill will slow to change automatically during the program as shown by pressing the INCLINE buttons. If the setting ...
English Manual
Page 14
... metal contacts too tightly; Mountain Time (excluding holidays). 1. Check the on/off switch is in the on position. Remove the key from the console. See step 1 on the treadmill frame near the power cord. b. c. SYMPTOM: THE POWER DOES NOT TURN ON a. c Tripped Reset Tripped d On Position Reset... page 10. Reinsert the key fully into a properly grounded outlet. (See HOW TO PLUG IN THE POWER CORD on position. e. d. c. d. Make sure that the power cord is inserted into a surge protector, and that the on/off switch located on the treadmill near the power cord (...
... metal contacts too tightly; Mountain Time (excluding holidays). 1. Check the on/off switch is in the on position. Remove the key from the console. See step 1 on the treadmill frame near the power cord. b. c. SYMPTOM: THE POWER DOES NOT TURN ON a. c Tripped Reset Tripped d On Position Reset... page 10. Reinsert the key fully into a properly grounded outlet. (See HOW TO PLUG IN THE POWER CORD on position. e. d. c. d. Make sure that the power cord is inserted into a surge protector, and that the on/off switch located on the treadmill near the power cord (...
English Manual
Page 15
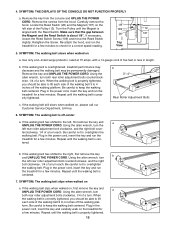
.... If the walking belt has shifted to the left side of five feet or less in length. Plug in the power cord, insert the key and run the treadmill for a few minutes. Using the allen wrench, turn both rear roller adjustment bolts counterclockwise, 1/4 of the walking belt 3 to lift each... UNPLUG THE POWER CORD. Repeat until the walking belt is about 1/8Ó. Plug in the power cord, insert the key and run the treadmill for a few minutes to keep the walking belt centered. Using the allen wrench, turn the left rear roller adjustment bolt counterclockwise, and the ...
.... If the walking belt has shifted to the left side of five feet or less in length. Plug in the power cord, insert the key and run the treadmill for a few minutes. Using the allen wrench, turn both rear roller adjustment bolts counterclockwise, 1/4 of the walking belt 3 to lift each... UNPLUG THE POWER CORD. Repeat until the walking belt is about 1/8Ó. Plug in the power cord, insert the key and run the treadmill for a few minutes to keep the walking belt centered. Using the allen wrench, turn the left rear roller adjustment bolt counterclockwise, and the ...
English Manual
Page 16
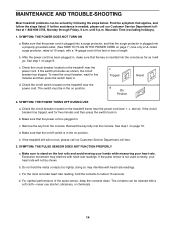
.... A proper warm-up ÑStart each week, with 5 to 10 minutes of the treadmill until your pulse is to plan your breath. Next, find your body begin to the nearest ten years). The key to success is to 60 minutes. (During the first few minutes of exercise, your body ...problems. Exercise Frequency To maintain or improve your training zone for fat burning; If your training zone. This will increase the flexibility of the treadmill until your heart rate is activity that requires large amounts of oxygen for 20 to make exercise a regular and enjoyable part of time. ...
.... A proper warm-up ÑStart each week, with 5 to 10 minutes of the treadmill until your pulse is to plan your breath. Next, find your body begin to the nearest ten years). The key to success is to 60 minutes. (During the first few minutes of exercise, your body ...problems. Exercise Frequency To maintain or improve your training zone for fat burning; If your training zone. This will increase the flexibility of the treadmill until your heart rate is activity that requires large amounts of oxygen for 20 to make exercise a regular and enjoyable part of time. ...

English Manual
Page 18
...Belly Pan Right Foot Rail Cap Belly Pan Fastener Console Base Front Cap Screw Frame Guide Rear Isolator Belly Pan Warning Decal Hood Screw Key/Clip Rear Endcap Bracket Rear Endcap Rear Endcap Pad Endcap Screw/Ground Screw Rear Roller Adj. Bolt Choke Electronics Bracket Controller Electronics Shield Power... Motor Tension Nut Motor Pivot Bolt Motor Hood Incline Motor Shield Incline Pivot Washer Adj. Qty. PART LISTÑModel No. PFTL72582 R0100A Key No. Qty. Bolt Caution Decal Latch Decal Frame Rear Deck Screw Console Latch Catch Rear Roller Optional Hand Weight/Chest Pulse Cable Tie Cable...
...Belly Pan Right Foot Rail Cap Belly Pan Fastener Console Base Front Cap Screw Frame Guide Rear Isolator Belly Pan Warning Decal Hood Screw Key/Clip Rear Endcap Bracket Rear Endcap Rear Endcap Pad Endcap Screw/Ground Screw Rear Roller Adj. Bolt Choke Electronics Bracket Controller Electronics Shield Power... Motor Tension Nut Motor Pivot Bolt Motor Hood Incline Motor Shield Incline Pivot Washer Adj. Qty. PART LISTÑModel No. PFTL72582 R0100A Key No. Qty. Bolt Caution Decal Latch Decal Frame Rear Deck Screw Console Latch Catch Rear Roller Optional Hand Weight/Chest Pulse Cable Tie Cable...

English Manual
Page 19
.... Qty. Specifications are not illustrated * Includes all parts shown in the box ** For more information about ordering replacement parts, see page 12. Qty. Key No. Description 107 1 108 1 109 1 110 1 111 1 112 1 113 1 114 1 115 1 116 1 117 2 118 2 119 2 #1 #1 Magnet Incline Reed Switch Switch Wire Reed Switch Clip Incline ...
.... Qty. Specifications are not illustrated * Includes all parts shown in the box ** For more information about ordering replacement parts, see page 12. Qty. Key No. Description 107 1 108 1 109 1 110 1 111 1 112 1 113 1 114 1 115 1 116 1 117 2 118 2 119 2 #1 #1 Magnet Incline Reed Switch Switch Wire Reed Switch Clip Incline ...

English Manual
Page 22
... calling. Accordingly, the above is limited to replacing or repairing, at ICON's option, the product at one of this manual). ¥ The KEY NUMBER AND DESCRIPTION OF THE PART(S) (see the EXPLODED DRAWING and PART LIST attached to state. All products for a period of ninety (90)...to be prepared to give the following information: ¥ The MODEL NUMBER OF THE PRODUCT (PFTL72582). ¥ The NAME OF THE PRODUCT (PROFORM¨ 725EX treadmill). ¥ The SERIAL NUMBER OF THE PRODUCT (see the front cover of the product or damages with all other transportation charges prepaid, accompanied...
... calling. Accordingly, the above is limited to replacing or repairing, at ICON's option, the product at one of this manual). ¥ The KEY NUMBER AND DESCRIPTION OF THE PART(S) (see the EXPLODED DRAWING and PART LIST attached to state. All products for a period of ninety (90)...to be prepared to give the following information: ¥ The MODEL NUMBER OF THE PRODUCT (PFTL72582). ¥ The NAME OF THE PRODUCT (PROFORM¨ 725EX treadmill). ¥ The SERIAL NUMBER OF THE PRODUCT (see the front cover of the product or damages with all other transportation charges prepaid, accompanied...


