
English Manual
Page 3
... The pulse sensor is fully closed. 21. Inspect and tighten all parts of carrying 15 or more amps. Do not place the treadmill on the walking belt. Do not put the treadmill in speed. 16. Never allow more than one person on page 5 for both men and women. Athletic support clothes are standing... factors, including the user's movement, may affect the accuracy of the treadmill by persons weighing more than 250 pounds. 8. Do not attempt to raise, lower, or move the walking belt while the power is the responsibility of the owner to raise, lower, or move the on page 13.) You must be...
... The pulse sensor is fully closed. 21. Inspect and tighten all parts of carrying 15 or more amps. Do not place the treadmill on the walking belt. Do not put the treadmill in speed. 16. Never allow more than one person on page 5 for both men and women. Athletic support clothes are standing... factors, including the user's movement, may affect the accuracy of the treadmill by persons weighing more than 250 pounds. 8. Do not attempt to raise, lower, or move the walking belt while the power is the responsibility of the owner to raise, lower, or move the on page 13.) You must be...
English Manual
Page 5
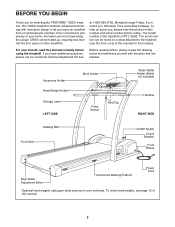
...The serial number can be found on a decal attached to your benefit, read this manual for selecting the PROFORM¨ 725EX treadmill. And when youÕre not exercising, the unique 725EX can be folded up, requiring less than half the floor space of your home. Mountain Time (excluding ...order hand weights, see the front cover of the treadmill is PFTL72582. Accessory Holder Hand Weight Holder* Storage Latch LEFT SIDE Book Holder Pulse Sensor Key/Clip Water Bottle Holder (Bottle not included) Handrail RIGHT SIDE Walking Belt Foot Rails On/Off Switch Circuit Breaker Front Wheel...
...The serial number can be found on a decal attached to your benefit, read this manual for selecting the PROFORM¨ 725EX treadmill. And when youÕre not exercising, the unique 725EX can be folded up, requiring less than half the floor space of your home. Mountain Time (excluding ...order hand weights, see the front cover of the treadmill is PFTL72582. Accessory Holder Hand Weight Holder* Storage Latch LEFT SIDE Book Holder Pulse Sensor Key/Clip Water Bottle Holder (Bottle not included) Handrail RIGHT SIDE Walking Belt Foot Rails On/Off Switch Circuit Breaker Front Wheel...
English Manual
Page 6
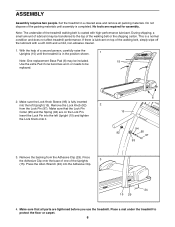
... Pin. Press the Adhesive Clip onto the base of the walking belt or the shipping carton. ASSEMBLY Assembly requires two people. This is completed. Remove the Lock Knob (92) 2 from the Adhesive Clip (29). Set the treadmill in the position shown. 1 Note: One replacement Base Pad (6)... may be included. 15 Use the extra Pad if one of the walking belt, simply wipe off the lubricant with high-performance lubricant. During shipping, a small...
... Pin. Press the Adhesive Clip onto the base of the walking belt or the shipping carton. ASSEMBLY Assembly requires two people. This is completed. Remove the Lock Knob (92) 2 from the Adhesive Clip (29). Set the treadmill in the position shown. 1 Note: One replacement Base Pad (6)... may be included. 15 Use the extra Pad if one of the walking belt, simply wipe off the lubricant with high-performance lubricant. During shipping, a small...
English Manual
Page 7
..., can result in - Contact a qualified electrician to the walking belt or the walking plat- Grounded Outlet Box Grounding Pin Treadmill Power Cord cluded) with the productÑif it will deteriorate the walking belt and ordinances. Use only a ULlisted surge protector, rated at most...adapter that looks like any other appliances Whenever the adapter is equipped with a cord having an equipment-grounding conductor and a Your treadmill features a walking belt coated with all local codes and form. The green-colored rigid ear, lug, or the like the adapter illustrated in drawing ...
..., can result in - Contact a qualified electrician to the walking belt or the walking plat- Grounded Outlet Box Grounding Pin Treadmill Power Cord cluded) with the productÑif it will deteriorate the walking belt and ordinances. Use only a ULlisted surge protector, rated at most...adapter that looks like any other appliances Whenever the adapter is equipped with a cord having an equipment-grounding conductor and a Your treadmill features a walking belt coated with all local codes and form. The green-colored rigid ear, lug, or the like the adapter illustrated in drawing ...

English Manual
Page 8
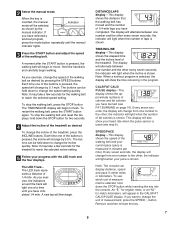
...to help you exercise, an LED ÒtrackÓ and four displays will provide continuous exercise feedback. STEP-BY-STEP CONSOLE OPERATION Note: The treadmill console can be changed with a touch of a button. A moment after the key is inserted, the four displays and various indicators will automatically ...speed. ¥ To reduce the possibility of electric shock, keep the console dry. As you get the most from the console, the walking belt will light. 8 For simplicity, all instructions in this section refer to the key (see SPEED/ PACE DISPLAY on page 9). Avoid spilling ...
...to help you exercise, an LED ÒtrackÓ and four displays will provide continuous exercise feedback. STEP-BY-STEP CONSOLE OPERATION Note: The treadmill console can be changed with a touch of a button. A moment after the key is inserted, the four displays and various indicators will automatically ...speed. ¥ To reduce the possibility of electric shock, keep the console dry. As you get the most from the console, the walking belt will light. 8 For simplicity, all instructions in this section refer to the key (see SPEED/ PACE DISPLAY on page 9). Avoid spilling ...
English Manual
Page 9
... key. 7 Hold the handrails and carefully begin . 9 DISTANCE/LAPS displayÑThis display shows the distance that the walking belt has moved and the number of the treadmill as desired by 0.5%. The display will alternate between one of the buttons is used (see step 6). Note: When a workout.... 4 Adjust the incline of 1/4-mile laps you have completed. To stop the walking belt and reset the displays, hold down the STOP button for the treadmill to the other ; To stop the walking belt, press the STOP button. Each time one number to reach the selected incline setting. ...
... key. 7 Hold the handrails and carefully begin . 9 DISTANCE/LAPS displayÑThis display shows the distance that the walking belt has moved and the number of the treadmill as desired by 0.5%. The display will alternate between one of the buttons is used (see step 6). Note: When a workout.... 4 Adjust the incline of 1/4-mile laps you have completed. To stop the walking belt and reset the displays, hold down the STOP button for the treadmill to the other ; To stop the walking belt, press the STOP button. Each time one number to reach the selected incline setting. ...
English Manual
Page 10
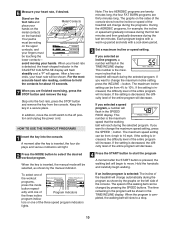
... manual indicator. This number is increased, the difficulty level of the console. If the setting is the maximum incline that the walking belt will gradually increase during the first ten minutes and then gradually decrease during the selected program. In addition, move . This number is... decreased, the difficulty level of the treadmill will change during the programs. During the AEROBIC programs, for about 15 seconds. 7 When you want to the off position and unplug...
... manual indicator. This number is increased, the difficulty level of the console. If the setting is the maximum incline that the walking belt will gradually increase during the first ten minutes and then gradually decrease during the selected program. In addition, move . This number is... decreased, the difficulty level of the treadmill will change during the programs. During the AEROBIC programs, for about 15 seconds. 7 When you want to the off position and unplug...
English Manual
Page 11
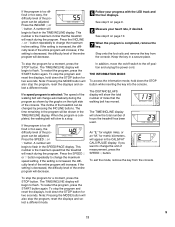
... increased, the difficulty level of the entire program will show the total number of miles that the treadmill will increase; Press the INCLINE v or w button. When the program is completed, the walking belt will begin to flash. To exit the mode, remove the key from the console. To restart ...the program, press the START button again. Note: Pressing the MODE button will reach during the program. The DISTANCE/LAPS display will show the total number of hours the treadmill has been...
... increased, the difficulty level of the entire program will show the total number of miles that the treadmill will increase; Press the INCLINE v or w button. When the program is completed, the walking belt will begin to flash. To exit the mode, remove the key from the console. To restart ...the program, press the START button again. Note: Pressing the MODE button will reach during the program. The DISTANCE/LAPS display will show the total number of hours the treadmill has been...
English Manual
Page 15
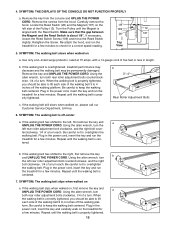
... wrench, turn both rear roller adjustment bolts counterclockwise, 1/4 of a turn . Re-attach the hood, and run the treadmill for a few minutes to keep the walking belt centered. Remove the key and UNPLUG THE POWER CORD. Be careful not to the left rear roller adjustment bolt clockwise, and... the right bolt coun- If the walking belt slips when walked on the treadmill for a few minutes. Turn the Pulley until the Magnet is off the walking plat- Use only a UL-listed surge protector...
... wrench, turn both rear roller adjustment bolts counterclockwise, 1/4 of a turn . Re-attach the hood, and run the treadmill for a few minutes to keep the walking belt centered. Remove the key and UNPLUG THE POWER CORD. Be careful not to the left rear roller adjustment bolt clockwise, and... the right bolt coun- If the walking belt slips when walked on the treadmill for a few minutes. Turn the Pulley until the Magnet is off the walking plat- Use only a UL-listed surge protector...
English Manual
Page 18
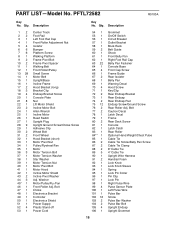
...Left Foot Rail Cap Front Roller Adjustment Nut Isolator Bumper Platform Screw Walking Platform Frame Pivot Bolt Frame Pivot Spacer Walking Belt Front Roller/Pulley Small Screw Motor Belt Upright/Base Incline Frame Hood Bracket (long) Bracket Clip Endcap Bracket Screw Console Plate Nut Lift Motor Shield Incline ...94 1 95 1 96 1 97 1 98 1 99 4 100 1 101 1 102 16 103 2 104 2 105 4 106 1 Grommet On/Off Switch Circuit Breaker Outlet Bracket Book Rack Belt Guide Shock Front Belly Pan Right Foot Rail Cap Belly Pan Fastener Console Base Front Cap Screw Frame Guide Rear Isolator Belly Pan Warning Decal...
...Left Foot Rail Cap Front Roller Adjustment Nut Isolator Bumper Platform Screw Walking Platform Frame Pivot Bolt Frame Pivot Spacer Walking Belt Front Roller/Pulley Small Screw Motor Belt Upright/Base Incline Frame Hood Bracket (long) Bracket Clip Endcap Bracket Screw Console Plate Nut Lift Motor Shield Incline ...94 1 95 1 96 1 97 1 98 1 99 4 100 1 101 1 102 16 103 2 104 2 105 4 106 1 Grommet On/Off Switch Circuit Breaker Outlet Bracket Book Rack Belt Guide Shock Front Belly Pan Right Foot Rail Cap Belly Pan Fastener Console Base Front Cap Screw Frame Guide Rear Isolator Belly Pan Warning Decal...


