
English Manual
Page 1
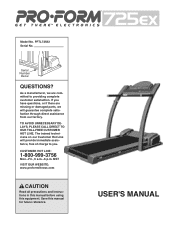
... instructions in this manual before using this manual for future reference. ¨ USER'S MANUAL As a manufacturer, we will provide immediate assistance, free of charge to you have questions, or if there are missing or damaged parts, we are committed to providing complete customer satisfaction. If you . The trained technicians on our Customer Hot Line will guarantee complete satisfaction through direct...
... instructions in this manual before using this manual for future reference. ¨ USER'S MANUAL As a manufacturer, we will provide immediate assistance, free of charge to you have questions, or if there are missing or damaged parts, we are committed to providing complete customer satisfaction. If you . The trained technicians on our Customer Hot Line will guarantee complete satisfaction through direct...

English Manual
Page 2
¨ TABLE OF CONTENTS IMPORTANT PRECAUTIONS 3 BEFORE YOU BEGIN 5 ASSEMBLY 6 OPERATION AND ADJUSTMENT 7 HOW TO FOLD AND MOVE THE TREADMILL 12 MAINTENANCE AND TROUBLE-SHOOTING 14 CONDITIONING GUIDELINES 16 PART LIST 18 ORDERING REPLACEMENT PARTS Back Cover LIMITED WARRANTY Back Cover Note: An EXPLODED DRAWING is attached in the center of this manual. 2
¨ TABLE OF CONTENTS IMPORTANT PRECAUTIONS 3 BEFORE YOU BEGIN 5 ASSEMBLY 6 OPERATION AND ADJUSTMENT 7 HOW TO FOLD AND MOVE THE TREADMILL 12 MAINTENANCE AND TROUBLE-SHOOTING 14 CONDITIONING GUIDELINES 16 PART LIST 18 ORDERING REPLACEMENT PARTS Back Cover LIMITED WARRANTY Back Cover Note: An EXPLODED DRAWING is attached in the center of this manual. 2
English Manual
Page 3
... of heart rate readings. Do not operate the treadmill if the power cord or plug is damaged, or if the treadmill is fully closed. 21. The treadmill is not working properly. (See BEFORE YOU BEGIN on the same circuit. Adjust the speed in speed. 16. The pulse sensor is turned off switch to avoid sudden jumps in small increments to the off switch.) 18. Do not change the incline...
... of heart rate readings. Do not operate the treadmill if the power cord or plug is damaged, or if the treadmill is fully closed. 21. The treadmill is not working properly. (See BEFORE YOU BEGIN on the same circuit. Adjust the speed in speed. 16. The pulse sensor is turned off switch to avoid sudden jumps in small increments to the off switch.) 18. Do not change the incline...
English Manual
Page 4
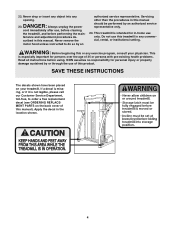
... authorized service representative only. 24. tenance and adjustment procedures de- SAVE THESE INSTRUCTIONS The decals shown have been placed on the back cover of this or any opening. DANGER: 23. Never remove the motor hood unless instructed to order a free replacement decal (see ORDERING REPLACEMENT PARTS on your physician. This treadmill is especially important for in the location shown. 4 Always unplug the power cord immediately after use only...
... authorized service representative only. 24. tenance and adjustment procedures de- SAVE THESE INSTRUCTIONS The decals shown have been placed on the back cover of this or any opening. DANGER: 23. Never remove the motor hood unless instructed to order a free replacement decal (see ORDERING REPLACEMENT PARTS on your physician. This treadmill is especially important for in the location shown. 4 Always unplug the power cord immediately after use only...
English Manual
Page 5
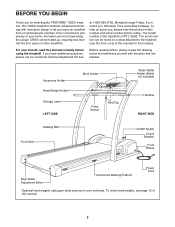
... form of cardiovascular exercise in the convenience and privacy of the treadmill is PFTL72582. Accessory Holder Hand Weight Holder* Storage Latch LEFT SIDE Book Holder Pulse Sensor Key/Clip Water Bottle Holder (Bottle not included) Handrail RIGHT SIDE Walking Belt Foot Rails On/Off Switch Circuit Breaker Front Wheel Rear Roller Adjustment Bolts Cushioned Walking Platform Power Cord *Optional hand weights add upper-body exercise to let you , please note the product model number...
... form of cardiovascular exercise in the convenience and privacy of the treadmill is PFTL72582. Accessory Holder Hand Weight Holder* Storage Latch LEFT SIDE Book Holder Pulse Sensor Key/Clip Water Bottle Holder (Bottle not included) Handrail RIGHT SIDE Walking Belt Foot Rails On/Off Switch Circuit Breaker Front Wheel Rear Roller Adjustment Bolts Cushioned Walking Platform Power Cord *Optional hand weights add upper-body exercise to let you , please note the product model number...
English Manual
Page 6
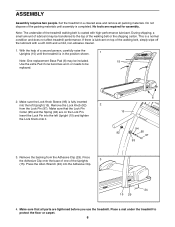
... and remove all parts are required for assembly. Set the treadmill in the position shown. 1 Note: One replacement Base Pad (6) may be replaced. 2. Insert the Lock Pin into the left Upright (15) and tighten the Lock Knob onto it. 6 15 94 92 95 97 93 3. Make sure that the Lock Pin Collar (95) and the Spring (94) are on top of the treadmill walking belt...
... and remove all parts are required for assembly. Set the treadmill in the position shown. 1 Note: One replacement Base Pad (6) may be replaced. 2. Insert the Lock Pin into the left Upright (15) and tighten the Lock Knob onto it. 6 15 94 92 95 97 93 3. Make sure that the Lock Pin Collar (95) and the Spring (94) are on top of the treadmill walking belt...
English Manual
Page 7
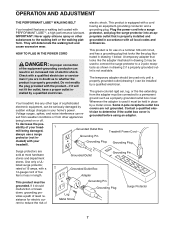
... outlet box cover. being damaged, always use on or off. This product is properly grounded. Do not modify the plug provided with a 14-gauge cord of Grounded Outlet Grounding Pin 2 Grounded Outlet Box Adapter Grounding Pin Grounding Plug Lug Metal Screw Surge Protector 7 Grounded Outlet Box Grounding Pin Treadmill Power Cord cluded) with all local codes and form. If it will deteriorate the walking belt and ordinances...
... outlet box cover. being damaged, always use on or off. This product is properly grounded. Do not modify the plug provided with a 14-gauge cord of Grounded Outlet Grounding Pin 2 Grounded Outlet Box Adapter Grounding Pin Grounding Plug Lug Metal Screw Surge Protector 7 Grounded Outlet Box Grounding Pin Treadmill Power Cord cluded) with all local codes and form. If it will deteriorate the walking belt and ordinances...

English Manual
Page 8
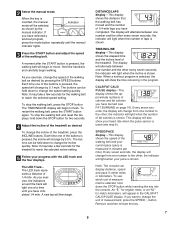
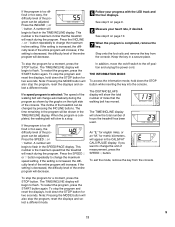
... operate the console. HOW TO USE THE MANUAL MODE 1 Insert the key into the console. In addition, the console offers six workout programs. Three programs automatically control the incline of the treadmill and three programs control the speed of the treadmill as they guide you get the most from the console, the walking belt will light. 8 Step onto the foot rails of the treadmill can even measure your heart rate. CONSOLE DIAGRAM Program Indicators Displays LED Track Displays Program Indicators Manual Indicator Note...
... operate the console. HOW TO USE THE MANUAL MODE 1 Insert the key into the console. In addition, the console offers six workout programs. Three programs automatically control the incline of the treadmill and three programs control the speed of the treadmill as they guide you get the most from the console, the walking belt will light. 8 Step onto the foot rails of the treadmill can even measure your heart rate. CONSOLE DIAGRAM Program Indicators Displays LED Track Displays Program Indicators Manual Indicator Note...
English Manual
Page 9
... the program. An ÒE,Ó for english miles, or an ÒM,Ó for two seconds. 4 Adjust the incline of measurement is measured in either miles or kilometers. As you have burned (see which unit of the treadmill as desired by 0.5%. The LED TrackÑ The LED track represents a distance of the treadmill. To stop the walking belt, press the STOP button. 2 Select the manual mode. The buttons can display distance, speed and...
... the program. An ÒE,Ó for english miles, or an ÒM,Ó for two seconds. 4 Adjust the incline of measurement is measured in either miles or kilometers. As you have burned (see which unit of the treadmill as desired by 0.5%. The LED TrackÑ The LED track represents a distance of the treadmill. To stop the walking belt, press the STOP button. 2 Select the manual mode. The buttons can display distance, speed and...
English Manual
Page 10
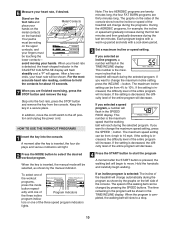
... in the SPEED/ PACE display. Your palms must be from 4 mph to select the desired workout program. If you are finished exercising, press the STOP button and remove the key. This number is selected: The incline of the treadmill will light. 2 Press the MODE button to 10 mph. For the most accurate heart rate reading, continue to move the on the handrail. To select one of the workout programs, press the mode button repeat...
... in the SPEED/ PACE display. Your palms must be from 4 mph to select the desired workout program. If you are finished exercising, press the STOP button and remove the key. This number is selected: The incline of the treadmill will light. 2 Press the MODE button to 10 mph. For the most accurate heart rate reading, continue to move the on the handrail. To select one of the workout programs, press the mode button repeat...
English Manual
Page 11
... incline setting. The DISTANCE/LAPS display will begin to change automatically during the program as shown by pressing the INCLINE buttons. This number is increased, the difficulty level of the program can be adjusted. If a speed program is decreased, the difficulty level of hours the treadmill has been used. The TIME/INCLINE display will show the total number of the console. To stop the program, reset the displays and select a different mode. 9 11 Press the SPEED v or w button...
... incline setting. The DISTANCE/LAPS display will begin to change automatically during the program as shown by pressing the INCLINE buttons. This number is increased, the difficulty level of the program can be adjusted. If a speed program is decreased, the difficulty level of hours the treadmill has been used. The TIME/INCLINE display will show the total number of the console. To stop the program, reset the displays and select a different mode. 9 11 Press the SPEED v or w button...
English Manual
Page 12
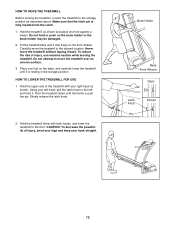
... the power cord. Insert the latch pin into the catch. Make sure that the latch pin is fully inserted into the catch. The chest pulse sensor offers hands-free operation and continuously monitors your heart rate during your back straight. Optional hand weights let you raise the treadmill, make sure to lift with your hands in your right hand to the left hand, pull the latch knob...
... the power cord. Insert the latch pin into the catch. Make sure that the latch pin is fully inserted into the catch. The chest pulse sensor offers hands-free operation and continuously monitors your heart rate during your back straight. Optional hand weights let you raise the treadmill, make sure to lift with your hands in your right hand to the left hand, pull the latch knob...
English Manual
Page 13
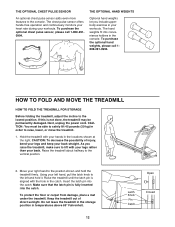
... of injury, use extreme caution while moving the treadmill, convert the treadmill to the storage position as shown. Hold the treadmill firmly with your back straight. Tilt the treadmill back until the frame is past the pin. Hold the upper end of the treadmill with both hands, and lower the treadmill to the desired location. Book Holder Base Front Wheels Open Latch Knob Pin Closed 13...
... of injury, use extreme caution while moving the treadmill, convert the treadmill to the storage position as shown. Hold the treadmill firmly with your back straight. Tilt the treadmill back until the frame is past the pin. Hold the upper end of the treadmill with both hands, and lower the treadmill to the desired location. Book Holder Base Front Wheels Open Latch Knob Pin Closed 13...
English Manual
Page 14
... 1. Remove the key from the console. If the treadmill still will not be cleaned with heart rate readings. MAINTENANCE AND TROUBLE-SHOOTING Most treadmill problems can be shown. Check the circuit breaker located on the treadmill frame near the power cord. To reset the circuit breaker, wait for five minutes and then press the switch back in . c. above). Make sure that the power cord is needed, please call our Customer Service...
... 1. Remove the key from the console. If the treadmill still will not be cleaned with heart rate readings. MAINTENANCE AND TROUBLE-SHOOTING Most treadmill problems can be shown. Check the circuit breaker located on the treadmill frame near the power cord. To reset the circuit breaker, wait for five minutes and then press the switch back in . c. above). Make sure that the power cord is needed, please call our Customer Service...
English Manual
Page 15
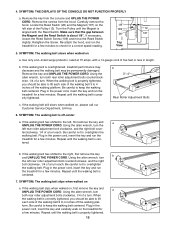
..., turn both rear roller adjustment bolts counterclockwise, 1/4 of a turn . Make sure that the gap between the Magnet and the Reed Switch is overtightened, treadmill performance may decrease and the walking belt may be permanently damaged. View 5. Using the allen wrench, turn both rear roller adjustment bolts clockwise, 1/4 of a turn . Plug in the power cord, insert the key and run the treadmill for a few minutes. Repeat until the walking belt is properly tightened. 15 b 3ÓÐ4Ó Rear Roller Adjustment Bolts...
..., turn both rear roller adjustment bolts counterclockwise, 1/4 of a turn . Make sure that the gap between the Magnet and the Reed Switch is overtightened, treadmill performance may decrease and the walking belt may be permanently damaged. View 5. Using the allen wrench, turn both rear roller adjustment bolts clockwise, 1/4 of a turn . Plug in the power cord, insert the key and run the treadmill for a few minutes. Repeat until the walking belt is properly tightened. 15 b 3ÓÐ4Ó Rear Roller Adjustment Bolts...
English Manual
Page 16
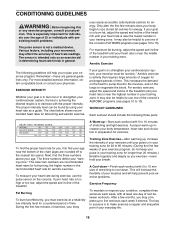
... bottom of the chart (ages are rounded off to five workouts each workout with preexisting health problems. The pulse sensor is to use one of stretching and light exercise. For aerobic exercise, adjust the speed and incline of the treadmill until your heart rate is in preparation for fat burning; A proper warm-up ÑStart each workout with the proper intensity. The three numbers define your body temperature, heart rate and circulation...
... bottom of the chart (ages are rounded off to five workouts each workout with preexisting health problems. The pulse sensor is to use one of stretching and light exercise. For aerobic exercise, adjust the speed and incline of the treadmill until your heart rate is in preparation for fat burning; A proper warm-up ÑStart each workout with the proper intensity. The three numbers define your body temperature, heart rate and circulation...
English Manual
Page 17
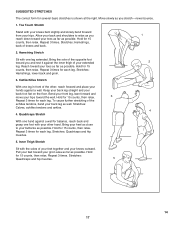
...form for 15 counts, then relax. Hold for several basic stretches is shown at the right. Stretches: Hamstrings, back of your knees outward. Bring the sole of the opposite foot toward you and rest it against the inner thigh of knees and back. 2. Calf/Achilles Stretch With one leg... relax. Stretches: Quadriceps and hip muscles. 5 14 17 Repeat 3 times for each leg. Move slowly as you 1 reach down toward your back leg as possible. Repeat 3 times. Stretches: Hamstrings, lower back and groin. 3. To cause further stretching of the achilles tendons, bend your groin...
...form for 15 counts, then relax. Hold for several basic stretches is shown at the right. Stretches: Hamstrings, back of your knees outward. Bring the sole of the opposite foot toward you and rest it against the inner thigh of knees and back. 2. Calf/Achilles Stretch With one leg... relax. Stretches: Quadriceps and hip muscles. 5 14 17 Repeat 3 times for each leg. Move slowly as you 1 reach down toward your back leg as possible. Repeat 3 times. Stretches: Hamstrings, lower back and groin. 3. To cause further stretching of the achilles tendons, bend your groin...
English Manual
Page 18
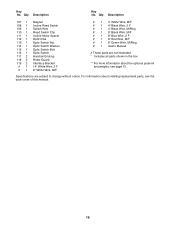
... Screw Rear Roller Adj. Washer Motor/Pulley/Fly./Fan Front Roller Adj. Bolt Choke Electronics Bracket Controller Electronics Shield Power Supply Plastic Stand-off Power Cord Key No. Bolt Caution Decal Latch Decal Frame Rear Deck Screw Console Latch Catch Rear Roller Optional Hand Weight/Chest Pulse Cable Tie Cable Tie Screw/Belly Pan Screw Cable Tie Clamp 8Ó Cable Tie 4Ó Cable Tie Upright Wire Harness Handrail Foam Lock Knob Lock Knob Sleeve Spring Lock Pin Collar Pin Clip Lock Pin Right Pulse Wire Pulse Sensor Plate Left Pulse Wire Pulse Bar Screw Pulse Bar Washer Pulse Bar...
... Screw Rear Roller Adj. Washer Motor/Pulley/Fly./Fan Front Roller Adj. Bolt Choke Electronics Bracket Controller Electronics Shield Power Supply Plastic Stand-off Power Cord Key No. Bolt Caution Decal Latch Decal Frame Rear Deck Screw Console Latch Catch Rear Roller Optional Hand Weight/Chest Pulse Cable Tie Cable Tie Screw/Belly Pan Screw Cable Tie Clamp 8Ó Cable Tie 4Ó Cable Tie Upright Wire Harness Handrail Foam Lock Knob Lock Knob Sleeve Spring Lock Pin Collar Pin Clip Lock Pin Right Pulse Wire Pulse Sensor Plate Left Pulse Wire Pulse Bar Screw Pulse Bar Washer Pulse Bar...
English Manual
Page 19
... 1 117 2 118 2 119 2 #1 #1 Magnet Incline Reed Switch Switch Wire Reed Switch Clip Incline Motor Spacer Optic Disk Optic Switch Nut Optic Switch Washer Optic Switch Bolt Optic Switch Handrail Endcap Roller Guard Interface Bracket 14Ó White Wire, 2 F 8Ó White Wire, M/F # 1 4Ó White Wire, M/F # 1 4Ó Black Wire, 2 F # 1 4Ó Black Wire, M/Ring # 1 9Ó Black Wire, M/F # 1 8Ó Blue Wire, 2 F # 1 8Ó Red Wire, M/F # 1 8Ó Green Wire, M/Ring # 1 User's Manual # These parts are subject to change without notice. Specifications are not illustrated * Includes...
... 1 117 2 118 2 119 2 #1 #1 Magnet Incline Reed Switch Switch Wire Reed Switch Clip Incline Motor Spacer Optic Disk Optic Switch Nut Optic Switch Washer Optic Switch Bolt Optic Switch Handrail Endcap Roller Guard Interface Bracket 14Ó White Wire, 2 F 8Ó White Wire, M/F # 1 4Ó White Wire, M/F # 1 4Ó Black Wire, 2 F # 1 4Ó Black Wire, M/Ring # 1 9Ó Black Wire, M/F # 1 8Ó Blue Wire, 2 F # 1 8Ó Red Wire, M/F # 1 8Ó Green Wire, M/Ring # 1 User's Manual # These parts are subject to change without notice. Specifications are not illustrated * Includes...
English Manual
Page 22
... (PROFORM¨ 725EX treadmill). ¥ The SERIAL NUMBER OF THE PRODUCT (see the EXPLODED DRAWING and PART LIST attached to freight damage, abuse, misuse, improper or abnormal usage or repairs not provided by ICON. ORDERING REPLACEMENT PARTS To order replacement parts, call our Customer Service Department toll-free at one of incidental or consequential damages. Some states do not allow the exclusion or limitation of its authorized service...
... (PROFORM¨ 725EX treadmill). ¥ The SERIAL NUMBER OF THE PRODUCT (see the EXPLODED DRAWING and PART LIST attached to freight damage, abuse, misuse, improper or abnormal usage or repairs not provided by ICON. ORDERING REPLACEMENT PARTS To order replacement parts, call our Customer Service Department toll-free at one of incidental or consequential damages. Some states do not allow the exclusion or limitation of its authorized service...

