

User Manual
Page 2
PRO•FORM® "72 TABLE OF CONTENTS IMPORTANT PRECAUTIONS BEFORE YOU BEGIN ASSEMBLY OPERATION AND ADJUSTMENT HOW TO FOLD AND MOVE THE TREADMILL TROUBLE-SHOOTING CONDITIONING GUIDELINES ORDERING REPLACEMENT PARTS LIMITED WARRANTY 3 4 5 7 11 12 14 Back Cover Back Cover Note: An EXPLODED DRAWING and a PART LIST are attached ...
PRO•FORM® "72 TABLE OF CONTENTS IMPORTANT PRECAUTIONS BEFORE YOU BEGIN ASSEMBLY OPERATION AND ADJUSTMENT HOW TO FOLD AND MOVE THE TREADMILL TROUBLE-SHOOTING CONDITIONING GUIDELINES ORDERING REPLACEMENT PARTS LIMITED WARRANTY 3 4 5 7 11 12 14 Back Cover Back Cover Note: An EXPLODED DRAWING and a PART LIST are attached ...

User Manual
Page 3
... procedures described In this manual should be on any opening. 10. You must be used or where oxygen is the responsibility of the treadmill overheating, do so by an authorized service representative. Never move the on the walking belt. The pulse sensor is turned off switch.) ...'s movement, may affect the accuracy of burns, fire, electric shock, or injury to ensure that the storage latch is damaged, or if the treadmill Is not working properly.) 12. Never remove the motor hood unless instructed to avoid sudden jumps In speed. 15. IMPORTANT PRECAUTIONS .4.1•SIWF: ...
... procedures described In this manual should be on any opening. 10. You must be used or where oxygen is the responsibility of the treadmill overheating, do so by an authorized service representative. Never move the on the walking belt. The pulse sensor is turned off switch.) ...'s movement, may affect the accuracy of burns, fire, electric shock, or injury to ensure that the storage latch is damaged, or if the treadmill Is not working properly.) 12. Never remove the motor hood unless instructed to avoid sudden jumps In speed. 15. IMPORTANT PRECAUTIONS .4.1•SIWF: ...

User Manual
Page 4
...benefit, read this manual for the location). If you enjoy an excellent form of cardiovascular exercise in the convenience and privacy of other treadmills. Towel Rack Water Bottle Holder* ..*. ar 1 III Console "' Speed Control Key/Clip Resistance Knobs Walking Belt Foot Rails On/...Off Switch Circuit Breaker FRONT Power Cord Rear Roller Adjustment Bolt BACK 4 Incline Leg Cushioned Walking Platform for selecting the PROFORM® 725xt treadmill. The serial number can be found on a decal attached to let you have additional questions, please call our Customer ...
...benefit, read this manual for the location). If you enjoy an excellent form of cardiovascular exercise in the convenience and privacy of other treadmills. Towel Rack Water Bottle Holder* ..*. ar 1 III Console "' Speed Control Key/Clip Resistance Knobs Walking Belt Foot Rails On/...Off Switch Circuit Breaker FRONT Power Cord Rear Roller Adjustment Bolt BACK 4 Incline Leg Cushioned Walking Platform for selecting the PROFORM® 725xt treadmill. The serial number can be found on a decal attached to let you have additional questions, please call our Customer ...

User Manual
Page 5
...7/32" alien wrench -1 and your back. Raise the Uprights until it r 3. Tighten Crossbar Screws (9) into all packing materials. Raise the treadmill about halfway to the storage position. Look under the Left and Right Crossbar Brackets (4, 51) and find the two small holes in assembly step ... the Crossbar Bolts (2) in the ends of the packing materials until assembly is included. ..... ..... ,.... . 75 0 .::0>•73 2. Next, the treadmill should be used in each end of the Base (75) in a cleared area and remove all four holes. Firmly hold the Uprights (11, 58)...
...7/32" alien wrench -1 and your back. Raise the Uprights until it r 3. Tighten Crossbar Screws (9) into all packing materials. Raise the treadmill about halfway to the storage position. Look under the Left and Right Crossbar Brackets (4, 51) and find the two small holes in assembly step ... the Crossbar Bolts (2) in the ends of the packing materials until assembly is included. ..... ..... ,.... . 75 0 .::0>•73 2. Next, the treadmill should be used in each end of the Base (75) in a cleared area and remove all four holes. Firmly hold the Uprights (11, 58)...

User Manual
Page 6
... the storage latch Is fully closed. 5 Storage Latch Locking Pin 6. Attach the Stabilizer Plate (88) to the base with both hands, and lower the ( treadmill to the floor. To decrease the possibility of the 3/16" Allen Wrench is de- jury, bend your legs and keep your left hand, lift the...Adhesive Clip. Keeping your right hand as shown. 6 51 88 v 73 88 . Hold the upper end of the stor- Note: Place a mat beneath the treadmill to the bottom of this position, a second person should slide the Stabilizer Plate (88) onto the base (see the lower inset drawing). Hold the Right...
... the storage latch Is fully closed. 5 Storage Latch Locking Pin 6. Attach the Stabilizer Plate (88) to the base with both hands, and lower the ( treadmill to the floor. To decrease the possibility of the 3/16" Allen Wrench is de- jury, bend your legs and keep your left hand, lift the...Adhesive Clip. Keeping your right hand as shown. 6 51 88 v 73 88 . Hold the upper end of the stor- Note: Place a mat beneath the treadmill to the bottom of this position, a second person should slide the Stabilizer Plate (88) onto the base (see the lower inset drawing). Hold the Right...
User Manual
Page 7
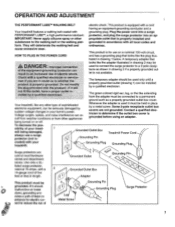
...that looks like the plug illus- used only until a properly grounded outlet (drawing 1) can be connected to reduce the risk of your treadmill. not fit the outlet, have a proper outlet installed by a qualified electrician. Some 2-pole receptacle outlet box covers are in doubt as ... used to connect the surge protector to whether the product is equipped with a cord having an equipment-grounding conductor and a Your treadmill features a walking belt coated with a qualified electrician or serviceman if you are not grounded. OPERATION AND ADJUSTMENT THE PERFORMANT LUBETM WALKING...
...that looks like the plug illus- used only until a properly grounded outlet (drawing 1) can be connected to reduce the risk of your treadmill. not fit the outlet, have a proper outlet installed by a qualified electrician. Some 2-pole receptacle outlet box covers are in doubt as ... used to connect the surge protector to whether the product is equipped with a cord having an equipment-grounding conductor and a Your treadmill features a walking belt coated with a qualified electrician or serviceman if you are not grounded. OPERATION AND ADJUSTMENT THE PERFORMANT LUBETM WALKING...

User Manual
Page 8
... the walking belt can be restarted. WM/ FAST JP awn IID SLOW MEW 2;ITSP/EED use caulkal. STEP 1,INRT STEP-BY-STEP CONSOLE OPERATION The treadmill console features a manual mode and six preset workout programs. In the manual mode, the speed of the workout programs is in the console, remove it... moved to move yet. Note: Each time the walking belt is in . (See HOW TO PLUG IN THE POWER CORD on the face of the treadmill. INSERT KEY TRAINING ZONES - Make sure that the on/off switch near the power cord 8 is stopped. Note: If the key was Just Inserted, the...
... the walking belt can be restarted. WM/ FAST JP awn IID SLOW MEW 2;ITSP/EED use caulkal. STEP 1,INRT STEP-BY-STEP CONSOLE OPERATION The treadmill console features a manual mode and six preset workout programs. In the manual mode, the speed of the workout programs is in the console, remove it... moved to move yet. Note: Each time the walking belt is in . (See HOW TO PLUG IN THE POWER CORD on the face of the treadmill. INSERT KEY TRAINING ZONES - Make sure that the on/off switch near the power cord 8 is stopped. Note: If the key was Just Inserted, the...

User Manual
Page 10
...down one upper body arm with it. Hold your thumb on page 9). Hold your thumb at this mode, hold down again on the treadmill. tioned as shown. To change the in a secure place. THE INFORMATION MODE The console features an information mode that you are designed to.../ PULSE display flashes steadily. Remember to be displayed in kilometers. A V INCLINE HOW TO USE THE UPPER BODY ARMS As you exercise on the treadmill, you walk. • DISTANCE/PULSE display-Displays the distance you are finished, remove the key. Next, slightly raise your arms, shoulders, and ...
...down one upper body arm with it. Hold your thumb on page 9). Hold your thumb at this mode, hold down again on the treadmill. tioned as shown. To change the in a secure place. THE INFORMATION MODE The console features an information mode that you are designed to.../ PULSE display flashes steadily. Remember to be displayed in kilometers. A V INCLINE HOW TO USE THE UPPER BODY ARMS As you exercise on the treadmill, you walk. • DISTANCE/PULSE display-Displays the distance you are finished, remove the key. Next, slightly raise your arms, shoulders, and ...

User Manual
Page 11
.... Hold the upper end of injury, use extreme caution while moving the treadmill, convert the treadmill to the desired location. As you raise the treadmill, make sure to the vertical position. 2. Raise the treadmill about halfway to lift with your right hand as described above 85°...1 , -- . -,, Locking Pin Crossbar Bracket Base Front Wheels Storage Latch - . -.„ , Locking Pin 11 HOW TO FOLD AND MOVE THE TREADMILL HOW TO FOLD THE TREADMILL FOR STORAGE Before folding the treadmill, unplug the power cord. To protect the floor or carpet from damage, place a mat under the...
.... Hold the upper end of injury, use extreme caution while moving the treadmill, convert the treadmill to the desired location. As you raise the treadmill, make sure to the vertical position. 2. Raise the treadmill about halfway to lift with your right hand as described above 85°...1 , -- . -,, Locking Pin Crossbar Bracket Base Front Wheels Storage Latch - . -.„ , Locking Pin 11 HOW TO FOLD AND MOVE THE TREADMILL HOW TO FOLD THE TREADMILL FOR STORAGE Before folding the treadmill, unplug the power cord. To protect the floor or carpet from damage, place a mat under the...

User Manual
Page 12
...console. d. Make sure that the power cord is plugged into the console. (See step 1 on /off switch located at the front of the treadmill near the power cord. The switch must be solved by following the steps below. above .) 12 e. If further assistance is plugged into the ...console. (See step 1 on the treadmill frame near the power cord. To reset the circuit breaker, wait for five minutes and then press the switch back in . Tripped 0 Reset d. c....
...console. d. Make sure that the power cord is plugged into the console. (See step 1 on /off switch located at the front of the treadmill near the power cord. The switch must be solved by following the steps below. above .) 12 e. If further assistance is plugged into the ...console. (See step 1 on the treadmill frame near the power cord. To reset the circuit breaker, wait for five minutes and then press the switch back in . Tripped 0 Reset d. c....

User Manual
Page 13
...CORD. Turn the Resistance Knob (59) counterclockwise until the walking belt is centered. 5. Plug in the power cord, insert the key and run the treadmill for a few minutes. Use only a UL-listed surge protector, rated at most department stores. Repeat until it back in length. Using the 3/16"... alien wrench, turn the left , first remove the key and UNPLUG THE POWER CORD. Plug in the power cord, insert the key and run the treadmill for a few minutes. Remove the Resistance Cone (60) and the Upper Body Arm (12), along with a 14-gauge cord of a turn . 3. ...
...CORD. Turn the Resistance Knob (59) counterclockwise until the walking belt is centered. 5. Plug in the power cord, insert the key and run the treadmill for a few minutes. Use only a UL-listed surge protector, rated at most department stores. Repeat until it back in length. Using the 3/16"... alien wrench, turn the left , first remove the key and UNPLUG THE POWER CORD. Plug in the power cord, insert the key and run the treadmill for a few minutes. Remove the Resistance Cone (60) and the Upper Body Arm (12), along with a 14-gauge cord of a turn . 3. ...

User Manual
Page 16
...which warranty claim is authorized by ICON. SOME STATES DO NOT ALLOW LIMITATIONS ON HOW LONG AN IMPLIED WARRANTY LASTS. If possible, place the treadmill near your telephone for which vary from the date of purchase. All products for easy reference when calling. until 6 p.m. This warranty extends...must be prepared to give the following information: • The MODEL NUMBER OF THE PRODUCT (PFTL20560). • The NAME OF THE PRODUCT (PROFORM® 725xt treadmill). • The SERIAL NUMBER OF THE PRODUCT (see the front cover of this manual). • The KEY NUMBER OF THE PART(S) (see...
...which warranty claim is authorized by ICON. SOME STATES DO NOT ALLOW LIMITATIONS ON HOW LONG AN IMPLIED WARRANTY LASTS. If possible, place the treadmill near your telephone for which vary from the date of purchase. All products for easy reference when calling. until 6 p.m. This warranty extends...must be prepared to give the following information: • The MODEL NUMBER OF THE PRODUCT (PFTL20560). • The NAME OF THE PRODUCT (PROFORM® 725xt treadmill). • The SERIAL NUMBER OF THE PRODUCT (see the front cover of this manual). • The KEY NUMBER OF THE PART(S) (see...


