

User Manual
Page 1
....10#45 th mneanuaallffor'future reference USER'S MANUAL As a manufacturer, we will provide immediate assistance, free of charge to providing complete customer satisfaction. CUSTOMER HOT LINE: 1-800-999-3756 Mon.-Fri., 6 a.m.-6 p.m. Serial Number Decal O 0 QUESTIONS? PFTL20560 Serial No. PRO•FORM® 7 12 toga fr Model No. TO AVOID UNNECESSARY DELAYS, PLEASE CALL DIRECT TO OUR TOLL-FREE CUSTOMER HOT LINE.
....10#45 th mneanuaallffor'future reference USER'S MANUAL As a manufacturer, we will provide immediate assistance, free of charge to providing complete customer satisfaction. CUSTOMER HOT LINE: 1-800-999-3756 Mon.-Fri., 6 a.m.-6 p.m. Serial Number Decal O 0 QUESTIONS? PFTL20560 Serial No. PRO•FORM® 7 12 toga fr Model No. TO AVOID UNNECESSARY DELAYS, PLEASE CALL DIRECT TO OUR TOLL-FREE CUSTOMER HOT LINE.

User Manual
Page 2
Save the EXPLODED DRAWING and PART LIST for future reference. PRO•FORM® "72 TABLE OF CONTENTS IMPORTANT PRECAUTIONS BEFORE YOU BEGIN ASSEMBLY OPERATION AND ADJUSTMENT HOW TO FOLD AND MOVE THE TREADMILL TROUBLE-SHOOTING CONDITIONING GUIDELINES ORDERING REPLACEMENT PARTS LIMITED WARRANTY 3 4 5 7 11 12 14 Back Cover Back Cover Note: An EXPLODED DRAWING and a PART LIST are attached to the center of this or eny exert{se prograi consult...
Save the EXPLODED DRAWING and PART LIST for future reference. PRO•FORM® "72 TABLE OF CONTENTS IMPORTANT PRECAUTIONS BEFORE YOU BEGIN ASSEMBLY OPERATION AND ADJUSTMENT HOW TO FOLD AND MOVE THE TREADMILL TROUBLE-SHOOTING CONDITIONING GUIDELINES ORDERING REPLACEMENT PARTS LIMITED WARRANTY 3 4 5 7 11 12 14 Back Cover Back Cover Note: An EXPLODED DRAWING and a PART LIST are attached to the center of this or eny exert{se prograi consult...

User Manual
Page 3
... treadmill. 14. Never remove the motor hood unless instructed to do not operate the treadmill continuously for longer than one person on page 4 if the treadmill is not in use the treadmill with a 14-gauge cord of five feet or less in general. 17. Do not place the treadmill on any opening. 10. When connecting the power cord (see HOW TO PLUG IN THE POWER CORD on the walking belt...
... treadmill. 14. Never remove the motor hood unless instructed to do not operate the treadmill continuously for longer than one person on page 4 if the treadmill is not in use the treadmill with a 14-gauge cord of five feet or less in general. 17. Do not place the treadmill on any opening. 10. When connecting the power cord (see HOW TO PLUG IN THE POWER CORD on the walking belt...

User Manual
Page 4
... through Friday, 6 a.m. The model number of your benefit, read this manual for selecting the PROFORM® 725xt treadmill. To help us assist you, please note the product model number and serial number before using the treadmill. Towel Rack Water Bottle Holder* ..*. For your home. ar 1 III Console "' Speed Control Key/Clip Resistance Knobs Walking Belt Foot Rails On/Off Switch Circuit Breaker FRONT Power Cord Rear Roller Adjustment Bolt BACK 4 Incline Leg Cushioned Walking Platform for maximum exercise comfort RIGHT SIDE
... through Friday, 6 a.m. The model number of your benefit, read this manual for selecting the PROFORM® 725xt treadmill. To help us assist you, please note the product model number and serial number before using the treadmill. Towel Rack Water Bottle Holder* ..*. For your home. ar 1 III Console "' Speed Control Key/Clip Resistance Knobs Walking Belt Foot Rails On/Off Switch Circuit Breaker FRONT Power Cord Rear Roller Adjustment Bolt BACK 4 Incline Leg Cushioned Walking Platform for maximum exercise comfort RIGHT SIDE

User Manual
Page 5
... legs rather than your hands in assembly step 6, 1 73 .... 73 73 and one extra Base Pad is completed. Set the treadmill in a cleared area and remove all four holes. Loosen the Crossbar Bolts (2) in the indicated locations (see the inset drawing). Tighten Crossbar Screws (9) into all packing materials. As you raise the treadmill, make sure to the storage position. pose of the Console...
... legs rather than your hands in assembly step 6, 1 73 .... 73 73 and one extra Base Pad is completed. Set the treadmill in a cleared area and remove all four holes. Loosen the Crossbar Bolts (2) in the indicated locations (see the inset drawing). Tighten Crossbar Screws (9) into all packing materials. As you raise the treadmill, make sure to the storage position. pose of the Console...

User Manual
Page 6
... location. Using your left hand, lift the storage latch. Remove the paper backing from the Adhesive Clip (44). 5. Move your right hand as shown. 6 51 88 v 73 88 . Attach a Base Pad (73) to the base with a Stabilizer Plate Bolt (105), two Washers (97), and the Stabilizer Plate Nut (95) as 7 shown. Tip the treadmill back slightly. jury, bend your legs...
... location. Using your left hand, lift the storage latch. Remove the paper backing from the Adhesive Clip (44). 5. Move your right hand as shown. 6 51 88 v 73 88 . Attach a Base Pad (73) to the base with a Stabilizer Plate Bolt (105), two Washers (97), and the Stabilizer Plate Nut (95) as 7 shown. Tip the treadmill back slightly. jury, bend your legs...
User Manual
Page 7
... grounding plug. Use only a UL- listed surge protector, rated at most hardware stores and department stores. Do not modify the plug provided with your treadmill. Voltage surges, spikes, and noise interference can result from weather conditions or from the adapter must be connected to the walking belt or the walking plat- being damaged, always use on or off. sibility of your home's power. Plug the power cord...
... grounding plug. Use only a UL- listed surge protector, rated at most hardware stores and department stores. Do not modify the plug provided with your treadmill. Voltage surges, spikes, and noise interference can result from weather conditions or from the adapter must be connected to the walking belt or the walking plat- being damaged, always use on or off. sibility of your home's power. Plug the power cord...

User Manual
Page 8
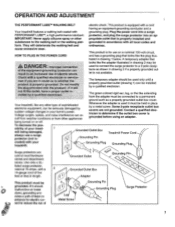
... sheet of the walking belt can be changed with the electronic speed control. WrzKOMR:-,;VMM AUTION113etiiie60eiiiih4 the .heold;leedtbkfoiteiiiithd:•:0':edeutitihe If the key is selected, the console will light. Find the clip attached to operate the console: Ei Insert the key fully into the power switch. STEP 1,INRT STEP-BY-STEP CONSOLE OPERATION The treadmill console features a manual mode and six preset workout programs. In the manual mode, the speed of clear plastic on...
... sheet of the walking belt can be changed with the electronic speed control. WrzKOMR:-,;VMM AUTION113etiiie60eiiiih4 the .heold;leedtbkfoiteiiiithd:•:0':edeutitihe If the key is selected, the console will light. Find the clip attached to operate the console: Ei Insert the key fully into the power switch. STEP 1,INRT STEP-BY-STEP CONSOLE OPERATION The treadmill console features a manual mode and six preset workout programs. In the manual mode, the speed of clear plastic on...

User Manual
Page 9
... key into the console. onds, the display will be shown in the MANUAL mode. Note: To change from the number shown if the speed or in the center of measurement, hold down period. 4 Press the START/STOP button. Remove and then reinsert the key. 9 CA Press the SELECT MODE button to change automatically during the program as desired by the speed profiles in - The MANUAL mode can also be selected by pressing the START/ STOP button...
... key into the console. onds, the display will be shown in the MANUAL mode. Note: To change from the number shown if the speed or in the center of measurement, hold down period. 4 Press the START/STOP button. Remove and then reinsert the key. 9 CA Press the SELECT MODE button to change automatically during the program as desired by the speed profiles in - The MANUAL mode can also be selected by pressing the START/ STOP button...

User Manual
Page 10
..., move the arms forward and backward as shown, and that keeps track of your pulse, if desired. Press down the START/ STOP button while inserting the key into the console. Upper Body Arms Resistance Knobs To vary the intensity of the total time and distance accumulated on the foot rails and place your thumb off the sensor and allow the display to be displayed in the SPEED display). The DISTANCE/PULSE display will...
..., move the arms forward and backward as shown, and that keeps track of your pulse, if desired. Press down the START/ STOP button while inserting the key into the console. Upper Body Arms Resistance Knobs To vary the intensity of the total time and distance accumulated on the foot rails and place your thumb off the sensor and allow the display to be displayed in the SPEED display). The DISTANCE/PULSE display will...

User Manual
Page 11
.... 3. HOW TO LOWER THE TREADMILL FOR USE 1. Using your left hand, lift the storage latch. HOW TO FOLD AND MOVE THE TREADMILL HOW TO FOLD THE TREADMILL FOR STORAGE Before folding the treadmill, unplug the power cord. Hold the treadmill, with your left hand, lift the storage latch. Using your right hand as described above 85° Fahrenheit. Do not leave the treadmill in the storage position in the locations shown at the...
.... 3. HOW TO LOWER THE TREADMILL FOR USE 1. Using your left hand, lift the storage latch. HOW TO FOLD AND MOVE THE TREADMILL HOW TO FOLD THE TREADMILL FOR STORAGE Before folding the treadmill, unplug the power cord. Hold the treadmill, with your left hand, lift the storage latch. Using your right hand as described above 85° Fahrenheit. Do not leave the treadmill in the storage position in the locations shown at the...

User Manual
Page 12
... HOW TO PLUG IN THE POWER CORD on " position. (See 1. If further assistance is needed, please call our Customer Service Department, toll-free. Tripped 0 Reset d. If the circuit breaker has tripped, wait for five minutes and then press the switch back in the "on page 7.) Use only a UL-listed surge protector, rated at 15 amps, with both hands, and lower the treadmill to make...
... HOW TO PLUG IN THE POWER CORD on " position. (See 1. If further assistance is needed, please call our Customer Service Department, toll-free. Tripped 0 Reset d. If the circuit breaker has tripped, wait for five minutes and then press the switch back in the "on page 7.) Use only a UL-listed surge protector, rated at 15 amps, with both hands, and lower the treadmill to make...

User Manual
Page 13
... Correcting this problem requires a small amount of five feet or less in length. b. b. If the walking belt still slows when walked on, please call our Customer Service Department, toll-free. 4. Use only a UL-listed surge protector, rated at most department stores. If the walking belt has shifted to the left rear roller adjustment bolt counterclockwise 1/4 of a turn the left , first remove the key and UNPLUG THE POWER CORD. Turn the Resistance Knob (59...
... Correcting this problem requires a small amount of five feet or less in length. b. b. If the walking belt still slows when walked on, please call our Customer Service Department, toll-free. 4. Use only a UL-listed surge protector, rated at most department stores. If the walking belt has shifted to the left rear roller adjustment bolt counterclockwise 1/4 of a turn the left , first remove the key and UNPLUG THE POWER CORD. Turn the Resistance Knob (59...

User Manual
Page 14
... ex- 55 ercise program. Begin each workout 14 During the first few months of your body uses easily accessible carbohydrate calories for set the speed control on the console to PERFORMANCE to your training zone as a guide. As you exercise. Training Zone (Beats/Min.) Age Unconditioned 20 138-167 25 136-166 Conditioned A.133-162 132-160 The .pulse sensor is to age and...
... ex- 55 ercise program. Begin each workout 14 During the first few months of your body uses easily accessible carbohydrate calories for set the speed control on the console to PERFORMANCE to your training zone as a guide. As you exercise. Training Zone (Beats/Min.) Age Unconditioned 20 138-167 25 136-166 Conditioned A.133-162 132-160 The .pulse sensor is to age and...

User Manual
Page 15
...STRETCHES The correct form for several basic stretches is in the drawings below. Toe Touch Stretch Stand with one day of stretching to make exercise a regular and enjoyable part of your exercise program, do not keep your pulse in front ...leg, lean forward and move your hips toward your other , reach forward and place your buttocks as you may complete up , increase the intensity of your exercise until your pulse is shown in your training zone for 20 to prevent post-exercise problems. Exercise Frequency To maintain or improve your condition, complete three workouts each workout...
...STRETCHES The correct form for several basic stretches is in the drawings below. Toe Touch Stretch Stand with one day of stretching to make exercise a regular and enjoyable part of your exercise program, do not keep your pulse in front ...leg, lean forward and move your hips toward your other , reach forward and place your buttocks as you may complete up , increase the intensity of your exercise until your pulse is shown in your training zone for 20 to prevent post-exercise problems. Exercise Frequency To maintain or improve your condition, complete three workouts each workout...

User Manual
Page 16
... treadmill). • The SERIAL NUMBER OF THE PRODUCT (see the front cover of this manual). • The KEY NUMBER OF THE PART(S) (see the EXPLODED DRAWING and PART LIST attached to the center of this manual). • The DESCRIPTION OF THE PART(S) (see the EXPLODED DRAWING and PART LIST attached to the center of its authorized service centers. No other rights which warranty claim is authorized by ICON. THE WARRANTY...
... treadmill). • The SERIAL NUMBER OF THE PRODUCT (see the front cover of this manual). • The KEY NUMBER OF THE PART(S) (see the EXPLODED DRAWING and PART LIST attached to the center of this manual). • The DESCRIPTION OF THE PART(S) (see the EXPLODED DRAWING and PART LIST attached to the center of its authorized service centers. No other rights which warranty claim is authorized by ICON. THE WARRANTY...

User Manual
Page 17
N.-2) D ° irtr tOi ,•7t1 O X Note: Specifications are subject to change without notice. REMOVE THIS EXPLODED DRAWING AND PART LIST FROM THE MANUAL Save this EXPLODED DRAWING and PART LIST for future reference. For information about ordering replacement parts, see the back cover of the User's Manual.
N.-2) D ° irtr tOi ,•7t1 O X Note: Specifications are subject to change without notice. REMOVE THIS EXPLODED DRAWING AND PART LIST FROM THE MANUAL Save this EXPLODED DRAWING and PART LIST for future reference. For information about ordering replacement parts, see the back cover of the User's Manual.

User Manual
Page 18
PFTL20560 EXPLODED DRAWING Model H . 24 23 2 \\ 9 13 68 10 11 7 15 7 12 R0296A 25 81 27 28 29 \26 34 35 36 37 38 21 20 19* 18 40 ...
PFTL20560 EXPLODED DRAWING Model H . 24 23 2 \\ 9 13 68 10 11 7 15 7 12 R0296A 25 81 27 28 29 \26 34 35 36 37 38 21 20 19* 18 40 ...

User Manual
Page 19
... Resistance Bolt Cable Loom Upright Pivot Bolt Front Wheel Bolt/Incline Leg Bolt Wheel Spacer Upright Plug Base Pad Wheel Base Motor/Controller Wire Resistance Bracket Bolt Foot Rail Power Cord Grommet Safety Cover Screw Safety Cover Hairpin Cotter Pin Frame Base Shock Isolator Belt Guide Stabilizer Plate Roller Guard Front Roller/Pulley Walking Platform Walking Belt Platform Screw Left Rear Roller Adj. Description Key No. Bolt Incline Leg Rear Hood Spacer 8" Wire Tie Upright Pivot Nut Tie Holder Clamp Rear Hood Safety Cover Wire Harness 14" Blue Wire, 2 Female 14" White Wire, 2 Female...
... Resistance Bolt Cable Loom Upright Pivot Bolt Front Wheel Bolt/Incline Leg Bolt Wheel Spacer Upright Plug Base Pad Wheel Base Motor/Controller Wire Resistance Bracket Bolt Foot Rail Power Cord Grommet Safety Cover Screw Safety Cover Hairpin Cotter Pin Frame Base Shock Isolator Belt Guide Stabilizer Plate Roller Guard Front Roller/Pulley Walking Platform Walking Belt Platform Screw Left Rear Roller Adj. Description Key No. Bolt Incline Leg Rear Hood Spacer 8" Wire Tie Upright Pivot Nut Tie Holder Clamp Rear Hood Safety Cover Wire Harness 14" Blue Wire, 2 Female 14" White Wire, 2 Female...

