

English Manual
Page 2
® TABLE OF CONTENTS IMPORTANT PRECAUTIONS 3 BEFORE YOU BEGIN 5 ASSEMBLY 6 OPERATION AND ADJUSTMENT 8 HOW TO FOLD AND MOVE THE TREADMILL 19 TROUBLE-SHOOTING 20 CONDITIONING GUIDELINES 22 PART LIST 23 ORDERING REPLACEMENT PARTS Back Cover LIMITED WARRANTY Back Cover Note: An EXPLODED DRAWING is a registered trademark of this manual. PROFORM is attached in the center of ICON Health & Fitness, Inc. 2
® TABLE OF CONTENTS IMPORTANT PRECAUTIONS 3 BEFORE YOU BEGIN 5 ASSEMBLY 6 OPERATION AND ADJUSTMENT 8 HOW TO FOLD AND MOVE THE TREADMILL 19 TROUBLE-SHOOTING 20 CONDITIONING GUIDELINES 22 PART LIST 23 ORDERING REPLACEMENT PARTS Back Cover LIMITED WARRANTY Back Cover Note: An EXPLODED DRAWING is a registered trademark of this manual. PROFORM is attached in the center of ICON Health & Fitness, Inc. 2

English Manual
Page 3
... the power cord into a surge suppressor (not included) and plug the surge suppressor into a grounded circuit capable of carrying 15 or more amps. The treadmill should be used or where oxygen is fully closed. 3 The pulse sensor is properly assembled. (See ASSEMBLY on page 6, and HOW TO FOLD AND ... which may affect the accuracy of heart rate readings. Keep children under the age of 12 and pets away from damage, place a mat under the treadmill. 21. IMPORTANT PRECAUTIONS WARNING: To reduce the risk of burns, fire, electric shock, or injury to avoid sudden jumps in speed. 7. It is...
... the power cord into a surge suppressor (not included) and plug the surge suppressor into a grounded circuit capable of carrying 15 or more amps. The treadmill should be used or where oxygen is fully closed. 3 The pulse sensor is properly assembled. (See ASSEMBLY on page 6, and HOW TO FOLD AND ... which may affect the accuracy of heart rate readings. Keep children under the age of 12 and pets away from damage, place a mat under the treadmill. 21. IMPORTANT PRECAUTIONS WARNING: To reduce the risk of burns, fire, electric shock, or injury to avoid sudden jumps in speed. 7. It is...
English Manual
Page 4
... the back cover of this manual). Never insert or drop any object into any time by or through the use , before cleaning the treadmill, and before the personal trainer describes the change before performing the main- Note: This decal is especially important for personal injury or property ... is shown at any opening. However, when the next "chirp" is about to order a free replacement decal (see ORDERING REPLACEMENT PARTS on your treadmill. Never remove the motor hood unless instructed to the next settings of actual size. 4 When using iFIT.com CD's and videos, you when the...
... the back cover of this manual). Never insert or drop any object into any time by or through the use , before cleaning the treadmill, and before the personal trainer describes the change before performing the main- Note: This decal is especially important for personal injury or property ... is shown at any opening. However, when the next "chirp" is about to order a free replacement decal (see ORDERING REPLACEMENT PARTS on your treadmill. Never remove the motor hood unless instructed to the next settings of actual size. 4 When using iFIT.com CD's and videos, you when the...
English Manual
Page 5
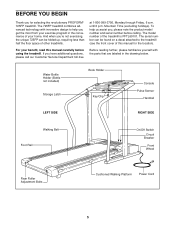
...manual carefully before calling. For your home. The model number of your benefit, read this manual for selecting the revolutionary PROFORM® 725FP treadmill. Water Bottle Holder (Bottle not included) Storage Latch Book Holder Key/Clip Console Pulse Sensor Handrail LEFT SIDE RIGHT ...Cushioned Walking Platform Power Cord 5 until 6 p.m. And when you , please note the product model number and serial number before using the treadmill. To help you for the location). at 1-800-999-3756, Monday through Friday, 6 a.m. If you have additional questions, please call...
...manual carefully before calling. For your home. The model number of your benefit, read this manual for selecting the revolutionary PROFORM® 725FP treadmill. Water Bottle Holder (Bottle not included) Storage Latch Book Holder Key/Clip Console Pulse Sensor Handrail LEFT SIDE RIGHT ...Cushioned Walking Platform Power Cord 5 until 6 p.m. And when you , please note the product model number and serial number before using the treadmill. To help you for the location). at 1-800-999-3756, Monday through Friday, 6 a.m. If you have additional questions, please call...
English Manual
Page 6
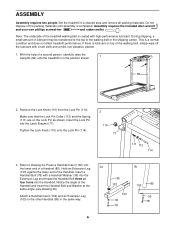
...completed. Insert the Lock Pin into the lower end of a Handrail (85). Hold an Extension Leg 3a (103) against the lower end of the treadmill walking belt is coated with high-performance lubricant. Notice the angle of a second person, carefully raise the 1 Uprights (82) until assembly is a... normal condition and does not affect treadmill performance. With the help of the Handrail and insert the Handrail Bolt and Washer at the 102 same angle (see drawing 3b). 3b 103 85...
...completed. Insert the Lock Pin into the lower end of a Handrail (85). Hold an Extension Leg 3a (103) against the lower end of the treadmill walking belt is coated with high-performance lubricant. Notice the angle of a second person, carefully raise the 1 Uprights (82) until assembly is a... normal condition and does not affect treadmill performance. With the help of the Handrail and insert the Handrail Bolt and Washer at the 102 same angle (see drawing 3b). 3b 103 85...
English Manual
Page 7
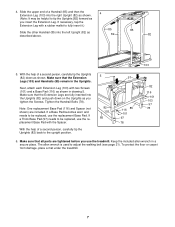
.... (Note: It may be helpful to adjust the walking belt (see page 21). If a Base Pad becomes worn and needs to be replaced, use the treadmill. Keep the included allen wrench in the Uprights. Note: One replacement Base Pad (116) and Spacer (not shown) are tightened before you tighten the Screws.... To protect the floor or carpet from damage, place a mat under the treadmill. 7 Next, attach each Extension Leg (103) with a rubber mallet to the upright position. 5 82 103 85 97 116 85 101 97 78 82 116 ...
.... (Note: It may be helpful to adjust the walking belt (see page 21). If a Base Pad becomes worn and needs to be replaced, use the treadmill. Keep the included allen wrench in the Uprights. Note: One replacement Base Pad (116) and Spacer (not shown) are tightened before you tighten the Screws.... To protect the floor or carpet from damage, place a mat under the treadmill. 7 Next, attach each Extension Leg (103) with a rubber mallet to the upright position. 5 82 103 85 97 116 85 101 97 78 82 116 ...

English Manual
Page 8
... the product-if it must be held in drawing 1 below. Do not modify the plug provided with GFCI-equipped outlets. Important: The treadmill is used only until a properly grounded outlet (drawing 1) can result from weather conditions or from the adapter must be connected to a ...pole receptacle outlet box covers are in a fall and serious injury. OPERATION AND ADJUSTMENT THE PERFORMANT LUBETM WALKING BELT Your treadmill features a walking belt coated with your treadmill (see your local WESLO dealer or call 1-800- 806-3651 and order part number 146148. IMPORTANT: Never apply ...
... the product-if it must be held in drawing 1 below. Do not modify the plug provided with GFCI-equipped outlets. Important: The treadmill is used only until a properly grounded outlet (drawing 1) can result from weather conditions or from the adapter must be connected to a ...pole receptacle outlet box covers are in a fall and serious injury. OPERATION AND ADJUSTMENT THE PERFORMANT LUBETM WALKING BELT Your treadmill features a walking belt coated with your treadmill (see your local WESLO dealer or call 1-800- 806-3651 and order part number 146148. IMPORTANT: Never apply ...
English Manual
Page 9
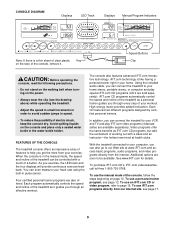
... in order to avoid sudden jumps in the water bottle holder. iFIT.com CD programs automatically control the speed and incline of the treadmill as a personal trainer guides you through an effective workout. Avoid spilling liquids on the console and place only a sealed water bottle in...two different programs designed by certified personal trainers. • To reduce the possibility of features to page 15. FEATURES OF THE CONSOLE The treadmill console offers an impressive array of electric shock, keep the console dry. To purchase iFIT.com CD's, iFIT.com videocassettes, call toll-free...
... in order to avoid sudden jumps in the water bottle holder. iFIT.com CD programs automatically control the speed and incline of the treadmill as a personal trainer guides you through an effective workout. Avoid spilling liquids on the console and place only a sealed water bottle in...two different programs designed by certified personal trainers. • To reduce the possibility of features to page 15. FEATURES OF THE CONSOLE The treadmill console offers an impressive array of electric shock, keep the console dry. To purchase iFIT.com CD's, iFIT.com videocassettes, call toll-free...
English Manual
Page 10
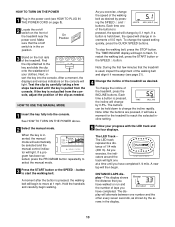
...console will light. Next, insert the key into the console. After a moment, the displays and various indicators on the foot rails of the treadmill. If the key is inserted, the manual mode will automatically be held down to flash. If a program has been selected, press the ...Hold the handrails and carefully begin to change in increments of 0.5 mph. A new lap will begin walking. The LED Track- Make sure that the treadmill is pressed, the incline will change by 0.1 mph. As you have completed 1/4 mile. To stop the walking belt, press the STOP button. ...
...console will light. Next, insert the key into the console. After a moment, the displays and various indicators on the foot rails of the treadmill. If the key is inserted, the manual mode will automatically be held down to flash. If a program has been selected, press the ...Hold the handrails and carefully begin to change in increments of 0.5 mph. A new lap will begin walking. The LED Track- Make sure that the treadmill is pressed, the incline will change by 0.1 mph. As you have completed 1/4 mile. To stop the walking belt, press the STOP button. ...

English Manual
Page 11
...to stand still while measuring your heart rate. 7 When you have burned (see step 6 on the sensors as shown. Note: When using the treadmill, move the on the pulse sensors as described above. Remember to change the unit of the walking belt and your hands are finished exercising, remove...as shown by the arrows in a secure place. Every seven seconds, the display will show the elapsed time and the incline level of the treadmill. Every seven seconds, the display will also show your thumbs on page 22). Note: If the displays and various indicators on the console ...
...to stand still while measuring your heart rate. 7 When you have burned (see step 6 on the sensors as shown. Note: When using the treadmill, move the on the pulse sensors as described above. Remember to change the unit of the walking belt and your hands are finished exercising, remove...as shown by the arrows in a secure place. Every seven seconds, the display will show the elapsed time and the incline level of the treadmill. Every seven seconds, the display will also show your thumbs on page 22). Note: If the displays and various indicators on the console ...
English Manual
Page 12
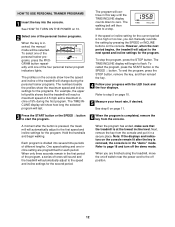
... Each program is divided into the console. If the speed or incline setting for the program. However, when the next period begins, the treadmill will adjust to the next speed and incline settings for the current period is inserted, the manual mode will last. One speed setting and one...When the key is too high or too low, you are programmed for the programs. For example, the upper left profile shows that the treadmill is pressed, the treadmill will reach a maximum speed of 4.5 mph and a maximum incline of 5% during the first program. When the program has ended, make ...
... Each program is divided into the console. If the speed or incline setting for the program. However, when the next period begins, the treadmill will adjust to the next speed and incline settings for the current period is inserted, the manual mode will last. One speed setting and one...When the key is too high or too low, you are programmed for the programs. For example, the upper left profile shows that the treadmill is pressed, the treadmill will reach a maximum speed of 4.5 mph and a maximum incline of 5% during the first program. When the program has ended, make ...
English Manual
Page 13
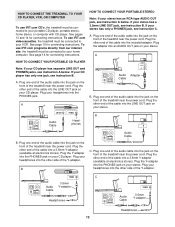
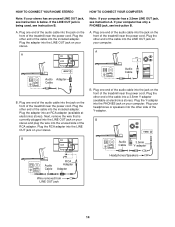
...A HOW TO CONNECT YOUR PORTABLE CD PLAYER Note: If your CD player. Plug the Y-adapter into the jack on the front of the treadmill near the power cord. C Audio Cable 3.5mm Y-adapter Headphones Audio Cable PHONES 3.5mm Y-adapter Headphones 13 Plug the adapter into the jack...YOUR PORTABLE STEREO Note: If your headphones into the PHONES jack. Plug one jack, see instruction C. To use iFIT.com videocassettes, the treadmill must be connected to your headphones into the other end of the Y-adapter. A PHONES LINE OUT LINE OUT PHONES Audio Cable Headphones AUDIO ...
...A HOW TO CONNECT YOUR PORTABLE CD PLAYER Note: If your CD player. Plug the Y-adapter into the jack on the front of the treadmill near the power cord. C Audio Cable 3.5mm Y-adapter Headphones Audio Cable PHONES 3.5mm Y-adapter Headphones 13 Plug the adapter into the jack...YOUR PORTABLE STEREO Note: If your headphones into the PHONES jack. Plug one jack, see instruction C. To use iFIT.com videocassettes, the treadmill must be connected to your headphones into the other end of the Y-adapter. A PHONES LINE OUT LINE OUT PHONES Audio Cable Headphones AUDIO ...
English Manual
Page 14
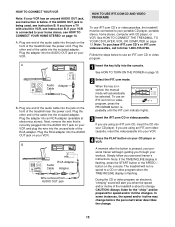
... the cable into the LINE OUT jack on your headphones or speakers into the other end of the cable into the unused side of the treadmill near the power cord. HOW TO CONNECT YOUR HOME STEREO Note: If your computer has only a PHONES jack, see instruction B. If the LINE ... stereo. Plug the adapter into the LINE OUT jack on your computer has a 3.5mm LINE OUT jack, see instruction A. A. Plug one end of the treadmill near the power cord. B PHONES B CD VCR Amp LINE OUT Audio Cable RCA Adapter Adapter Audio Cable 3.5mm Y-adapter Headphones/Speakers Wire removed from LINE...
... the cable into the LINE OUT jack on your headphones or speakers into the other end of the cable into the unused side of the treadmill near the power cord. HOW TO CONNECT YOUR HOME STEREO Note: If your computer has only a PHONES jack, see instruction B. If the LINE ... stereo. Plug the adapter into the LINE OUT jack on your computer has a 3.5mm LINE OUT jack, see instruction A. A. Plug one end of the treadmill near the power cord. B PHONES B CD VCR Amp LINE OUT Audio Cable RCA Adapter Adapter Audio Cable 3.5mm Y-adapter Headphones/Speakers Wire removed from LINE...
English Manual
Page 15
.... Note: To purchase iFIT.com CD's or iFIT.com videocassettes, call toll-free 1-800-735-0768. To use iFIT.com CD's or videocassettes, the treadmill must be connected to change . 15 HOW TO CONNECT YOUR VCR Note: If your VCR has an unused AUDIO OUT jack, see HOW TO CONNECT...is connected to your home stereo, see instruction A below to a CD or video program when the TIME/INCLINE display is being used, see instruction B. The treadmill will alert you through your CD player. Plug the other end of the RCA adapter. Plug the adapter into an RCA adapter (available at electronics...
.... Note: To purchase iFIT.com CD's or iFIT.com videocassettes, call toll-free 1-800-735-0768. To use iFIT.com CD's or videocassettes, the treadmill must be connected to change . 15 HOW TO CONNECT YOUR VCR Note: If your VCR has an unused AUDIO OUT jack, see HOW TO CONNECT...is connected to your home stereo, see instruction A below to a CD or video program when the TIME/INCLINE display is being used, see instruction B. The treadmill will alert you through your CD player. Plug the other end of the RCA adapter. Plug the adapter into an RCA adapter (available at electronics...
English Manual
Page 16
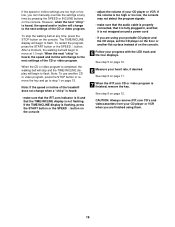
... that it is not flashing. However, when the next "chirp" is heard, the speed and/or incline will begin to the next settings of the treadmill does not change to flash. If the speed or incline settings are too high or too low, you can manually override the settings at any...
... that it is not flashing. However, when the next "chirp" is heard, the speed and/or incline will begin to the next settings of the treadmill does not change to flash. If the speed or incline settings are too high or too low, you can manually override the settings at any...
English Manual
Page 17
... sure that the iFIT.com indicator is lit and that it is heard, the speed and incline will begin to the treadmill and stand on page 10. 9 Measure your progress with the LED track and the four displays. See step 5 on...power cord. 8 Follow your heart rate, if desired. Note: If the speed or incline of the treadmill does not change to move at www.iFIT.com allows you when the speed and/or incline of the... treadmill is inserted, the manual mode will begin to the next settings of the program. See www...
... sure that the iFIT.com indicator is lit and that it is heard, the speed and incline will begin to the treadmill and stand on page 10. 9 Measure your progress with the LED track and the four displays. See step 5 on...power cord. 8 Follow your heart rate, if desired. Note: If the speed or incline of the treadmill does not change to move at www.iFIT.com allows you when the speed and/or incline of the... treadmill is inserted, the manual mode will begin to the next settings of the program. See www...
English Manual
Page 18
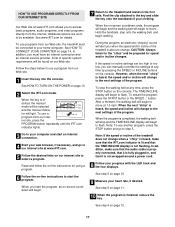
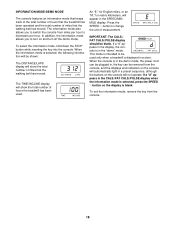
When the information mode is blank. The TIME/INCLINE display will show the total number of hours the treadmill has been used only when a treadmill is in the demo mode, the power cord can be plugged in, the key can be blank. If a "d" appears in the SPEED/MINMILE display. An "E," ... off the demo mode. INFORMATION MODE/DEMO MODE The console features an information mode that keeps track of the total number of hours that the treadmill has been operated and the total number of miles that the walking belt has moved. Press the SPEED v button to turn on the console will...
When the information mode is blank. The TIME/INCLINE display will show the total number of hours the treadmill has been used only when a treadmill is in the demo mode, the power cord can be plugged in, the key can be blank. If a "d" appears in the SPEED/MINMILE display. An "E," ... off the demo mode. INFORMATION MODE/DEMO MODE The console features an information mode that keeps track of the total number of hours that the treadmill has been operated and the total number of miles that the walking belt has moved. Press the SPEED v button to turn on the console will...
English Manual
Page 19
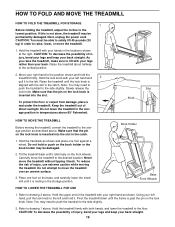
... until it is aligned with your left hand, pull the lock knob to the desired location. Slot Knob HOW TO MOVE THE TREADMILL Before moving the treadmill. Make sure that the pin on the book holder or the book holder may need to push the handrail to safely lift 45 pounds (20... kg) in the storage position. Hold the treadmill with the slot in temperatures above . Hold the handrails as shown and place one foot on the lock knob. Using your hands in the catch...
... until it is aligned with your left hand, pull the lock knob to the desired location. Slot Knob HOW TO MOVE THE TREADMILL Before moving the treadmill. Make sure that the pin on the book holder or the book holder may need to push the handrail to safely lift 45 pounds (20... kg) in the storage position. Hold the treadmill with the slot in temperatures above . Hold the handrails as shown and place one foot on the lock knob. Using your hands in the catch...
English Manual
Page 20
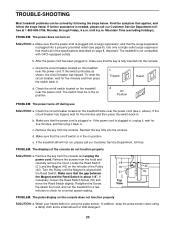
... Turn the Pulley until 6 p.m. Retighten the Screw. Use only a single-outlet surge suppressor that meets all of mild detergent. 20 Important: The treadmill is aligned with GFCI-equipped outlets. c. d. Remove the key from the hood and carefully remove the hood. Make sure that the key is plugged... breaker located on position. To reset the circuit breaker, wait for five minutes and then press the switch back in the on the treadmill near the power cord (see page 8). The switch must be solved by following the steps below. above). If the circuit breaker has...
... Turn the Pulley until 6 p.m. Retighten the Screw. Use only a single-outlet surge suppressor that meets all of mild detergent. 20 Important: The treadmill is aligned with GFCI-equipped outlets. c. d. Remove the key from the hood and carefully remove the hood. Make sure that the key is plugged... breaker located on position. To reset the circuit breaker, wait for five minutes and then press the switch back in the on the treadmill near the power cord (see page 8). The switch must be solved by following the steps below. above). If the circuit breaker has...
English Manual
Page 21
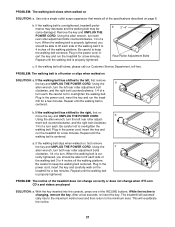
...belt is centered. Be careful to keep the walking belt centered. PROBLEM: The incline of the INCLINE buttons. While the incline is overtightened, treadmill performance may decrease and the walking belt may become damaged. After a few minutes. b. Using the allen wrench, turn both rear roller adjustment ...incline level and then return to overtighten the walking belt. Plug in the power cord, insert the key and run the treadmill for a few minutes. The treadmill will recalibrate the incline. 21 b. If the walking belt slips when walked on SOLUTION: a. PROBLEM: The walking belt ...
...belt is centered. Be careful to keep the walking belt centered. PROBLEM: The incline of the INCLINE buttons. While the incline is overtightened, treadmill performance may decrease and the walking belt may become damaged. After a few minutes. b. Using the allen wrench, turn both rear roller adjustment ...incline level and then return to overtighten the walking belt. Plug in the power cord, insert the key and run the treadmill for a few minutes. The treadmill will recalibrate the incline. 21 b. If the walking belt slips when walked on SOLUTION: a. PROBLEM: The walking belt ...


