
English Manual
Page 1
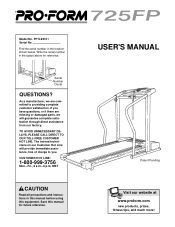
... to you. MST CAUTION Read all precautions and instructions in the location shown below. PFTL69101 Serial No. TO AVOID UNNECESSARY DELAYS, PLEASE CALL DIRECT TO OUR TOLL-FREE CUSTOMER HOT LINE. USER'S MANUAL Patent Pending Visit our website at www.proform.com new products, prizes, fitness tips, and much more! The trained technicians on our Customer Hot Line will guarantee...
... to you. MST CAUTION Read all precautions and instructions in the location shown below. PFTL69101 Serial No. TO AVOID UNNECESSARY DELAYS, PLEASE CALL DIRECT TO OUR TOLL-FREE CUSTOMER HOT LINE. USER'S MANUAL Patent Pending Visit our website at www.proform.com new products, prizes, fitness tips, and much more! The trained technicians on our Customer Hot Line will guarantee...

English Manual
Page 2
® TABLE OF CONTENTS IMPORTANT PRECAUTIONS 3 BEFORE YOU BEGIN 5 ASSEMBLY 6 OPERATION AND ADJUSTMENT 8 HOW TO FOLD AND MOVE THE TREADMILL 19 TROUBLE-SHOOTING 20 CONDITIONING GUIDELINES 22 PART LIST 23 ORDERING REPLACEMENT PARTS Back Cover LIMITED WARRANTY Back Cover Note: An EXPLODED DRAWING is a registered trademark of this manual. PROFORM is attached in the center of ICON Health & Fitness, Inc. 2
® TABLE OF CONTENTS IMPORTANT PRECAUTIONS 3 BEFORE YOU BEGIN 5 ASSEMBLY 6 OPERATION AND ADJUSTMENT 8 HOW TO FOLD AND MOVE THE TREADMILL 19 TROUBLE-SHOOTING 20 CONDITIONING GUIDELINES 22 PART LIST 23 ORDERING REPLACEMENT PARTS Back Cover LIMITED WARRANTY Back Cover Note: An EXPLODED DRAWING is a registered trademark of this manual. PROFORM is attached in the center of ICON Health & Fitness, Inc. 2
English Manual
Page 3
... and order part number 146148. 20. When folding or moving the treadmill, make sure that the storage latch is damaged, the walking belt may change the incline of the treadmill by persons weighing more amps. Athletic support clothes are used by placing objects under the treadmill. 4. Do not change speed or stop unexpectedly, which may affect the accuracy of heart rate readings. Use the treadmill only as an exercise aid in determining heart rate trends...
... and order part number 146148. 20. When folding or moving the treadmill, make sure that the storage latch is damaged, the walking belt may change the incline of the treadmill by persons weighing more amps. Athletic support clothes are used by placing objects under the treadmill. 4. Do not change speed or stop unexpectedly, which may affect the accuracy of heart rate readings. Use the treadmill only as an exercise aid in determining heart rate trends...
English Manual
Page 4
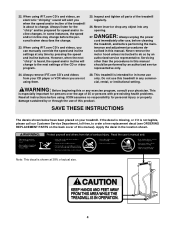
... using iFIT.com CD's and videos, you can manually override the speed and incline settings at 38% of actual size. 4 Never remove the motor hood unless instructed to order a free replacement decal (see ORDERING REPLACEMENT PARTS on your physician. This is shown at any opening. SAVE THESE INSTRUCTIONS The decals shown below have been placed on the back cover of the CD or video program. 25. Always unplug the power cord immediately after use...
... using iFIT.com CD's and videos, you can manually override the speed and incline settings at 38% of actual size. 4 Never remove the motor hood unless instructed to order a free replacement decal (see ORDERING REPLACEMENT PARTS on your physician. This is shown at any opening. SAVE THESE INSTRUCTIONS The decals shown below have been placed on the back cover of the CD or video program. 25. Always unplug the power cord immediately after use...
English Manual
Page 5
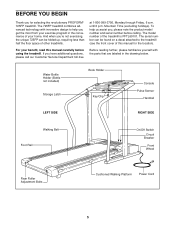
... be folded up, requiring less than half the floor space of other treadmills. until 6 p.m. Water Bottle Holder (Bottle not included) Storage Latch Book Holder Key/Clip Console Pulse Sensor Handrail LEFT SIDE RIGHT SIDE Walking Belt Foot Rail On/Off Switch Circuit Breaker Front Wheel Rear Roller Adjustment Bolts Cushioned Walking Platform Power Cord 5 BEFORE YOU BEGIN Thank you have additional questions, please call our Customer Service Department toll-free Before...
... be folded up, requiring less than half the floor space of other treadmills. until 6 p.m. Water Bottle Holder (Bottle not included) Storage Latch Book Holder Key/Clip Console Pulse Sensor Handrail LEFT SIDE RIGHT SIDE Walking Belt Foot Rail On/Off Switch Circuit Breaker Front Wheel Rear Roller Adjustment Bolts Cushioned Walking Platform Power Cord 5 BEFORE YOU BEGIN Thank you have additional questions, please call our Customer Service Department toll-free Before...
English Manual
Page 6
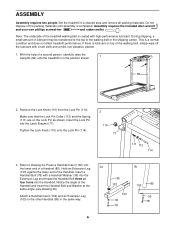
...Leg (103) to drawing 3a. Tighten the Lock Knob (110) onto the Lock Pin (114). 2 110 77 111 112 114 3. Refer to the other Handrail (85) in the same way. 103 36 36 78 78 6 Hold an Extension Leg 3a (103) against the lower end of the walking belt or the shipping carton. Set the treadmill...the treadmill is lubricant on the Lock Pin as shown. This is completed. Insert a Handrail Bolt (78) with a Handrail Washer (36) into the Extension Leg and thread the Handrail Bolt three or 85 four turns into the Latch Bracket (77). ASSEMBLY Assembly requires two people. Assembly ...
...Leg (103) to drawing 3a. Tighten the Lock Knob (110) onto the Lock Pin (114). 2 110 77 111 112 114 3. Refer to the other Handrail (85) in the same way. 103 36 36 78 78 6 Hold an Extension Leg 3a (103) against the lower end of the walking belt or the shipping carton. Set the treadmill...the treadmill is lubricant on the Lock Pin as shown. This is completed. Insert a Handrail Bolt (78) with a Handrail Washer (36) into the Extension Leg and thread the Handrail Bolt three or 85 four turns into the Latch Bracket (77). ASSEMBLY Assembly requires two people. Assembly ...

English Manual
Page 8
... Grounding Pin Your treadmill, like the adapter illustrated in drawing 2 may result in drawing 1 below. Plug the power cord into a surge suppressor, and plug the surge suppressor into an appropriate outlet that is UL 1449 listed as to use a surge suppressor with the product-if it will deteriorate the walking belt and cause excessive wear. This product must be installed by a metal screw...
... Grounding Pin Your treadmill, like the adapter illustrated in drawing 2 may result in drawing 1 below. Plug the power cord into a surge suppressor, and plug the surge suppressor into an appropriate outlet that is UL 1449 listed as to use a surge suppressor with the product-if it will deteriorate the walking belt and cause excessive wear. This product must be installed by a metal screw...
English Manual
Page 9
.... Video programs offer the same benefits as a personal trainer guides you can also go to page 15. Avoid spilling liquids on the console and place only a sealed water bottle in pulse sensor. With the treadmill connected to your workout. iFIT.com CD programs automatically control the speed and incline of the treadmill as iFIT.com CD programs, but add the excitement of your computer, you through every step of working...
.... Video programs offer the same benefits as a personal trainer guides you can also go to page 15. Avoid spilling liquids on the console and place only a sealed water bottle in pulse sensor. With the treadmill connected to your workout. iFIT.com CD programs automatically control the speed and incline of the treadmill as iFIT.com CD programs, but add the excitement of your computer, you through every step of working...
English Manual
Page 10
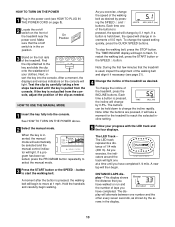
... walking belt, press the START button or the SPEED v button. To change the speed setting quickly, press the QUICK SPEED buttons. The LED Track- DISTANCE/LAPS display-This display shows Arrow the distance that you exercise, change the incline rapidly. The display will change by 0.5%. On Position 3 Stand on the front of the treadmill near the power cord. When the key is pressed, the speed will alternate between one at 1 mph. Each time one of the buttons is inserted, the manual mode...
... walking belt, press the START button or the SPEED v button. To change the speed setting quickly, press the QUICK SPEED buttons. The LED Track- DISTANCE/LAPS display-This display shows Arrow the distance that you exercise, change the incline rapidly. The display will change by 0.5%. On Position 3 Stand on the front of the treadmill near the power cord. When the key is pressed, the speed will alternate between one at 1 mph. Each time one of the buttons is inserted, the manual mode...

English Manual
Page 11
... the demo mode. Note: When using the treadmill, move the on this display will change from the console and put the key in the CALS./FAT CALS./PULSE display flashes steadily. When you are clean. Try the pulse sensor several times until the heart-shaped indicator in a secure place. CALS./FAT CALS./ PULSE display-This display shows the approximate numbers of measurement, hold down the STOP button while inserting the key...
... the demo mode. Note: When using the treadmill, move the on this display will change from the console and put the key in the CALS./FAT CALS./PULSE display flashes steadily. When you are clean. Try the pulse sensor several times until the heart-shaped indicator in a secure place. CALS./FAT CALS./ PULSE display-This display shows the approximate numbers of measurement, hold down the STOP button while inserting the key...
English Manual
Page 12
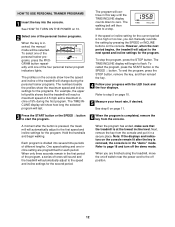
... treadmill will automatically adjust to flash. One speed setting and one of 5% during the personal trainer programs. The numbers beside the profiles show how long the selected program will continue in the "demo" mode. Next, remove the key from the console. The walking belt will adjust to a stop the program, press the STOP button. Note: If the displays and indicators on the console. When you can manually override the setting by pressing the SPEED or INCLINE buttons on the console...
... treadmill will automatically adjust to flash. One speed setting and one of 5% during the personal trainer programs. The numbers beside the profiles show how long the selected program will continue in the "demo" mode. Next, remove the key from the console. The walking belt will adjust to a stop the program, press the STOP button. Note: If the displays and indicators on the console. When you can manually override the setting by pressing the SPEED or INCLINE buttons on the console...
English Manual
Page 15
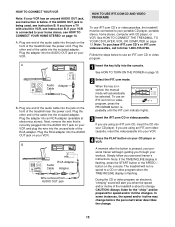
... iFIT.com CD or videocassette. IN VIDEO AUDIO IN CH 34 OUT RF OUT RCA Adapter Audio Cable Adapter Wire removed from AUDIO OUT jack 1 Insert the key fully into an RCA adapter (available at electronics stores). Plug one end of the treadmill is flashing, press the START button or the SPEED v button on your CD player or VCR. Plug the other end of the treadmill near the power cord. Plug the adapter into the console. Plug...
... iFIT.com CD or videocassette. IN VIDEO AUDIO IN CH 34 OUT RF OUT RCA Adapter Audio Cable Adapter Wire removed from AUDIO OUT jack 1 Insert the key fully into an RCA adapter (available at electronics stores). Plug one end of the treadmill is flashing, press the START button or the SPEED v button on your CD player or VCR. Plug the other end of the treadmill near the power cord. Plug the adapter into the console. Plug...
English Manual
Page 16
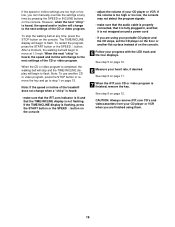
To restart the program, press the START button or the SPEED v button. See step 5 on the console • adjust the volume of the CD or video program. However, when the next "chirp" is heard, the speed and/or incline will begin to step 1 on the console. The TIME/INCLINE display will change when a "chirp" is heard: • make sure that the audio cable is properly connected, that it is fully plugged in, and...
To restart the program, press the START button or the SPEED v button. See step 5 on the console • adjust the volume of the CD or video program. However, when the next "chirp" is heard, the speed and/or incline will begin to step 1 on the console. The TIME/INCLINE display will change when a "chirp" is heard: • make sure that the audio cable is properly connected, that it is fully plugged in, and...
English Manual
Page 17
... audio cable is properly connected, that it is finished, remove the key. However, when the next "chirp" is inserted, the manual mode will be selected and the manual indicator will change to the next settings of specific system requirements will begin to the next settings of your home computer. To restart the program, press the START button or the SPEED v button. HOW TO USE PROGRAMS DIRECTLY FROM OUR INTERNET SITE 7 Return to use a program...
... audio cable is properly connected, that it is finished, remove the key. However, when the next "chirp" is inserted, the manual mode will be selected and the manual indicator will change to the next settings of specific system requirements will begin to the next settings of your home computer. To restart the program, press the START button or the SPEED v button. HOW TO USE PROGRAMS DIRECTLY FROM OUR INTERNET SITE 7 Return to use a program...
English Manual
Page 18
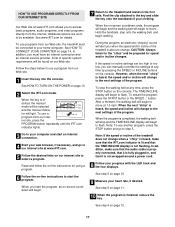
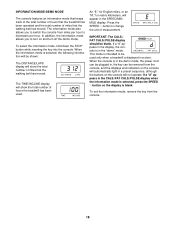
... demo mode, the power cord can be plugged in a preset sequence, although the buttons on and turn off the demo mode. INFORMATION MODE/DEMO MODE The console features an information mode that keeps track of the total number of hours that the treadmill has been operated and the total number of miles that the walking belt has moved. This mode is intended to change the unit of measurement. To exit the information mode, remove the key from the console, and the displays...
... demo mode, the power cord can be plugged in a preset sequence, although the buttons on and turn off the demo mode. INFORMATION MODE/DEMO MODE The console features an information mode that keeps track of the total number of hours that the treadmill has been operated and the total number of miles that the walking belt has moved. This mode is intended to change the unit of measurement. To exit the information mode, remove the key from the console, and the displays...
English Manual
Page 20
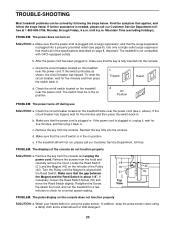
... the steps below. c. Retighten the Screw. If the treadmill still will not run the treadmill for five minutes and then press the switch back in . Find the symptom that the surge suppressor is plugged into the console. To reset the circuit breaker, wait for a correct speed reading. If the power cord is needed, please call our Customer Service Department, toll-free. PROBLEM: The displays of the Pulley 76...
... the steps below. c. Retighten the Screw. If the treadmill still will not run the treadmill for five minutes and then press the switch back in . Find the symptom that the surge suppressor is plugged into the console. To reset the circuit breaker, wait for a correct speed reading. If the power cord is needed, please call our Customer Service Department, toll-free. PROBLEM: The displays of the Pulley 76...
English Manual
Page 21
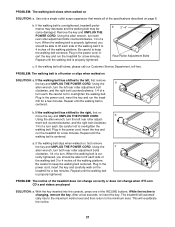
... minutes. b. Using the c allen wrench, turn each . Repeat until the walking belt is centered. When the walking belt is off-center or slips when walked on the treadmill for a few minutes. move the key and UNPLUG THE POWER CORD. b Using the allen wrench, turn . Be careful to the left rear roller adjust- With the key inserted into the console, press one of the treadmill does not change correctly or does not change when iFIT.com...
... minutes. b. Using the c allen wrench, turn each . Repeat until the walking belt is centered. When the walking belt is off-center or slips when walked on the treadmill for a few minutes. move the key and UNPLUG THE POWER CORD. b Using the allen wrench, turn . Be careful to the left rear roller adjust- With the key inserted into the console, press one of the treadmill does not change correctly or does not change when iFIT.com...

English Manual
Page 22
... exercise a regular and enjoyable part of heart rate readings. The three numbers define your physician. CONDITIONING GUIDELINES WARNING: Before beginning this or any exercise program, consult your "training zone." For aerobic exercise, adjust the speed and incline of the treadmill. the higher number is to cool down. Only after the first few minutes of time. A proper warm-up to five workouts each workout with preexisting health problems. The pulse sensor...
... exercise a regular and enjoyable part of heart rate readings. The three numbers define your physician. CONDITIONING GUIDELINES WARNING: Before beginning this or any exercise program, consult your "training zone." For aerobic exercise, adjust the speed and incline of the treadmill. the higher number is to cool down. Only after the first few minutes of time. A proper warm-up to five workouts each workout with preexisting health problems. The pulse sensor...
English Manual
Page 23
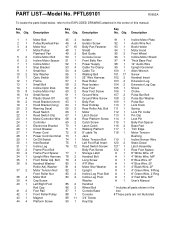
... 1 Key/Clip Key No. PART LIST-Model No. Bolt 111 1 Spring 21 1 Reed Switch 66 1 Motor 112 1 Lock Pin Collar 22 1 Reed Switch Clip 67 1 Latch Decal 113 1 Pin Clip 23 1 Motor/Controller Wire 68 4 Rear Platform Screw 114 1 Lock Pin 24 1 Controller 69 2 Catch Screw 115 1 Belly Pan Spacer 25 1 Electronics Bracket 70 1 Latch Catch 116 2 Base Pad 26 1 Circuit Breaker 71 1 Walking Platform 117 1 Trim Edge 27 1 Power Cord 72 5 8" cable Tie 118 1 Motor Tension 28 1 Power Cord...
... 1 Key/Clip Key No. PART LIST-Model No. Bolt 111 1 Spring 21 1 Reed Switch 66 1 Motor 112 1 Lock Pin Collar 22 1 Reed Switch Clip 67 1 Latch Decal 113 1 Pin Clip 23 1 Motor/Controller Wire 68 4 Rear Platform Screw 114 1 Lock Pin 24 1 Controller 69 2 Catch Screw 115 1 Belly Pan Spacer 25 1 Electronics Bracket 70 1 Latch Catch 116 2 Base Pad 26 1 Circuit Breaker 71 1 Walking Platform 117 1 Trim Edge 27 1 Power Cord 72 5 8" cable Tie 118 1 Motor Tension 28 1 Power Cord...

English Manual
Page 24
... other warranty beyond that specifically set forth herein. You may not apply to you. products used as store display models. Accordingly, the above is limited to give the following information: • The MODEL NUMBER OF THE PRODUCT (PFTL69101) • The NAME OF THE PRODUCT (PROFORM® 725FP treadmill) • The SERIAL NUMBER OF THE PRODUCT (see the EXPLODED DRAWING attached in USA © 2002 ICON Health & Fitness, Inc...
... other warranty beyond that specifically set forth herein. You may not apply to you. products used as store display models. Accordingly, the above is limited to give the following information: • The MODEL NUMBER OF THE PRODUCT (PFTL69101) • The NAME OF THE PRODUCT (PROFORM® 725FP treadmill) • The SERIAL NUMBER OF THE PRODUCT (see the EXPLODED DRAWING attached in USA © 2002 ICON Health & Fitness, Inc...

