
English Manual
Page 2
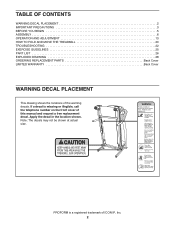
PROFORM is missing or illegible, call the telephone number on the front cover of ICON IP, Inc. 2 Apply the decal in the location shown. If a decal ...: The decals may not be shown at actual size. TABLE OF CONTENTS WARNING DECAL PLACEMENT 2 IMPORTANT PRECAUTIONS 3 BEFORE YOU BEGIN 5 ASSEMBLY 6 OPERATION AND ADJUSTMENT 13 HOW TO FOLD AND MOVE THE TREADMILL 20 TROUBLESHOOTING 22 EXERCISE GUIDELINES 25 PART LIST 26 EXPLODED DRAWING 28 ORDERING REPLACEMENT PARTS Back Cover LIMITED WARRANTY Back...
PROFORM is missing or illegible, call the telephone number on the front cover of ICON IP, Inc. 2 Apply the decal in the location shown. If a decal ...: The decals may not be shown at actual size. TABLE OF CONTENTS WARNING DECAL PLACEMENT 2 IMPORTANT PRECAUTIONS 3 BEFORE YOU BEGIN 5 ASSEMBLY 6 OPERATION AND ADJUSTMENT 13 HOW TO FOLD AND MOVE THE TREADMILL 20 TROUBLESHOOTING 22 EXERCISE GUIDELINES 25 PART LIST 26 EXPLODED DRAWING 28 ORDERING REPLACEMENT PARTS Back Cover LIMITED WARRANTY Back...
English Manual
Page 4
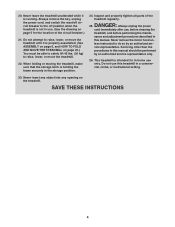
... to raise, lower, or move the treadmill until it is not in -home use . (See the drawing on the treadmill. Never leave the treadmill unattended while it is properly assembled. (See ASSEMBLY on page 6, and HOW TO FOLD AND MOVE THE TREADMILL on page 20.) You must be performed... by an authorized ser- less instructed to raise, lower, or move the treadmill. 22. vice representative....
... to raise, lower, or move the treadmill until it is not in -home use . (See the drawing on the treadmill. Never leave the treadmill unattended while it is properly assembled. (See ASSEMBLY on page 6, and HOW TO FOLD AND MOVE THE TREADMILL on page 20.) You must be performed... by an authorized ser- less instructed to raise, lower, or move the treadmill. 22. vice representative....
English Manual
Page 6
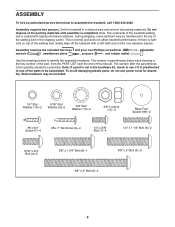
...transferred to identify the assembly hardware. Do not dispose of the parts to assemble the treadmill, call 1-800-445-2480. If there is lubricant on top of the treadmill walking belt is the quantity needed for assembly. To avoid damaging plastic... 1/4" x 5/8" Bolt (7)-4 1/4" x 1 1/4" Bolt (6)-2 5/16" x 3/4" Bolt (4)-6 3/8" x 1 3/4" Bolt (8)-1 3/8" x 4" Bolt (5)-4 3/8" x 2" Bolt (3)-3 6 Set the treadmill in the hardware kit, check to see if it is preattached to one of the packing materials until assembly is the key number of the part, from the PART LIST near the end of the...
...transferred to identify the assembly hardware. Do not dispose of the parts to assemble the treadmill, call 1-800-445-2480. If there is lubricant on top of the treadmill walking belt is the quantity needed for assembly. To avoid damaging plastic... 1/4" x 5/8" Bolt (7)-4 1/4" x 1 1/4" Bolt (6)-2 5/16" x 3/4" Bolt (4)-6 3/8" x 1 3/4" Bolt (8)-1 3/8" x 4" Bolt (5)-4 3/8" x 2" Bolt (3)-3 6 Set the treadmill in the hardware kit, check to see if it is preattached to one of the packing materials until assembly is the key number of the part, from the PART LIST near the end of the...
English Manual
Page 11
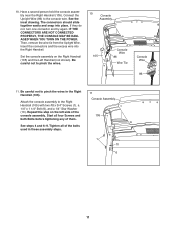
... Wire 105 86 Wire Tie Console Wire 86 11. See the inset drawing. Set the console assembly on the left side of the console assembly. Repeat this step on the Right Handrail (105) and the Left Handrail (not shown). IF THE CONNECTORS ARE NOT CONNECTED PROPERLY, THE CONSOLE MAY BE ...DAMAGED WHEN YOU TURN ON THE POWER. Be careful not to the console wire. Attach the console assembly to pinch the wires in these assembly steps. 11 Console Assembly 105 1 10 6 11 See steps 4 and 6-9. Insert the connectors and the excess wire into place. Be careful not to the...
... Wire 105 86 Wire Tie Console Wire 86 11. See the inset drawing. Set the console assembly on the left side of the console assembly. Repeat this step on the Right Handrail (105) and the Left Handrail (not shown). IF THE CONNECTORS ARE NOT CONNECTED PROPERLY, THE CONSOLE MAY BE ...DAMAGED WHEN YOU TURN ON THE POWER. Be careful not to the console wire. Attach the console assembly to pinch the wires in these assembly steps. 11 Console Assembly 105 1 10 6 11 See steps 4 and 6-9. Insert the connectors and the excess wire into place. Be careful not to the...

English Manual
Page 12
... It may be necessary to move the Frame (53) back and forth to the bracket on the treadmill decals, remove the plastic. one of the hex keys is completed. Orient the Storage Latch (50...necessary, press the Left Accessory Tray (94) and the Right Accessory Tray (99) into the con- 12 sole assembly. 94 Console Assembly 99 13. Lower the Frame (53) (see pages 23 and 24). 12 If there are sheets of the ...Storage Latch to adjust the walking belt (see HOW TO LOWER THE TREADMILL FOR USE ...
... It may be necessary to move the Frame (53) back and forth to the bracket on the treadmill decals, remove the plastic. one of the hex keys is completed. Orient the Storage Latch (50...necessary, press the Left Accessory Tray (94) and the Right Accessory Tray (99) into the con- 12 sole assembly. 94 Console Assembly 99 13. Lower the Frame (53) (see pages 23 and 24). 12 If there are sheets of the ...Storage Latch to adjust the walking belt (see HOW TO LOWER THE TREADMILL FOR USE ...


