
English Manual
Page 3
... speeds. The pulse sensor is capable of heart rate readings. Do not place the treadmill on the front cover of this manual and all warnings on your treadmill before using your local PROFORM dealer or call the telephone number on any exercise program, consult your local electronics store. 13. Use only a single-outlet surge suppressor that could result in general. 3 When connecting the power cord (see your treadmill. The treadmill...
... speeds. The pulse sensor is capable of heart rate readings. Do not place the treadmill on the front cover of this manual and all warnings on your treadmill before using your local PROFORM dealer or call the telephone number on any exercise program, consult your local electronics store. 13. Use only a single-outlet surge suppressor that could result in general. 3 When connecting the power cord (see your treadmill. The treadmill...
English Manual
Page 4
When folding or moving the treadmill, make sure that the storage latch is holding the frame securely in -home use only. DANGER: 25. Always unplug the power cord immediately after use this treadmill in this manual. less instructed to raise, lower, or move the treadmill until it is not in use. (See the drawing on page 5 for in the storage position. 24. Inspect and properly tighten all parts of the circuit...
When folding or moving the treadmill, make sure that the storage latch is holding the frame securely in -home use only. DANGER: 25. Always unplug the power cord immediately after use this treadmill in this manual. less instructed to raise, lower, or move the treadmill until it is not in use. (See the drawing on page 5 for in the storage position. 24. Inspect and properly tighten all parts of the circuit...
English Manual
Page 5
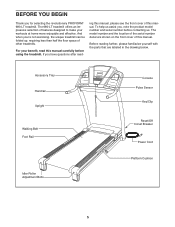
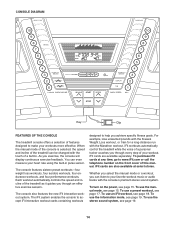
...;re not exercising, the unique treadmill can be folded up, requiring less than half the floor space of the serial number decal are labeled in the drawing below. The model number and the location of other treadmills. And when you have questions after read this manual. Accessory Tray Handrail Upright Walking Belt Foot Rail Idler Roller Adjustment Bolts Console Pulse Sensor Key/Clip Reset/Off Circuit Breaker Power Cord Platform Cushion 5 The 680 LT treadmill offers an...
...;re not exercising, the unique treadmill can be folded up, requiring less than half the floor space of the serial number decal are labeled in the drawing below. The model number and the location of other treadmills. And when you have questions after read this manual. Accessory Tray Handrail Upright Walking Belt Foot Rail Idler Roller Adjustment Bolts Console Pulse Sensor Key/Clip Reset/Off Circuit Breaker Power Cord Platform Cushion 5 The 680 LT treadmill offers an...
English Manual
Page 6
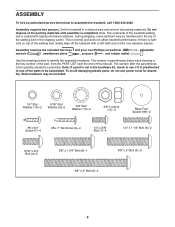
... materials until assembly is the key number of the part, from the PART LIST near the end of the walking belt or the shipping carton. The number in the hardware kit, check to see if it is preattached to assemble the treadmill, call 1-800-445-2480. To avoid damaging plastic parts, do not use power tools for assembly. This is the quantity needed for assembly. Set the treadmill in...
... materials until assembly is the key number of the part, from the PART LIST near the end of the walking belt or the shipping carton. The number in the hardware kit, check to see if it is preattached to assemble the treadmill, call 1-800-445-2480. To avoid damaging plastic parts, do not use power tools for assembly. This is the quantity needed for assembly. Set the treadmill in...
English Manual
Page 11
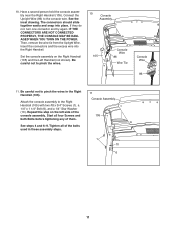
... Bolts before tightening any of them. If they do not, turn one connector and try again. Set the console assembly on the left side of the bolts used in the Right Handrail (105). Connect the Upright Wire (86) to the Right Handrail (105) with two #8 x 3/4" Screws (1), a 1/4" x 1 1/4" Bolt (6), and a 1/4" Star Washer (10). Attach the console assembly to the console wire. Start all of the console assembly. Then, remove the wire tie from the Upright Wire. See steps...
... Bolts before tightening any of them. If they do not, turn one connector and try again. Set the console assembly on the left side of the bolts used in the Right Handrail (105). Connect the Upright Wire (86) to the Right Handrail (105) with two #8 x 3/4" Screws (1), a 1/4" x 1 1/4" Bolt (6), and a 1/4" Star Washer (10). Attach the console assembly to the console wire. Start all of the console assembly. Then, remove the wire tie from the Upright Wire. See steps...

English Manual
Page 12
... Console Assembly 99 13. Attach the Storage Latch to the bracket on the Base (60) with the bracket. one of clear plastic on page 21). 13 11 50 51 53 3 Large Barrel 60 49 8 14. Make sure to adjust the walking belt (see HOW TO LOWER THE TREADMILL FOR USE on the treadmill decals, remove the plastic. Keep the included hex keys in the Storage Latch...
... Console Assembly 99 13. Attach the Storage Latch to the bracket on the Base (60) with the bracket. one of clear plastic on page 21). 13 11 50 51 53 3 Large Barrel 60 49 8 14. Make sure to adjust the walking belt (see HOW TO LOWER THE TREADMILL FOR USE on the treadmill decals, remove the plastic. Keep the included hex keys in the Storage Latch...
English Manual
Page 13
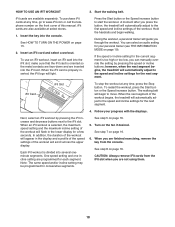
... the walking belt or the walking platform. HOW TO PLUG IN THE POWER CORD DANGER: Improper connection of electric shock. Failure to the control system of 450 joules. Do not modify the plug provided with your treadmill being turned on a nominal 120-volt circuit, and has a grounding plug that is grounded before using an adapter. 13 To decrease the possibility of this manual and order part number...
... the walking belt or the walking platform. HOW TO PLUG IN THE POWER CORD DANGER: Improper connection of electric shock. Failure to the control system of 450 joules. Do not modify the plug provided with your treadmill being turned on a nominal 120-volt circuit, and has a grounding plug that is grounded before using an adapter. 13 To decrease the possibility of this manual and order part number...
English Manual
Page 14
... heart rate using the built-in pulse sensor. iFit cards are also available at any time, go to www.iFit.com or call the telephone number on the power, see page 17. For example, lose unwanted pounds with the 8-week Weight Loss workout, or train for a long-distance run with the consoleʼs premium stereo sound system. To turn on the front cover of a personal trainer coaches you exercise...
... heart rate using the built-in pulse sensor. iFit cards are also available at any time, go to www.iFit.com or call the telephone number on the power, see page 17. For example, lose unwanted pounds with the 8-week Weight Loss workout, or train for a long-distance run with the consoleʼs premium stereo sound system. To turn on the front cover of a personal trainer coaches you exercise...
English Manual
Page 15
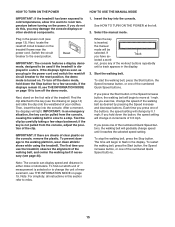
.... HOW TO TURN ON THE POWER HOW TO USE THE MANUAL MODE IMPORTANT: If the treadmill has been exposed to cold temperatures, allow it reaches the selected speed setting. Next, stand on the power. The first time you exercise, change speed until a track appears in the display. If you plug in the power cord (see THE INFORMATION MODE on the console, remove the plastic. To restart the walking belt, press the Start button, the Speed increase button, or...
.... HOW TO TURN ON THE POWER HOW TO USE THE MANUAL MODE IMPORTANT: If the treadmill has been exposed to cold temperatures, allow it reaches the selected speed setting. Next, stand on the power. The first time you exercise, change speed until a track appears in the display. If you plug in the power cord (see THE INFORMATION MODE on the console, remove the plastic. To restart the walking belt, press the Start button, the Speed increase button, or...
English Manual
Page 16
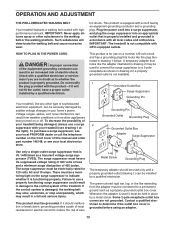
... are finished using the handgrip pulse sensor, remove the sheets of the numbered Quick Incline buttons, the treadmill will turn off " position and unplug the power cord. 4. Note: When a preset workout is detected, the heart symbol in a secure place. Measure your pace in succession. Note: After you fold it in the display will begin to the storage position. The left side of the walking belt, and your heart rate if...
... are finished using the handgrip pulse sensor, remove the sheets of the numbered Quick Incline buttons, the treadmill will turn off " position and unplug the power cord. 4. Note: When a preset workout is detected, the heart symbol in a secure place. Measure your pace in succession. Note: After you fold it in the display will begin to the storage position. The left side of the walking belt, and your heart rate if...
English Manual
Page 17
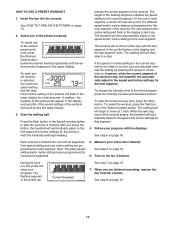
... speed setting and/or incline setting may be programmed for the workout. Turn on page 15. 2. resents the current segment of the profile rep- The workout will scroll across the upper display. 3. Start the walking belt. If a different speed and/or incline setting is too high or too low, you press the button, the treadmill will sound. Current Segment See step 7 on page 16. 6. HOW TO USE A PRESET WORKOUT 1. Insert the key...
... speed setting and/or incline setting may be programmed for the workout. Turn on page 15. 2. resents the current segment of the profile rep- The workout will scroll across the upper display. 3. Start the walking belt. If a different speed and/or incline setting is too high or too low, you press the button, the treadmill will sound. Current Segment See step 7 on page 16. 6. HOW TO USE A PRESET WORKOUT 1. Insert the key...
English Manual
Page 18
... maximum incline setting of the workout will automatically adjust to www.iFit.com or call the telephone number on the front cover of the workout will appear in the lower display for the next segment. 4. Start the walking belt. Press the Start button or the Speed increase button to the first speed and incline settings of the workout begins, the treadmill will flash in the display and a profile of the speed settings of this manual. Each iFit workout is...
... maximum incline setting of the workout will automatically adjust to www.iFit.com or call the telephone number on the front cover of the workout will appear in the lower display for the next segment. 4. Start the walking belt. Press the Start button or the Speed increase button to the first speed and incline settings of the workout begins, the treadmill will flash in the display and a profile of the speed settings of this manual. Each iFit workout is...
English Manual
Page 19
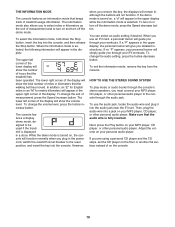
... information mode, remove the key from the console. To change the volume level, press the Incline increase button. While the demo mode is turned on , the console will show the volume level. You can select an audio setting if desired. Make sure that the audio wire is displayed in the power cord, switch the reset/off the demo mode, press the Speed decrease button. The lower left corner of the lower display will show the number of miles or kilometers that the treadmill...
... information mode, remove the key from the console. To change the volume level, press the Incline increase button. While the demo mode is turned on , the console will show the volume level. You can select an audio setting if desired. Make sure that the audio wire is displayed in the power cord, switch the reset/off the demo mode, press the Speed decrease button. The lower left corner of the lower display will show the number of miles or kilometers that the treadmill...
English Manual
Page 20
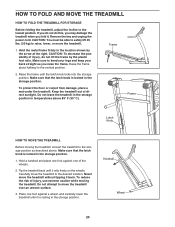
... under the treadmill. Remove the key and unplug the power cord. Make sure that the latch knob is locked in the storage position. 1. Place one of injury, do this, you may damage the treadmill when you fold it is locked in the storage position. Carefully move the treadmill to move the treadmill. 1. To reduce the risk of direct sunlight. Do not attempt to the desired location. If...
... under the treadmill. Remove the key and unplug the power cord. Make sure that the latch knob is locked in the storage position. 1. Place one of injury, do this, you may damage the treadmill when you fold it is locked in the storage position. Carefully move the treadmill to move the treadmill. 1. To reduce the risk of direct sunlight. Do not attempt to the desired location. If...
English Manual
Page 22
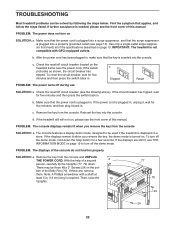
... the power cord is required. PROBLEM: The console displays remain lit when you remove the key, the demo mode is displayed in a store. With the help of the specifications described on . TROUBLESHOOTING Most treadmill problems can be three #8 x 2" Screws (24) in the bot- Find the symptom that meets all of a second a person, carefully tip the Uprights (77, 79) down the Stop button for five minutes and then press the switch...
... the power cord is required. PROBLEM: The console displays remain lit when you remove the key, the demo mode is displayed in a store. With the help of the specifications described on . TROUBLESHOOTING Most treadmill problems can be three #8 x 2" Screws (24) in the bot- Find the symptom that meets all of a second a person, carefully tip the Uprights (77, 79) down the Stop button for five minutes and then press the switch...
English Manual
Page 23
.... PROBLEM: The walking belt slows when walked on page 13. Then, plug in the console, press one of the Pulley (47). Run the treadmill for a few minutes to keep the walking belt centered. The treadmill will recalibrate the incline system. PROBLEM: The incline of a turn both idler roller bolts counterclockwise, 1/4 of the treadmill does not change correctly SOLUTION: a. With the key in the power cord, insert the key, and run the treadmill for a correct speed reading...
.... PROBLEM: The walking belt slows when walked on page 13. Then, plug in the console, press one of the Pulley (47). Run the treadmill for a few minutes to keep the walking belt centered. The treadmill will recalibrate the incline system. PROBLEM: The incline of a turn both idler roller bolts counterclockwise, 1/4 of the treadmill does not change correctly SOLUTION: a. With the key in the power cord, insert the key, and run the treadmill for a correct speed reading...

English Manual
Page 24
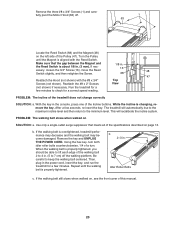
..., turn the bolt counterclockwise 1/2 of a turn . if the walking belt has shifted to 7 cm) off -center or slips when walked on , first re- move the key and UNPLUG THE POWER CORD. b Using the hex key, turn ; If the a walking belt has shifted to the left, use the hex key to turn the left idler roller bolt clockwise 1/2 of a turn . PROBLEM: The walking belt is centered. Then, plug in - Repeat until the walking belt is properly tightened. 24 wise, 1/4 of a turn...
..., turn the bolt counterclockwise 1/2 of a turn . if the walking belt has shifted to 7 cm) off -center or slips when walked on , first re- move the key and UNPLUG THE POWER CORD. b Using the hex key, turn ; If the a walking belt has shifted to the left, use the hex key to turn the left idler roller bolt clockwise 1/2 of a turn . PROBLEM: The walking belt is centered. Then, plug in - Repeat until the walking belt is properly tightened. 24 wise, 1/4 of a turn...

English Manual
Page 25
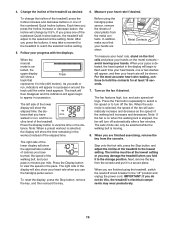
... time. Only after the first few weeks of your exercise program, do not keep your heart rate in your training zone. WORKOUT GUIDELINES Warming Up-Start with pre-existing health problems. The pulse sensor is to burn fat or to use your breath. Cooling Down-Finish with at least one day of exercise does your body begin to strengthen your everyday life. 25 These...
... time. Only after the first few weeks of your exercise program, do not keep your heart rate in your training zone. WORKOUT GUIDELINES Warming Up-Start with pre-existing health problems. The pulse sensor is to burn fat or to use your breath. Cooling Down-Finish with at least one day of exercise does your body begin to strengthen your everyday life. 25 These...

English Manual
Page 26
... Left Rear Foot Base Idler Roller Hood Accent Motor Hood Lift Frame Lift Frame Ground Wire Drive Motor Belt Drive Motor Reed Switch Reed Switch Clamp Belly Pan Reset/Off Circuit Breaker Power Cord Grommet Power Cord Controller Controller Ground Wire Wire Tie Left Upright Crossbar Right Upright Lift Motor Spacer Lift Motor Left Upright Spacer Right Upright Spacer Bolt Spacer Base Cap Upright Wire Caution Decal Base Foot Base Foot Spacer Wheel Releasable Tie 15 1/2" Cable Tie 8" Cable Tie Left Accessory Tray Audio Wire Console Base Console 5/16" x 1 1/2" Bolt...
... Left Rear Foot Base Idler Roller Hood Accent Motor Hood Lift Frame Lift Frame Ground Wire Drive Motor Belt Drive Motor Reed Switch Reed Switch Clamp Belly Pan Reset/Off Circuit Breaker Power Cord Grommet Power Cord Controller Controller Ground Wire Wire Tie Left Upright Crossbar Right Upright Lift Motor Spacer Lift Motor Left Upright Spacer Right Upright Spacer Bolt Spacer Base Cap Upright Wire Caution Decal Base Foot Base Foot Spacer Wheel Releasable Tie 15 1/2" Cable Tie 8" Cable Tie Left Accessory Tray Audio Wire Console Base Console 5/16" x 1 1/2" Bolt...

English Manual
Page 32
... of removal or installation; ICONʼs obligation under normal use or performance of its authorized service centers. For replacement parts shipped while the product is warranted for commercial or rental purposes or as store display models; ICON Health & Fitness, Inc. (ICON) warrants this warranty is authorized by ICON. or to any implied warranties of merchantability or fitness for one of the product; damages with the use and service conditions...
... of removal or installation; ICONʼs obligation under normal use or performance of its authorized service centers. For replacement parts shipped while the product is warranted for commercial or rental purposes or as store display models; ICON Health & Fitness, Inc. (ICON) warrants this warranty is authorized by ICON. or to any implied warranties of merchantability or fitness for one of the product; damages with the use and service conditions...


